
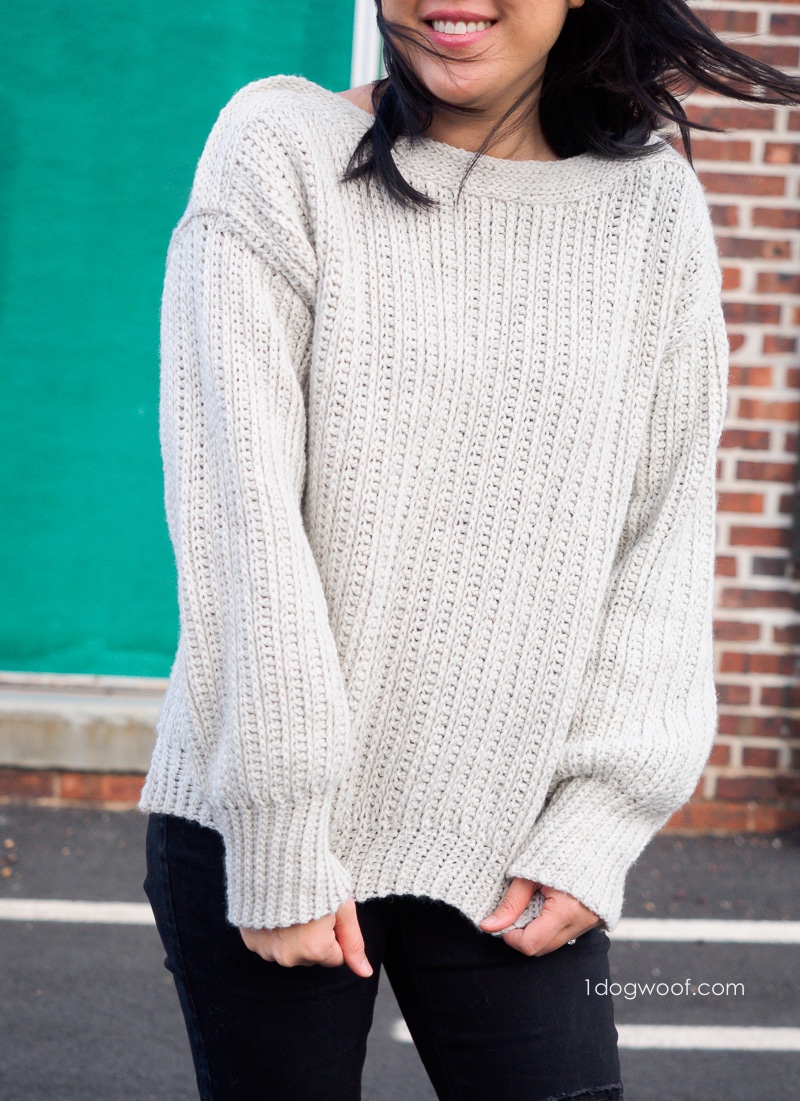
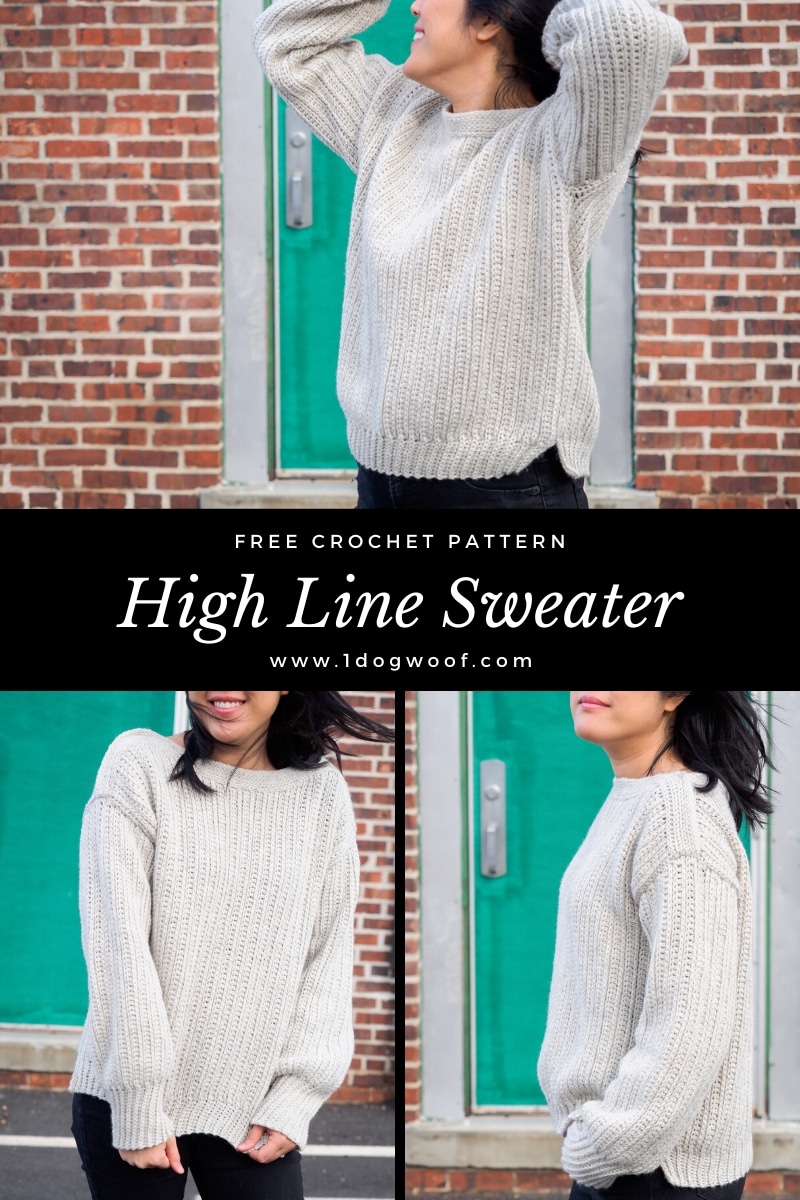
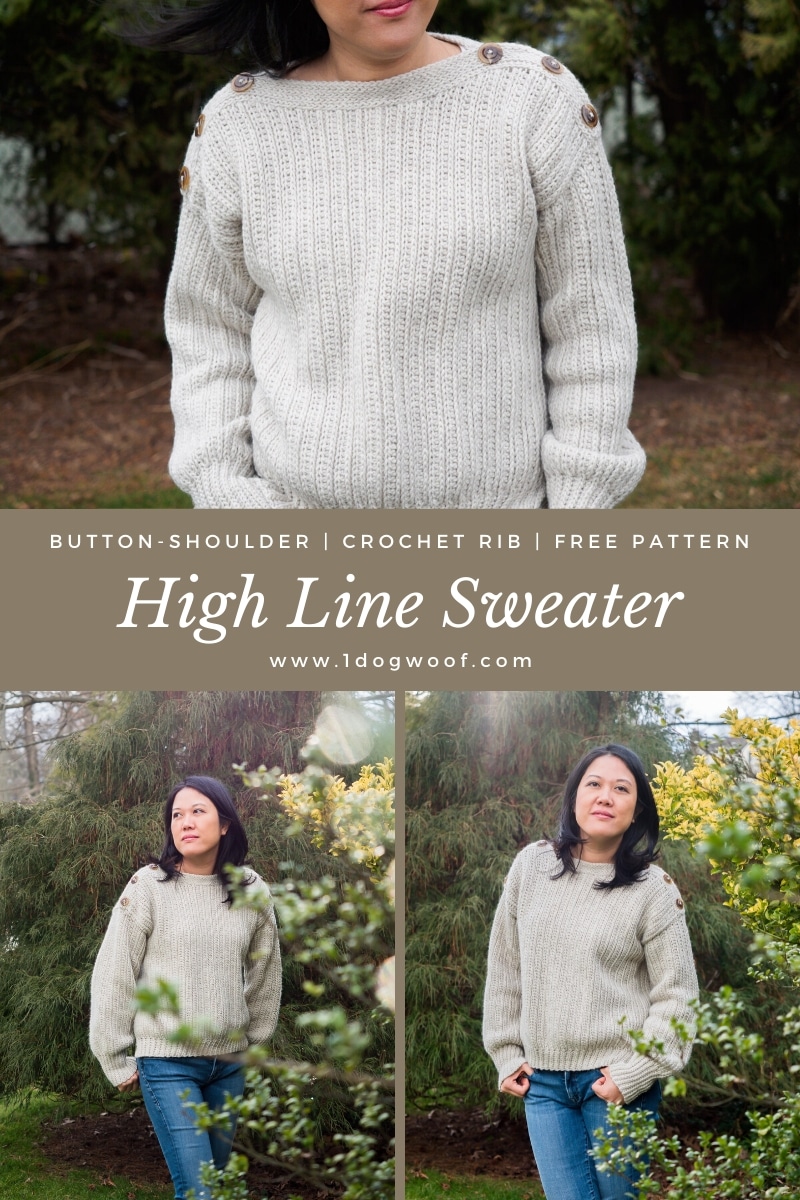
The High Line crochet sweater pattern uses the same basic stitches you know and love, simple construction, and a unique shoulder accent to create a a cozy wardrobe favorite you’ll want to wear every day!
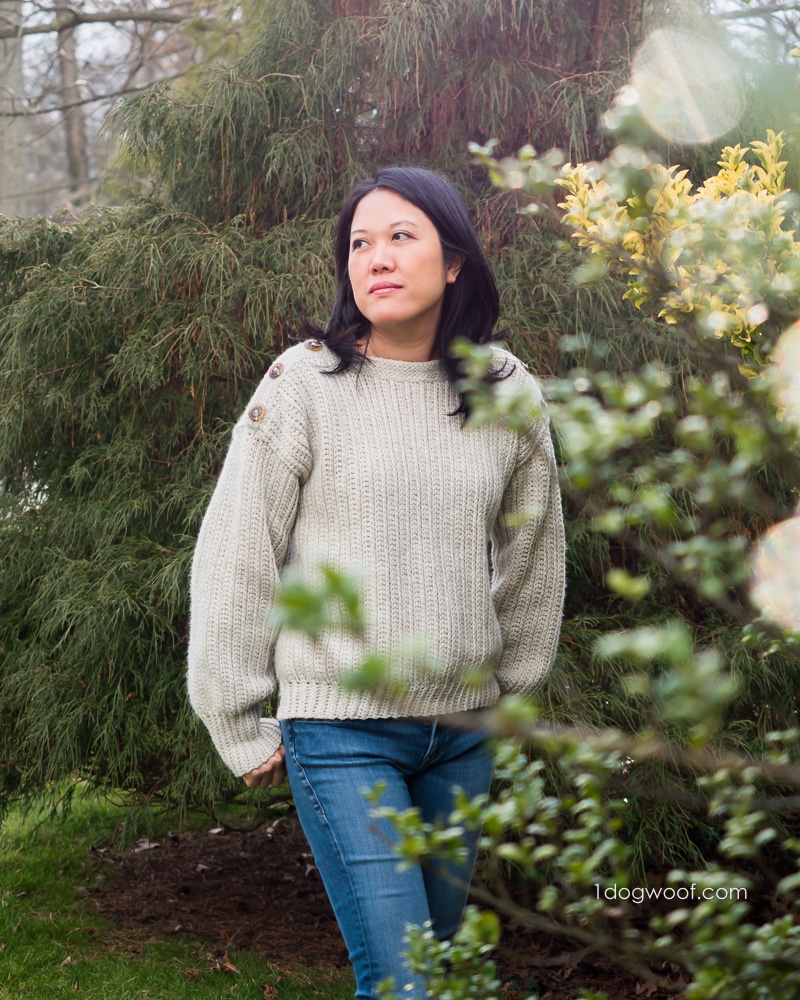
I’ve been working on this sweater for what seems like ages now, so it feels so good to get this out into the world! I think I started drawing up this project about 4 months ago, and had the idea pretty solidified in my head. It originally used a different yarn, but once again, I learned the lesson that the right (or wrong) yarn can make all the difference. The second attempt, with a new yarn, worked up exactly how I imagined it, thank goodness, and now it’s a favorite go-to piece for these dreary winter days.
The Yarn
Ok, so let’s talk about the yarn. Based on experience, I recommend using yarn that has some friction to it. I used Lion Brand Wool Ease as part of my collaboration with Lion Brand Yarn. Wool Ease is a worsted weight yarn, slightly on the lighter side of the worsted family. It is just a little bit fuzzy as you work with it, but softens after blocking. I had used a shinier, silkier yarn before, and it just made some of the stitches too loose, especially on those single loop stitches like back-loop-only. And I think a yarn on the heavier side of the worsted weight family might make this sweater a bit too bulky, so Wool Ease really worked out perfectly. There’s a variety of colors in the Wool Ease family, but my wardrobe is full of neutrals and I just stuck with my comfort zone on this one.
The Construction
The construction of this crochet sweater is very simple. There’s no raglans or set-in sleeves or funny shapes here, just rectangles! There’s 4 big rectangles – the front, the back, and two sleeves. Each piece is worked sideways, since crochet ribbing is worked along the row, unlike knit ribbing. At the top of each body piece, you pick up and work slip stitches perpendicularly to the crochet ribbing to create this woven-looking strip. I love how this type of stitch looks, and have used it both on my Woven Wall Hanging and as edging on my Wonderland Cardigan. It’s just such great texture that doesn’t look like crochet at all.
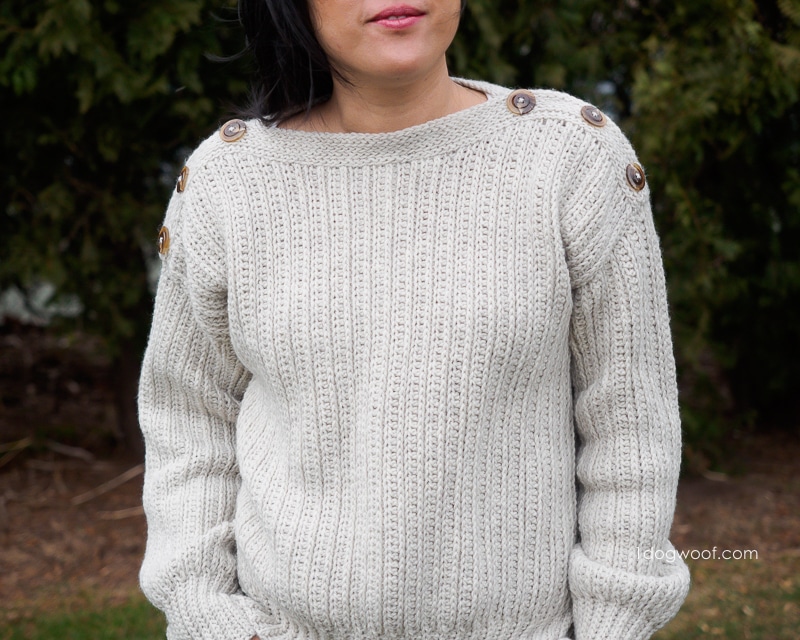
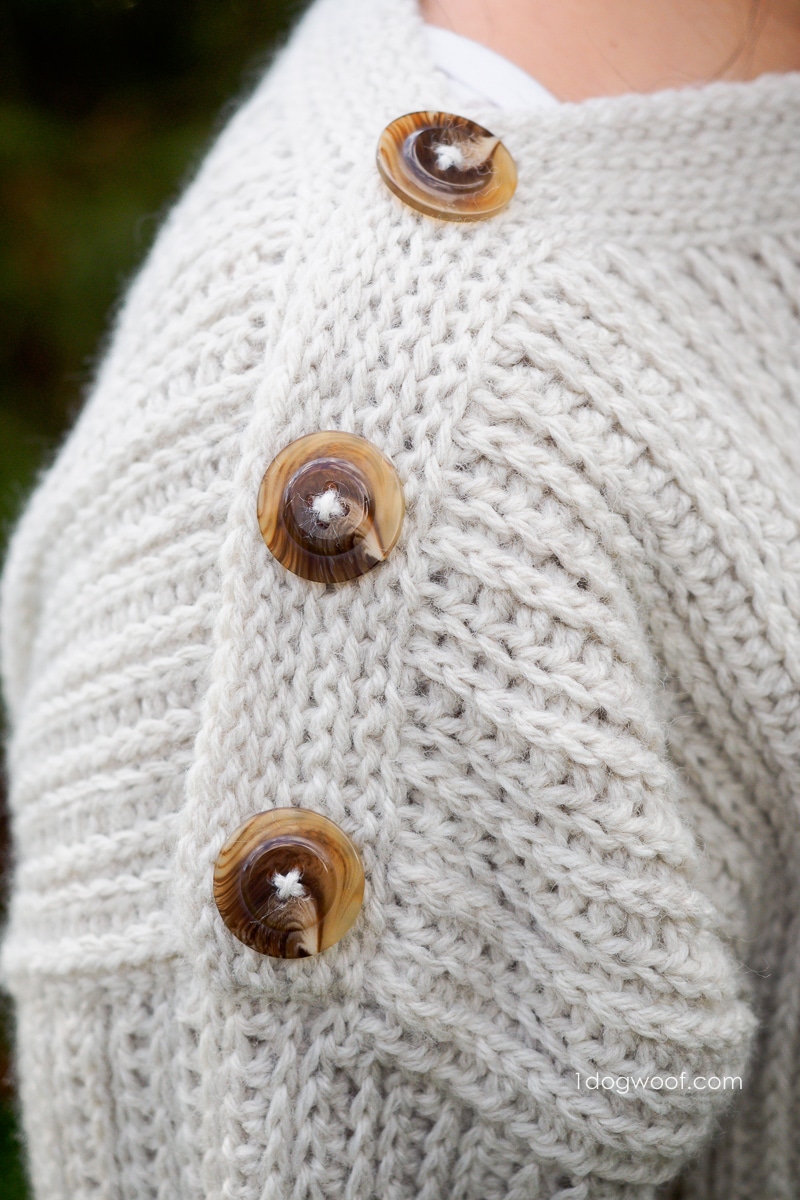
Once you have all the pieces done and blocked, it’s a matter of sewing the sweater together. The only slightly more complex bit is to make sure the strip along the top of the front and back pieces overlap, which makes it perfect to add either decorative or functional buttons. So really, it’s a button-shoulder crochet sweater. I just chose to sew the shoulder together and add decorative buttons. I felt that this method would give the sweater more structure and minimize the stretch and pull of the sweater on the buttons themselves.
Crochet Ribbing
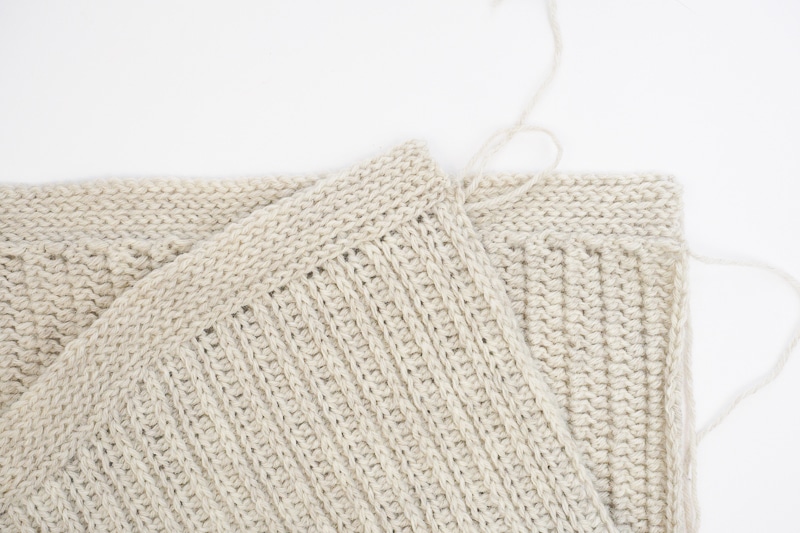
The ribbing stitch I used is something that I played around with for quite a while before deciding to use it in the High Line Sweater. It’s a row of working half double crochet stitches into the 3rd loop in the back of a half-double crochet stitch, followed by a row of working half double crochet stitches into the back loop of the previous row’s stitches. So the ribbing is 100% half-double crochet; the only difference is which loop you work into. The first row is always a foundation row – either foundation hdc stitches or foundation sc stitches. You can find a tutorial for the Foundation Half Double Crochet stitch HERE, or check out a video of the Foundation Single Crochet stitch HERE.
At the end of a row, I found that working into a single loop (either the 3rd loop or the back loop) created a really loose and gappy hole. So, in the last stitch of the row, and first stitch of the next row, I’d work into the correct loop, but pick up an extra one just to give the stitch a bit more structure. It’s a little hack, and totally optional, but I found it tidies up the end of the row. You only have to do it on the turn from half double crochet to half double crochet.
On the other side of the row, you’ll be making a mock “1×1” rib. Use one row of working sc into the back loop, followed by working slip stitches into the back loop. I found the gap at the turn isn’t too bad here, just make sure your chain stitch is tight so it becomes invisible.
Isn’t it neat? You can create two types of ribbing in a single row, and it automatically gives you that tapered look at the bottom!
Where to Grab the Pattern
Yes, you know it’s a free pattern, and you’re gonna have to keep scrolling to the bottom to get to it. But there’s also a downloadable, printable, and formatted PDF that you can purchase from my Ravelry shop. Or, if you like the yarn I’m showing here, you can grab the entire crochet kit (yarn + printed pattern) from Lion Brand Yarn.
The High Line Sweater is graded from XS to 3XL, and instructions for all sizes are included in the free pattern. The PDF has some extra info, like a full schematic, a table with measurements for all sizes, and helpful links on where to get some matching buttons if that’s something you want to add to your sweater.
So, which one will you choose? I appreciate your support regardless of how you get your hands on the High Line Sweater, and I’d love for you to share this post with your friends!
——————————————
Buy the High Line Sweater PDF from Ravelry
Buy the High Line Sweater Crochet Kit from Lion Brand Yarn
Save this pattern for later on Pinterest
——————————————
The High Line Crochet Sweater Pattern
Supplies
- 6 (6, 7, 8, 9, 10, 10) balls of Lion Brand Wool Ease (85g/3oz, 197yds/180m)
- J/6.00mm crochet hook
- Tapestry needle
- Scissors
- Several stitch markers
Gauge (after blocking)
- 14 sts and 9 rows in 4” of hdc rib, in pattern.
- Sleeve cuff ribbing is 16 sts and 22 rows in 4”
- Bottom ribbing on body is 20 sts, 16 rows in 4”
Abbreviations (US terminology)
- st(s) – stitch(es)
- ch – chain stitch
- sl st – slip stitch
- sc – single crochet
- hdc – half double crochet
- hdc inc – increase: work 2 hdc in same st
- hdc2tog – decrease: yarn over, insert hook into next st and pull up a loop, repeat in next st – there are 4 loops on hook. Yarn over and pull through all 4 loops.
- BLO – back loop only
- fsc – Foundation Single Crochet – First stitch: Ch 2, insert hook into first ch and pull up a loop, yo, pull through one loop on hook (chain stitch made), yo, pull through 2 loops on hook. All other stitches: insert hook into ch st made by previous st and pull up a loop, yo, pull through one loop on hook (ch st made), yo, pull through 2 loops on hook.
- fhdc – Foundation Half Double Crochet – First stitch: Ch 3, yo, insert hook into first ch and pull up a loop, yo, pull through one loop on hook (chain stitch made), yo, pull through all loops on hook. All other stitches: Yo, insert hook into ch st made by previous st and pull up a loop, yo, pull through one loop on hook (ch st made), yo, pull through all loops on hook.
Pattern and Construction Notes
Sizes XS (S, M, L, XL, 2XL, 3XL)
I am wearing the size M. I have a bust size of 34″, so I’m wearing an oversized sweater with 14″ of positive ease. You can choose the size of the sweater you’d like to make based on how roomy you like your fit.
Sweater measurements in inches:
- Body Width (width of front and back panels): 20 (22, 24, 26, 28, 30, 32) = Bust size: 40 (44, 48, 52, 56, 60, 64)
- Sleeve Depth (width of sleeve panels): 7 (7.5, 8, 8.5, 9, 9.5, 10)
- Length to Underarm: 14.75 (14.75, 14.75, 15, 15, 15, 15.25)
- Total Length: 21.75 (22.25, 22.75, 23.5, 24, 24.5, 25.25)
The body panels are worked side to side, with the collar panel worked across the top of the body panel. The back panel is a rectangle, but the front panel has a dip in the neckline.
The sleeves are also worked side to side and are seamed prior to attaching to the body.
At the end of a WS row, work your hook through the 3rd loop + an extra loop in the back of the hdc stitch to prevent a loose last stitch.
At the start of RS row, work your hook through the back loop + the 3rd loop of the first stitch to make your first hdc to prevent a loose first stitch.
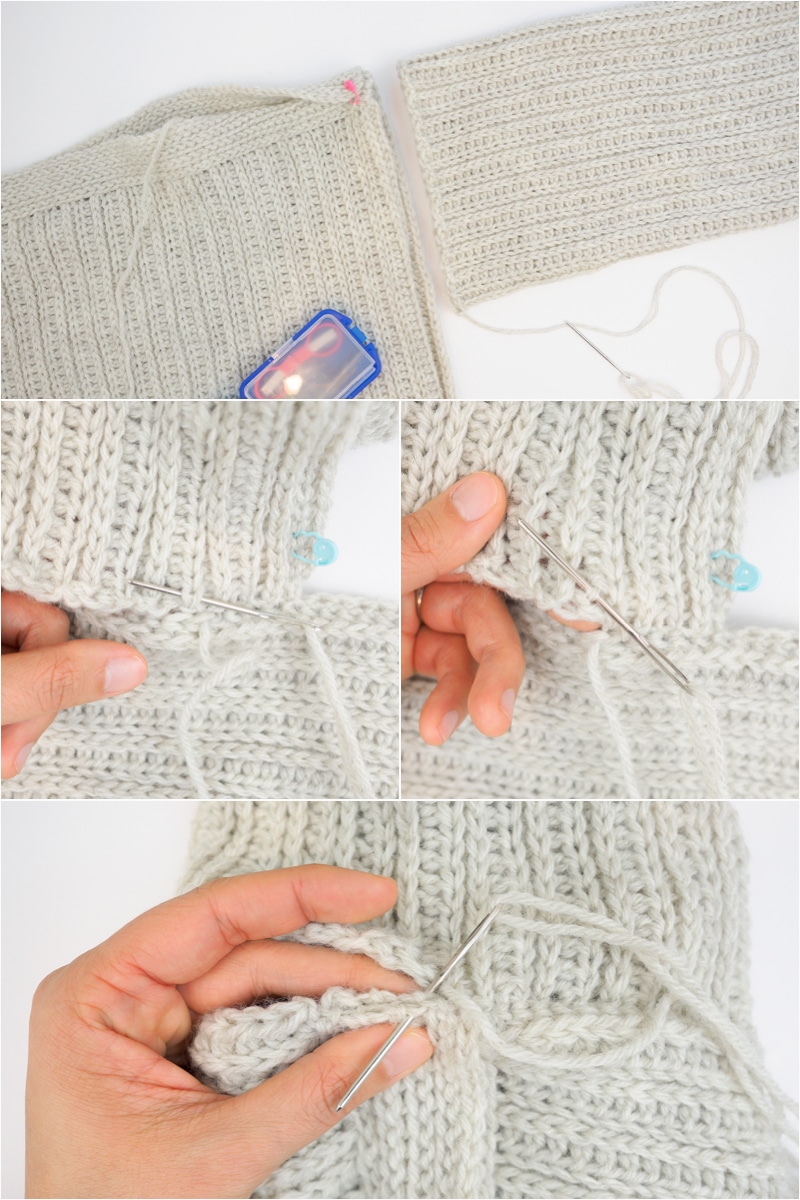
When seaming together the ribbed pieces, you’ll want to line up the mattress stitch to make the seam invisible:
- On the foundation row side, work through both loops of the foundation row.
- On the end row side, work through the 3rd loop of the hdc.
- Do not pull the mattress stitch too tightly, leave a bit of room for the sleeve to stretch lengthwise.
Instructions for the Button Shoulder Top
BACK PANEL
Row 1: Work 66 (68, 70, 72, 74, 76, 78) fhdc sts, followed by 10 fsc sts. Turn.
Row 2 (WS): Ch 1. Work 10 sl sts in BLO, 66 (68, 70, 72, 74, 76, 78) hdc in 3rd loop. Turn. Note: Keep sl sts loose.
Row 3 (RS): Ch 2. Work 66 (68, 70, 72, 74, 76, 78) hdc in BLO, 10 sc in BLO. Turn.
Repeat Rows 2 and 3 until piece measures 20 (22, 24, 26, 28, 30, 32)”/51 (56, 61, 66, 71, 76, 81.5) cm wide, ending on a WS row.
Cut yarn, fasten off, and weave in ends.
Collar Strip
Row 1: With RS facing, and new yarn, sl st evenly across the top of body panel, approx. 3 sl sts across 2 rows. Turn. Note: Keep sl sts loose to maintain drape.
Row 2: Ch 1. Sl st in front loop only of each st across. Turn.
Repeat Row 2 until Collar strip is 1.5”/4cm wide, ending on RS row. Cut yarn, fasten off, and weave in ends.
FRONT PANEL
Left Shoulder
Row 1: Work 66 (68, 70, 72, 74, 76, 78) foundation hdc sts, followed by 10 foundation sc sts. Turn.
Row 2 (WS): Ch 1. Work 10 sl sts in BLO, 66 (68, 70, 72, 74, 76, 78) hdc in 3rd loop. Turn.
Row 3 (RS): Ch 2. Work 66 (68, 70, 72, 74, 76, 78) hdc in BLO, 10 sc in BLO.
Rows 4 (WS) – 11 (13, 15, 17, 19, 21, 23) (RS): Repeat Rows 2 and 3 until work from first row measures 5 (6, 7, 8, 9, 10, 11)”/12.5 (15, 18, 20.5, 23, 25.5, 28) cm, ending on a RS row.
Neckline
Decrease Row 1 (WS): Ch 1. Work 10 sl sts in BLO, hdc in 3rd loop, across row until 2 sts remaining, 1 hdc2tog in 3rd loop. Turn. (10 sl sts, 65 (67, 69, 71, 73, 75, 77) hdc)
Decrease Row 2 (RS): Ch 2. Work 1 hdc2tog in BLO, 63 (65, 67, 69, 71, 73, 75) hdc in BLO, 10 sc in BLO. Turn. (64 (66, 68, 70, 72, 74, 76) hdc, 10 sl sts)
Decrease Row 3 (WS): Ch 1. Work 10 sl sts in BLO, 62 (64, 66, 68, 70, 72, 74) hdc in 3rd loop, 1 hdc2tog in 3rd loop. Turn. (10 sl sts, 63 (65, 67, 69, 71, 73, 75) hdc)
Flat Row 1 (RS): Ch2. Work 63 (65, 67, 69, 71, 73, 75) hdc in BLO, 10 sc in BLO. Turn.
Flat Row 2 (WS): Ch 1. Work 10 sl sts in BLO, 63 (65, 67, 69, 71, 73, 75)7 hdc in 3rd loop. Turn.
Flat Rows 3 (RS) – 16 (16, 16, 18, 18, 18, 18) (WS): Repeat Rows 1 and 2.
Flat Row 17 (17, 17, 19, 19, 19, 19) (RS): Ch 2. Work 63 (65, 67, 69, 71, 73, 75) hdc in BLO, 10 sc in BLO. Turn.
Increase Row 1 (WS): Ch 1. Work 10 sl sts in BLO, 62 (64, 66, 68, 70, 72, 74) hdc in 3rd loop, hdc inc in 3rd loop of last st. Turn. (10 sl sts, 64 (66, 68, 70, 72, 74, 76) hdc)
Increase Row 2 (RS): Ch 2. Work hdc inc in BLO, 63 (65, 67, 69, 71, 73, 75) hdc in BLO, 10 sc in BLO to end of row. Turn. (65 (67, 69, 71, 73, 75, 77) hdc, 10 sl sts)
Increase Row 3 (WS): Ch 1. Work 10 sl sts in BLO, 64 (66, 68, 70, 72, 74, 76) hdc in 3rd loop, hdc in 3rd loop of last st. Turn. (10 sl sts, 66 (68, 70, 72, 74, 76, 78) hdc)
Right Shoulder
Row 1 (RS): Ch 2. Work 70 hdc in BLO, 10 sc in BLO.
Row 2 (WS): Ch 1. Work 10 sl sts in BLO, 70 hdc in 3rd loop. Turn.
Rows 3 (RS) – 11 (13, 15, 17, 19, 21, 23) (RS): Repeat Rows 1 and 2 until work from Row 1 of Right Shoulder measures 5 (6, 7, 8, 9, 10, 11)”/12.5 (15, 18, 20.5, 23, 25.5, 28) cm, ending on a RS row.
Front Panel should measure 20 (22, 24, 26, 28, 30, 32)”/51 (56, 61, 66, 71, 76, 81.5) cm wide. Cut yarn, fasten off, and weave in ends.
Collar Strip
Row 1: With RS facing, and new yarn, sl st evenly across the top of body panel, approx. 3 sl sts across 2 flat rows, and 4 sl sts across every 2 sloped rows. Turn.
Row 2: Ch 1. Sl st in front loop only of each st across. Turn.
Repeat Row 2 until Collar Panel is 1.5”/4cm wide, ending on RS row.
SLEEVES (make 2)
Row 1: Work 60 (all sizes) foundation hdc sts, followed by 18 foundation sc sts. Turn.
Row 2 (WS): Ch 1. Work 18 sl sts in BLO, 60 hdc in 3rd loop. Turn.
Row 3 (RS): Ch 2. Work 60 hdc in BLO, 18 sc in BLO.
Repeat Rows 2 and 3 until piece measures 14 (15, 16, 17, 18, 19, 20)”/35.5 (38, 40.5, 43, 45.5, 48.5, 51) cm wide, ending on a RS row.
Cut yarn tail, leaving twice the length of the sleeve for seaming.
ASSEMBLY
Block all pieces separately.
Shoulders
- Lay the BACK PANEL wrong side up, and the FRONT PANEL right side up on top.
- Fold the COLLAR of the BACK PANEL down.
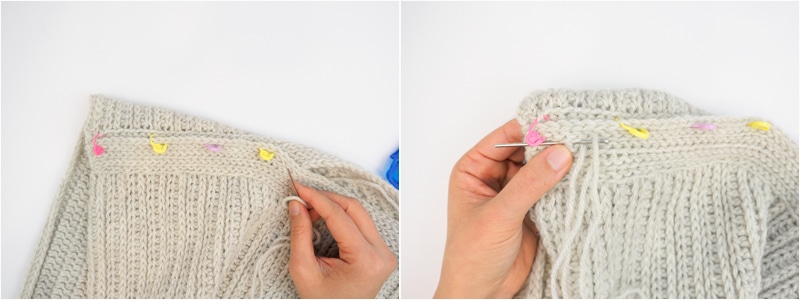
- Overlap the front COLLAR over the back COLLAR.
- Use a length of yarn to stitch the overlapping COLLARs together with a running stitch, about halfway down from the top edge of the front COLLAR, from the outside edge to about 4 (5, 6, 6.5, 7.5, 8.5, 9.5)” in towards the center. (You can use stitch markers to hold the overlap in place until the pieces are stitched together.)
- Repeat for other shoulder, making sure the front COLLAR overlaps over the back COLLAR.
Sleeves
- With RS facing, use a mattress stitch to seam up the sleeve, from cuff to underarm.

Body sides
- With a long length of yarn, seam up the sides of the body panels, starting where the hdc ribbing starts (skips the sc/sl st ribbing) and ending 7 (7.5, 8, 8.5, 9, 9.5, 10)”/17.75 (19, 20.25, 21.5, 22.75, 24.25, 25.5)cm from the top of the shoulder.
Armhole
- Using the same length of yarn or a separate length of yarn, mattress stitch the sleeve to the arm opening, starting from the underarm, working through both overlapping COLLARS at the shoulder, and ending back at the underarm. Fasten off securely, and weave in all ends.
- Repeat for the other side and sleeve.


This is a beautiful,go to sweater.your design is great, your directions and tips are excellent.
Did you need to block?
I have used the yarn called for and you are right,it works up beautiful.the color you chose shows the design off beautifully.
Thank you for the perfect pattern and a beautiful design,love your site.
Jen j
Gorgeous! I’ve never crocheted a sweater (only amigurumi) but i really want to give this one a try! What’s the size you’re wearing? Taking into account it’s oversized, i don’t want it to get too big. Should i pick my actual size or maybe size down a little?
This is a beautiful sweater. Love the texture. I’ve not made a sweater before, and have been looking at patterns. I think this will be the one. I have a question about the sizing. On the Lion Brand website kit, I see measurements for body width instead of bust/ chest measurement. Am I correct that this is the width of the front and back rectangle?
Also I want to thank you for making your patterns free but also available on sites other than Ravelry.
Very beautiful.
Hi, yes, the measurements are for body panel width, not for bust/chest measurements, since the sweater is meant to be oversized. You can make this at whatever width you’d like if you want to change the overall fit. Hope that helps!
Ah, I’m sorry I omitted that, I will update the post. I am wearing a size M. My bust size is 34″ so there’s a lot of positive ease (Around 14″ I think). The measurements given are for the width of the front and back panels themselves, so you can choose whichever body width you’re comfortable with.
I did block the pieces separately, as I find that Wool Ease softens a lot after wet blocking.
I’ve updated the post with the body panel measurements, I hope that helps you decide which size to make!
I’ve updated the post with the body panel measurements – I hope that helps you decide which size to make!
A very beautiful sweater, I made the same for myself and my two daughters, they really like it. Thanks for your blog, very nice. I wish you inspiration
Hi! I purchased this pattern on ravelry and am just starting it. I’m a little confused about the sizing though. What is body width? How do you measure that? Is that how wide the sweater width is or person? Do you have an idea what bust sizes the different sizes are? Thanks!
Hi Megan, I added measurements for the panels into the post, and how it corresponds to bust sizes. Hopefully that will help you!
Should i pick my actual size or maybe size down a little?
https://supermariobros.io/
The information is very special, I will have to follow you, the information you bring is very real, reflecting correctly and objectively, it is very useful for society to grow together.
Hi There! LOVE this and can’t wait to make this! I’ve never made a sweater before (I actually just started crocheting last August) I was wondering if you think I could use Lion Brand Cotton Jeans yarn? It’s a weight 3 light. Should I go up a size (from small to medium). Any advice would be so greatly appreciated!!
Update: I’m reposting this cause I didnt enter my email address before (on accident) Don’t know how much that matters, but wanted to post again just in case
Hi There! LOVE this and can’t wait to make this! I’ve never made a sweater before (I actually just started crocheting last August) I was wondering if you think I could use Lion Brand Cotton Jeans yarn? It’s a weight 3 light. Should I go up a size (from small to medium). Any advice would be so greatly appreciated!!
Love this pattern! I am working on the gauge swatch and had a question about the look of the ribbing. In your photos it looks like there are two “knit” ribs close together and then a gap/HDC and then two ribs close together again. When I’m working it up it looks like the ribs are evenly spaced. Any ideas why this could be happening?
And question on the third loop – do you mean that we go from the back of the work with the hook, under the stitch and pick up the third loop from the front, bring it through to the back and do the HDC? That’s what I’m thinking but please let me know if that’s not right!
Just a note – I am using an acrylic worsted weight yarn that I have on hand. Using my current stash as we can’t currently get to stores!
Thanks so much!
Can you please tell me what brand crochet hook you used. Unfortunately I find that even if they say 6mm, they are all completely different.
Would pound of love be a good choice or what other yarns would you recommend?
Pound of love is a category 4 yarn like the Wool-ease I used, so it should work, just be sure to check your gauge!
Hello ChiWei,
Just found your pattern on internet and done the back panel. I’m starting the front panel, left shoulder.There is something I don’t understand :
Rows4 (WS)-11(13,15,17,19,21,23) (RS):Repeat Rows 2 and
etc…
There’s where I am lost: I don’t quite understand what I am supposed to do with the 11 ( or 13,15..) stitches.
Can you help?
Sylvie
These numbers are indicating how many rows you are needing to repeat rows 2 and 3. For example, for a small, they would repeat Rows 2 & 3 for their Rows 4 -13, or until the piece measures 6″.
Hi There! LOVE this and can’t wait to make this! I’ve never made a sweater before (I actually just started crocheting last August) I was wondering if you think I could use Lion Brand Cotton Jeans yarn? It’s a weight 3 light. Should I go up a size (from small to medium). Any advice would be so greatly appreciated!!
Because it’s a lighter weight yarn you would have to check your gauge and then determine whether your difference in gauge and the difference in sizes would end up making a sweater that would fit the way you wanted!
I almost always use Clover Amour Hooks.
Hi! I love the look of this sweater and I am so excited to try it for my first wearable project! I am half way through the back panel but I just noticed that the instructions for the front panel are missing from the free online pattern. Did it get removed accidentally?
How would I go about extending the back bottom of the sweater? I wear a size medium.
They are there! The Front Panel consists of the Left Shoulder, Neckline, and Right Shoulder. You can also ctrl+f “front” and it will guide you to this section.
You could add however many stitches you desire in extra length to the foundation row and the stitches worked in the body portion of the back panel before the ribbing
question on the third loop – do you mean that we go from the back of the work with the hook, under the stitch and pick up the third loop from the front, bring it through to the back and do the HDC? That’s what I’m thinking but please let me know if that’s not right!
Hi Celina! You don’t pull the third loop through the stitch. https://stitchesnscraps.com/tutorial-3rd-loop-hdc/ – hopefully this tutorial helps to explain it! Thanks!