
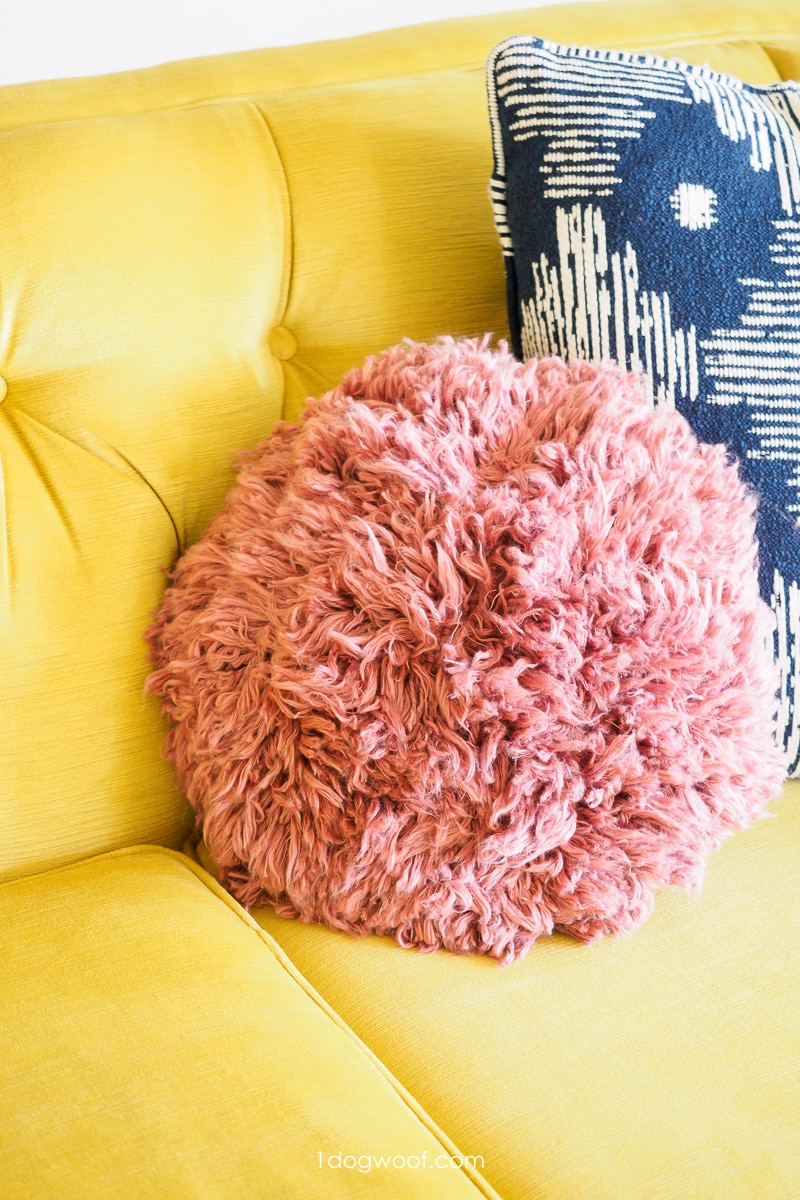
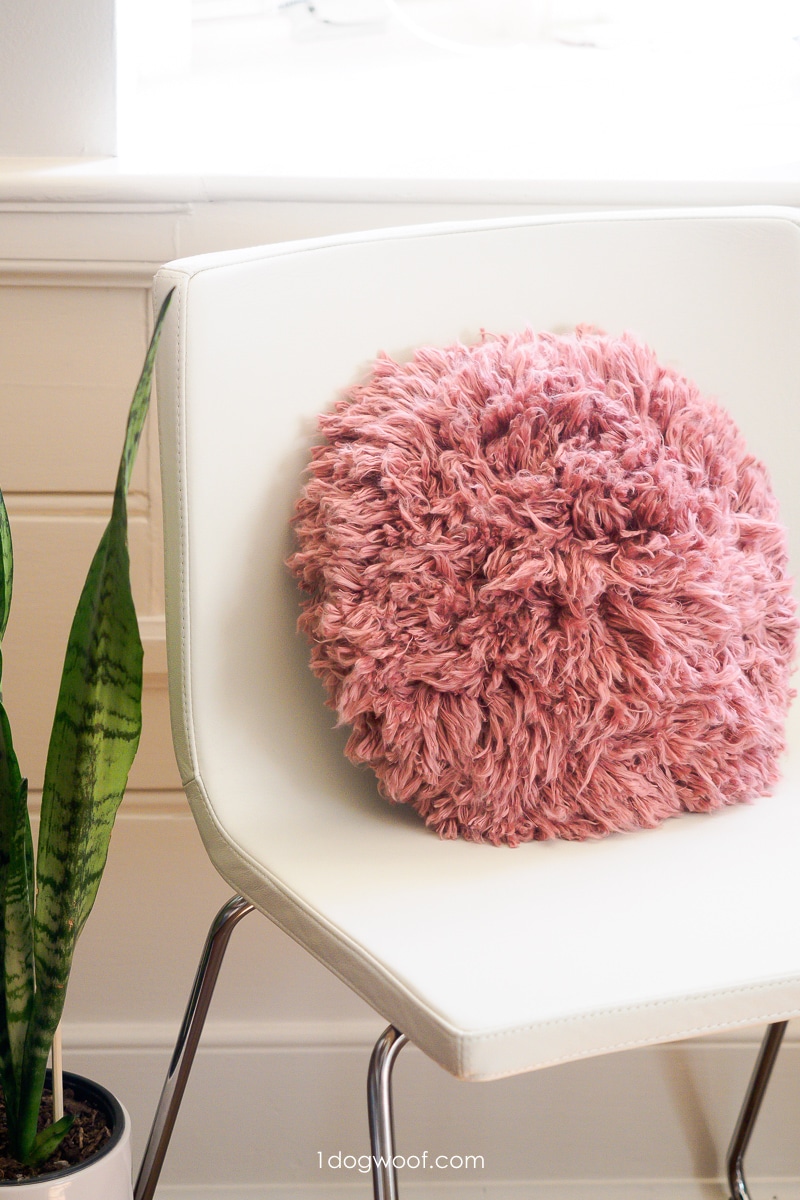
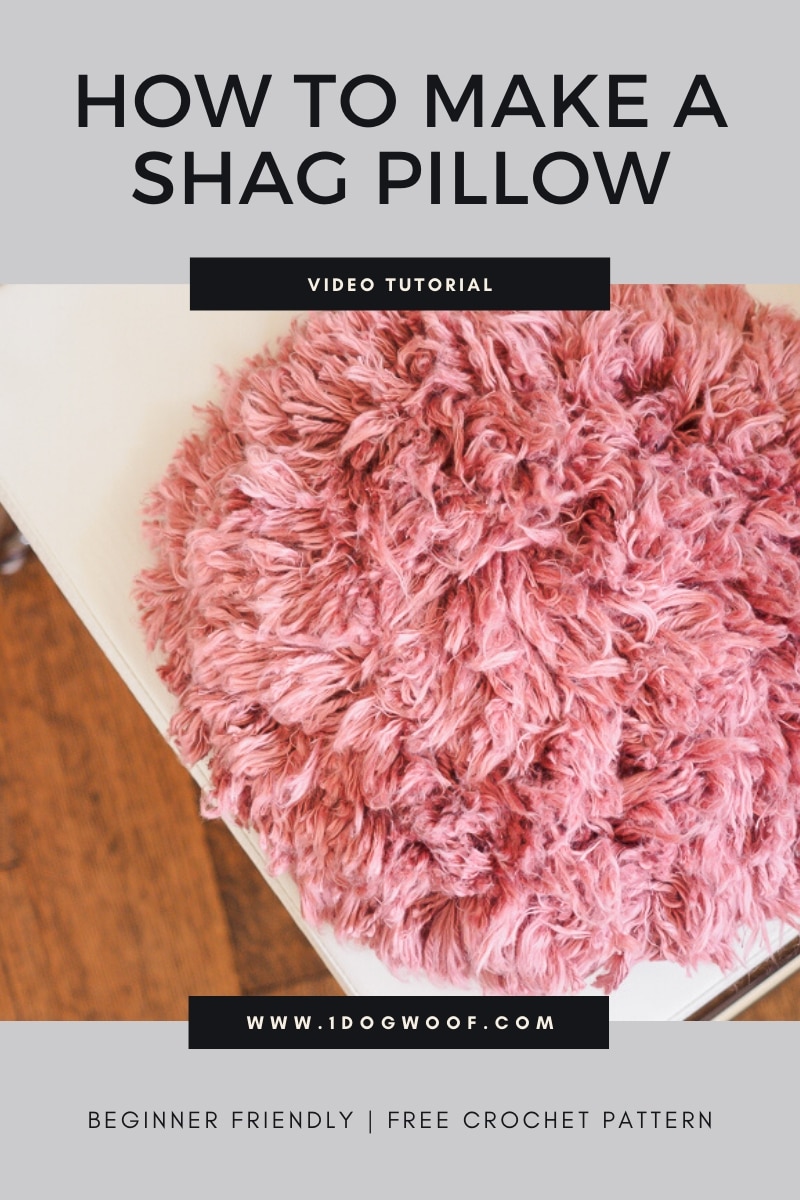
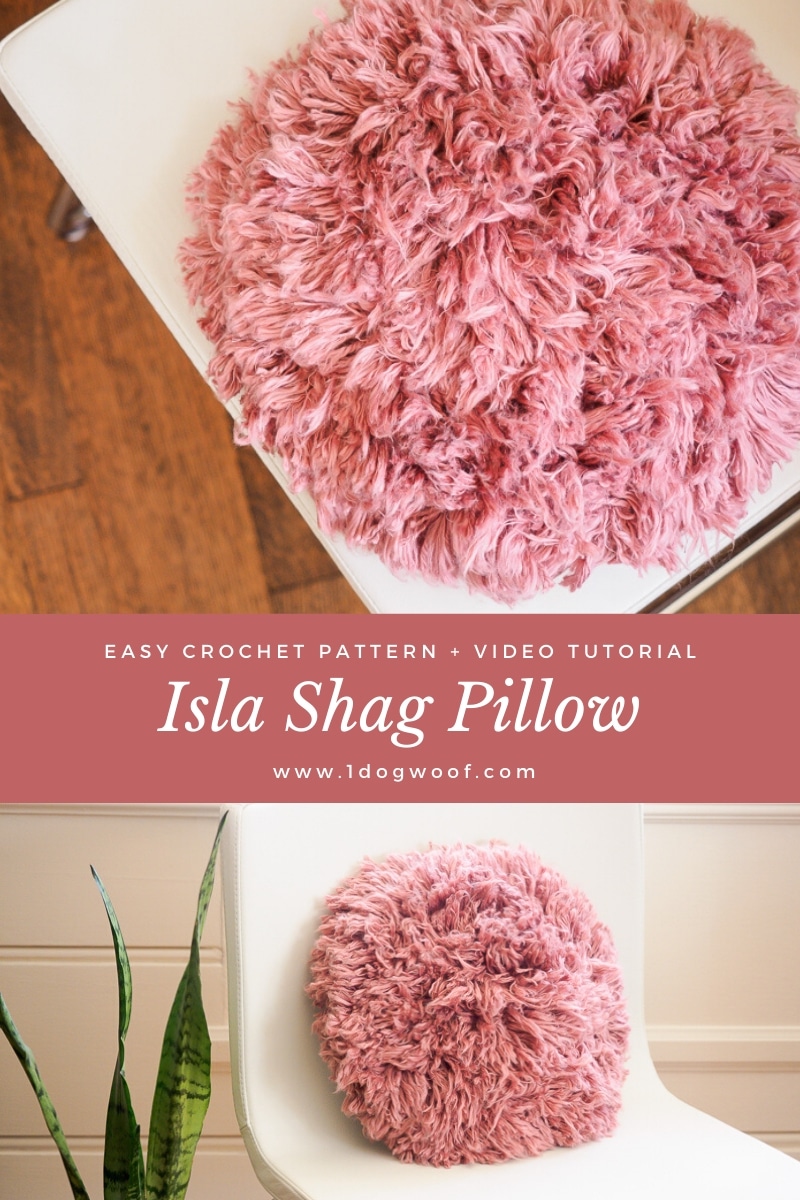
I promise you, this is a crochet pillow. And it’s an easy crochet pillow to make. Scroll down to see how to make a shag pillow worthy of your favorite shop! All you need to know are a few basic crochet techniques, and you’ll be on your way.
This project is made in collaboration with WeCrochet.
For this crochet throw pillow, I used Billow yarn from WeCrochet. It is a bulky weight, 100% Pima Cotton yarn that features a thick and thin texture. This varying texture gives your diy shag pillow that messy cool vibe. The thick parts of the yarn are not spun tightly, so it produces a fluffy halo feel, while the thin parts of the yarn are spun so tightly it doesn’t unravel, and provides definition among all the fluff. Billow comes in a palette of gorgeously moody colors with rich jewel tones that would make an accent pillow really stand out.
——————————————
Add this project to your Ravelry queue
Watch the video tutorial on YouTube
——————————————
Loop Stitch Magic
The magic being the Isla pillow is the single crochet loop stitch. It’s worked similar to the double crochet loop stitch from my Boho Fringe Shawl, except it has a single crochet base. And working it in the round is exactly like working regular single crochet stitches in the round. When you need to increase, you simply work 2 loop stitches into the same stitch. At the end of a round, join to the first stitch with a slip stitch.
Make each loop approximately 1.5″-2″ tall which will give you a 1″-1.5″ long shag. After completing a few rounds of the single crochet loop stitch, you’ll see that the loops are on the “back” of your work. The side you’re used to seeing as the front of your work will actually be the inside of your pillow. With all the loop stitches in place, your pillow will look like a loofah or a wig for a doll.
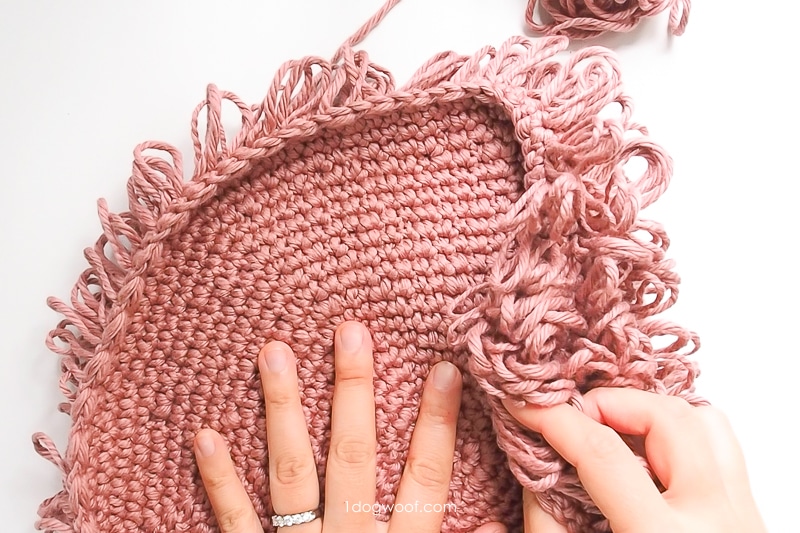
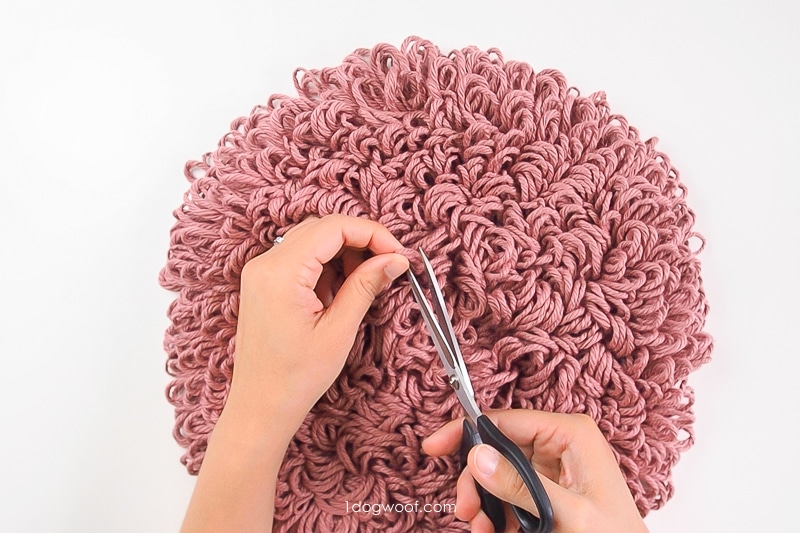
Next, take a pair of scissors and cut open all the loops to create short pieces of fringe.
Then take a comb to brush out all those individual bits of yarn to separate the twists. As you brush, the pillow will shed A LOT of cotton fiber because some of the plies are so loose. You’ll want to brush enough to get the shaggy look but not too much that you have nothing left to the yarn! And don’t worry about the fluff left in your hands. It compacts together and makes the perfect extra stuffing for your pillow.
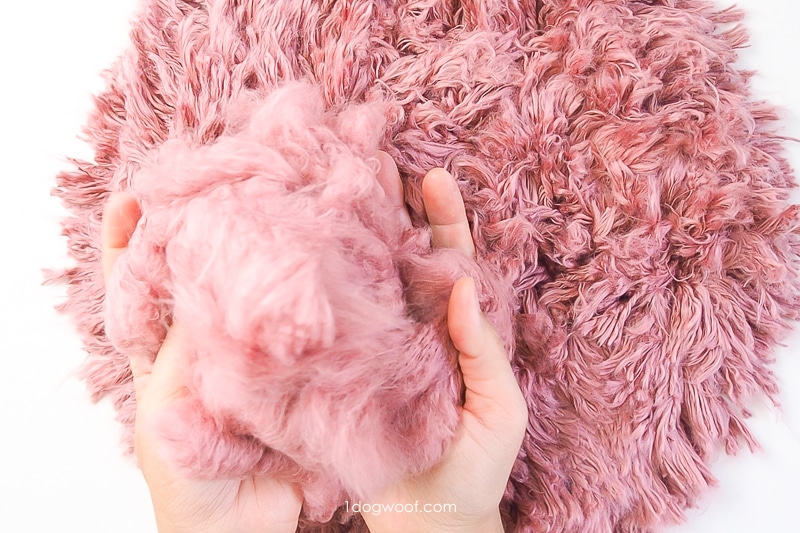
I used a combination of a fine-tooth comb and a wire dog brush to brush out the fringe. The comb seemed to separate the fringe without destroying it completely, so using a comb on its own will work fine. Brushing with a wire dog brush will increase the shedding (A LOT) but also add extra fluff.
Make Your Own Modern Throw Pillow
The Isla Shag round crochet pillow is what happens when you start experimenting with fun new yarn using fun new techniques, crossing your fingers and hoping for the best. And Billow did not disappoint. The thick and thin quality of the yarn brushed out to a beautiful shaggy effect that I’ve not seen when brushing out macrame rope or acrylic yarn.
Scroll down to get the free pattern, or head over to my Ravelry shop to grab a downloadable copy of this crochet pillow pattern for offline use.
Enjoy your new crochet throw pillow! Be sure to share your work with me on Instagram using #1dogwoof and tagging me in your photos!
Click Here to Pin It For Later!
Isla Shag Crochet Pillow Pattern
Supplies
- 3 skeins of WeCrochet Billow yarn (3.5oz/100g, 120yds/110m) in Tea Rose
- J/6mm crochet hook
- scissors
- tapestry needle
- fine-tooth comb or wire pet brush
- polyester fiberfill
Gauge
14 sts and 14 rows in 4″, using single crochet
Finished Size
12″/30cm diameter base. With 1.5″/3.8cm fringe, total diameter is approximately 15″/38cm
Abbreviations
- st(s) – stitch(es)
- sl st(s) – slip stitch(es)
- ch – chain stitch
- sc – single crochet
- sc-loop st(s) – single crochet loop stitch: with working yarn looped over left hand, insert hook into stitch, swing hook to the outside of the working yarn and around to catch the other side of the loop, pull through stitch, yo, pull through both loops.
Pattern and Construction Notes
- Isla Shag Pillow video tutorial is available on YouTube.
- The Isla Shag Pillow is constructed from 2 panels, both worked in joined rounds.
- Ch 1 sts at the beginning of rounds do not count as st.
- Loop sts should be approximately 1.5″/3.8cm tall. Slight inconsistencies are ok, but large outliers may waste yarn.
- Instructions indicate using the tail from the front panel for seaming, but you can use a tail from either the front or back panel to seam the pillow together.
- Any loose fibers brushed out of the fringe can be used as stuffing in the pillow.
- Be careful to match the tension of the single crochet stitches for the back panel with the loop stitches in the front panel. You may need to go up a hook size if your loop stitches are looser than your usual tension.

Instructions
Front Panel
Round 1: Work 1 sc into a magic circle, work 5 sc-loop sts into the magic circle. Join to first sc with a sl st. (6)
Round 2: Ch 1, 2 sc-loop sts in each st around. Join to first sc with sl st. (12)
Round 3: Ch 1, *1 sc-loop st in next st, 2 sc-loop sts in next st, repeat from * around. Join to first sc with sl st. (18)
Round 4: Ch 1, *1 sc-loop st in each of the next 2 sts, 2 sc-loop sts in next st, repeat from * around. Join to first sc with sl st. (24)
Round 5: Ch 1, *1 sc-loop st in each of the next 3 sts, 2 sc-loop sts in next st, repeat from * around. Join to first sc with sl st. (30)
Round 6: Ch 1, *1 sc-loop st in each of the next 4 sts, 2 sc-loop sts in next st, repeat from * around. Join to first sc with sl st. (36)
Round 7: Ch 1, *1 sc-loop st in each of the next 5 sts, 2 sc-loop sts in next st, repeat from * around. Join to first sc with sl st. (42)
Round 8: Ch 1, *1 sc-loop st in each of the next 6 sts, 2 sc-loop sts in next st, repeat from * around. Join to first sc with sl st. (48)
Round 9: Ch 1, *1 sc-loop st in each of the next 7 sts, 2 sc-loop sts in next st, repeat from * around. Join to first sc with sl st. (54)
Round 10: Ch 1, *1 sc-loop st in each of the next 8 sts, 2 sc-loop sts in next st, repeat from * around. Join to first sc with sl st. (60)
Round 11: Ch 1, *1 sc-loop st in each of the next 9 sts, 2 sc-loop sts in next st, repeat from * around. Join to first sc with sl st. (66)
Round 12: Ch 1, *1 sc-loop st in each of the next 10 sts, 2 sc-loop sts in next st, repeat from * around. Join to first sc with sl st. (72)
Round 13: Ch 1, *1 sc-loop st in each of the next 11 sts, 2 sc-loop sts in next st, repeat from * around. Join to first sc with sl st. (78)
Round 14: Ch 1, *1 sc-loop st in each of the next 12 sts, 2 sc-loop sts in next st, repeat from * around. Join to first sc with sl st. (84)
Round 15: Ch 1, *1 sc-loop st in each of the next 13 sts, 2 sc-loop sts in next st, repeat from * around. Join to first sc with sl st. (90)
Round 16: Ch 1, *1 sc-loop st in each of the next 14 sts, 2 sc-loop sts in next st, repeat from * around. Join to first sc with sl st. (96)
Round 17: Ch 1, *1 sc-loop st in each of the next 15 sts, 2 sc-loop sts in next st, repeat from * around. Join to first sc with sl st. (102)
Round 18: Ch 1, *1 sc-loop st in each of the next 16 sts, 2 sc-loop sts in next st, repeat from * around. Join to first sc with sl st. (108)
Round 19: Ch 1, *1 sc-loop st in each of the next 17 sts, 2 sc-loop sts in next st, repeat from * around. Join to first sc with sl st. (114)
Round 20: Ch 1, *1 sc-loop st in each of the next 18 sts, 2 sc-loop sts in next st, repeat from * around. Join to first sc with sl st. (120)
Round 21: Ch 1, 1 sc-loop st in each st around. Join to first sc with sl st. (126)
Round 22: Ch 1, 1 sc-loop st in each st around. Join to first sc with sl st. (132)
Round 23: Ch 1, 1 sc-loop st in each st around. Join to first sc with sl st. (138)
Fasten off, leaving a tail that is 2-3x the length of the circle’s circumference.
Tie a knot to secure the magic circle and weave in the end.
Cut all loops open to create short fringe.
Turn the panel over and use a comb to carefully brush out the fringe along the edge.
Turn the panel back to right side facing and brush out the rest of the fringe, cutting open any missed loops.
Put aside any loose fibers brushed out of the fringe.
Back Panel
Repeat instructions for the FRONT PANEL, except using all sc instead of sc-loop sts.
Fasten off, leave a 6″/15.25 tail, and weave in ends.
Assembly
Place the FRONT and BACK panels wrong side facing.
Use the tail from the FRONT PANEL to mattress stitch the two panels together, until there is 6″/15.25 left of the seam.
Stuff the pillow with polyfill stuffing and any leftover brushed fiber.
Seam the rest of the pillow closed. Fasten off securely and weave in ends.


Great pillow! I absolutely love it. I’ve never seen that stitch before and can’t wait to give it a try. Thanks for sharing!
What a great idea!! 😮 Thank you for the tutorial!! I will definitely try this and I’m dreaming of a wall hanging rug with this!
It’s so fluffy and shaggy! Love this pillow!
Thanks for the idea.