
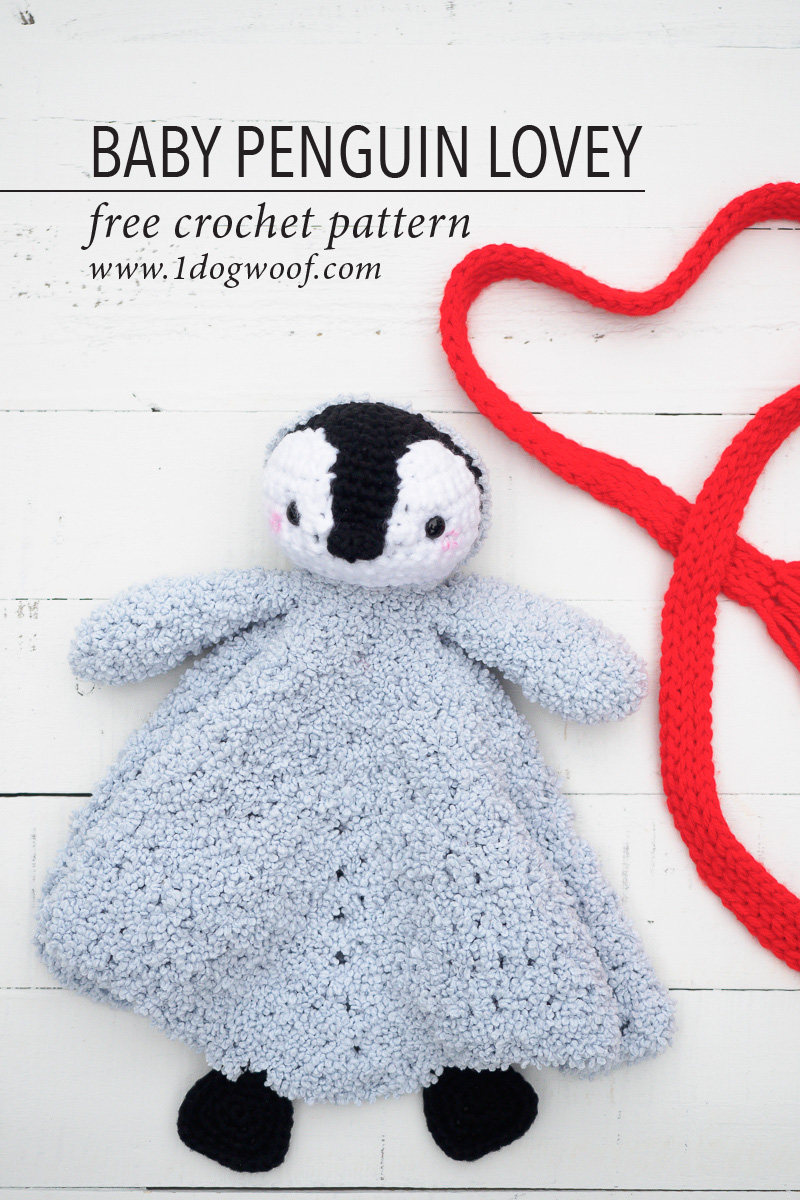
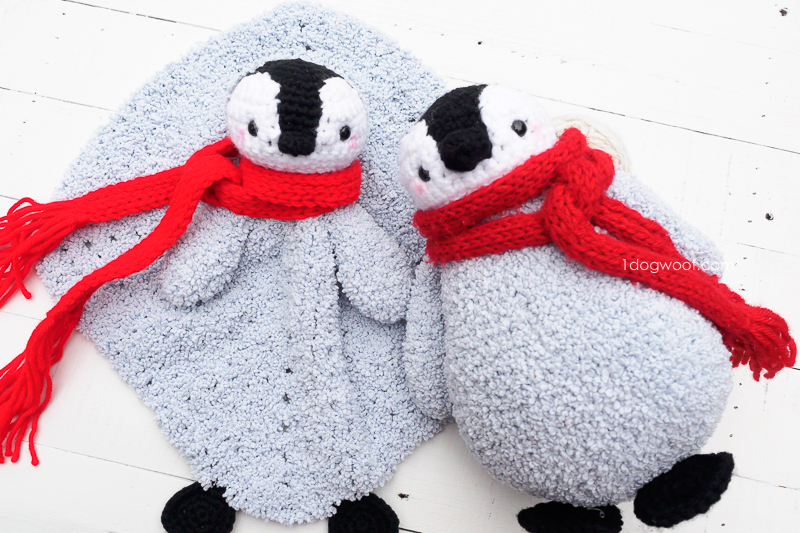
My contribution this year to Lion Brand’s annual 12 Weeks of Christmas project series is the Baby Penguin Amigurumi using Baby Soft Boucle. It’s a project that works up quickly, and only uses 1 skein the Boucle yarn. In Lion Brand’s crochet kit, they included another skein of Baby Soft Boucle and enough DIYarn to make two baby penguins. That makes it a great option for families like mine where everything needs to be identical or else my kids will fight over whose new toy is better. But if your kids have a better grasp of the concept that “fair doesn’t mean equal”, or if you’re looking for an adorable gift idea for winter baby showers, why not make a Baby Penguin Crochet Lovey for a perfectly penguiny gift set.
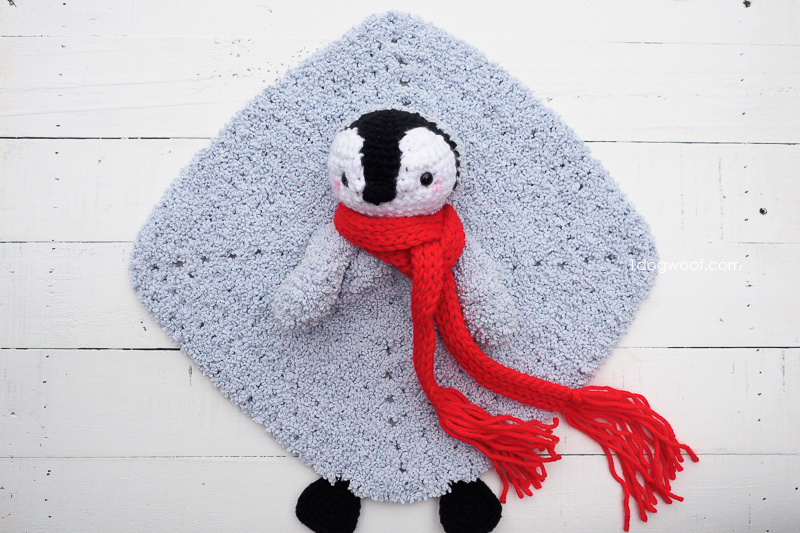
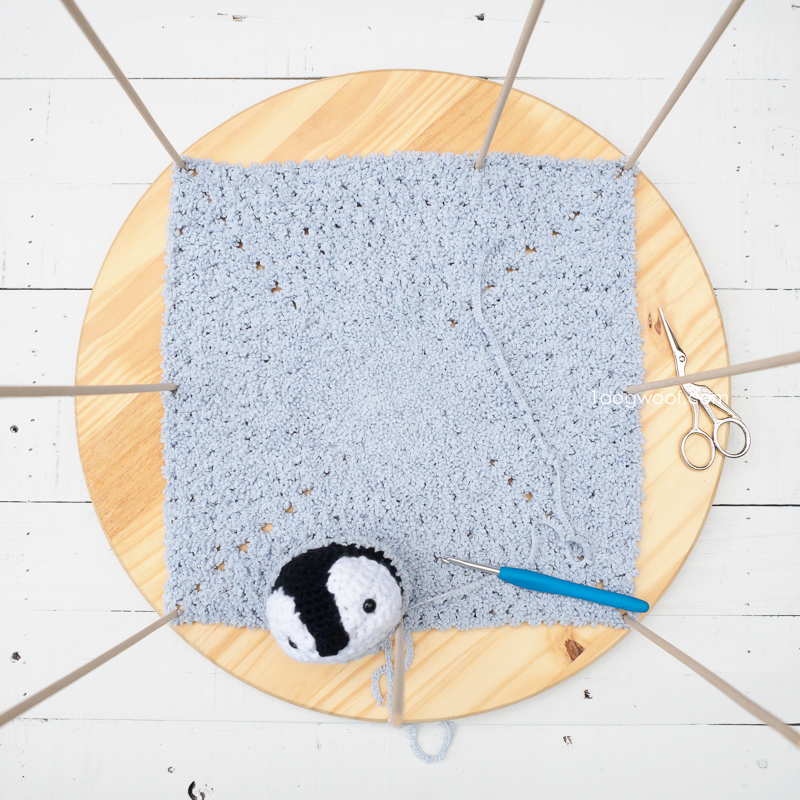
The penguin lovey is in many ways similar or identical to the stuffed toy, except for the obvious difference of the body. Instead of crocheting a plump, fluffy body for the penguin, you’ll make a fluffy granny square. There is enough yarn to make the square about 12 inches by 12 inches.
If you’re having trouble working with the Baby Soft Boucle, head over to my YouTube channel to check out my Baby Soft Boucle tutorial. It was made for my Stanley Duck Amigurumi, but the concept of working with 2 different stitch markers and feeling your stitches remains the same.
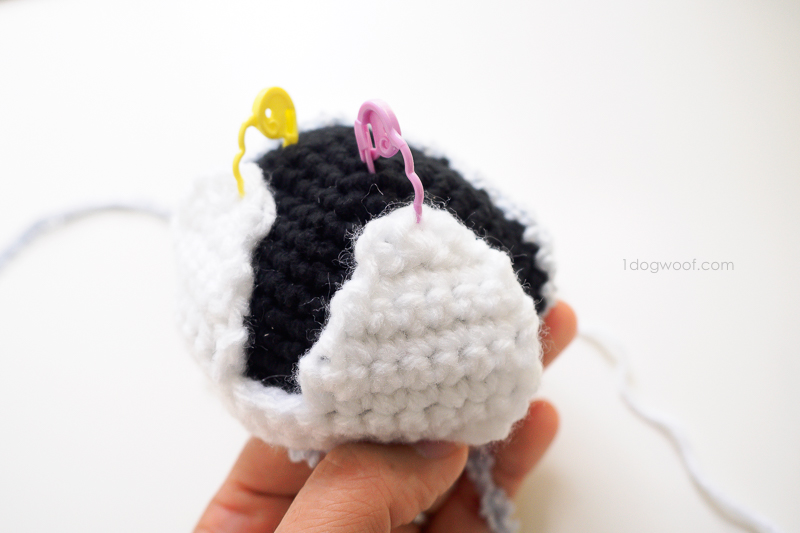
The penguin lovey head has some minor changes in the pattern, mostly so that the head can be closed up completely. In the amigurumi version, the head is left open at the neck with 30 stitches around, and is joined directly to the body. In the lovey, the head is closed up to make a solid ball, and then attached to the center of the granny square. However, the white face patch is the same in both.
The lovey fins are slightly shorter than in the amigurumi version, so they don’t hang as far down on the lovey. Actually, you can choose not to add the fins at all, as many loveys don’t have the extra appendages. I personally like having the fin to hold on to, though. My daughter has loveys with no arms, and she tends to drag them around by the head. I’ve always been enamored with the image of a child dragging a much-loved stuffed friend, like Christopher Robin dragging Pooh Bear by the arms.
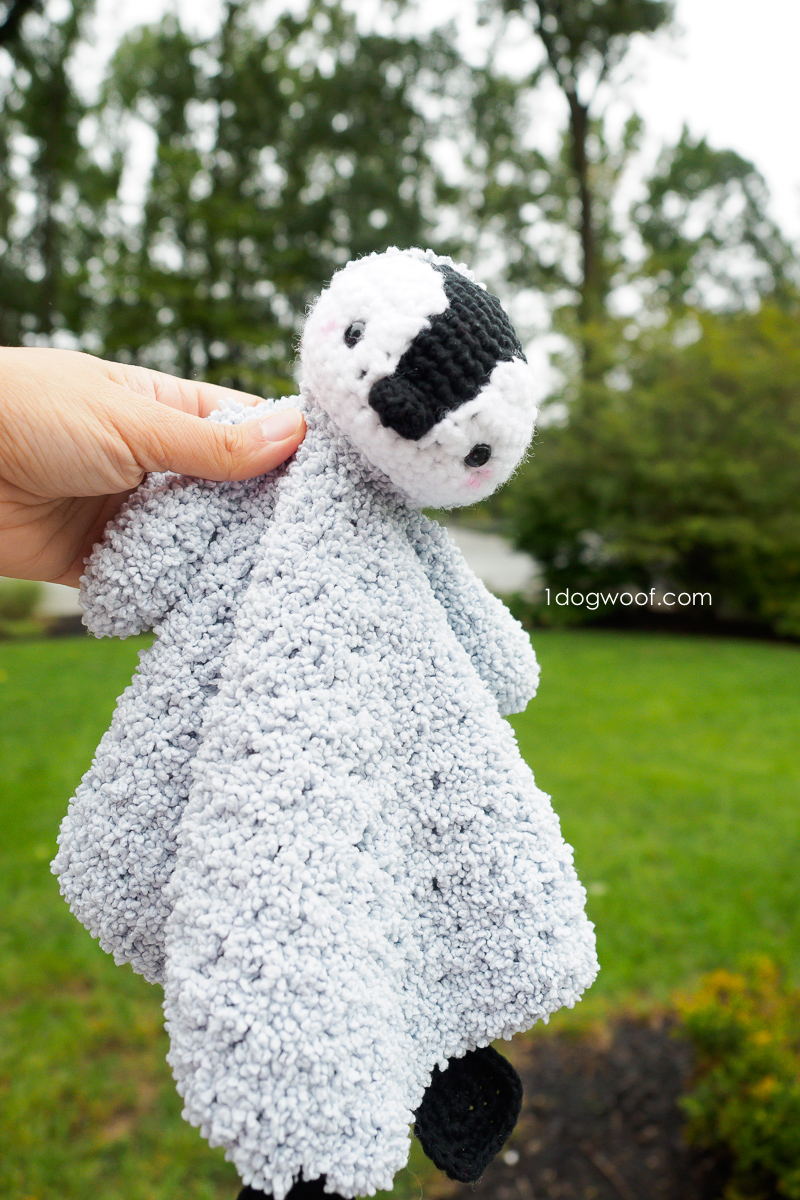
The feet in both projects are identical, so no problems there. I had designed the feet flat for the amigurumi because you never really see a baby penguin’s feet – they’re always tucked under all that chubbiness. In this case, the design decision worked out well, because the flat feet become little taggies on the lovey, providing a bit of extra texture and tactile interest.
Although the kit from Lion Brand includes the yarn for a second scarf, I don’t believe it’s necessary for the lovey. It doesn’t sit well on the lovey, and can be dangerous for infants. Actually, here’s a good time to remind everyone that these toys, whether it’s the stuffed toy or the lovey, should only be played with under adult supervision, especially if given to young children. The scarf especially should always be under the watchful eye of an adult and never given to children in bed. I trust my 5 year old with the penguin amigurumi, but she still doesn’t get to take the scarf to sleep.
The Lion Brand Yarn Baby Penguin Amigurumi Crochet Kit sells for under $20, and even less when it’s on sale. You’ll need a few other supplies, like polyester fiberfill and safety eyes, but if you already have those on hand, you can have an inexpensive yet gorgeous baby shower gift set, with the added bonus of it having been handmade with love. Add in a Penguin Wubbanub Pacifier for even more penguin goodness!
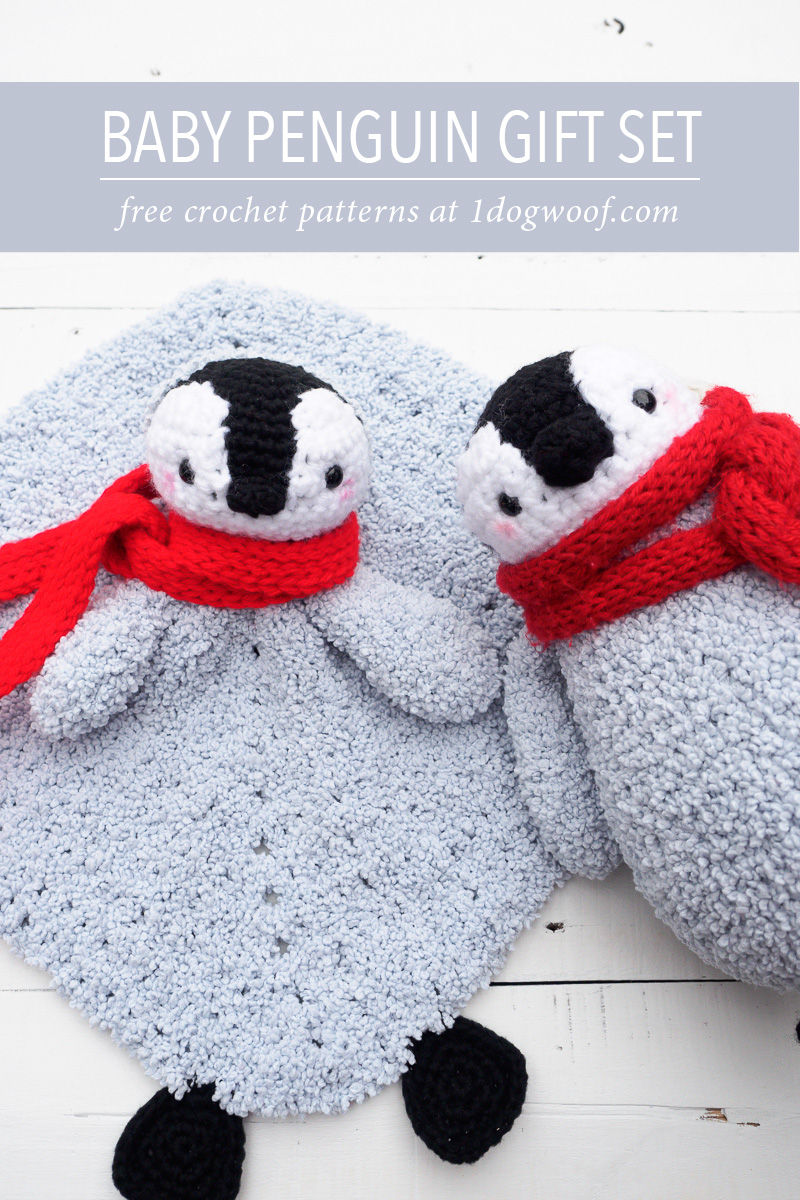
You can purchase the crochet kit directly from Lion Brand Yarn, and it comes with the yarn and a printed copy of the Baby Penguin Amigurumi pattern. You can also find both the amigurumi and lovey patterns in my pattern shops, individually or as a pattern bundle!
——————————————
Get the Baby Penguin Amigurumi Crochet Kit from Lion Brand Yarn
Buy the Baby Penguin Lovey individual pattern from Etsy
Buy the Baby Penguin Amigurumi and Lovey PATTERN BUNDLE from Etsy
Add the Baby Penguin Lovey to your Ravelry queue or purchase directly from Ravelry
——————————————
For more baby gift ideas, you might like the Hedgehog Taggie Teether, a Goldfish Teether, or any of my other amigurumi patterns!

Supplies
- 1 skein of Lion Brand Baby Soft Boucle in Cloud (3.5oz/100g, 120yds/109m)
- 1 skein each of Lion Brand DIYarn in Black, White and Red (1.05oz/300g, 65yds/60m)
- H/5.0mm hook
- scissors
- tapestry needle
- polyester stuffing
- 9mm safety eyes
Abbreviations
- st(s) – stitch(es)
- ch – chain stitch
- sc – single crochet
- inc – increase: work 2 sc in same stitch
- dec – decrease: work 2 sc together
- sk – skip
- hdc – half double crochet
- corner – 1 dc, ch 2, 1 dc
- tr inc – work 3 sc in same stitch
Pattern Notes
- Granny square is blocked to 12″ by 12″.
- Gauge on granny square is approximately 8.5 sts in 4 inches.
- Body parts are worked in continuous rounds, joined rounds or turned rows as indicated in the pattern instructions below.
- Make sure to secure the magic circle with a small knot before weaving in ends.
Baby Penguin Crochet Lovey Pattern Instructions
BODY
- Uses GRAY.
- Worked in continuous rounds.
Round 1: Work 8 sc in magic circle. (8)
Round 2: Ch 2, work 1 dc in same st. Work [1 corner (see Abbreviations) in next st, 1 dc in next st] 3 times. Work 1 corner. Join to first st with sl st. (12)
Round 3: Ch 2, work 1 dc in same st, 1 dc in next st. Work [1 corner (see Abbreviations) in next st, 1 dc in each of next 3 st] 3 times. Work 1 corner, 1 dc in next st. Join to first st with sl st. (20)
Round 4: Ch 2, work 1 dc in same st, 1 dc in each of next 2 st. Work [1 corner (see Abbreviations) in next st, 1 dc in each of next 5 st] 3 times. Work 1 corner, 1 dc in each of next 2 st. Join to first st with sl st. (28)
Round 5: Ch 2, work 1 dc in same st, 1 dc in each of next 3 st. Work [1 corner (see Abbreviations) in next st, 1 dc in each of next 7 st] 3 times. Work 1 corner, 1 dc in each of next 3 st. Join to first st with sl st. (36)
Round 6: Ch 2, work 1 dc in same st, 1 dc in each of next 4 st. Work [1 corner (see Abbreviations) in next st, 1 dc in each of next 9 st] 3 times. Work 1 corner, 1 dc in each of next 4 st. Join to first st with sl st. (44)
Round 7: Ch 2, work 1 dc in same st, 1 dc in each of next 5 st. Work [1 corner (see Abbreviations) in next st, 1 dc in each of next 11 st] 3 times. Work 1 corner, 1 dc in each of next 5 st. Join to first st with sl st. (52)
Round 8: Ch 2, work 1 dc in same st, 1 dc in each of next 6 st. Work [1 corner (see Abbreviations) in next st, 1 dc in each of next 13 st] 3 times. Work 1 corner, 1 dc in each of next 6 st. Join to first st with sl st. (60)
Round 9: Ch 2, work 1 dc in same st, 1 dc in each of next 7 st. Work [1 corner (see Abbreviations) in next st, 1 dc in each of next 15 st] 3 times. Work 1 corner, 1 dc in each of next 7 st. Join to first st with sl st. (68)
Round 10: Ch 2, work 1 dc in same st, 1 dc in each of next 8 st. Work [1 corner (see Abbreviations) in next st, 1 dc in each of next 17 st] 3 times. Work 1 corner, 1 dc in each of next 8 st. Join to first st with sl st. (76)
Round 11: Ch 2, work 1 dc in same st, 1 dc in each of next 9 st. Work [1 corner (see Abbreviations) in next st, 1 dc in each of next 19 st] 3 times. Work 1 corner, 1 dc in each of next 9 st. Join to first st with sl st. (84)
Round 12: Ch 2, work 1 dc in same st, 1 dc in each of next 10 st. Work [1 corner (see Abbreviations) in next st, 1 dc in each of next 21 st] 3 times. Work 1 corner, 1 dc in each of next 10 st. Join to first st with sl st. (92)
Round 13: Ch 2, work 1 dc in same st, 1 dc in each of next 11 st. Work [1 corner (see Abbreviations) in next st, 1 dc in each of next 23 st] 3 times. Work 1 corner, 1 dc in each of next 11 st. Join to first st with sl st. (100)
Fasten off and weave in ends.
HEAD
- Uses GRAY and BLACK.
- Worked in continuous rounds.
Round 1: BLACK- Work 6 sc into a magic circle. (6)
Round 2: BLACK- Work 2 sc in each st around. (12)
Round 3: BLACK- Work [1 sc, inc] 6x. (18)
Round 4: BLACK- Work [2 sc, inc] 6x. (24)
Round 5: GRAY- Work 3 sc. BLACK- Work [inc, 3 sc] 4x, inc, 1 sc. GRAY- Work 2 sc, inc. (30)
Round 6: GRAY- Work 5 sc. BLACK- Work 19 sc. GRAY- Work 6 sc. (30)
Round 7: GRAY- Work 4 sc, inc. BLACK- Work [4, inc] 3x, 4 sc. GRAY- Work inc, 4 sc, inc. (36)
Round 8: GRAY- Work 6 sc. BLACK- Work 22 sc. GRAY- 8 sc. (36)
Round 9: GRAY- Work 5 sc, inc. BLACK- [5 sc, inc] 3x, 4 sc. GRAY- Work 1 sc, inc, 5 sc, inc. (42)
Round 10-12: GRAY- Work 7 sc. BLACK- Work 25 sc. GRAY- Work 10 sc. (42)
Round 13: GRAY- Work 5 sc, dec. BLACK- [5 sc, dec] 3x, 4 sc. GRAY- Work 1 sc, dec, 5 sc, dec. (36)
Round 14: GRAY- Work 4 sc, dec. BLACK- [4 sc, dec] 3x, 4 sc. GRAY- Work dec, 4 sc, dec. (30)
Round 15: GRAY- Work 3 sc, dec. BLACK- [3 sc, dec] 3x, 2 sc, dec. GRAY- Work 4 sc, dec. (24)
Round 16: GRAY- Work [2 sc, dec] 6x. (18)
- Weave in any black ends.
- Attach face to head, see directions for assembly below.
Round 17: GRAY- Work [1 sc, dec] 6x. (12)
- Stuff the head
Round 18: GRAY- Work 6 dec. (6)
- Cut off the GRAY yarn, leaving a long tail for sewing to the body.
- Whip stitch through each remaining 6 stitches, pull tight to close. Secure with a knot.
FACE
- Uses WHITE.
- Worked in rows.
Row 1: (Leave a long tail for attaching to the head) Ch 16. Turn.
Row 2: Starting from the 2nd chain from hook, work 1 sc in each ch across. Turn. (15)
Row 3: Ch 1. Work inc, 13 sc, inc. Turn. (17)
*Row 4: (should be working from the outer edge inwards) Ch 1. Work 7 sc. Turn. (7)
Row 5: Ch 1. Work inc, 6 sc. Turn. (8)
Row 6: Ch 1. Work 6 sc, dec. Turn. (7)
Row 7: Ch 1. Skip 1. Starting with the next st, work 6 sc. Turn. (6)
Row 8: Ch 1. Skip 1. Starting with the next st, work 5 sc. Turn. (5)
Row 9: Do not work a chain. Work 3 hdc in 3rd st. Sl st in last st.
- Fasten off and weave in ends.
- Starting with a standing sc at the other outer edge after Row 3, repeat Rows 4-9 to make the other eye “patch”. Fasten off and weave in ends.
NOSE
- Uses BLACK.
- Worked in joined rounds.
Round 1: (Leave a tail to close up the front of the nose) Ch 8. Join to first ch with sl st. (8)
Round 2-3: Ch 1. Work 1 sc in each st around. Join to first st with sl st. (8)
- Fasten off, leaving a tail to attach nose to head.
- Use the beginning tail to sew/close up the front of the nose and weave in ends.
FEET
- Uses BLACK.
- Worked in joined rounds.
Round 1: Work 6 sc into a magic circle. Join to first st with sl st. (6)
Round 2: Ch 1. Work 2 sc in each st around. Join to first st with sl st. (12)
Round 3: Ch 1. Work [3 sc, tr inc] 3x. Join to first st with sl st. (18)
Round 4: Ch 1. Work [5 sc, tr inc] 3x. Join to first st with sl st. (24)
- Fasten off, leaving a tail to attach to body.
SIDE FIN
- Uses GRAY.
- Worked in continuous rounds.
Round 1: Work 6 sc into a magic circle. (6)
Round 2: Work [1 sc, inc] 3x. (9)
Round 3: Work [2 sc, inc] 3x. (12)
Round 4-6: Work 1 sc in each st around. (12)
Round 7: Work [2 sc, dec] 3x. (9)
Round 8-11: Work 1 sc in each st around. Ch 1. (9)
Round 12: Work [1 sc, dec] 3x. (6)
- Do not stuff.
- Squeeze round together to close the fin: Working through all 4 loops, work 3 sc across.
- Fasten off, leaving a tail to attach to body.
ASSEMBLY
FACE to HEAD:
- Position the face centered on the black part of the head, with the bottom of the face lined up with the bottom of the head. Use clips or stitch markers to hold in place if necessary.
- Sew the face to the head using a whip stitch.
- Once the face is secured to the head, sew the nose directly to the black part of the head, in between the two white eye patches. You can create a round or oblong nose based on how you sew it to the head. Do not stuff the nose.
- Attach the safety eyes between Rows 5 and 6 of the face, approximately 3 stitches in from the inside edge of the eye patch. The eyes are positioned slightly higher than the nose.
HEAD to BODY:
- Position the head in the center of the granny square, facing one of the corners of the square.
- Use the tail from the head piece and sew to the granny square in a circle about 1.5″ to 2.0″ in diameter. Weave in ends.
FIN to BODY:
- Align the fins on either side of the body, just under where the head joins the body.
- Sew the fin to the body.
FEET TO BODY:
- Position each feet so that the back corner of the triangle (where the join/tail is) is lined up approximately 1.5″ from the corner of the body that the head is facing.
- Sew the feet to the body.
SCARF
- Uses Red.
- Worked in rows.
- Make sure to keep the slip stitches loose!
Row 1: Ch 119. Turn.
Row 2: Starting from the 2nd ch from hook, work 1 sl st in each ch across. Turn.
Row 3: Ch 1. Work 1 sl st into the back loop of each st across. Turn.
Row 4: Ch 1. Work 1 sl st into the back loop of each st across. Turn.
Row 5: Ch 1. Work 1 sl st into the back loop of each st across. Turn.
Row 6: Ch 1. Work 1 sl st into the back loop of each st across.
- Fasten off.
- For the fringe, cut 18 lengths of yarn, each approximately 8 inches in length. Holding 3 lengths of yarn together for each set of fringe, knot 3 sets on each end of the scarf.
- After tying, cut ends evenly.
OPTIONAL:
- Use a small paintbrush to add a bit of blush (blush or lipstick works!) below the eyes.
Will you be making individual penguins or gift sets this holiday season? Be sure to snap a pic and share it with my on Instagram by tagging it with #1dogwoof and #babypenguinamigurumi. I can’t wait to see your penguin families!


What a cool idea!! Thank you for sharing the tutorial!!
Penguins don’t have fins, they are wings, or flippers 🙂
Hello, I have two problems with the body instructions :
For each row exept the first, there are “Ch 2, work 1 dc in same st”, what is the “same st” ? Is it the last stich in the last row ?
And at the end of the 2nd round whe have 12 stitches but with the 3th instruction we need more than 12, for me I think we need 16 stitches :
Round 3: Ch 2, work 1 dc in same st, 1 dc in next st. Work [1 corner (see Abbreviations) in next st, 1 dc in each of next 3 st] 3 times. Work 1 corner, 1 dc in next st. Join to first st with sl st. (20)
I count needed stitch like this :
= dc + dc + (corner + dc + dc + dc ) * 3 + corner + dc
= 1 + 1 + (1 + 1 + 1 + 1) * 3 + 1 + 1
= 2 + 4*3 + 2
= 2 + 12 + 2
= 16
Can you help me ? 🙂
a corner isn’t one stitch, the combination is in the initial part of the pattern, 1dc ch 2, 1 dc
Please can you clarify the feet instructions? I get the 3sc but then I’m confused by the treble increase. if I just repeat the (3sc tr inc) 3 times I only get 15 stitches… what am I doing wrong? Thanks
Hi Claire, the “tr inc” means to work 3 sc in the same stitch. It looks like I didn’t put that into the abbreviations, so I will do that right now!
Hi ChiWei,
Looking over the pattern instructions, in the “Body” area, your row 12 is listed 2x. The last one should be “row 13”.
Hi Jacqueline, thank you for letting me know! Should be fixed now.