
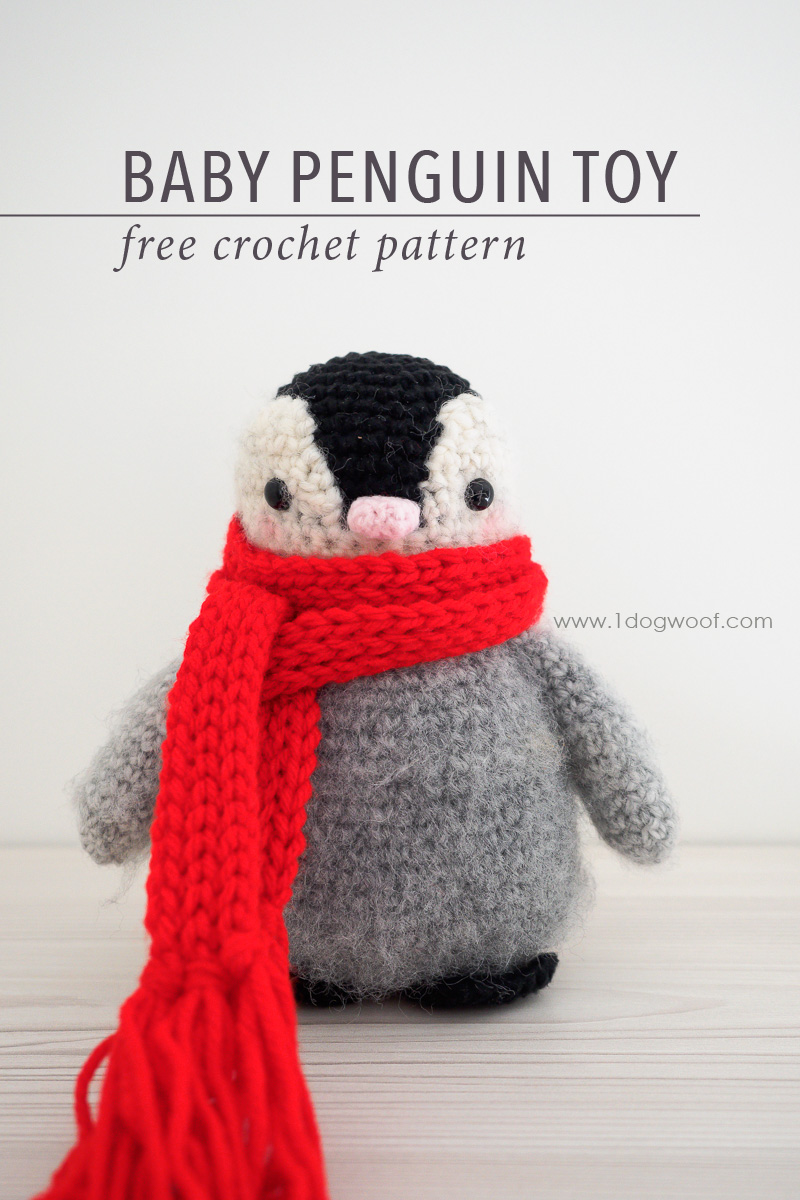
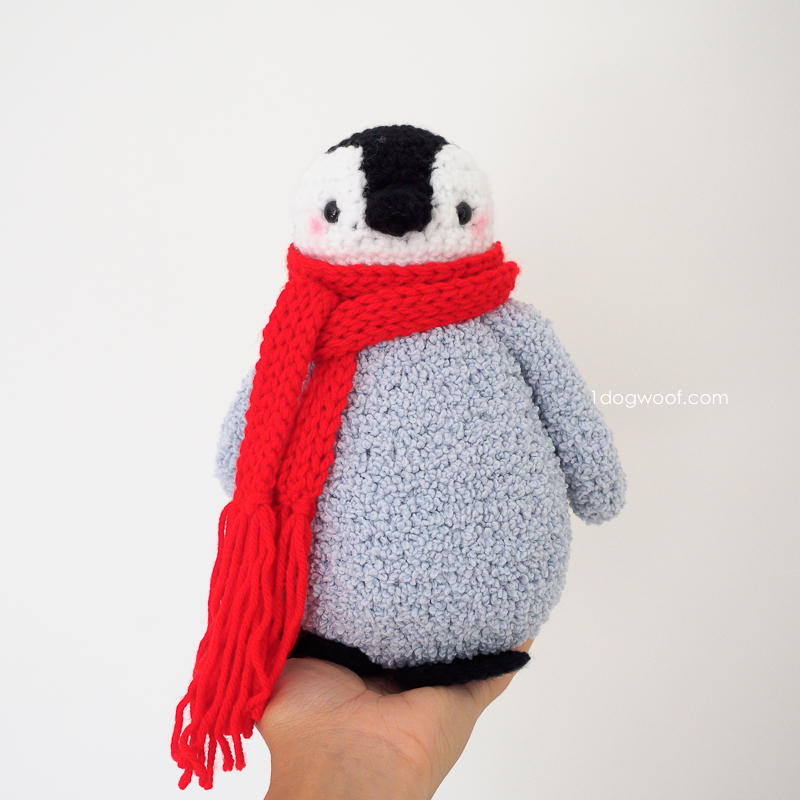
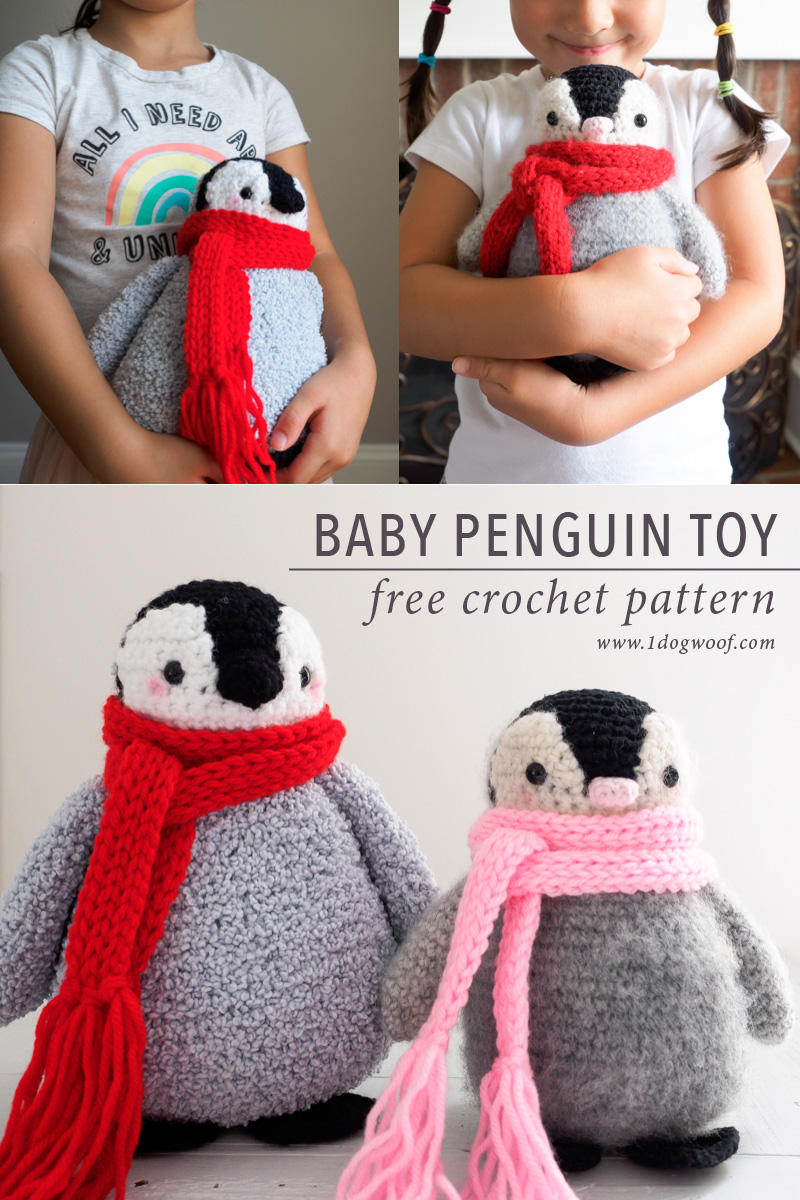
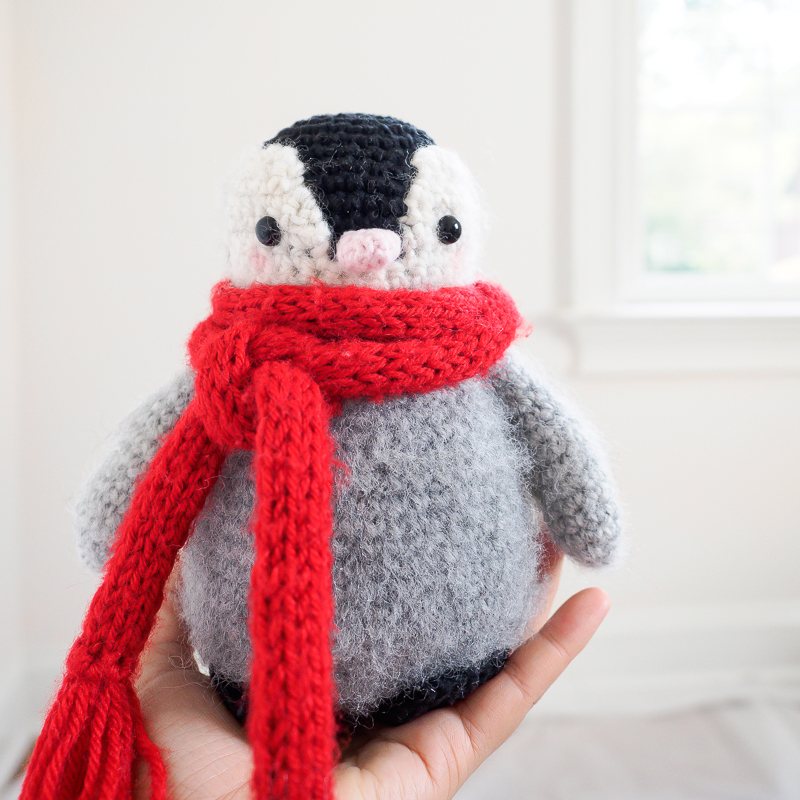
I think I’m a sucker for marine animals. And baby penguins are the newest addition to the gang! This baby penguin amigurumi is a ball of fluff, oozing coziness with his festive red scarf and ready to hand out warm hugs on cold winter days.
As with Stanley Duck, I made more than one baby penguin toys so I could experiment with different yarns and different techniques. And like Stanley, each penguin came out with their own personalities. It’s so interesting to mix and match different types of yarn, with slightly different variations in weight and feel.
Soft and Mellow with Scarfie Yarn
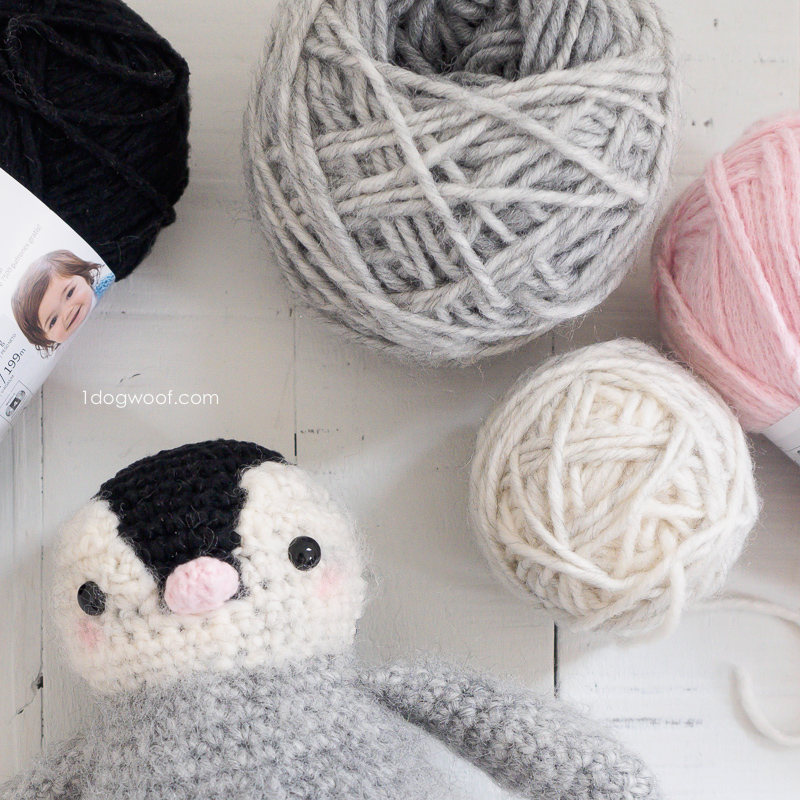
The first penguin is mainly made from Lion Brand Scarfie Yarn. I am really drawn to the warm tones of the Silver/Cream colorway in Scarfie. This yarn is self-striping, which means it has swaths of silver that slowly transition into a soft cream, and then transitions back into the silver. I find the gray to be perfect for representing a penguin’s baby fuzz, while the cream softens the white areas of the face. And those color variations in the transitions are great for adding a bit of extra texture in an otherwise solid gray body. Best of all, because the yarn is a bit fuzzy to begin with, you can brush it lightly with a bristle brush to really bring out that soft halo look for a baby penguin.

To use the Scarfie yarn, you need to separate the silver parts from the cream so they can be used for different parts of the penguin’s body. Some of the yarn in the middle of the transitions may be too light for the gray or too gray for the cream, and will end up not being used at all. Start with the end on the outside of the ball, not the one in the center. Unwind that yarn and rewind it into a cake until the color starts to transition. Here you’ll have to decide if you want to use the transition colors or not. You can keep winding, or cut out the transition bits until you get to a more solid cream or silver. Then wind up the next solid color into a separate cake. Since the penguin is so small, you’ll probably only need 2 cakes, 1 of each color, to complete the toy. I guess this isn’t the best use for a large skein of Scarfie, but I absolutely love the results.
Scarfie yarn is a level 5 on the Craft Yarn Council Standard Yarn Weight System, which makes it slightly bulkier than the worsted weight yarns, which is level 4. However, each yarn weight level has their own variations, and I found that Scarfie works fairly well with a level 4 yarn, especially ones on the thicker side, like DIYarn or Vanna’s Choice. And DIYarn is only $0.99 per ball!
Since the stitches worked up using Scarfie are fairly tight, I had no problem using the no-clump cluster stuffing for all the body parts. I find the no-clump stuffing works so much better for small parts and keeps everything squishy and extra huggable. Learn more about the types of stuffing I like to use for amigurumi in the video below.
Once the whole penguin is put together, you can use a bristle brush to purposely fuzz up the Scarfie yarn. I have used a dog slicker brush like this one in the past for brushing out the beard in my Santa Amigurumi, but I couldn’t find it in the chaos of moving, so I just used my bristle hair brush (similar to this brush on Amazon), and it worked just as well! You want to brush in small, short strokes, purposely snagging the yarn and bringing up the fuzz in the yarn. Brushing in too long of a stroke makes the fuzz clump together, which you don’t want. Instead, you just want to see a slight halo effect all around. You can brush the body, the arms/fins, and even the head where you used Scarfie. DIYarn, and Vanna’s Choice will not fuzz up as well in this case, so just stick to the Scarfie parts, and you’ll have a baby penguin that just oozes winter coziness!
Hearty and Huggable with Baby Soft Boucle
Over the summer, I made Stanley Duck using Lion Brand Baby Soft Boucle, which is a yarn with tiny loops on it and a soft chenille feel. It worked great for Stanley and I thought to try it on this penguin as well.
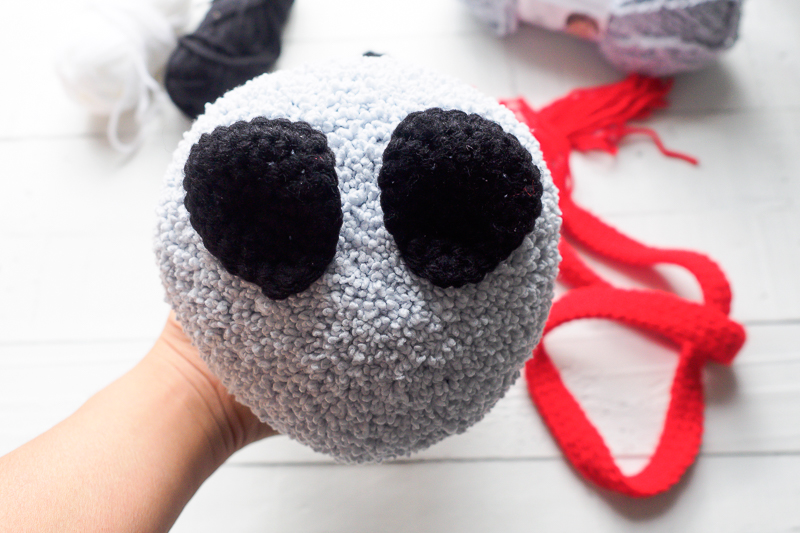
The Baby Soft Boucle gray colorway is a much cooler gray tone than the Scarfie silver. It’s almost a grayish blue, so it’s best to find a yarn in a cool white, like DIYarn in White, to match the cool undertones. In case you’re wondering, I chose not to use Baby Soft Boucle in White because the face doesn’t need to be as fluffy as the body. And any worsted weight yarn in Black will work for the head. Here I used DIYarn in Black.
Working with boucle yarn can be a bit of a challenge, as it’s much more difficult to see the stitches you’re working in. You have to feel your way to each stitch, and to find the working point of each single crochet with your fingers instead of your eyes. It’s much easier to do this when the stitches are large and loose, but since we’re matching up to worsted weight yarn in the head, and the whole thing needs to be stuffed, the boucle needs to be worked in the same hook size and stay fairly tight. Below is a video to show how I worked with Baby Soft Boucle for Stanley Duck, how I used stitch markers to help me identify the beginning and end of each round, and how I feel for each stitch around. The gauge I used on Stanley was much looser than the one I used for the penguin, and that’s just a matter of learning to work with the yarn each time you use it!
If you work your Baby Boucle body stitches tight enough, you can still use the no-clump stuffing for the body. For me, I know the stitches are not nearly as tight as the ones I used when crocheting with Scarfie, and that these penguins will be hugged so much, I chose to use regular polyfill stuffing to prevent any stuffing from coming out any loose Boucle stitches. The regular polyester fiberfill also works well to give this larger penguin more shape, since the Boucle body is much more floppy than the Scarfie body.
In this case, once you’re done with the penguin, you’re done! There’s no brushing needed, since the Baby Boucle already has the “fuzzy” look built in!
Finishing Touches
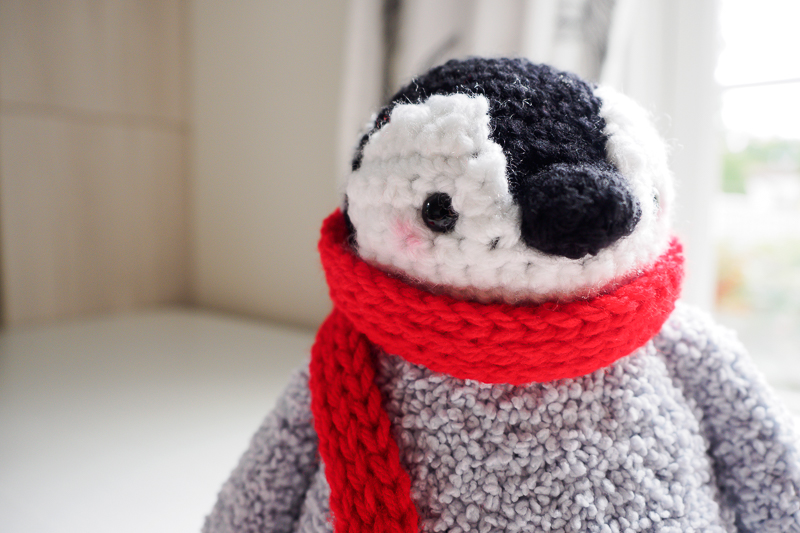
For both penguins, you can add a spot of blush to the cheeks to give it the feeling that it just came in from playing in the snow. I know some people use makeup blush, but I realized I don’t have any! So, I dabbed a bit of lipstick onto a q-tip, put a small dot of it on the penguin’s cheeks right below and slightly outside of the eyes, then used my finger to blur it in. That extra touch makes it so much sweeter, doesn’t it?
Below, I’ve shared the full pattern for the baby penguin amigurumi. Both penguins use the same pattern, the only difference is the yarn used. You can make this penguin using yarn from your stash, or if you’d like, you can purchase the Baby Penguin kit from Lion Brand Yarn which includes all the yarn you need to make the Baby Boucle version of the penguin, along with printed pattern instructions. The kit actually comes with enough yarn to make 2 penguins, complete with the red scarf!
You can also purchase a PDF of the pattern from my pattern shops for easy downloading and printing.
——————————————
Add to your queue on Ravelry or purchase from Ravelry.
——————————————
Other Amigurumi Toy Patterns You Might Like
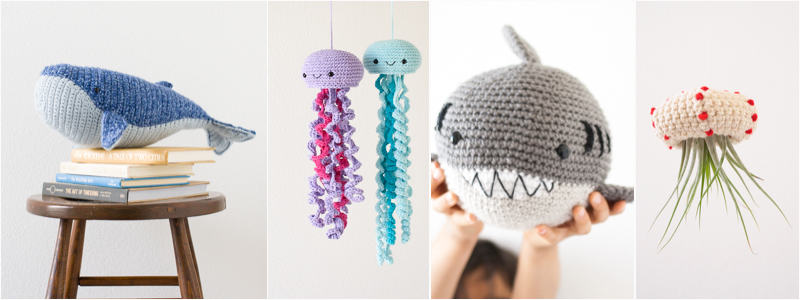
If you’re a sucker for marine animals like I am, you might enjoy a few of these other crochet patterns for water-loving creatures. What other animals am I missing from my aquarium? Hop onto Instagram and let me know!
——————————————
——————————————
Baby Penguin Amigurumi Toy Crochet Pattern
Supplies for Baby Soft Boucle Penguin
- 1 skein of Lion Brand Baby Soft Boucle in Cloud (3.5oz/100g, 120yds/109m)
- 1 skein each of Lion Brand DIYarn in Black, White and Red (1.05oz/300g, 65yds/60m)
- H/5.0mm hook
Supplies for Scarfie Penguin
- 1 skein of Lion Brand Scarfie in Silver/Cream (5.3oz/150g, 312yds/285m)
- 1 skein each of Lion Brand DIYarn in Black, and Red (1.05oz/300g, 65yds/60m) (In the photo, I used some scrap pink yarn for the nose, but it can easily be black)
- H/5.0mm hook
- Slicker brush
Supplies for Both Penguins
- scissors
- tapestry needle
- polyester stuffing
- 9mm safety eyes
Abbreviations
- st(s) – stitch(es)
- ch – chain stitch
- sc – single crochet
- tr inc – triple increase: work 3 sc in same stitch
- inc – increase: work 2 sc in same stitch
- dec – decrease: work 2 sc together
- sk – skip
- hdc – half double crochet
- tr inc – work 3 sc in same stitch
Pattern Notes
- Baby Soft Boucle penguin is approximately 10 inches high.
- Scarfie penguin is approximately 8 inches high.
- Body parts are worked in continuous rounds, joined rounds or turned rows as indicated in the pattern instructions below.
- Make sure to secure the magic circle with a small knot before weaving in ends.
- You can use a smaller hook to achieve a tighter gauge.
Baby Penguin Crochet Pattern Instructions
BODY
- Uses GRAY.
- Worked in continuous rounds.
Round 1: Work 6 sc into a magic circle. (6)
Round 2: Work 2 sc in each st around. (12)
Round 3: Work [3 sc, tr inc] 3x. (18)
Round 4: Work [5 sc, tr inc] 3x. (24)
Round 5: Work [7 sc, tr inc] 3x. (30)
Round 6: Work [8 sc, tr inc, 1 sc] 3x. (36)
Round 7: Work [9 sc, tr inc, 2 sc] 3x. (42)
Round 8: Work [10 sc, tr inc, 3 sc] 3x. (48)
Round 9: Work 1 sc in each st around. (48)
Round 10: Work [7 sc, inc] 6x. (54)
Round 11: Work 1 sc in each st around. (54)
Round 12: Work 18 sc, inc, 5 sc, inc, 29 sc. (56)
Round 13: Work 1 sc in each st around. (56)
Round 14: Work 50 sc, dec, dec, 2 sc. (54)
Round 15-16: Round 1 sc in each st around. (54)
Round 17: Work [7 sc, dec] 6x. (48)
Round 18-19: Work 1 sc in each st around. (48)
Round 20: Work [6 sc, dec] 6x. (42)
Round 21-22: Work 1 sc in each st around. (42)
Round 23: Work [5 sc, dec] 6x. (36)
Round 24-25: Work 1 sc in each st around. (36)
Round 26: Work [4 sc, dec] 6x. (30)
Round 27: Work 1 sc in each st around. (30)
- Add stitch marker on last st to indicate the back of the body.
- Fasten off, weave in ends.
- Stuff the body.
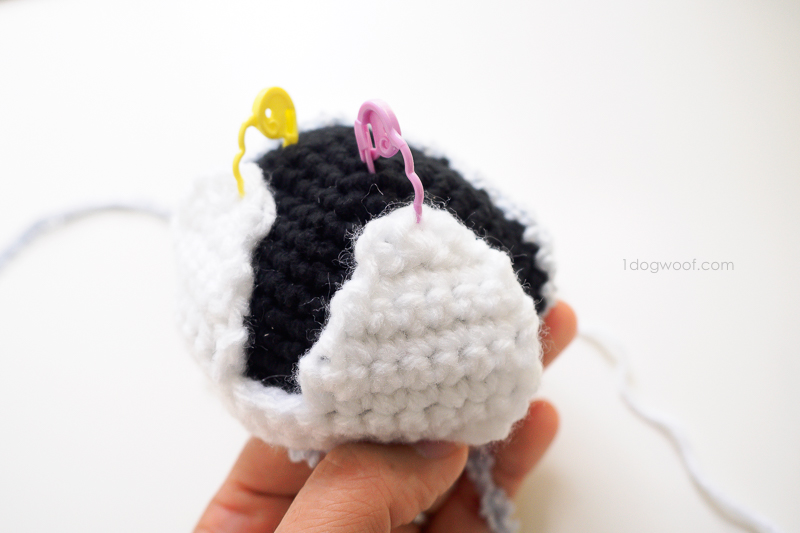
HEAD
- Uses GRAY and BLACK.
- Worked in continuous rounds.
Round 1: BLACK- Work 6 sc into a magic circle. (6)
Round 2: BLACK- Work 2 sc in each st around. (12)
Round 3: BLACK- Work [1 sc, inc] 6x. (18)
Round 4: BLACK- Work [2 sc, inc] 6x. (24)
Round 5: GRAY- Work 3 sc. BLACK- Work [inc, 3 sc] 4x, inc, 1 sc. GRAY- Work 2 sc, inc. (30)
Round 6: GRAY- Work 5 sc. BLACK- Work 19 sc. GRAY- Work 6 sc. (30)
Round 7: GRAY- Work 4 sc, inc. BLACK- Work [4 sc, inc] 3x, 4 sc. GRAY- Work inc, 4 sc, inc. (36)
Round 8: GRAY- Work 6 sc. BLACK- Work 22 sc. GRAY- 8 sc. (36)
Round 9: GRAY- Work 5 sc, inc. BLACK- [5 sc, inc] 3x, 4 sc. GRAY- Work 1 sc, inc, 5 sc, inc. (42)
Round 10-12: GRAY- Work 7 sc. BLACK- Work 25 sc. GRAY- Work 10 sc. (42)
Round 13: GRAY- Work 5 sc, dec. BLACK- [5 sc, dec] 3x, 4 sc. GRAY- Work 1 sc, dec, 5 sc, dec. (36)
Round 14: GRAY- Work 4 sc, dec. BLACK- [4 sc, dec] 3x, 4 sc. GRAY- Work dec, 4 sc, dec. (30)
- Fasten off the GRAY, leaving a long tail for sewing to the body.
- Secure the BLACK end.
FACE
- Uses WHITE.
- Worked in rows.
Row 1: (Leave a long tail for attaching to the head) Ch 16. Turn.
Row 2: Starting from the 2nd chain from hook, work 1 sc in each ch across. Turn. (15)
Row 3: Ch 1. Work inc, 13 sc, inc. Turn. (17)
*Row 4: (should be working from the outer edge inwards) Ch 1. Work 7 sc. Turn. (7)
Row 5: Ch 1. Work inc, 6 sc. Turn. (8)
Row 6: Ch 1. Work 6 sc, dec. Turn. (7)
Row 7: Ch 1. Skip 1. Starting with the next st, work 6 sc. Turn. (6)
Row 8: Ch 1. Skip 1. Starting with the next st, work 5 sc. Turn. (5)
Row 9: Do not work a chain. Work 3 hdc in 3rd st. Sl st in last st.
- Fasten off and weave in ends.
- Starting with a standing sc at the other outer edge after Row 3, repeat Rows 4-9 to make the other eye “patch”. Fasten off and weave in ends.
NOSE
- Uses BLACK.
- Worked in joined rounds.
Round 1: (Leave a tail to close up the front of the nose) Ch 8. Join to first ch with sl st. (8)
Round 2-3: Ch 1. Work 1 sc in each st around. Join to first st with sl st. (8)
- Fasten off, leaving a tail to attach nose to head.
- Use the beginning tail to sew/close up the front of the nose and weave in ends.
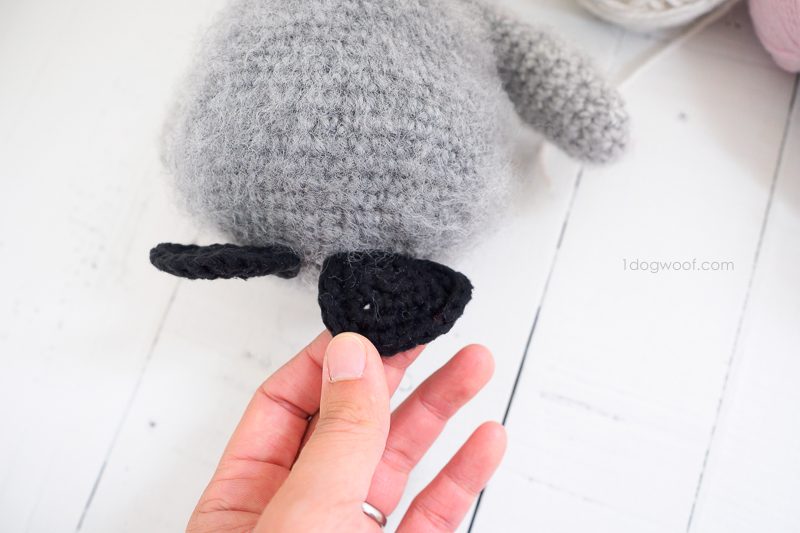
FEET
- Uses BLACK.
- Worked in joined rounds.
Round 1: Work 6 sc into a magic circle. Join to first st with sl st. (6)
Round 2: Ch 1. Work 2 sc in each st around. Join to first st with sl st. (12)
Round 3: Ch 1. Work [3 sc, tr inc] 3x. Join to first st with sl st. (18)
Round 4: Ch 1. Work [5 sc, tr inc] 3x. Join to first st with sl st. (24)
- Fasten off, leaving a tail to attach to body.
SIDE FIN
- Uses GRAY.
- Worked in continuous rounds.
Round 1: Work 6 sc into a magic circle. (6)
Round 2: Work [1 sc, inc] 3x. (9)
Round 3: Work [2 sc, inc] 3x. (12)
Round 4-5: Work 1 sc in each st around. (12)
Round 6: Work [3 sc, inc] 3x. (15)
Round 7-8: Work 1 sc in each st around. (15)
Round 9: Work [3 sc, dec] 3x. (12)
Round 10-11: Work 1 sc in each st around. (12)
Round 12: Work [2 sc, dec] 3x. (9)
Round 13-15: Work 1 sc in each st around. Ch 1. (9)
- Stuff lightly.
- Squeeze round together to close the fin: Working through all 4 loops, work 4 sc across.
- Fasten off, leaving a tail to attach to body.
ASSEMBLY
FACE to HEAD:
- Position the face centered on the black part of the head, with the bottom of the face lined up with the bottom of the head. Use clips or stitch markers to hold in place if necessary.
- Sew the face to the head using a whip stitch.
- Once the face is secured to the head, sew the nose directly to the black part of the head, in between the two white eye patches. You can create a round or oblong nose based on how you sew it to the head. Do not stuff the nose.
- Attach the safety eyes between Rows 5 and 6 of the face, approximately 3 stitches in from the inside edge of the eye patch. The eyes are positioned slightly higher than the nose.

HEAD to BODY:
- The stitch marker added at the end of the BODY section indicates the back of the body, so the front of the body is the side of the triangle opposite the stitch marker.
- Align the front of the head with the front of the body.
- Sew the head to the body using the mattress stitch, stuffing the head before closing the seam.
FIN to BODY:
- Align the fins on either side of the body, one row down from where the head joins the body.
- Sew the fin to the body.
FEET to BODY:
- Position each feet so that the back corner of the triangle (where the join/tail is) is lined up approximately on Round 3 of the body, with both feet pointing forwards. (Figure 3)
- Sew the feet to the body.
SCARF
- Uses Red.
- Worked in rows.
- Make sure to keep the slip stitches loose!
Row 1: Ch 119. Turn.
Row 2: Starting from the 2nd ch from hook, work 1 sl st in each ch across. Turn.
Row 3: Ch 1. Work 1 sl st into the back loop of each st across. Turn.
Row 4: Ch 1. Work 1 sl st into the back loop of each st across. Turn.
Row 5: Ch 1. Work 1 sl st into the back loop of each st across. Turn.
Row 6: Ch 1. Work 1 sl st into the back loop of each st across.
- Fasten off.
- For the fringe, cut 18 lengths of yarn, each approximately 8 inches in length. Holding 3 lengths of yarn together for each set of fringe, knot 3 sets on each end of the scarf.
- After tying, cut ends evenly.
OPTIONAL:
- Use a small paintbrush to add a bit of blush (blush or lipstick works!) below the eyes.
Check out my pattern shops on Ravelry and Etsy where you can purchase printable PDFs of my latest crochet patterns. These PDFs are formatted without comments or ads, and have instructional photos at the bottom for optional printing.
I sometimes include affiliate links in my supply lists. Purchasing from these merchants earns me a small commission with no extra cost to you, and goes towards supporting One Dog Woof.
Please be respectful and do not sell or distribute this pattern in any way, especially as your own. Instead, share the original blog post link! You can sell finished products made from this pattern by giving credit to One Dog Woof as the pattern designer and linking to the blog post. If you have any questions regarding distribution or translation of this pattern, please see my Terms of Use. Thank you for your consideration!


Very Cute! I am planning to make this as a present for my niece. Thank you for sharing it with us.
This is the cutest thing ever! I wish I had the patience to knit something so detailed!
<3 A N D R E A | THEBEAUTYDOJO.COM
I am stuck on the head part. Everything else is fine. It works in the round so how is the black separated around the eyes? Please help!
Hi,
I love this new pattern! Thanks. Have successfully completed the body and the fins but I can’t work out the head. For some reason, the grey doesn’t seem to look right. I can’t get it symmetrical. Is it supposed to be symmetrical?? Can you please post a picture of the back of the head so I can see what it looks like? Thank you.
I’m having the same issue with the back of the head. The grey is staggered through the black. Please post a picture of the back of head please!
Thanks!
I’m having the same problem with the head…the grey gets all weird on the left side. Any suggestions?
Hi Erin,
I’m not sure what you mean. There’s a white section that’s made separately and sewn onto the black part.
Hi Anna,
To be honest, these directions were as symmetrical as I could get it. Mine isn’t perfectly symmetrical either. Let me see if I can find a picture and update the post.
Hi
Planning to make this for my daughter for Christmas, as she loves Happy Feet. Is this pattern using Uk terms or USA terms?
I am having a hard time finding the wholes. My count was totally off, so I ripped it out and began again. Then I went on the Web and found your video showing how to use the boucle yarn. However, you used a larger crochet hook there. I thought maybe the pattern which came with the kit was wrong so I bought another one. Of course, it still uses the size H. I am trying again, but still struggling. What would happen if I used a larger hook?
Wooo your work it’s soo great
Hello! I am having great difficulty on the head, as well. I keep ending up with almost a “cinnamon roll” look with the gray and white… any idea what I am doing wrong? Are there step-by step photos available at all?
Thank you!
Hi Chi Wei. This little guy would be loved forever! So adorable. Thanks for sharing your tutorial, our readers will love it. I’ve included your post in our latest craft inspiration roundup. https://craftylikegranny.com/penguin-craft/ Cheers Jodie 🙂
Thank you so much for this pattern. This was my first crochet animal attempt, and I found your instructions very easy to follow. I love all of your designs. My niece loves polar bears. So, I thought this little guy would be perfect for her collection. I also chose a homespun type of yarn which was very difficult to keep count. The key for me was using my stitch markers and a bunch of them! Lol once I did that, I was never off on the rows. Thanks again!
spent hours trying to figure out and crochet and unravelling the head – what is wrong with the pattern
hello i was looking online and i came across this https://www.lovecrochet.com/baby-penguin-amigurumi-crochet-pattern-by-1dogwoof
i don’t know if you have stumbled upon this before but someone else is selling your pattern.
Did you ever get help on the head ? I’ve ripped it out numerous times! Getting frustrated….
Hello!Air behind a cold front is at unhealthy levels because of the wildfire smoke. Colder air is dense and naturally likes to sink, which helps drag smoke in the upper levels of the atmosphere (above 20,000 ft.) down to near the ground, causing air quality issues.
Probably use a $100 Target Gift Card pretty easily right now! Today the sponsors and friends of A Night Owl are joining up to bring you an amazing $100 Target Gift Card Giveaway! I love Target, you love Target, I can’t get out of Target with spending less than $100, so what are you waiting for? Enter today via the Rafflecopter form below!cat beds
Thanks for writing this awesome article and examples helped alot..please keep on writing and please tell us how to create custom sitemap for blogger bcuz now days google search console don’t update sitemap and takes a lot time in indexing.senior dog
The count on the feet is not right. It shouldn’t go from (3 sc, tr in) x 3. It should go to (4 sc, tr in) x 3. I ripped out the feet so many times frustrated. For everyone inquiring, the head lineup isn’t going to look as shown either. I don’t know why, but for me that’s not too huge a deal. The feet however pissed me off! I appreciate that this is a free pattern, but it should still be checked and double checked after written to make sure there aren’t any flaws.
Sorry, what I meant is it should go from 3 to 4 sc, not 3 to 5. There aren’t enough stitches for that!
Hi,,I almost had pancakes too, I was reallllyyy craving them this morning but had overnight oats in the fridge so I resisted, plus I was still tired so no extra effort for me today 😉 I love all the mexican inspired food you guys had, enjoy your sunday!Best dog food for bulldogs
The fact that the Sphynx is a hairless cat is only a small part of why we are Sphynx lovers. Sphynx cats and Sphynx kittens have very unique personalities. I really do not consider myself an owner of Sphynx cats, because really, my Sphynx cats and Sphynx kittens own me! Sphynx cats and Sphynx kittens love their owners unconditionally. The Sphynx has so much love to give and is willing to love anyone that will allow them into their lives.Sphynx Cats
Thanks for the amazing post but i’m looking to put a message to all my posts not a signature. Its the same thing? Thanks.pet friendly clubs
Hello, The fact that the Sphynx is a hairless cat is only a small part of why we are Sphynx lovers. Sphynx cats and Sphynx kittens have very unique personalities. I really do not consider myself an owner of Sphynx cats, because really, my Sphynx cats and Sphynx kittens own me! Sphynx cats and Sphynx kittens love their owners unconditionally. The Sphynx has so much love to give and is willing to love anyone that will allow them into their lives.Sphynx Cats
Hi, The fact that the Sphynx is a hairless cat is only a small part of why we are Sphynx lovers. Sphynx cats and Sphynx kittens have very unique personalities. I really do not consider myself an owner of Sphynx cats, because really, my Sphynx cats and Sphynx kittens own me! Sphynx cats and Sphynx kittens love their owners unconditionally. The Sphynx has so much love to give and is willing to love anyone that will allow them into their lives.Sphynx Cats
Hello, Are you a dog lover?
Pawsitive is an online dog store in Australia, where profits help with animal welfare.
Exclusive product range | Free Shipping | Money-Back Guarantee on all products!
A true lifestyle brand, an honest movement for dog lovers.dog store in australia
Love this post. I have kids and a dog.. and on top of that I am interior designer that is OCD! But my puppy needs to be inside and be a part of the family. Hence no white linen sofa.pomeranian for sale
I love this! So creative to make a dog house. ???? I love that stencil too! I’ve been trying to win it on EVERY cutting edge stencil giveaway I see.Lisa
Hi, What I hate is when the meals dont come out at the same time….and you have your food in front of you but you cant eat it because the rest of the table isnt served. By the time the other dishes arrive, you food is cold. arg.dachshund gifts
I did them in my main living area and they look horrible. I did them just like you did and everything scratches them! They were so beautiful at first and I’m really bummed. We plan on covering them with the tile that looks like wood now that I have a great dane.royal pet portraits
I really do not consider myself an owner of Sphynx cats, because really, my Sphynx cats and Sphynx kittens own me! Sphynx cats and Sphynx kittens love their owners unconditionally. The Sphynx has so much love to give and is willing to love anyone that will allow them into their lives. For more visit this site mobile pet grooming in naperville illinois
Pawsitive is an online dog store in Australia, where profits help with animal welfare.
Exclusive product range | Free Shipping | Money-Back Guarantee on all products!
A true lifestyle brand, an honest movement for dog lovers.pet portrait