
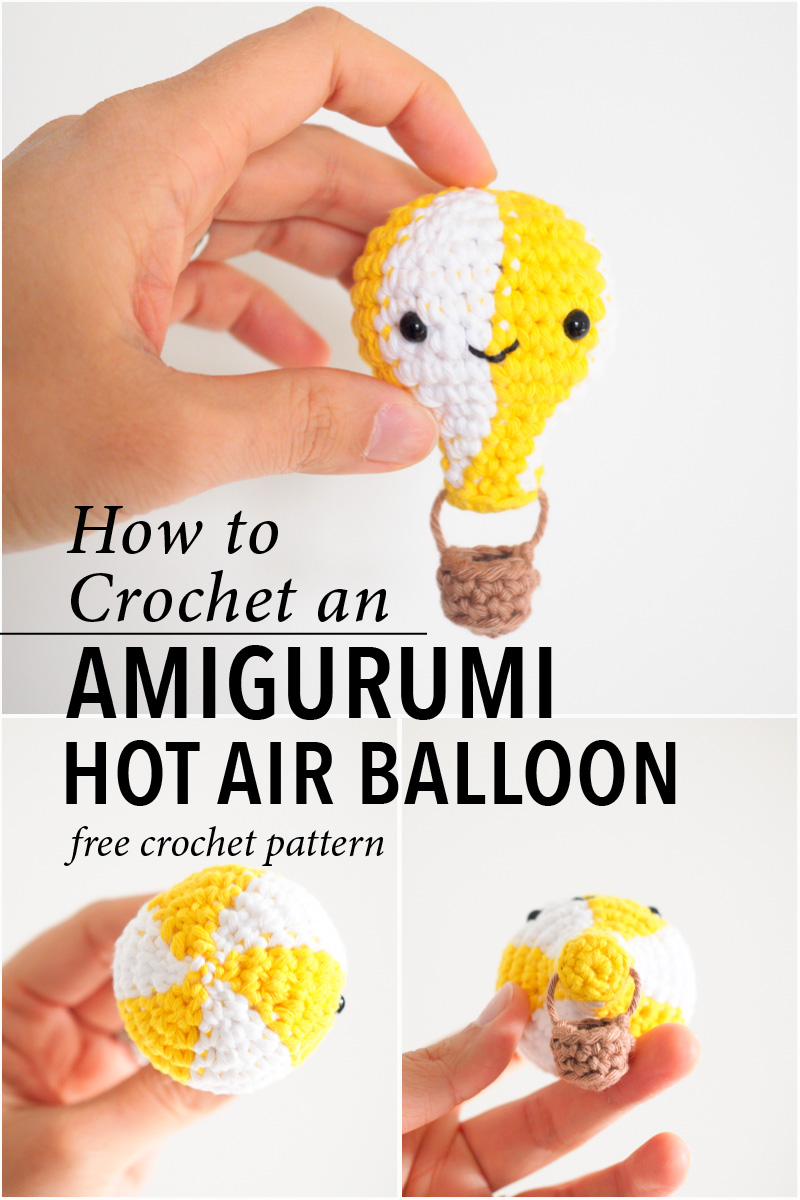
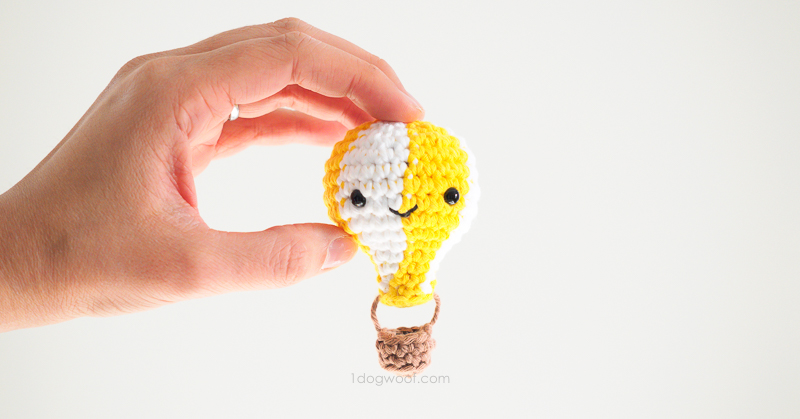
I asked on Instagram a while back what sorts of amigurumi people wanted to see, and this amigurumi hot air balloon was a big favorite, so here it is!
——————————————
Purchase the PDF from Ravelry or Add to your queue
——————————————
Before the Amigurumi Advent Calendar Crochet-Along started, I had made all the designs and wrote down all the patterns, and it gave me a chance to review each one to see if I wanted to do it differently a second time around. For most of the designs, I like the way they came out the first time, but the hot air balloon gave me second thoughts. The first one I made was top-down, which made for a very nice, smooth top, but the bottom got narrow and difficult to crochet. I figured I could crochet a second one and adjust the pattern to work from the bottom up to get that clean sharp edge at the bottom. But when you work from the bottom up, the top of the balloon uses an amigurumi close, which is a great technique, but not as neat as if you started with 6 single crochets in a magic circle. So now I’m stumped. Which pattern do I share?
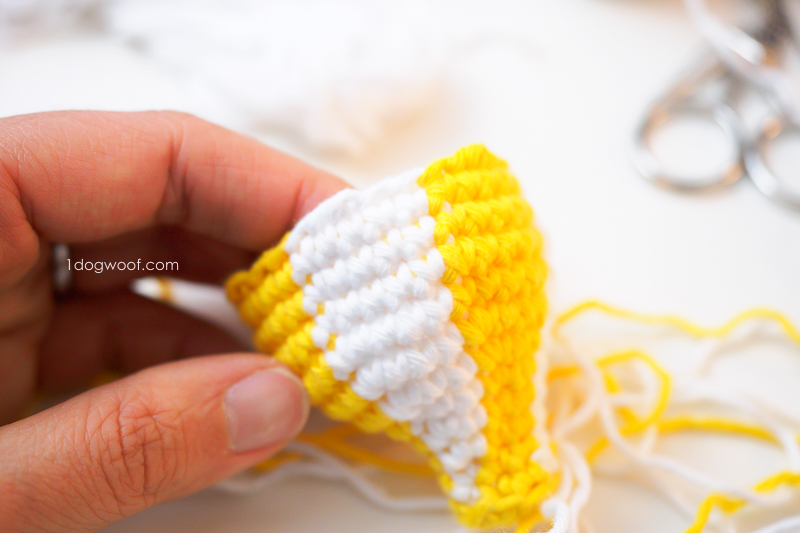
After a quick poll, it looks like more people like the bottoms up version, or maybe it’s because it’s a vertical striped design. The vertical stripes is a personal preference; like real hot air balloons, you can make yours any color, with stripes and other designs on it. I’m sharing 2 variations below – one for the plain bottoms up hot air balloon that you can customize yourself, and the variation for the vertical striping.
When you work in vertical stripes, you’ll be changing colors every few stitches. The video below shows you how I changed colors when making the amigurumi peppermint, in case you need a refresher.
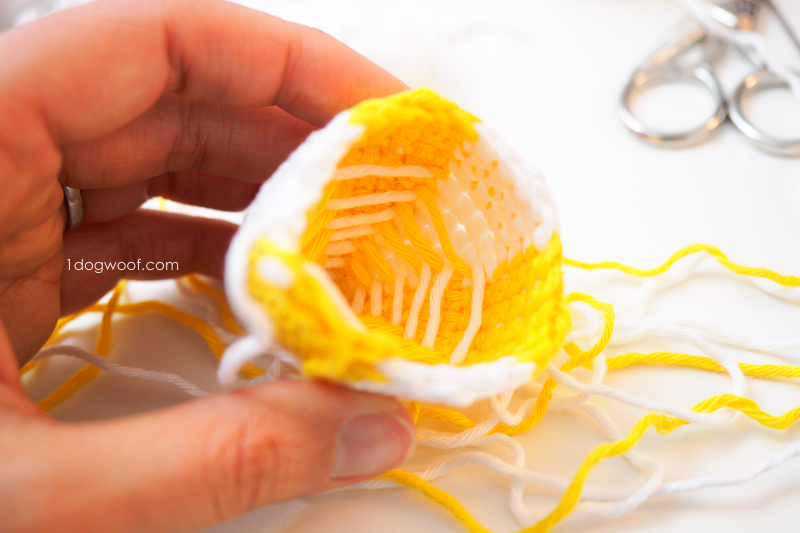
You can choose to carry the other color yarn with you or leave it to hang in the back/inside of the balloon. I found it easier to leave the yarn I wasn’t using just loose in the inside of the balloon for the first several rounds, but when I had to cover more distance, it became harder to keep my stitches even, so then I switched to carrying my yarn inside the stitches. It’s definitely a cleaner look on the inside, but you can see the tiniest bit of yellow showing through on the outside. For this project, either technique is personal preference.
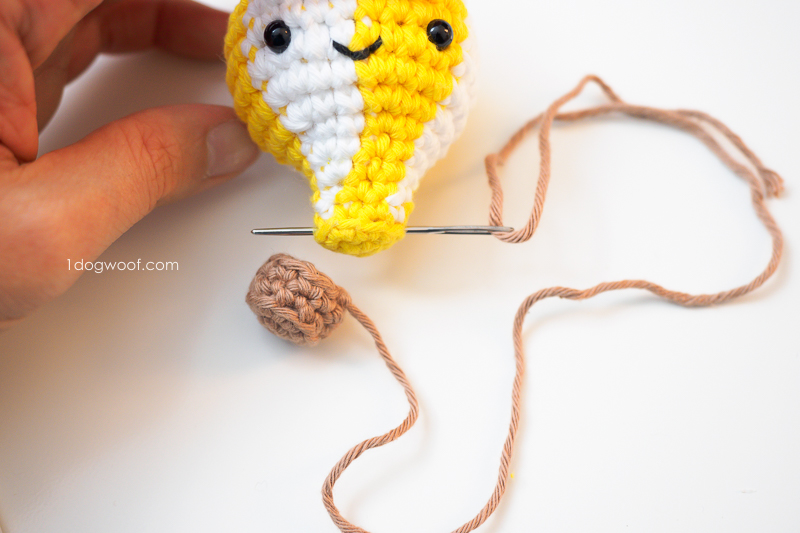
The basket of the hot air balloon is the same no matter what design you pick for the balloon itself. You create a tiny basket and then use the end tail to attach it to the bottom of the balloon. That’s all there is to that!
Supplies
- MC: Paintbox Cotton Aran color of choice
- C1: Paintbox Cotton Aran color of choice
- C2: Paintbox Cotton Aran Soft Fudge or other brown
- F/3.75mm crochet hook
- D/3.25mm crochet hook
- Cluster fiberfill
- 6mm safety eyes
- scissors
- embroidery thread or lightweight yarn in Black
Abbreviations
- st(s) – stitch(es)
- sl st – slip stitch
- ch – chain stitch
- sc – single crochet
- inc – increase: work 2 sc in same st
- dec – decrease: work 2 sc together
- BLO – back loop only
Pattern Notes
- Rounds in hot air balloon and basket are worked with a seam and joined with a seamless join.
- Eyes are placed approximately 1.0-1.25 inches apart.
- Amigurumi can be closed using this technique.
Amigurumi Hot Air Balloon Instructions
- Worked in seamed rounds.
Round 1: Work 6 sc into a magic circle. Join to first sc with sl st. (6)
Round 2: Ch 1. Work [1 sc, inc] 3x around. Join to first sc with sl st. (9)
Round 3: Ch 1. Work 1 sc in BLO of each st around. Join to first sc with sl st. (9)
Round 4: Ch 1. Work 1 sc in each st around. Join to first sc with sl st. (9)
Round 5: Ch 1. Work [2 sc, inc] 3x around. Join to first sc with sl st. (12)
Round 6: Ch 1. Work [3 sc, inc] 3x around. Join to first sc with sl st. (15)
Round 7: Ch 1. Work [4 sc, inc] 3x around. Join to first sc with sl st. (18)
Round 8: Ch 1. Work [2 sc, inc] 6x around. Join to first sc with sl st. (24)
Round 9: Ch 1. Work [3 sc, inc] 6x around. Join to first sc with sl st. (30)
Round 10-13: Ch 1. Work 1 sc in each st around. Join to first sc with sl st. (30)
Round 14: Ch 1. Work [3 sc, dec] 6x around. Join to first sc with sl st. (24)
- Add eyes between Rounds 9 and 10.
- Sew mouth between Rounds 8 and 9, centered between the eyes.
Round 15: Ch 1. Work [2 sc, dec] 6x around. Join to first sc with sl st. (18)
Round 16: Ch 1. Work [1 sc, dec] 6x around. Join to first sc with sl st. (12)
- Stuff the amigurumi. Make sure to get stuffing all the way into the bottom.
Round 17: Ch 1. Work 6 dec. (6)
- Fasten off, close, and weave in ends.
BASKET
- Worked with C2
- Worked with D hook.
Round 1: Work 6 sc into a magic circle. Join to first sc with sl st. (6)
Round 2: Ch 1. Work [1 sc, inc] 3x around. Join to first sc with sl st. (9)
Round 3: Ch 1. Work 1 sc in BLO of each st around. Join to first sc with sl st. (9)
Round 4: Ch 1. Work 1 sc in each st around. Join to first sc with sl st. (9)
Fasten off with a long tail.
Sew the tail through the bottom of the hot air balloon and secure onto the other side of the basket.
Amigurumi Hot Air Balloon Instructions (Vertical Striped Variation, Body Only)
- Worked in seamed rounds.
- Start with MC
Round 1: Work 6 sc into a magic circle. Join to first sc with sl st. (6)
Round 2: Ch 1. Work [1 sc, inc] 3x around. Join to first sc with sl st. (9)
Round 3: (Switch to C1 in middle of round.)Ch 1. Work [MC: 2 sc, C1: 1 sc] 3x in BLO of each st around. Join to first sc with sl st. (9)
Round 4: Ch 1. Work [MC: 2 sc, C1: 1 sc] 3x around. Join to first sc with sl st. (9)
Round 5: Ch 1. Work [MC: 2 sc, C1: inc] 3x around. Join to first sc with sl st. (12)
Round 6: Ch 1. Work [MC: 2 sc, C1: 1 sc, inc] 3x around. Join to first sc with sl st. (15)
Round 7: Ch 1. Work [MC: 1 sc, inc, C1: 3 sc] 3x around. Join to first sc with sl st. (18)
Round 8: Ch 1. Work [MC: 2 sc, inc, C1: 2 sc, inc] 3x around. Join to first sc with sl st. (24)
Round 9: Ch 1. Work [MC: 3 sc, inc, C1: 3 sc, inc] 3x around. Join to first sc with sl st. (30)
Round 10-13: Ch 1. Work [MC: 5 sc, C1: 5 sc] 3x around. Join to first sc with sl st. (30)
Round 14: Ch 1. Work [MC: 2 sc, dec, 1 sc, C1: 2 sc, dec, 1 sc] 3x around. Join to first sc with sl st. (24)
- Add eyes between Rounds 9 and 10.
- Sew mouth between Rounds 8 and 9, centered between the eyes.
Round 15: Ch 1. Work [MC: 1 sc, dec, 1 sc, C1: 1 sc, dec, 1 sc] 3x around. Join to first sc with sl st. (18)
Round 16: Ch 1. Work [MC: 1 sc, dec, C1: 1 sc, dec] 3x around. Join to first sc with sl st. (12)
- Stuff the amigurumi.
Round 17: Ch 1. Work [MC: dec, C1: dec] 3x around. (6)
- Fasten off C1 and secure to inside of the hot air balloon. Leave ends inside.
- Fasten off MC with a long tail and close with amigurumi close. Weave ends through balloon.
If you enjoyed this pattern and are showing it off to the world, make sure to tag me @1dogwoof with the hashtag #AmigurumiAdventCAL. I can’t wait to see all your creations!
Check out my pattern shops on Ravelry and Etsy where you can purchase printable PDFs of my latest crochet patterns. These PDFs are formatted without comments or ads, and have instructional photos at the bottom for optional printing.
I sometimes include affiliate links in my supply lists. Purchasing from these merchants earns me a small commission with no extra cost to you, and goes towards supporting One Dog Woof.
Please be respectful and do not sell or distribute this pattern in any way, especially as your own. Instead, share the original blog post link! You can sell finished products made from this pattern by giving credit to One Dog Woof as the pattern designer and linking to the blog post. If you have any questions regarding distribution or translation of this pattern, please see my Terms of Use. Thank you for your consideration!


I crochet a lot for my grandchildren. Then bought a hot air balloon pattern (with a swirl) that was the most ridiculous pattern ever. After coming across your pattern with the swirl in the balloon (not to mentioned the different hats that had swirls in it I was looking at) I was able to get started..I worked your pattern it was a delight…
I love love love this! Super cute. I have a suggestion for getting a sharp edge on the bottom if you are working top down…when you get to the the round in the neck of the balloon where you are ready to end, if you crochet in the back loop only and make your decreases until it’s closed you should get a nice defined edge. I hope this makes sense.