
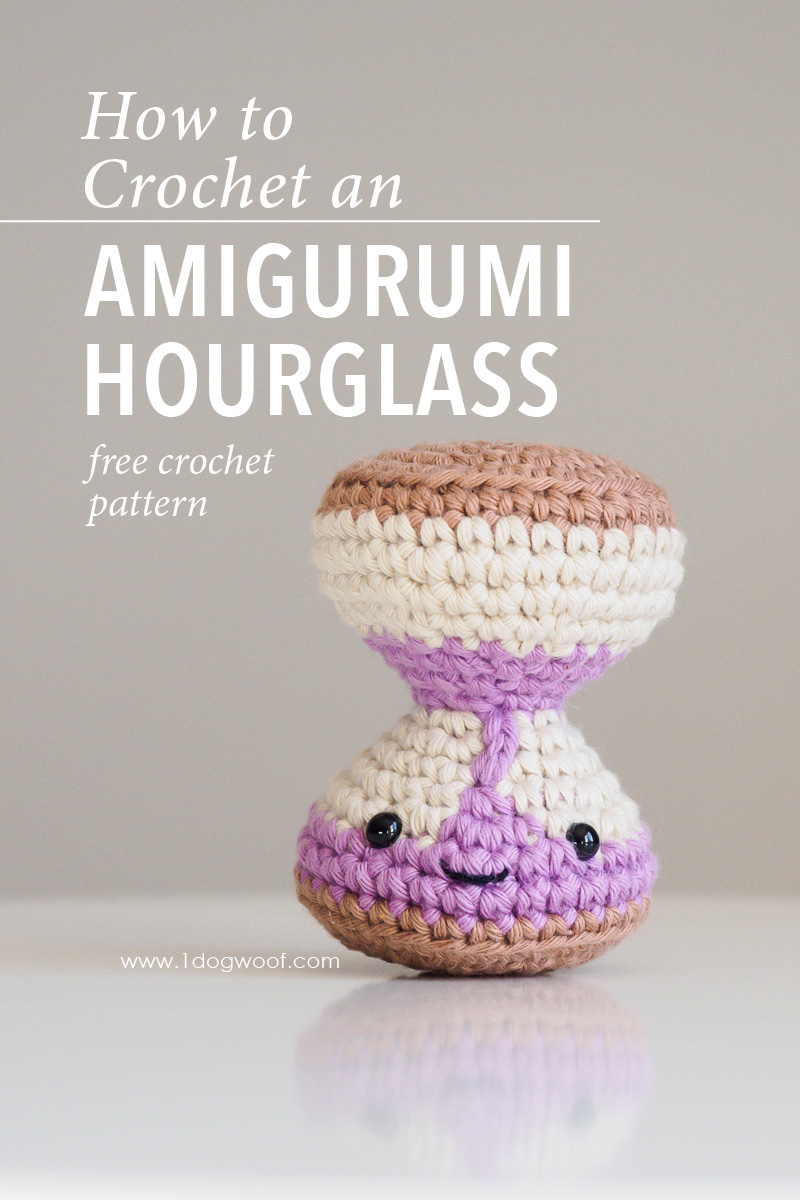
I couldn’t decide what to make next for the Amigurumi Advent Calendar, so I asked some vague this-or-that questions on Instagram. When given the choice between an alarm clock and an hourglass, the audience collectively chose for me to design this amigurumi hourglass!
——————————————
Purchase the PDF from Ravelry or Add to your queue
——————————————
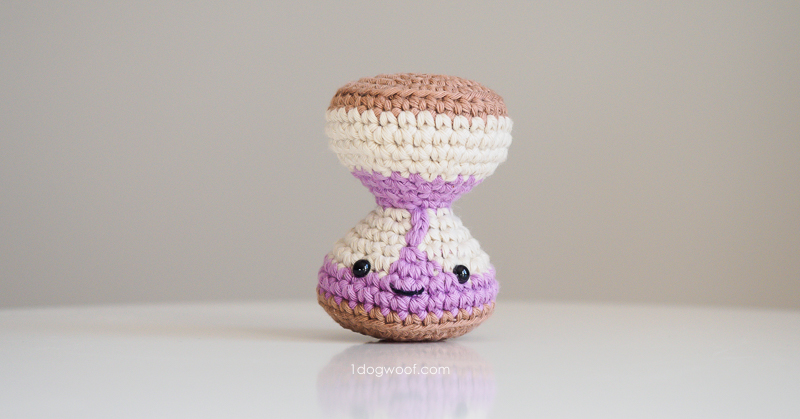
It took me a few tries to get the right look of the sand falling down through the hourglass, but then, this is just a simplification of the concept, right? Plus, the kids and the husband all recognized it, so I consider that a job done well enough, lol.
The hourglass is worked in seamed rounds, changing colors at the seam several times, and changing colors in the middle of the round a few times too. This amigurumi uses quite a few of the techniques you’ve built up over the last few weeks. You start with a magic circle, use a seamless join, change colors, and add detail with a few well-placed surface crochet stitches. Check out the following videos if you need help on any of the skills needed!
For the basic amigurumi techniques like the magic circle, seamless join, and amigurumi close, you can use my Amigurumi Flan video tutorial which goes through the making of an amigurumi from start to finish.
If you’re unfamiliar with how to change colors without leaving a jog in the seam or how to change colors in the middle of a round, you can use my Amigurumi Peppermint video tutorial, which focuses on color changes.
Then, for the surface stitches, see my Amigurumi Sleigh Bell video tutorial to see how to take a yarn end and surface crochet a few stitches down your amigurumi to create final details.
Supplies
- MC: Paintbox Cotton Aran in Vanilla Cream or other color for the clear glass
- C1: Paintbox Cotton Aran in Soft Fudge or other color for the base
- C2: Paintbox Cotton Aran in Tea Rose or other color for the hourglass sand
- F/3.75mm crochet hook
- Cluster fiberfill
- 6mm safety eyes
- scissors
- embroidery thread or lightweight yarn in Black
- tapestry needle
Abbreviations
- st(s) – stitch(es)
- sl st – slip stitch
- ch – chain stitch
- sc – single crochet
- inc – increase: work 2 sc in same st
- dec – decrease: work 2 sc together
- BLO – back loop only
Pattern Notes
- Rounds in hourglass are worked with a seam and joined with a seamless join.
- Eyes are placed approximately 1.0-1.25 inches apart.
- Amigurumi can be closed using this technique.
Amigurumi Hourglass Instructions
- Worked in seamed rounds.
- Start with C1 (BROWN).
Round 1: Work 6 sc into a magic circle. Join to first sc with sl st. (6)
Round 2: Ch 1. Work 2 sc into each st around. Join to first sc with sl st. (12)
Round 3: Ch 1. Work [1 sc, inc] 6x around. Join to first sc with sl st. (18)
Round 4: Ch 1. Work [2 sc, inc] 6x around. Join to first sc with sl st. (24)
Round 5: Ch 1. Work [3 sc, inc] 6x around. Join to first sc with sl st. (30)
Round 6: Ch 1. Work 1 sc in BLO of each st around. Join to first sc with sl st. (30)
- Switch to MC (CREAM/WHITE).
- Cut C1, and weave in ends.
Round 7-9: Ch 1. Work 1 sc in each st around. Join to first sc with sl st. (30)
Round 10: Ch 1. Work [3 sc, dec] 6x around. Join to first sc with sl st. (24)
- Switch to C2 (SAND COLOR).
- Cut MC, and weave in ends.
Round 11: Ch 1. Work [2 sc, dec] 6x around. Join to first sc with sl st. (18)
Round 12: Ch 1. Work [4 sc, dec] 3x around. Join to first sc with sl st. (15)
Round 13: Ch 1. Work [3 sc, dec] 3x around. Join to first sc with sl st. (12)
- Stuff the amigurumi.
Round 14: Ch 1. Work [2 sc, dec] 2x around. Join to first sc with sl st. (9)
- Switch to MC (CREAM/WHITE).
- Cut C2, leaving an 18 inch tail, bring tail to outside of the amigurumi.
Round 15: Ch 1. Work [2 sc, inc] 3x around. Join to first sc with sl st. (12)
Round 16: Ch 1. Work [3 sc, inc] 3x around. Join to first sc with sl st. (15)
Round 17: Ch 1. Work [4 sc, inc] 3x around. Join to first sc with sl st. (18)
Round 18: (Switch to C2 SAND COLOR in middle of row) With MC: Ch 1. Work [2 sc, inc] 3x, then 2 sc. With C2: Work 1 inc. With MC: Work [2 sc, inc] 2x. Join to first sc with sl st. (24)
Round 19: With MC: Ch 1. Work [3 sc, inc] 3x, then 2 sc. With C2: Work 1 sc, inc, 1 sc. With MC: Work 2 sc, inc, 3 sc, inc. Join to first sc with sl st. (30)
- Switch to C2 (SAND COLOR).
- Cut MC, and weave in ends.
Round 20-21: Ch 1. Work 1 sc in each st around. Join to first sc with sl st. (30)
- Switch to C1 (BROWN).
- Cut C2, and weave in ends.
Take the long tail from after Round 14, and surface crochet 3 stitches to meet the tip of the C2 triangle. You can also choose to simple back-stitch the line to the tip of the triangle.
- Add eyes between Rounds 19 and 20.
- Sew mouth between Rounds 20 and 21, centered between the eyes.
Round 22: Ch 1. Work 1 sc in each st around. Join to first sc with sl st. (30)
Round 23: Ch 1. Work 1 sc in BLO of each st around. Join to first sc with sl st. (30)
Round 24: Ch 1. Work [3 sc, dec] around. Join to first sc with sl st. (24)
Round 25: Ch 1. Work [2 sc, dec] 6x around. Join to first sc with sl st. (18)
Round 26: Ch 1. Work [1 sc, dec] 6x around. Join to first sc with sl st. (12)
- Stuff the remainder of the amigurumi.
Round 27: Ch 1. Work 6 dec. Join to first sc with sl st. (6)
Fasten off, close and weave in ends.
Go enjoy your new hourglass!
Head over to the Amigurumi Advent Calendar intro post to see the entire collection and share your work with the hashtag #AmigurumiAdventCAL.
Check out my pattern shops on Ravelry and Etsy where you can purchase printable PDFs of my latest crochet patterns. These PDFs are formatted without comments or ads, and have instructional photos at the bottom for optional printing.
I sometimes include affiliate links in my supply lists. Purchasing from these merchants earns me a small commission with no extra cost to you, and goes towards supporting One Dog Woof.
Please be respectful and do not sell or distribute this pattern in any way, especially as your own. Instead, share the original blog post link! You can sell finished products made from this pattern by giving credit to One Dog Woof as the pattern designer and linking to the blog post. If you have any questions regarding distribution or translation of this pattern, please see my Terms of Use. Thank you for your consideration!


0 Comments