
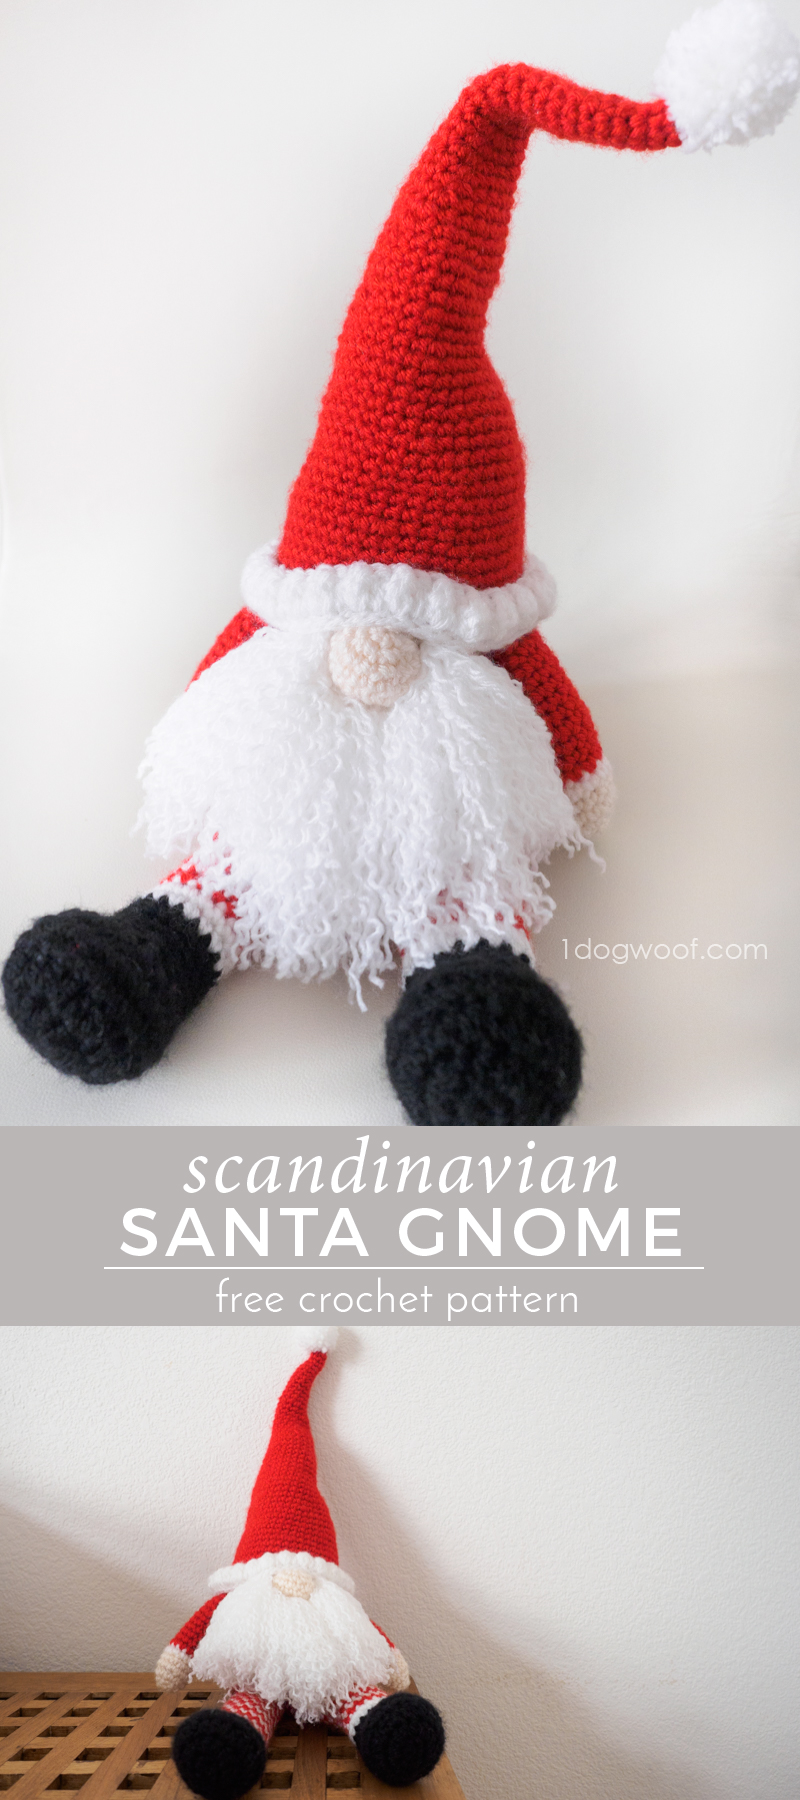
It’s almost October and time to start your holiday crocheting! I’m terribly proud of myself for having prepared for Christmas this far in advance with my Scandinavian Santa Gnome. Now to get crackin’ on other projects!

This Santa Gnome is part of my ongoing collaboration with Lion Brand Yarn, and is part of their 12 Weeks of Christmas extravaganza, where several of my favorite designers share crochet and knit projects that you can make in the weeks leading up to the holidays. Be sure to head over to lionbrand.com to see all 12 projects!
I guess making a santa gnome has always been somewhere on my list, and I especially liked the idea that I wouldn’t have to deal with amigurumi eyes. I know they totally make or break a facial expression, and I always end up spending so much time on time; I was looking forward to skipping that part and just sticking a nose on a face. Without a full facial expression, there’s always so much to interpret from these Scandinavian inspired gnomes. Are they sad, or mischievous, or somewhat languid and just enjoying a quiet life? I love their mystery and playfulness!
This Santa Gnome is made from my favorite Vanna’s Choice yarn, my go-to worsted weight acrylic workhorse. It’s just easy to work with, and easy to find, and there’s always a stash of it in my workroom. Besides the yarn and the polyfill, I tried a new technique this time around -> there’s a pouch of rice in his bum to give him a bit of extra weight! The pouch is the foot end of a pair of old nylon stockings, filled with dry, uncooked rice. After lightly stuffing the body piece, I added the rice pouch and then filled the rest of the body with the polyfill fiber. The body then feels soft still, but has that extra bit of oomph that makes him sit still!

All the body pieces are created separately, filled separately, and then sewn together. I had the most problems with the legs and feet, and ended up sewing the legs pretty close to front of the body piece so that he could sit properly. The arms were pretty easy, since they just needed to be on either side of the body. I sewed the nose on sideways, as in the opening and closing rounds were on the top and bottom, and NOT actually facing out. I also attached the nose at several points to give it a bit of a squashed look.

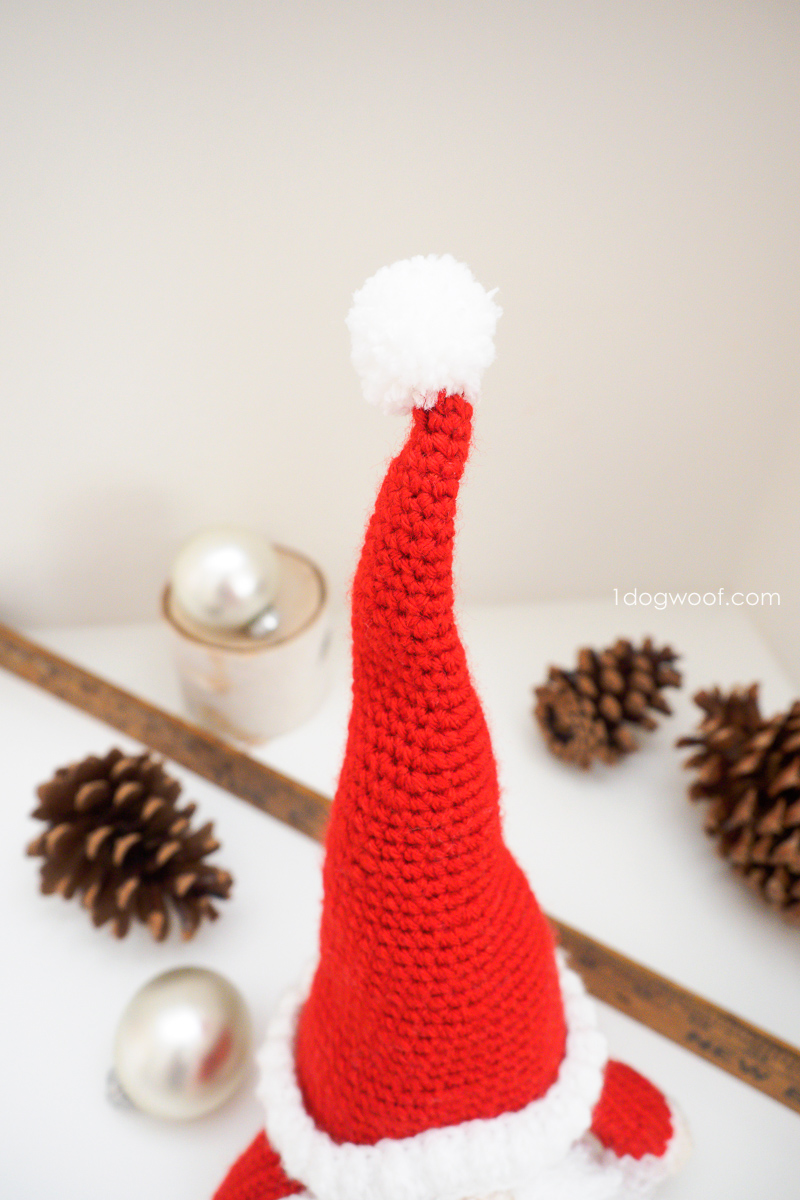
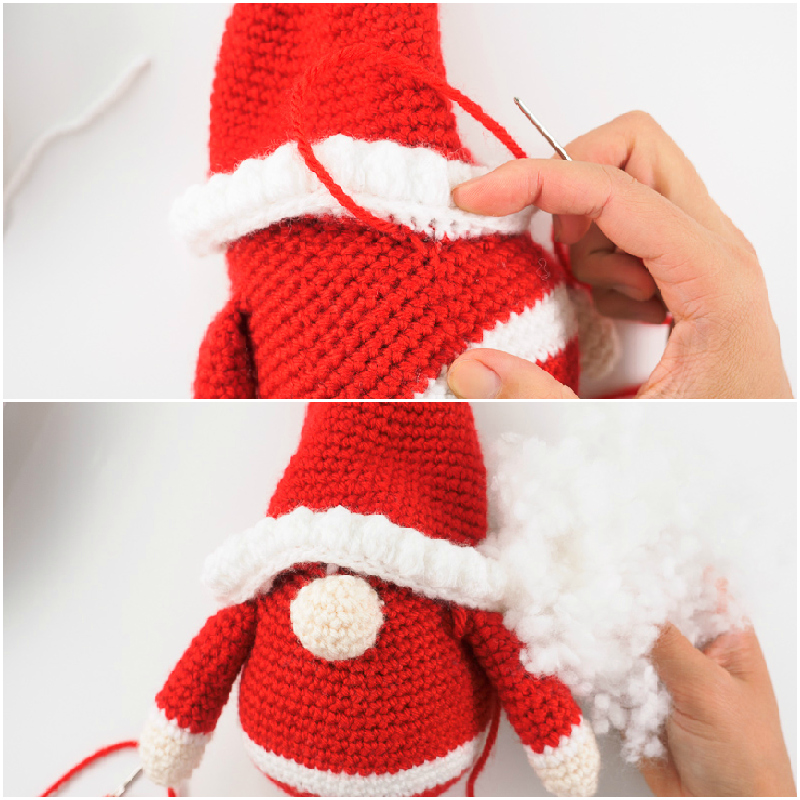
The hat was probably the least intuitive of all the pieces to put together. Of course, it’s a hat, so it goes on top of the “head”, but there’s no head, just the body, so it really just sits “on top”. In order to get that too-big look, I sewed the hat directly onto the arm, around the back and on the other arm, using a whip stitch. Before I closed it off over the nose, I added a bit of stuffing inside the hat to give the illusion that there’s a head there. Then I continued using the whip stitch to attach the hat just pulled over the nose.
The beard is made by tying yarn to each stitch in the body, all around the nose to fill it out. When my kids saw the face, they immediately asked where the face was! My daughter said “Mommy, where’s the face?” and then she answered her own question by lifting the beard and yelling “HERE! <insert manic laughter>”. You can leave the yarn as is, or unravel each piece to make a fuller beard, or even brush it out using a dog slicker brush* to get a totally different look!
The free pattern for Scandinavian Santa Gnome is available below. You can also purchase an inexpensive PDF from my pattern shops if you’d like to print the pattern for offline use. Another option is to purchase the entire kit – yarn + pattern – directly from Lion Brand. Choose your favorite flavor below!
——————————————
Purchase the crochet pattern from Etsy
Purchase the crochet pattern from Ravelry
Purchase the yarn kit from Lion Brand
——————————————
Supplies
- 1 skein of Lion Brand Vanna’s Choice in White (100g/3.5oz, 170yds/156m, 4 Medium)
- 1 skein of Lion Brand Vanna’s Choice in Red
- 1 skein of Lion Brand Vanna’s Choice in Black
- 1 skein of Lion Brand Vanna’s Choice in Fishermen
- 1 Clover USA crochet hook G/4.00mm
- (Optional) rice or pellet stuffed pouch
- stitch marker
- tapestry needle
- scissors
- polyfill stuffing
Abbreviations
- sl st – slip stitch
- ch – chain stitch
- sc – single crochet
- hdc – half double crochet
- dc – double crochet
- sc2tog – single crochet decrease: Insert hook into front loop of next st. Without yarning over, insert hook into front loop of next st. Yarn over. Pull through 2 loops on hook. Yarn over, pull through remaining loop on hook.
- hdc2tog – half double crochet decrease: Yarn over. Insert hook into front loop of next st. Without yarning over, insert hook into front loop of next st. Yarn over. Pull through 2 loops on hook. Yarn over, pull through remaining loops on hook.
- Single post st – Work around the post of the stitch, instead of through the loops.
- Bobble – [Yarn over, insert hook into st and pull up a loop. Yarn over, pull through 2 loops on hook.] Repeat [ ] 2 more times. Yarn over, pull through all 4 loops on hook.
Pattern Notes
- Skill level Easy.
- Gauge doesn’t matter on this project.
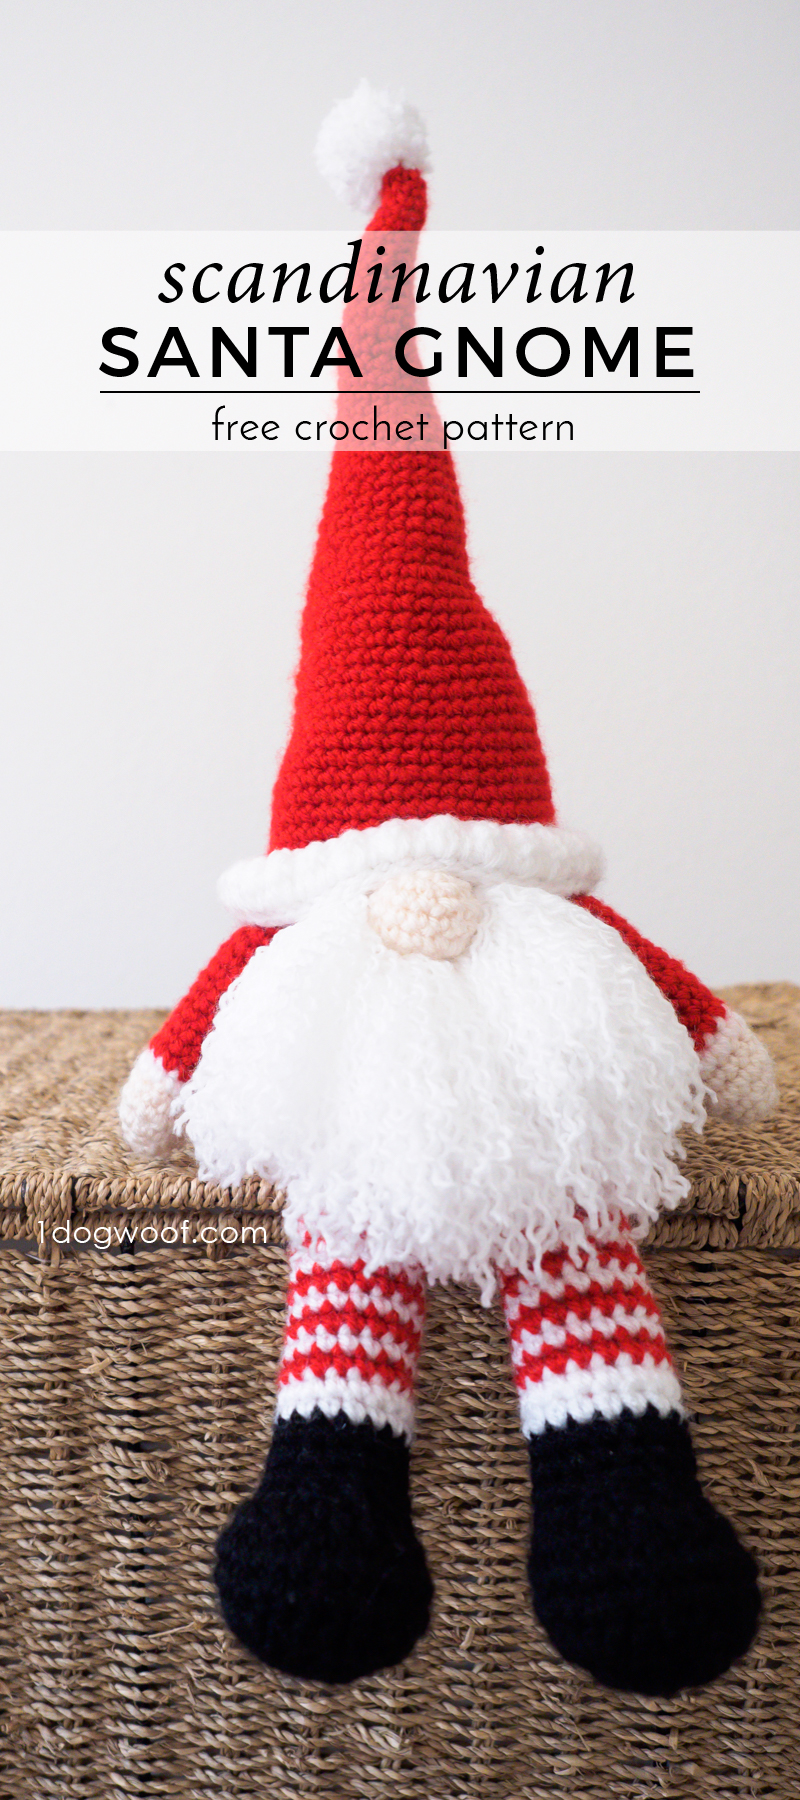
- Overall size is approximately 15 inches tall.
- Pattern is worked in both seamed and continuous rounds, as specifically indicated in the instructions.
Scandinavian Santa Gnome Pattern
BODY
Round 1: (in RED) Work 6 sc into a magic circle. Join with sl st to first sc. (6)
Round 2: Ch 1. Work 2 sc into each st around. Join with sl st to first sc. (12)
Round 3: Ch 1. Work [1 sc into next st, 2 sc into next st] 6 times. Join with sl st to first sc. (18)
Round 4: Ch 1. Work [1 sc into each of next 2 st, 2 sc into next st] 6 times. Join with sl st to first st. (24)
Round 5: Ch 1. Work [1 sc into each of next 3 st, 2 sc into next st] 6 times. Join with sl st to first st. (30)
Round 6: Ch 1. Work [1 sc into each of next 4 st, 2 sc into next st] 6 times. Join with sl st to first st. (36)
Round 7: Ch 1. Work [1 sc into each of next 5 st, 2 sc into next st] 6 times. Join with sl st to first st. (42)
Round 8: Ch 1. Work 1 sc in each st around. Join with sl st to first sc. (42)
Round 9: Ch 1. Work [1 sc into each of next 6 st, 2 sc into next st] 6 times. Join with sl st to first st. (48)
Round 10: Ch 1. Work [1 sc into each of next 7 st, 2 sc into next st] 6 times. Join with sl st to first st. (54)
Round 11: Ch 1. Work 1 sc in each st around. Join with sl st to first sc. (54)
Round 12: (in WHITE) Ch 1. Work [1 sc in each of next 8 st, 2 sc into next st] 6 times. Join with sl st to first st. (60)
Round 13-14: (in WHITE) Ch 1. Work 1 sc in each st around. Join with sl st to first sc. (60)
Round 15-19: (in RED) Ch 1. Work 1 sc in each st around. Join with sl st to first sc. (60)
Round 20: Ch 1. Work [1 sc into each of next 8 st, 1 sc2tog] 6 times. Join with sl st to first st. (54)
Round 21: Ch 1. Work 1 sc in each st around. Join with sl st to first sc. (54)
Round 22: Ch 1. Work [1 sc into each of next 7 st, 1 sc2tog] 6 times. Join with sl st to first st. (48)
Round 23: Ch 1. Work 1 sc in each st around. Join with sl st to first sc. (48)
Round 24: Ch 1. Work [1 sc into each of next 6 st, 1 sc2tog] 6 times. Join with sl st to first st. (42)
Round 25: Ch 1. Work 1 sc in each st around. Join with sl st to first sc. (42)
→ Start stuffing the body. You can use a small rice-filled pouch to give the body some weight.

Round 26: Ch 1. Work [1 sc into each of next 5 st, 1 sc2tog] 6 times. Join with sl st to first st. (36)
Round 27: Ch 1. Work 1 sc in each st around. Join with sl st to first sc. (36)
Round 28: Ch 1. Work [1 sc into each of next 4 st, 1 sc2tog] 6 times. Join with sl st to first st. (30)
Round 29: Ch 1. Work [1 sc into each of next 3 st, 1 sc2tog] 6 times. Join with sl st to first st. (24)
Round 30: Ch 1. Work [1 sc into each of next 2 st, 1 sc2tog] 6 times. Join with sl st to first st. (18)
Round 31: Ch 1. Work [1 sc next st, 1 sc2tog] 6 times. Join with sl st to first st. (12)
→ Finish stuffing the body before closing off.
Round 32: Ch 1. Work 1 sc2tog 6 times. Join with sl st to first st. (6)
→ Cut yarn, leaving a long tail. Pull yarn through last stitch. Sew yarn end into the front loop of each of the 6 st around. Pull tight to close the circle. Fasten off.
HAT: (worked in continuous rounds)
Round 1: (in RED) Work 6 sc into a magic circle. (6)
Round 2: Work 1 sc in each st around. (6)
Round 3: Work 2 sc in first st, 1 sc in each of the remaining sts. (7)
Round 4: Work 2 sc in first st, 1 sc in each of the remaining sts. (8)
Round 5: Work 2 sc in first st, 1 sc in each of the remaining sts. (9)
Round 6-7: Work 1 sc in each st around. (9)
Round 8: Work 2 sc in first st, 1 sc in each of the remaining sts. (10)
Round 9: Work 2 sc in first st, 1 sc in each of the remaining sts. (11)
Round 10: Work 2 sc in first st, 1 sc in each of the remaining sts. (12)
Round 11-12: Work 1 sc in each st around. (12)
Round 13: Work 2 sc in first st, 1 sc in each of the remaining sts. (13)
Round 14: Work 2 sc in first st, 1 sc in each of the remaining sts. (14)
Round 15: Work 2 sc in first st, 1 sc in each of the remaining sts. (15)
Round 16: Work 1 sc in each st around. (15)
Round 17: Work 2 sc in first st, 1 sc in each of the remaining sts. (16)
Round 18: Work 2 sc in first st, 1 sc in each of the remaining sts. (17)
Round 19: Work 2 sc in first st, 1 sc in each of the remaining sts. (18)
Round 20: Work 2 sc in first st, 1 sc in each of the remaining sts. (19)
Round 21: Work 2 sc in first st, 1 sc in each of the remaining sts. (20)
Round 22: Work 2 sc in first st, 1 sc in each of the remaining sts. (21)
Round 23: Work [1 sc in each of next 6 st, 2 sc in next st] 3 times. (24)
Round 24-25: Work 1 sc in each st around. (24)
Round 26: Work 2 sc in first st, 1 sc in each of the remaining sts. (25)
Round 27: Work 2 sc in first st, 1 sc in each of the remaining sts. (26)
Round 28: Work 2 sc in first st, 1 sc in each of the remaining sts. (27)
Round 29: Work [1 sc in each of next 8 st, 2 sc in next st] 3 times. (30)
Round 30: Work 1 sc in each of next 14 st, 2 sc in next st, 1 sc in each of next 15 st. (31)
Round 31: Work 1 sc in each of next 15 st, 2 sc in next st, 1 sc in each of next 15 st. (32)
Round 32: Work 1 sc in each of next 15 st, 2 sc in next st, 1 sc in each of next 16 st. (33)
Round 33: Work [1 sc in each of next 10 st, 2 sc in next st] 3 times. (36)
Round 34: Work 2 sc in first st, 1 sc in each of the remaining sts. (37)
Round 35: Work 1 sc in each of next 10 st, 2 sc in next st, 1 sc in each of next 26 st. (38)
Round 36: Work 1 sc in each of next 20 st, 2 sc in next st, 1 sc in each of next 17 st. (39)
Round 37: Work 1 sc in each st around. (39)
Round 38: Work 2 sc in first st, 1 sc in each of the remaining sts. (40)
Round 39: Work 2 sc in first st, 1 sc in each of the remaining sts. (41)
Round 40: Work 2 sc in first st, 1 sc in each of the remaining sts. (42)
Round 41: Work [1 sc in each of next 13 st, 2 sc in next st] 3 times. (45)
Round 42: Work 1 sc in each of next 18 st, 2 sc in next st, 1 sc in each of next 26 st. (46)
Round 43: Work 2 sc in first st, 1 sc in each of the remaining sts. (47)
Round 44: Work 2 sc in first st, 1 sc in each of the remaining sts. (48)
Round 45: Work [1 sc in each of next 7 st, 2 sc in next st] 6 times. (54)
Round 46-47: Work 1 sc in each st around. Sl st in next st. Cut yarn, leaving a long tail, but leave the loop on the hook. (54)
Round 48: (now worked in seamed rounds, in WHITE) Pull up a loop of white yarn. Ch 1. Work 1 sc in each st around. Join to first sc with sl st. (54)
Round 49: Ch 1. Work 1 single post st in each st around. Join to first st with sl st. (54)
Round 50: Ch 3. Work [1 bobble in next st, 1 dc in next st] 27 times. Join to first bobble with sl st. Fasten off and weave in ends. (54)
→ Make a small WHITE pom-pom and attach to the top of the hat. Tuck the knot on the inside of the hat.
FEET: (worked in seamed rounds)
Round 1: (in BLACK) Ch 4. Work 1 sc into the 2nd ch from hook. Work 1 sc in next ch, 3 sc in next ch (turns the corner), 1 sc in next ch, 2 sc in last ch. Join with sl st to first sc. (8)
Round 2: Ch 1. Work 2 sc in next st, 2 hdc in each of next 5 st, 2 sc in each of next 2 st. Join with sl st to first sc. (16)
Round 3: Ch 2. Work [1 hdc in next st, 2 hdc in next st] 8 times. Join with sl st to first sc. (24)
Round 4: Ch 1. Work [1 sc in next st, 2 sc in next st, 1 sc in next st] 8 times. Join with sl st to first sc. (32)
Round 5: Ch 1. Work 1 sc in each st around. Join with sl st to first sc. (32)
Round 6: Ch 1. Work 1 sc in each of next 6 st, 2 sc2tog, 6 hdc2tog, 2 sc2tog, 1 sc in each of next 6 st. Join with sl st to first sc. (22)
Round 7: Ch 1. Work 1 sc in each of next 5 st, 2 sc2tog, 2 hdc2tog, 2 sc2tog, 1 sc in each of next 5 st. Join with sl st to first sc. (16)
→ Weave in the beginning tail, and use the tail to fill in some of the gaps in the hdc2tog stitches.
Round 8-10: Ch 1. Work 1 sc in each st around. Join with sl st to first sc. (16)
Round 11-12: (in WHITE) Ch 1. Work 1 sc in each st around. Join with sl st to first sc using INVISIBLE STRIPES method. (16)
→ Stuff the shoe just enough to fill it out.
Round 13: (in RED) Ch 1. Work 1 sc in each st around. Join with sl st to first sc using INVISIBLE STRIPES method. (16)
Round 14: (in WHITE) Ch 1. Work 1 sc in each st around. Join with sl st to first sc using INVISIBLE STRIPES method. (16)
Round 15-32: Repeat Rounds 13-14 9 more times, creating RED and WHITE alternating stripes. (16)
Round 33: Ch 1. Work 1 sc2tog 8 times. Join with sl st to first st. (8)
→ Stuff the leg lightly.
Squeeze round together and align stitches. Insert hook through all 4 loops and work 1 sc. Repeat for the next 2 st. Fasten off and cut a long tail.
ARMS: (worked in seamed rounds)
Round 1: (in FISHERMEN) Work 6 sc into a magic circle. Join with sl st to first sc. (6)
Round 2: Ch 1. Work 2 sc into each st around. Join with sl st to first sc. (12)
Round 3: Ch 1. Work [1 sc into next 3 st, 2 sc into next st] 3 times. Join with sl st to first sc. (15)
Round 4: Ch 1. Work [1 sc into each of next 3 st, 1 sc2tog] 3 times. Join with sl st to first st. (12)
Round 5: Ch 1. Work 1 sc in each st around. Join with sl st to first st. (12)
Round 6: (in WHITE) Ch 1. Work 1 sc in each st around. Join with sl st to first st. (12)
Round 7-10: (in RED) Ch 1. Work 1 sc in each st around. Join with sl st to first st. (12)
Round 11: Ch 1. Work [1 sc in each of next 4 st, 1 sc2tog] 2 times. Join with sl st to first st. (10)
Round 12-14: Ch 1. Work 1 sc in each st around. Join with sl st to first st. (10)
Round 15: Ch 1. Work 1 sc in each of next 4 st, 1 sc2tog, 1 sc in each of next 4 st. Join with sl st to first st. (9)
Round 16-17: Ch 1. Work 1 sc in each st around. Join with sl st to first st. (9)
→ Stuff the arm, lightly.
→ Squeeze round together and align stitches. Work 4 sc across to close off. Fasten off and cut a long tail.
NOSE: (worked in seamed rounds)
Round 1: (in FISHERMEN) Work 6 sc into a magic circle. Join with sl st to first sc. (6)
Round 2: Ch 1. Work 2 sc into each st around. Join with sl st to first sc. (12)
Round 3: Ch 1. Work [1 sc into next 3 st, 2 sc into next st] 3 times. Join with sl st to first sc. (15)
Round 4: Ch 1. Work 1 sc in each st around. (15)
Round 5: Ch 1. Work [1 sc into each of next 3 st, 1 sc2tog] 3 times. Join with sl st to first st. (12)
→ Stuff the nose.
Round 6: Ch 1. Work 1 sc2tog 6 times. Join with sl st to first st. (6)
→ Cut yarn, leaving a long tail. Pull yarn through last stitch. Sew yarn end into the front loop of each of the 6 st around. Pull tight to close the circle. Fasten off.
ASSEMBLY:
→ LEGS to BODY: The inner edge of each leg is attached approximately 6 rounds in front of the center point. The outside edge of each leg is attached between body Rounds 11 and 12, right where the red meets the white.
→ ARMS to BODY: Arms are attached on either side of the body, centered to the legs, at body Round 26.
→ NOSE to BODY: Nose is centered between the arms, with the side of the nose facing outwards. It is approximately attached at body Round 27, and pulled slightly downwards to attach at body Round 24.
→ HAT to BODY: Attach the hat at body Round 24 by the front of the gnome’s right arm. Sew right into the arm and around using a whip stitch. Hat is pulled down lower in the back, across the left arm and attached at body Round 24 by the front of the left arm. Lightly stuff hat to fill out the shape. Continue sewing up and around the nose and finish at the starting point. Fasten off, weave in the ends.
→ BEARD: Cut 2 pieces of WHITE yarn, approximately 12” in length. Holding them together, tie to each stitch around the nose using a lark’s knot. Continue tying yarn to the body in concentric circles outward from the nose. You can leave as it, or separate the strands in the yarn to create a fuller beard. Trim to desired shape.

I love that this gnome is a bit fat and stodgy, has dangling legs, and is easy to squeeze. You can use him as a replacement for Elf on the Shelf – this scandinavian santa elf has real legs and real feet!

Check out my pattern shops on Etsy and Ravelry where you can purchase printable PDFs of my latest crochet patterns. These PDFs are formatted without comments or ads, and have instructional photos at the bottom for optional printing.
I sometimes include affiliate links in my supply lists. Purchasing from these merchants earns me a small commission with no extra cost to you, and goes towards supporting One Dog Woof.
Please be respectful and do not sell or distribute this pattern in any way, especially as your own. Instead, share the original blog post link! You can sell finished products made from this pattern by giving credit to One Dog Woof as the pattern designer and linking to the blog post. If you have any questions regarding distribution or translation of this pattern, please see my Terms of Use. Thank you for your consideration!


This is such a beautiful santa gnome! I’m from Norway and we call the santa for “nisse” oder “julenisse”. He sure look like a Scandinavian nisse!
He is perfect. Love him.
I just found this lovely little guy, and iam excited to make him, i dont understand what is meant by seamed stitch instead of in the round, could someone please explain
Thank you again for the sweet pattern
Instead of the usual going round in a continuous spiral, at the end of each round you make a chainof one, the continue. Your work will end up with a seam. I hope this helps ( and I hope it’s correct as I haven’t been crocheting for long)
64 yr old Male from Belfast.
Joe.
This is so cute! I can’t wait to make him!
I’m really confused about the beard. Could you please elaborate a bit? It says to cut 2 strands of white, 12 inches long.. I’m assuming I need to cut many strands, and use 2 at a time to attach via the lark’s knot? And after attaching around the nose, are the knots then attached to the stitches of the body? Sorry if I’m being dense, I’m just not sure I get it! Thanks in advance!
Hello, I loved this one so much that, after making a full size one, I made one in thread as a Christmas ornament. I am now working on the second full size gnome and will make a few more in thread to give to my children as their annual Christmas ornaments. Thank you
Yes! Keep making pairs of two and go out in concentric circles from the nose until you reach the desired width of your beard.
Sherbear4jesus Ohio USA
Just finished making this guy. Absolutely love how he turn out and the pattern was so easy to follow. Thank you 1dogwoog!
I just love this guy, everyone wants one so I’m going to be very busy. Thank you for the pattern!
Thank you so much for sharing your pattern. I highly recommend your site every time someone comments on patterns I have used. You are very talented, as well as generous.
This is so sweet Santa.
Good information and post as well.
I just saw this, but will definitely make this for next year. My granny was Swedish and my grandpa was Norwegian, and they would have loved this too! My grandfather knitted us some beautiful Norwegian style stockings that we kept for many years. Thanks for the free pattern.
I love this little guy!!!
I haven’t made him yet, but I definitely will. He’s just so gosh darn cute. ❤️ He was the ONE thing that made me smile today; thank you.
Thank you for the pattern, he is so adorable. May I ask when the Arms and Nose are to be made what do you mean “In Fishermen”?
Veronica
Hi Veronica, in case I haven’t got it yet, fisherman 7 is a color for the skin. Personally mine got made for Halloween with green skin and black dressings.
I’m so confused about how to attach the legs 🙁
I’m confused too. Wish there was a video
I think it means you slip into the first stitch when making a seam then chain one and continue working your next round. Working ‘ in the round’ you mark where you first stitch is with a marker then just keep gaining , moving up your marker each time you come to it and not slipping or chaining. Hope this helps!
Hello Joe. I’m Dave. 64 year old Male from Liverpool, now living in Turkey ????????????????????
Hi I’m trying to understand round 49 on hat… the single post sc. is that a fpsc or bpsc or something completely different?
I just finished making this cute guy today! Thank you so much for sharing ????
How to make exactly the same beard? I mean, the threads are not straight.
Thank you for sharing your gnome pattern.
Thank you for sharing this pattern….I got ill last year and gave away all my crochet stuff, but just had the urge to pick it up again. So went to the thrift store for some yarn and needles and this pattern is just perfect. I picked it up right away. Many, many thanks. Life isn’t so boring anymore. Advise me of any sales on yarn!! Merry Christmas.
Hello, did you find out the answer to your question? I’m making the Santa genom now and wondering about the same thing. Thank you
Thank you so much for this pattern, made my mother in law verry happy since she needed something to lift her spirit a bit. This guy made her smile 🙂
I just finishethis gnome and it turned out so cute! Thank you for sharing this free pattern!
I just finished making this. It’s adorable! I’d like to make a smaller one, how could I do that
If you use a lighter weight yarn, such as DK (category 3), sport (category 2), or fingering (category 1), and use a smaller hook to correspond with your chosen yarn, you can use the same instructions and it will turn out smaller!