
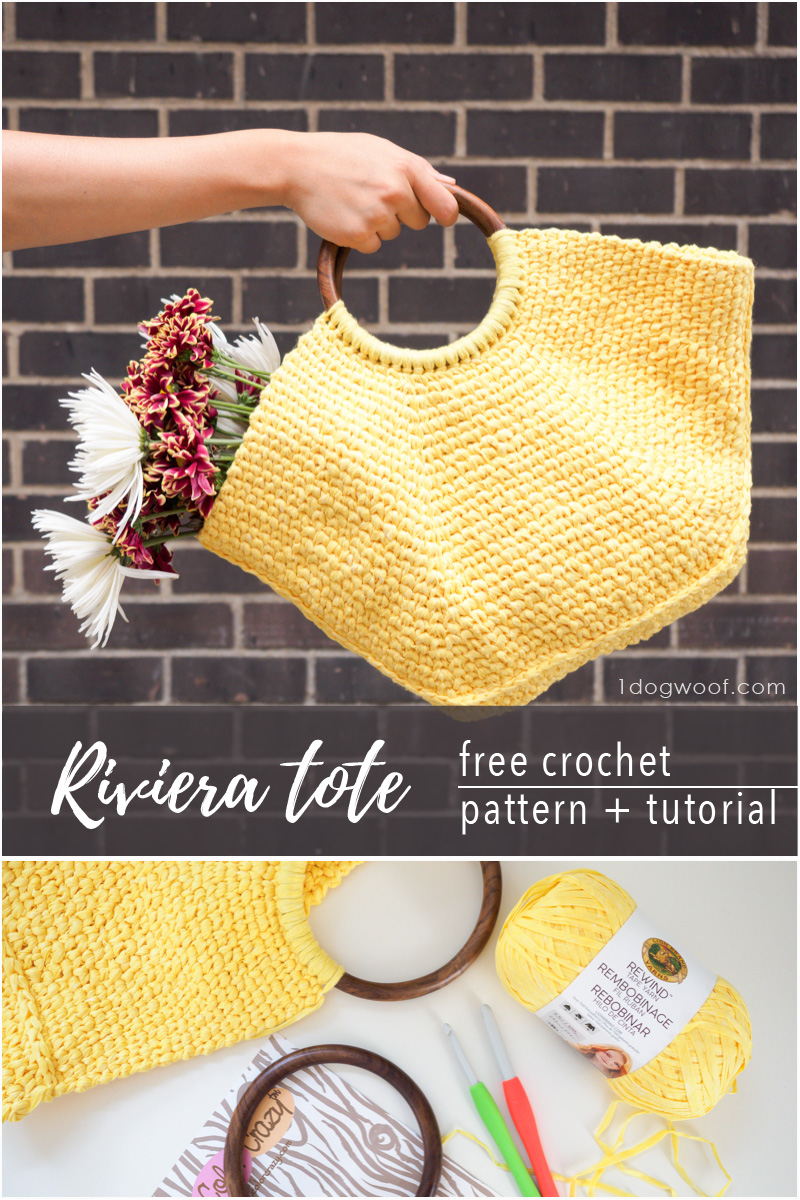
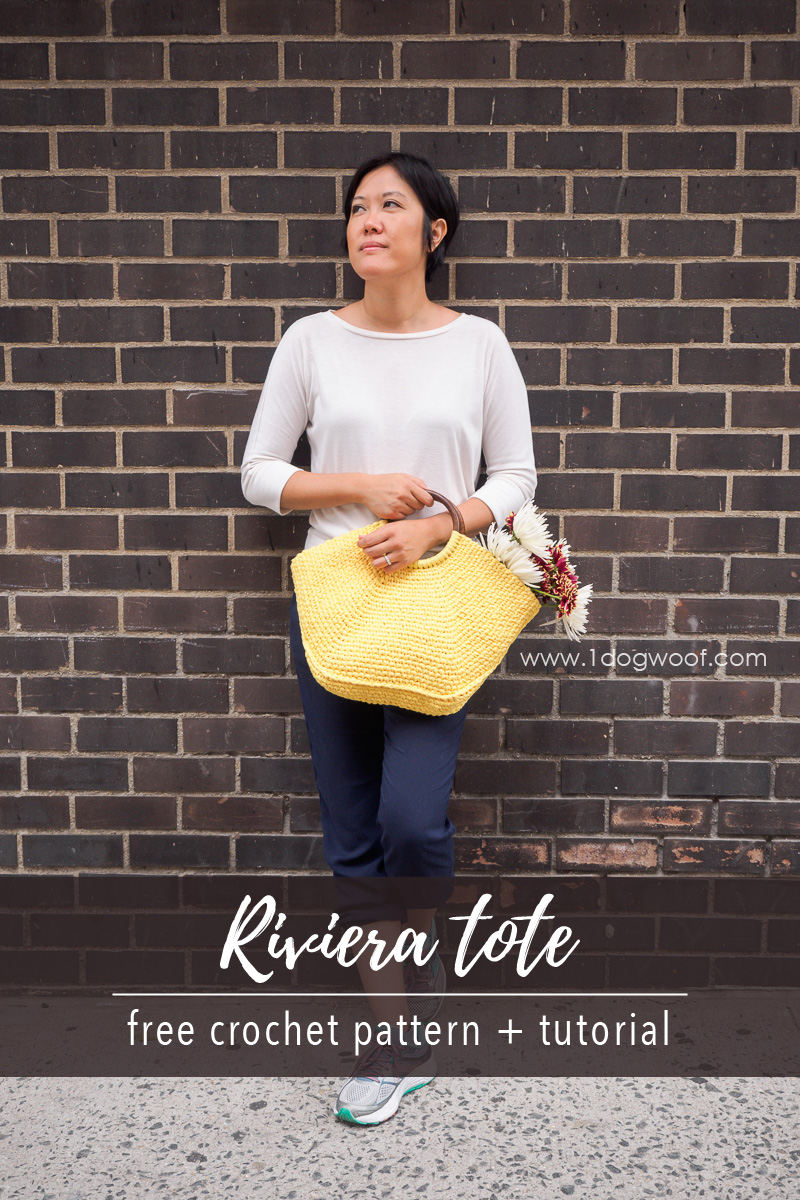
In the spirit of this summer’s straw bag trend, here’s the Riviera Tote crochet pattern, a yarn-y last hurrah before we officially switch into fall. But that doesn’t mean you can’t take this bag into the cooler months as well. It’s size and shape makes it a great carry-all for a fall picnic, an extra jacket, or your newest crochet project!
This project is designed with support from and in collaboration with Lion Brand Yarn. Post may contain affiliate links. All photos and opinions are my own.
I’m a sucker for bags. Some people have a shoe addiction, but for me, it’s all about different sized, different shaped, different colored bags. I’m not sure why or how it’s taken so long for me to come to this realization, but it feels good to accept this little quirk about myself. My budget (and my schedule) prevents me from shopping for bags all the time, but I can make my own, and by doing so, make it exactly the way I like it.

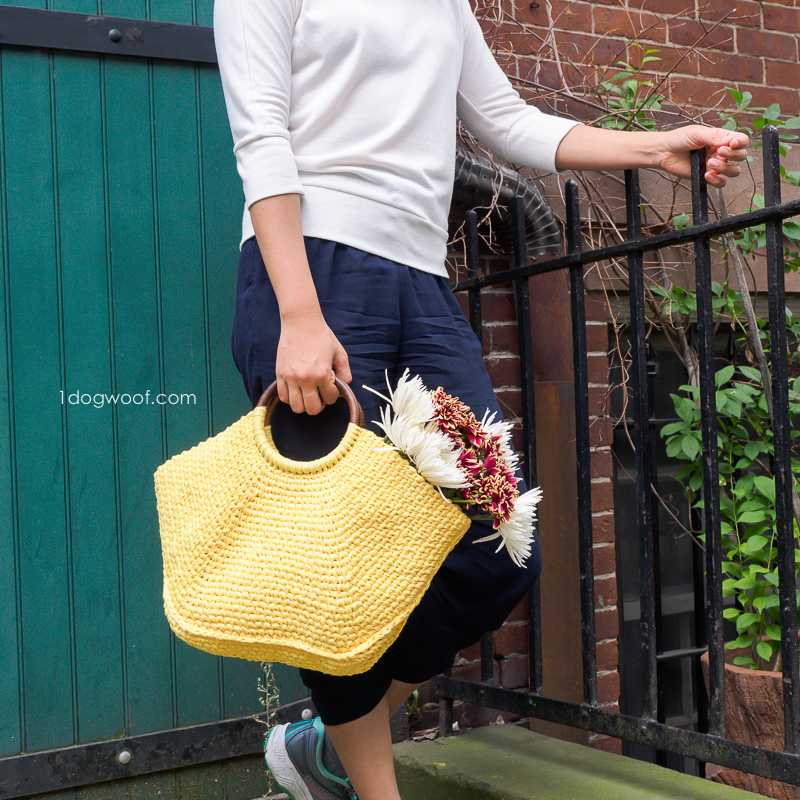
I nicknamed this bag my sunshine bag, but you can (and should!) make this in any and all of the Lion Brand Rewind Yarn colors. This tote in Olive You would look amazing, don’t you think? The polished wooden handles elevates this project just that tad bit more, so you can surprise the passers-by who compliment you on the Riviera Tote that it’s indeed handmade and not purchased from a retail shop.
Construction Details
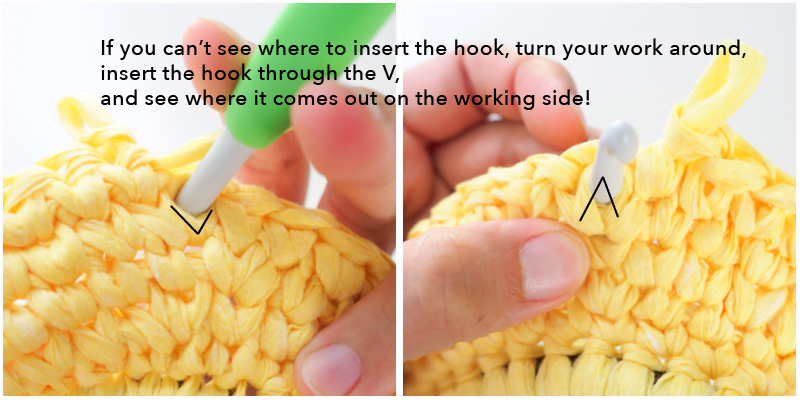
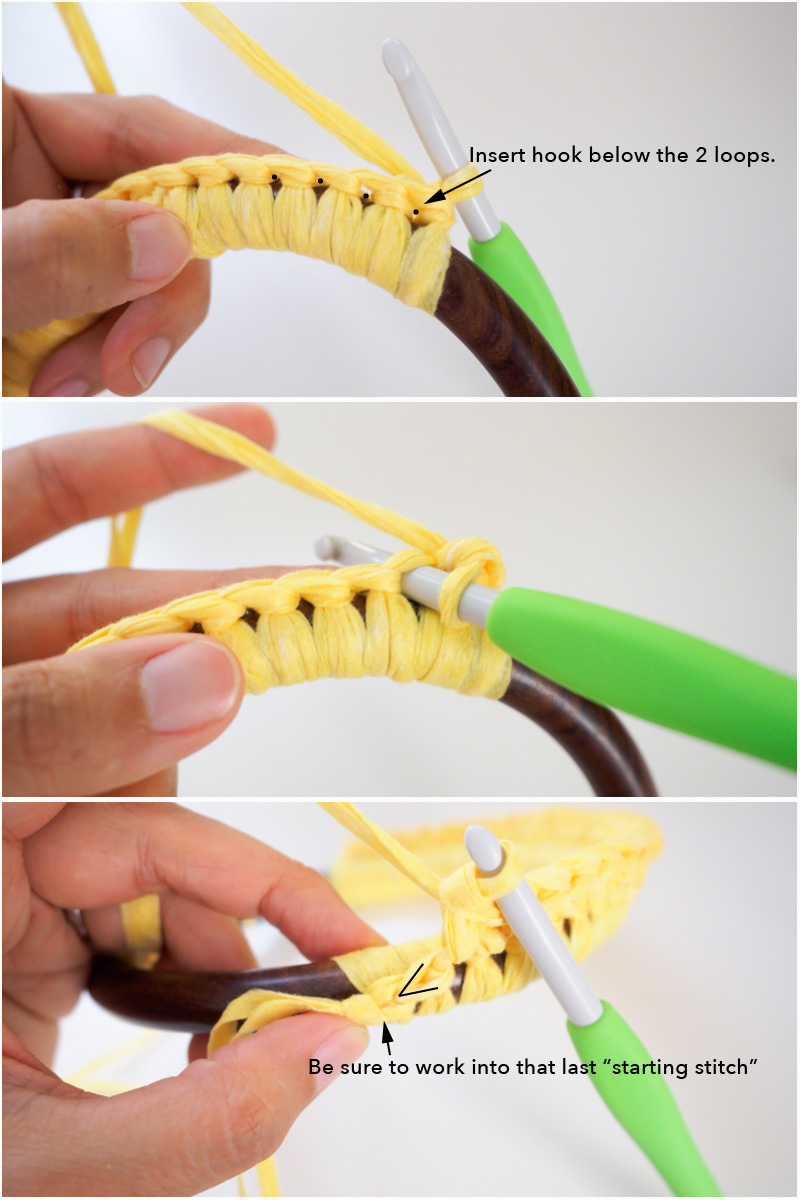
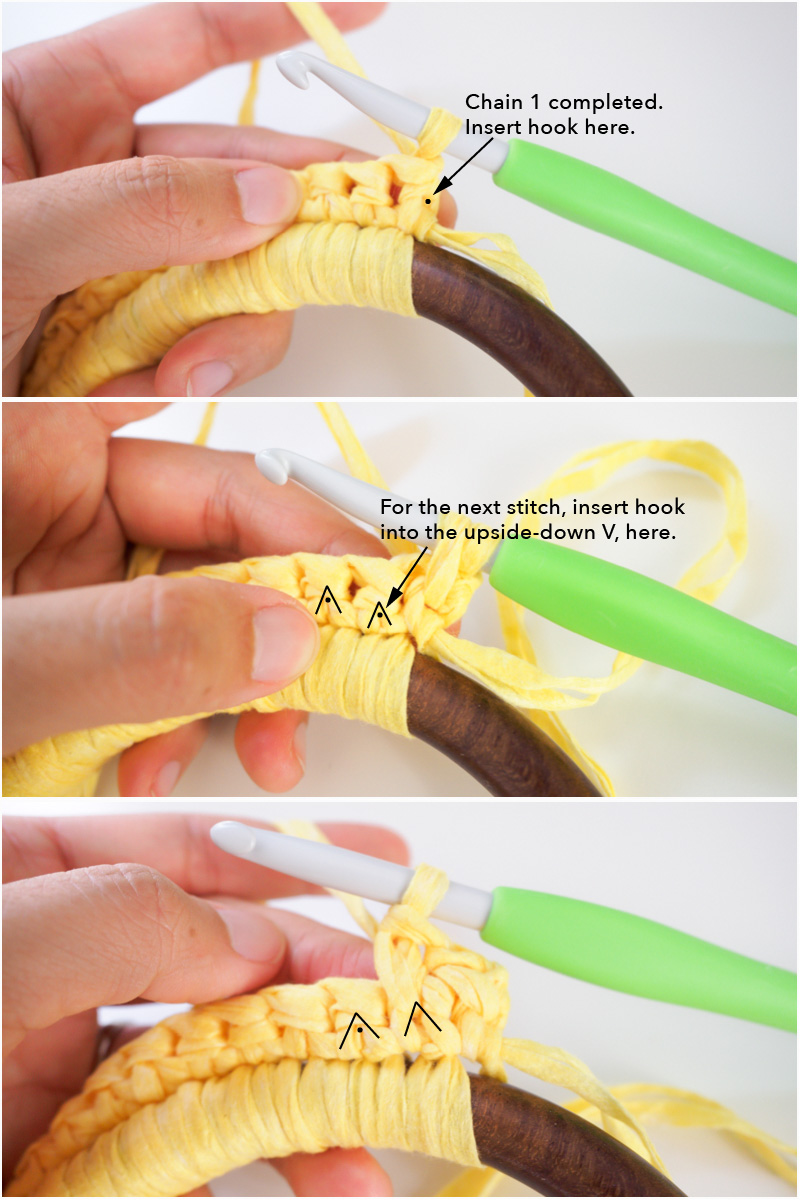
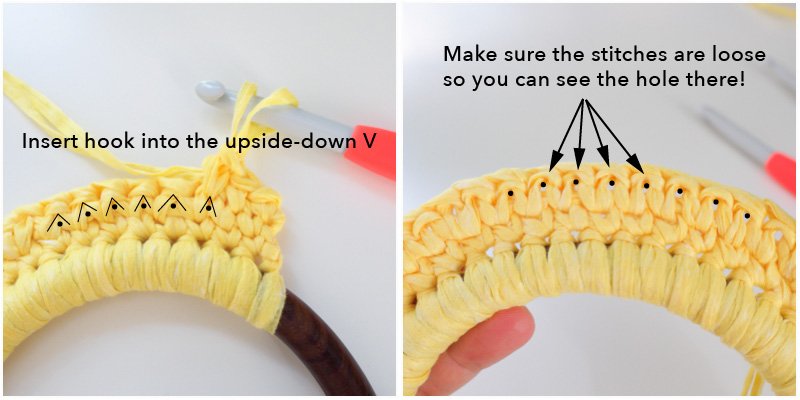
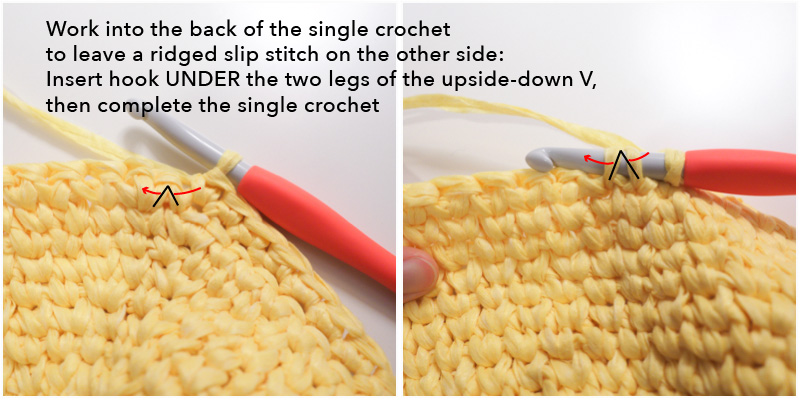
The stitches used in this tote are a bit unique. They are all still single crochet stitches, but instead of working into the 2 loops as you would normally do, these single crochet stitches are worked into the middle V part of the stitch below. Called the waistcoat stitch, or a knit-look crochet stitch, it’s something you see often in hats and other projects worked in the round to create a knit stockinette look. Things get a little trickier when you work this stitch flat, since the back of a single crochet doesn’t have the distinctive V you’re looking for. Instead, you’ll work into the upside-down V to create the same effect. Don’t worry, I’ve got lots of pictures below to help you along!
The beginning and end of each row uses a smaller crochet hook to build the stitches to create a tighter look. Just finish the indicated stitch, switch out the hook for larger or smaller one and then continue. It’s not overly visible in the finished tote, but all those rows do add up to create a tighter weave on the sides.
Remember to leave all stitches a little looser than normal so you can find the right place to insert the hook on your next row! You can always use a smaller hook to find and sort of “carve out” the hole you need in between the upside-down V to insert the larger hook, in case you find your stitches a bit tight. Or, turn your work around to find the upright V, insert your hook and see where it comes out on the working side. Then you can remove that hook and work into that hole properly.
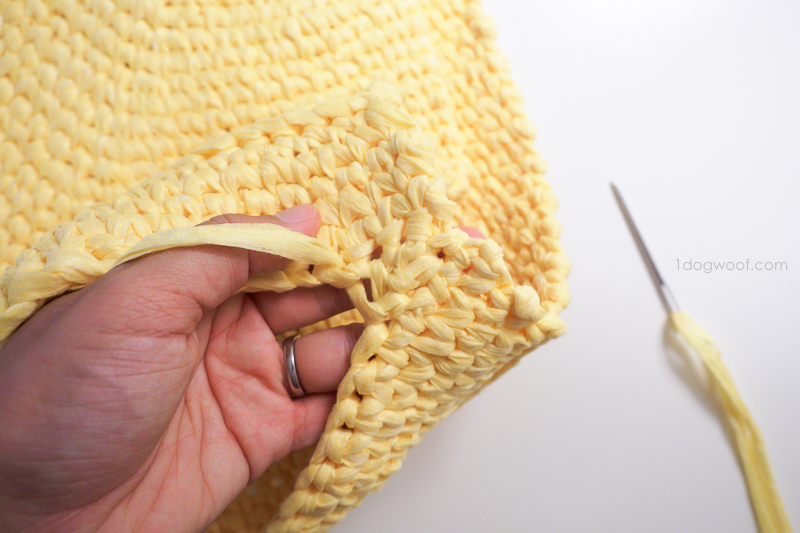
Within a few rows, you’ll see the shape of the bag start to form. Once the bag gets large enough, you’ll add a row of slip stitches to create a distinct edge, and then work a few more rows to form the bottom of the bag.
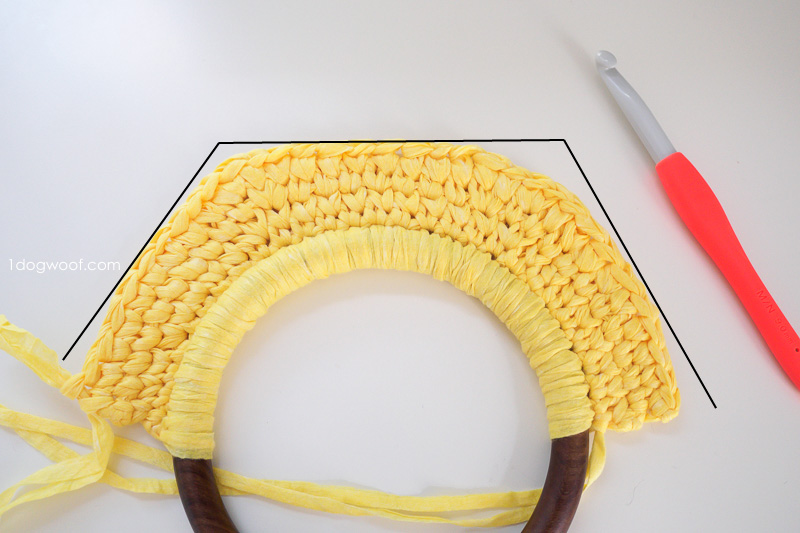
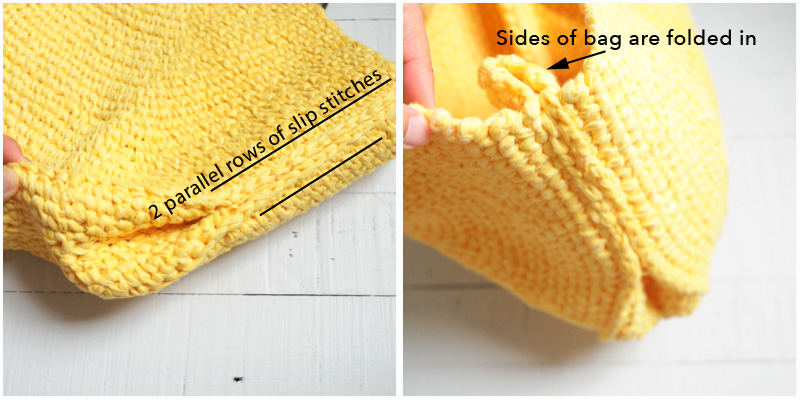
The tote is made up of 2 identical pieces, both worked from the handle downwards. The two pieces are then seamed together, kinda like seaming a boat together down its length. This creates a rather large and flappy opening, so the last step is to pull the edges of the tote in with an extra seam to force that lemon-y shape.
The pattern is shared below, along with step by step instructions and photos on how to start, work the waistcoat stitch, create the slip stitch edge, and assemble the tote. If you would like a printable copy of the pattern, you can purchase an inexpensive PDF from my pattern shops. The PDF will include the full pattern and all the photos, but the photos are all at the end, so you can choose to just print the first few pages for the pattern text, or print it all for the photo tutorial.
More Bags for You
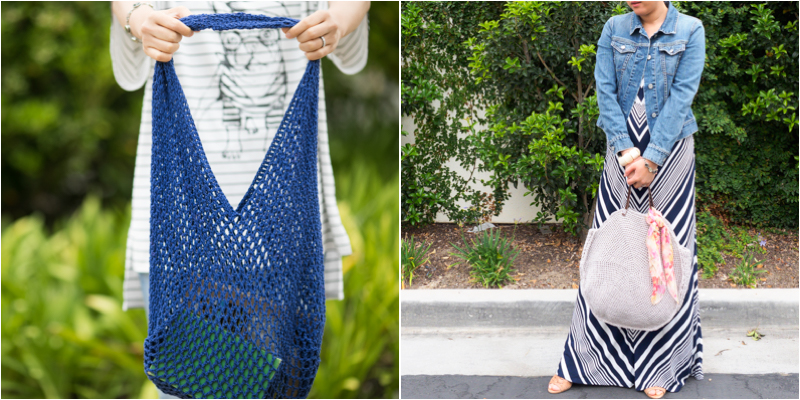
Since I’m on a bit of a bag kick, here’s 2 of my recent bag patterns, also free on the blog. They reflect my love of simple shapes, practical functionality and ease of making something you can be proud of.
Left: Weekend Wanderer Mesh Bento Bag
Right: Sonoma Circle Bag
Riviera Tote Crochet Pattern Instructions and Tutorial
Supplies
- 4 ball of Lion Brand Rewind Yarn*
- K/6.5mm crochet hook
- M/N 9.0mm crochet hook
- Circular Purse Handles*
- tapestry needle
- scissors
Abbreviations
- st(s) – stitch(es)
- sl st – slip stitch
- ch – chain stitch
- sc – single crochet
- wsc – waistcoat single crochet – a single crochet worked into the middle of the stitch instead of through the 2 loops
- inc – increase – work 2 sc in st
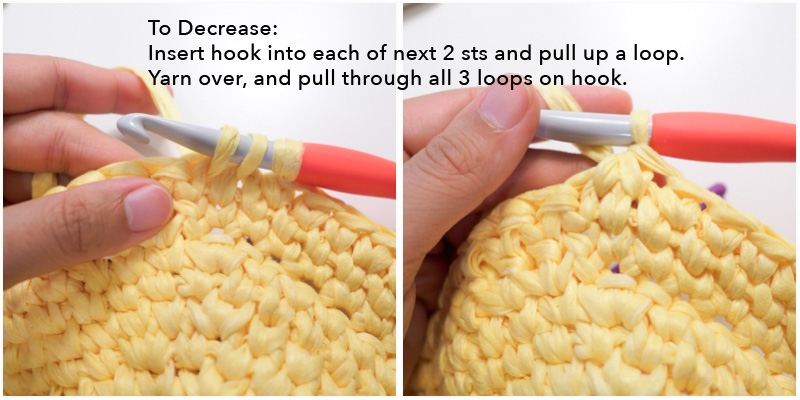
- dec – decrease – work 2 sc together
Pattern Notes
- The tote is worked holding two strands of Rewind Yarn together.
- Remember to crochet each stitch loosely, otherwise, it’ll be difficult to insert your hook into the middle of the working single crochet stitch.
- All waistcoat stitches are worked into the upside-down Vs as shown in the photos.
- Increases and decreases are worked into the upside-down Vs.
Riviera Tote Crochet Pattern Instructions
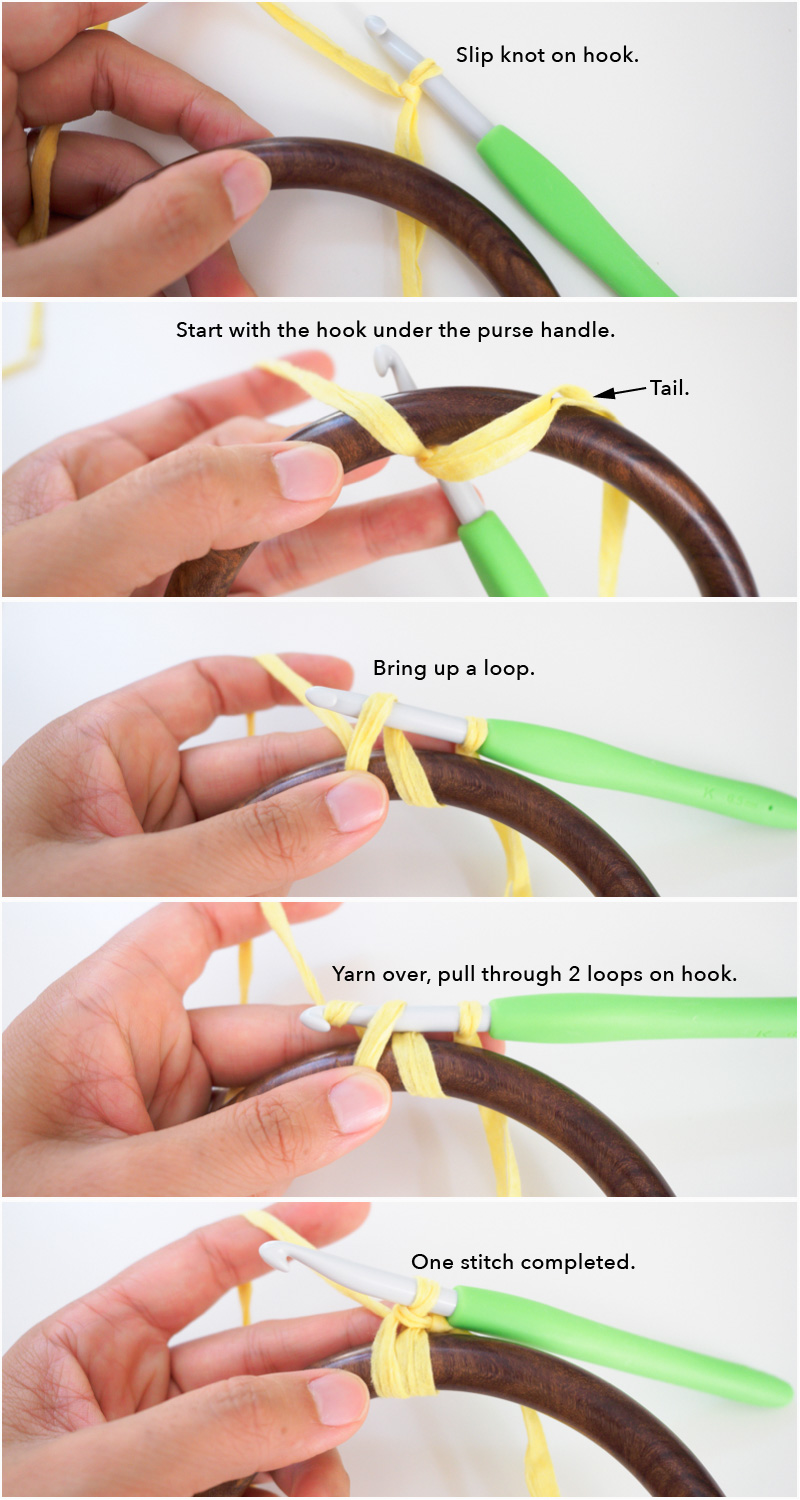
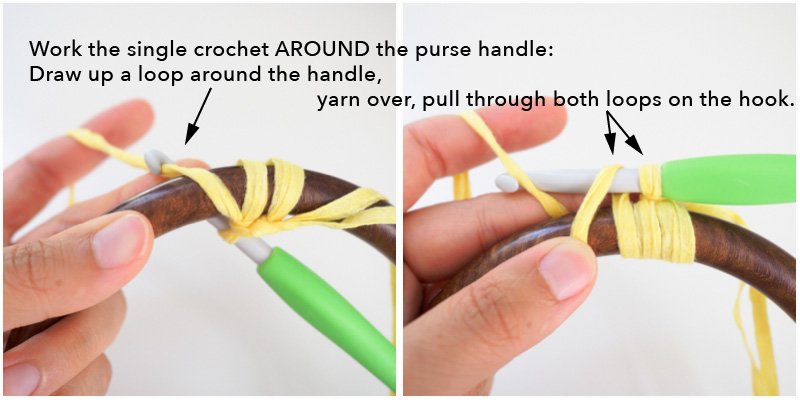
Row 1: K hook – Work 27 sc around purse handle. Turn.
Row 2: K hook – Ch 1. Work 1 sc in each stitch around. Turn.
Row 3: K hook – Ch 1. Work 3 wsc. M/N hook – Work 5 wsc, inc, 9 wsc, inc, 5 wsc. K hook – Work 3 wsc. Turn.
Row 4: K hook – Ch 1. Work 3 wsc. M/N hook – Work 7 wsc, inc, 7 wsc, inc, 7 wsc. K hook – Work 3 wsc. Turn.
Row 5: K hook – Ch 1. Work 3 wsc. M/N hook – Work 6 wsc, inc, 11 wsc, inc, 6 wsc. K hook – Work 3 wsc. Turn.
Row 6: K hook – Ch 1. Work 3 wsc. M/N hook – Work 27 wsc. K hook – Work 3 wsc. Turn.
Row 7: K hook – Ch 1. Work 4 wsc. M/N hook – Work 6 wsc, inc, 11 wsc, inc, 6 wsc. K hook – Work 4 wsc. Turn.
Row 8: K hook – Ch 1. Work 4 wsc. M/N hook – Work 8 wsc, inc, 9 wsc, inc, 8 wsc. K hook – Work 4 wsc. Turn.
Row 9: K hook – Ch 1. Work 4 wsc. M/N hook – Work 7 wsc, inc, 13 wsc, inc, 7 wsc. K hook – Work 4 wsc. Turn.
Row 10: K hook – Ch 1. Work 4 wsc. M/N hook – Work 31 wsc. K hook – Work 4 wsc. Turn.
Row 11: K hook – Ch 1. Work 5 wsc. M/N hook – Work 7 wsc, inc, 13 wsc, inc, 7 wsc. K hook – Work 5 wsc. Turn.
Row 12: K hook – Ch 1. Work 5 wsc. M/N hook – Work 9 wsc, inc, 11 wsc, inc, 9 wsc. K hook – Work 5 wsc. Turn.
Row 13: K hook – Ch 1. Work 5 wsc. M/N hook – Work 8 wsc, inc, 15 wsc, inc, 8 wsc. K hook – Work 5 wsc. Turn.
Row 14: K hook – Ch 1. Work 5 wsc. M/N hook – Work 35 wsc. K hook – Work 5 wsc. Turn.
Row 15: K hook – Ch 1. Work 6 wsc. M/N hook – Work 8 wsc, inc, 15 wsc, inc, 8 wsc. K hook – Work 6 wsc. Turn.
Row 16: K hook – Ch 1. Work 6 wsc. M/N hook – Work 10 wsc, inc, 13 wsc, inc, 10 wsc. K hook – Work 6 wsc. Turn.
Row 17: K hook – Ch 1. Work 6 wsc. M/N hook – Work 9 wsc, inc, 17 wsc, inc, 9 wsc. K hook – Work 6 wsc. Turn.
Row 18: K hook – Ch 1. Work 6 wsc. M/N hook – Work 39 wsc. K hook – Work 6 wsc. Turn.
Row 19: K hook – Ch 1. Work 7 wsc. M/N hook – Work 9 wsc, inc, 17 wsc, inc, 9 wsc. K hook – Work 7 wsc. Turn.
Row 20: K hook – Ch 1. Work 7 wsc. M/N hook – Work 11 wsc, inc, 15 wsc, inc, 11 wsc. K hook – Work 7 wsc. Turn.
Row 21: K hook – Ch 1. Work 7 wsc. M/N hook – Work 10 wsc, inc, 19 wsc, inc, 10 wsc. K hook – Work 7 wsc. Turn.
Row 22: K hook – Ch 1. Work 7 wsc. M/N hook – Work 43 wsc. K hook – Work 7 wsc. Turn.
Row 23: K hook – Ch 1. Work 8 wsc. M/N hook – Work 10 wsc, inc, 19 wsc, inc, 10 wsc. K hook – Work 8 wsc. Turn.
Row 24: K hook – Ch 1. Work 8 wsc. M/N hook – Work 12 wsc, inc, 17 wsc, inc, 12 wsc. K hook – Work 8 wsc. Turn.
Row 25: K hook – Ch 1. Work 8 wsc. M/N hook – Work 11 wsc, inc, 21 wsc, inc, 11 wsc. K hook – Work 8 wsc. Turn.
Row 26: K hook – Ch 1. Work 8 wsc. M/N hook – Work 47 wsc. K hook – Work 8 wsc. Turn.
Row 27: K hook – Ch 1. Work 9 wsc. M/N hook – Work 11 wsc, inc, 21 wsc, inc, 11 wsc. K hook – Work 9 wsc. Turn.
Use M/N hook from this point forwards. (Using a smaller hook to help find the sts may help if your sts are too tight.)
Row 28: Ch 1. Work 22 sl sts, inc, 19 wsc, inc, 22 sl sts. Turn.
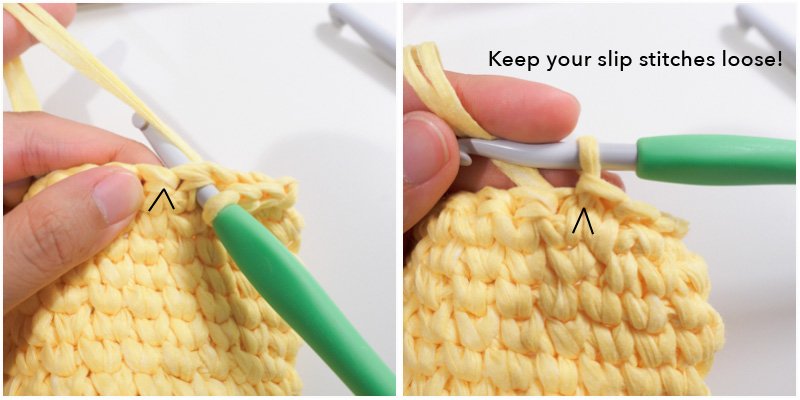
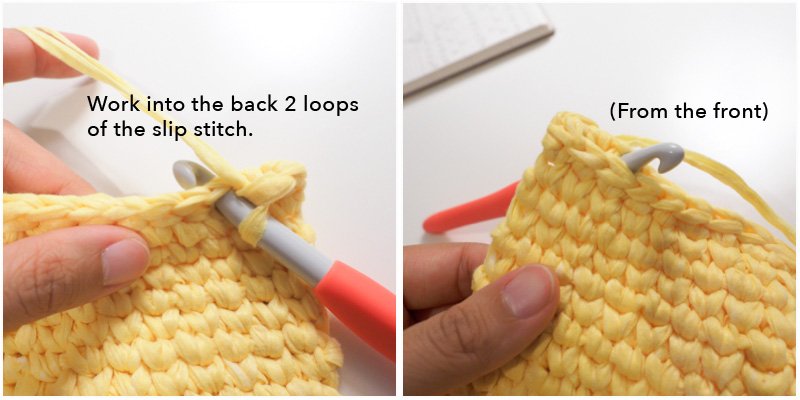
Row 29: Ch 1. Work 22 sc in back loop of sl st, 23 sc in back 2 loops of each st, 22 sc in back loop of sl st. Turn.
The first pic below shows where to work into the back loop of the 22 slip stitches. Then when you hit the 23 single crochet stitches, you’ll want to work into under the 2 legs of the upside-down V instead of through the V to the other side.
Row 30: Ch 1. Work 1 wsc in each st across. Turn.
Row 31: Ch 1. Work 21 wsc, dec, 21 wsc, dec, 21 sc. Turn.
Rows 32-33: Ch 1. Work 1 wsc in each st across. Turn.
At the end of Row 33, fasten off, leaving a tail for seaming.
ASSEMBLY
With the ridged slip stitches facing out, seam the two pieces together along the bottom using the mattress stitch.
On the sides of the purse, bring the slip stitch ridges together. The sides of the purse will be folded into the bag.
Using a length of yarn, insert needle into the horizontal bar below each slip stitch and join the two sides of the purse together, with the slip stitches lined up next to each other. Do this down both sides of the purse approximately 6 inches.

Fasten off and weave in all ends.
Unlike other bags where you have to add the handle to it when the body is finished, for the Riviera Tote, you’re done once you seam everything together, since it was worked with the handle built in!
Check out my pattern shops on Ravelry and Etsy where you can purchase printable PDFs of my latest crochet patterns. These PDFs are formatted without comments or ads, and have instructional photos at the bottom for optional printing.
I sometimes include affiliate links in my supply lists. Purchasing from these merchants earns me a small commission with no extra cost to you, and goes towards supporting One Dog Woof.
Please be respectful and do not sell or distribute this pattern in any way, especially as your own. Instead, share the original blog post link! You can sell finished products made from this pattern by giving credit to One Dog Woof as the pattern designer and linking to the blog post. If you have any questions regarding distribution or translation of this pattern, please see my Terms of Use. Thank you for your consideration!


Is there no need to line the Riviera Tote? Is it stitched tightly enough to prevent small items from coming through the fabric and then falling out? My greatest concern with crocheted bags is that items will work their way through and fall out. And like you, I really love bags of all kinds!
Is it possible to use larger handles without adjusting the entire pattern?
Where is the increase of 3 wsc
I couldn’t see them in the photos?
Hi I was wondering about the 3 was stitches are they placed in one v stitch or how are they placed thanks
Hello,
What is the handle’s size of cm, please?
The link to the circular handles is broken. What is the size of the handles? Love this handbag!
I love the pattern. What I do not see in the instructions the total number of stitches I should have at the end of each row. I am assuming that you cast on 27, so you begin with 26. And then just add the number to get the next total? Typically on a pattern, that row number is included in the instructions. That helps a lot to have that. Thank you. Looking forward to your REPLY
When I posted my comment I made a typo. here is what I meant to ask..Typically on a pattern, each row would include the number of stitches for the row. That helps a lot to have that.