
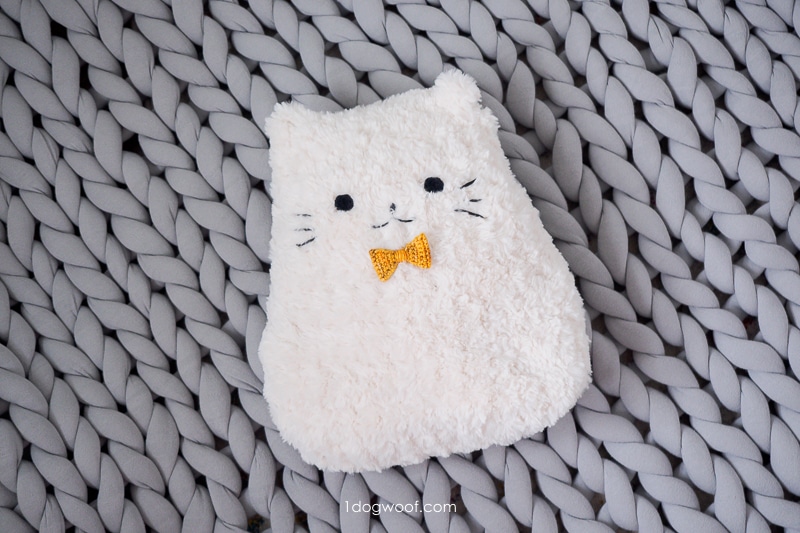
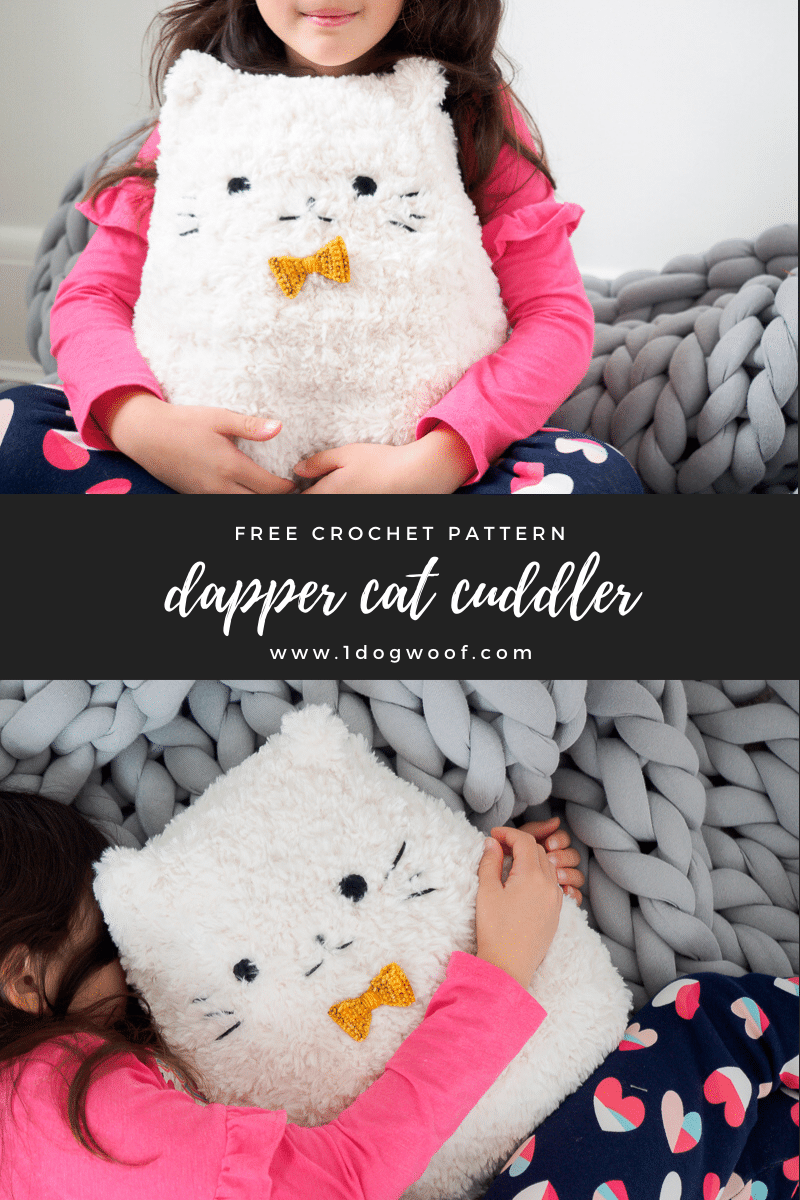
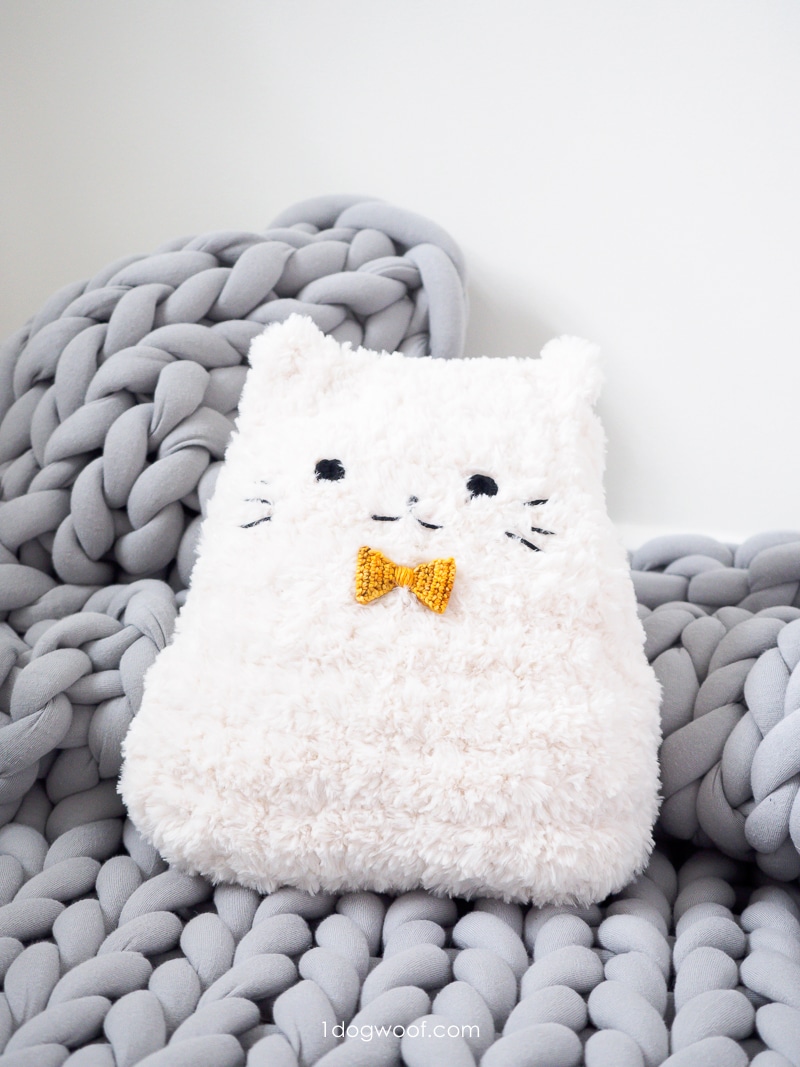
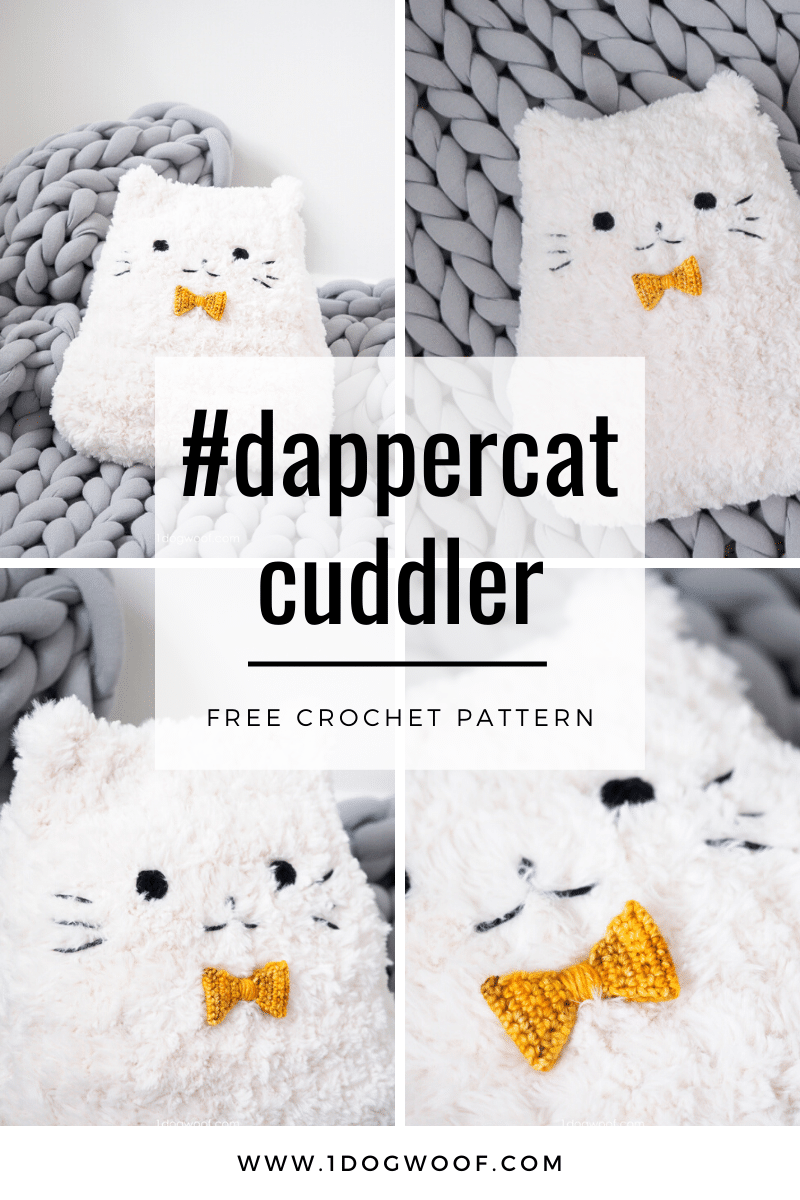
I always have a hard time naming my patterns, but for some reason, this one came easy. This soft and snuggly guy was screaming #dappercat as soon as I put the bowtie on him. Of course, being a dapper cat, he wasn’t so much screaming as he was basking in his own adorableness. Anyways, I think Mr. Dapper Cat crochet cuddler is the only major stuffed toy I’ve made all year. I absolutely love him, and I hope you do too!
When my sister and I were kids, she had this cute cat pillow that I wasn’t never really allowed to play with. Maybe because it was a gift, or because it was white fur; whatever the reason, the pillow is in shockingly good condition. It resides at my mom’s house, far away from my kids’ grubby hands.
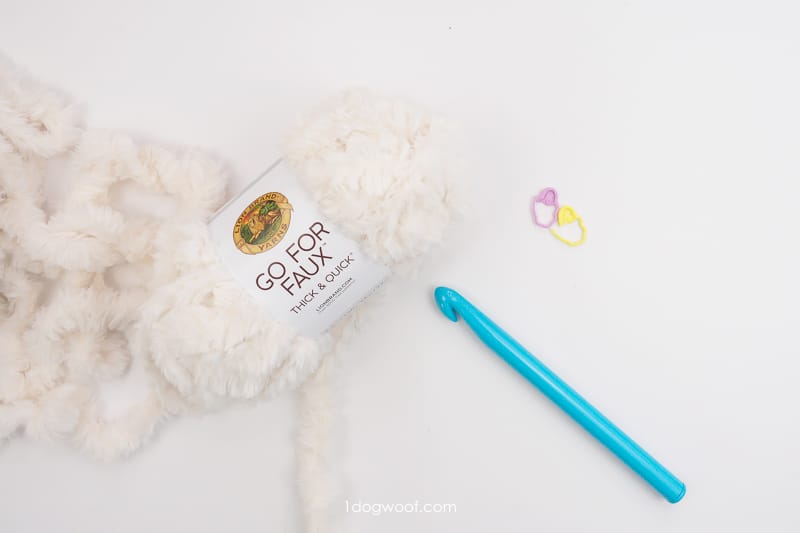
Meanwhile, in my crazy home office, I had 4 skeins of Lion Brand Go For Faux Thick and Quick burning a hole in my yarn shelf. I was intending to use it for my faux fur Alpine Sheepskin, but at only 24 yds a skein, the Thick and Quick yarn wasn’t a reasonable choice to use for a rug. I had a few furry design ideas jotted down on random post-it notes here and there, but it wasn’t until my mom and my sister came for a visit that I decided to revisit my childhood and make my own version of the toy that always felt a bit off-limits.
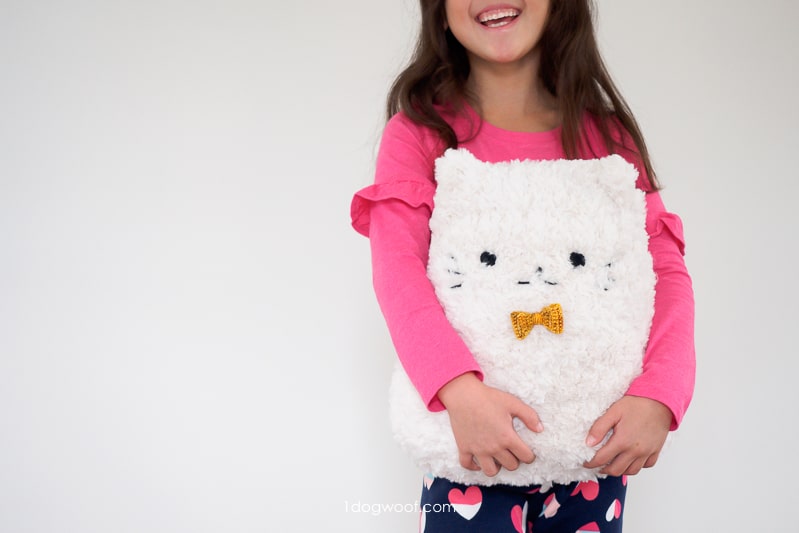
My new #dappercat crochet cuddler is big, hefty, super soft, and has already found a home in my daughter’s bed. He won’t be an off-limits toy in our house; he’s meant to be hugged and kissed, snuggled for comfort, and be a general provider of all things cozy.
——————————————
Purchase an ad-free PDF of the Dapper Cat pattern from Ravelry
Save this for later on Pinterest!
——————————————
The Yarn
Yes, you read it right. Lion Brand’s Go For Faux Thick and Quick only has 24 yds per skein. It’s still a hefty 120g per skein, so you can imagine the weight of this chunky yarn. In fact, it’s listed as a 7-Jumbo yarn, one category above the usual super-bulky. The feel of working with this yarn is indescribable. It’s just SO thick and furry, and slides so well on the ginormous 15mm crochet hook I used. Obviously, the yarn works up incredibly fast, and each stitch just eats up yardage. The Dapper Cat crochet cuddler uses 4 skeins of the Go For Faux Thick and Quick, and it’s only 12 inches wide x 14 inches long!
Working with furry yarn like this means it’s almost impossible to see your stitches. You have to feel each stitch, and use stitch markers to help mark the first and last stitches of each row. On the other hand, mistakes are also nearly impossible to see, so even if you inserted your hook through the wrong loop, you won’t be able to tell. It gives a lot of leeway for sewing up seams and weaving in ends too.
And if you’re worried about shedding, you’re in luck! I got more lint on me from the fiberfill stuffing than I did from a few hours of working with this yarn on my lap. There’s absolutely no shedding at all.
Go For Faux Thick and Quick comes in a few beautiful colors. I’m itching to make a few more of these furry crochet cuddlers from some of the other color options!
The Construction
The Body
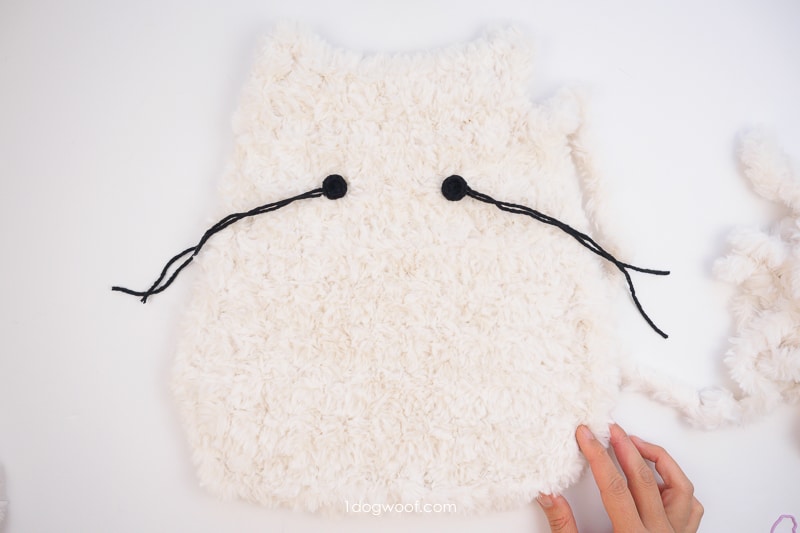
The dapper cat crochet cuddler is made up of 2 almost identical panels, one front and one back. A face is sewn (embroidered?) onto the front panel, and then the 2 panels are seamed together using the mattress stitch and stuffed. That’s basically it!
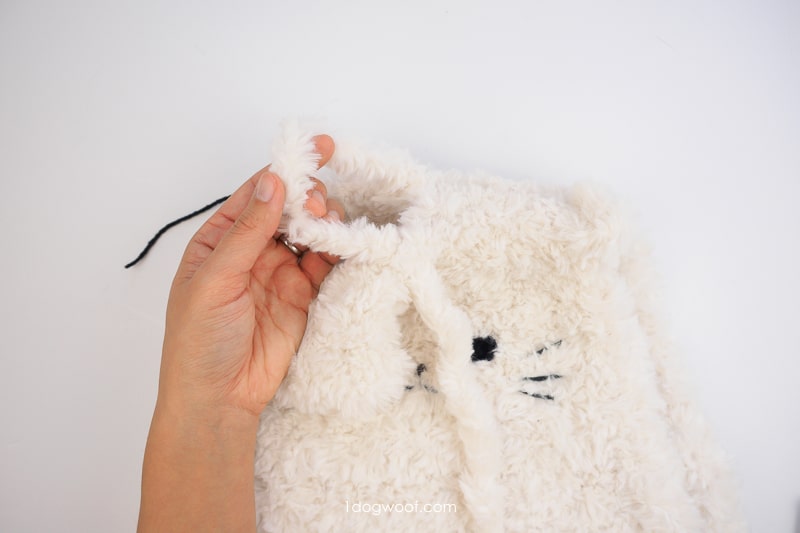
I say almost identical panels because you only need to make the ears once, on the front panel. The back is just a simple trapezoid shape. When you join the two panels together, you’ll join the panels excluding the ears, so they stick up on their own.
The thing you need to watch out for in this project is yarn usage and gauge. Using yarn this thick, you can’t help but have holes in your work – the stitches are just too big – but the faux fur halo helps fill in those holes and prevents any stuffing from falling out. You can try using a smaller hook to make your stitches tighter, but then you’re playing yarn chicken with how many yards your stitches will eat up. So, I’ve provided my gauge in the instructions below, and it’s highly recommended to stay close to those numbers.
I used 2 full skeins for each panel, but there was some variability in those 2 skeins. On the front panel, I had a few yards left, which I used to join the panels. On the back panel, I didn’t even make the ears, and barely had enough to roughly weave in ends.
The pattern calls for 4 skeins of yarn, but I recommend purchasing a 5th skein just so you have a bit of buffer, especially a buffer from the same dye lot. That way, if you do run use every last inch of 2 skeins for each panel, you still have plenty to use to join the panels together.
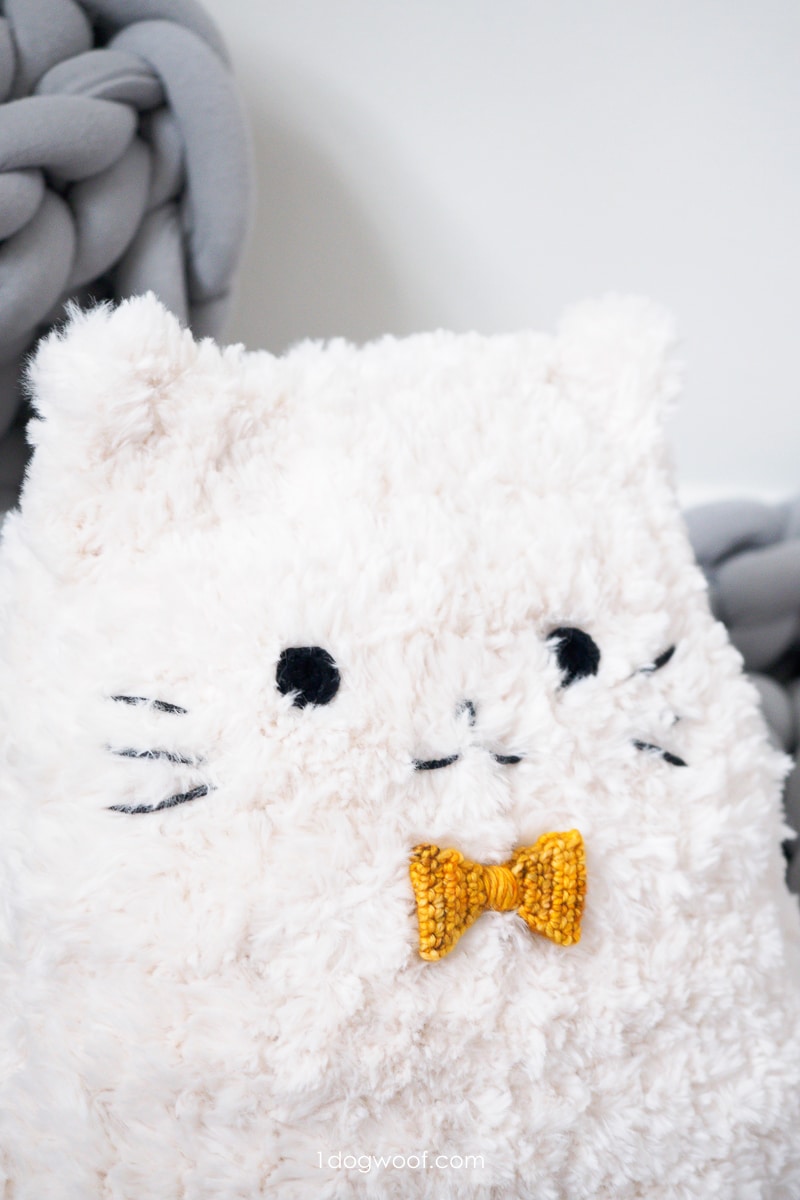
The Face
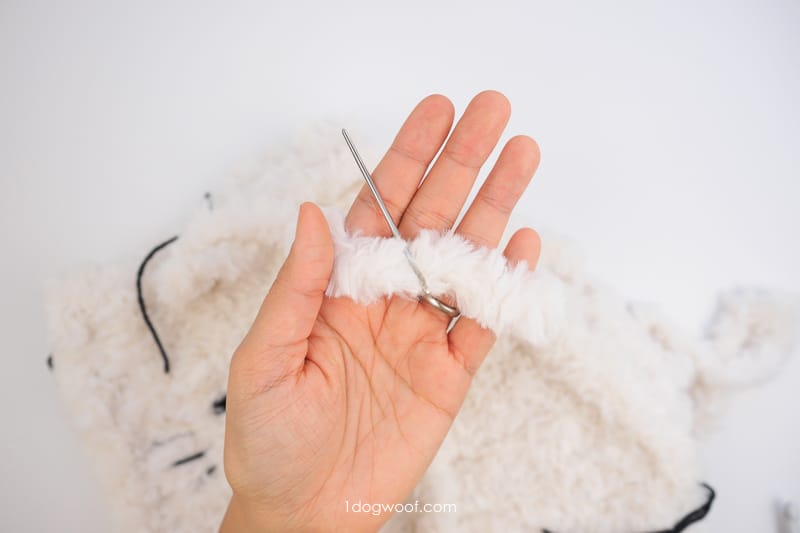
There’s really no easy way to explain the exact embroidery process. The eyes are easy enough – you make a single round of half double stitches in a magic circle. The difficulty comes in finding where to put your tapestry needle. Remember that because the chunky stitches are so large, the crochet fabric is quite loose. You want to make sure to sew your tapestry needle into something of substance, not through a gaping hole of a stitch. Even sewing through the fur halo itself can help secure your black yarn.
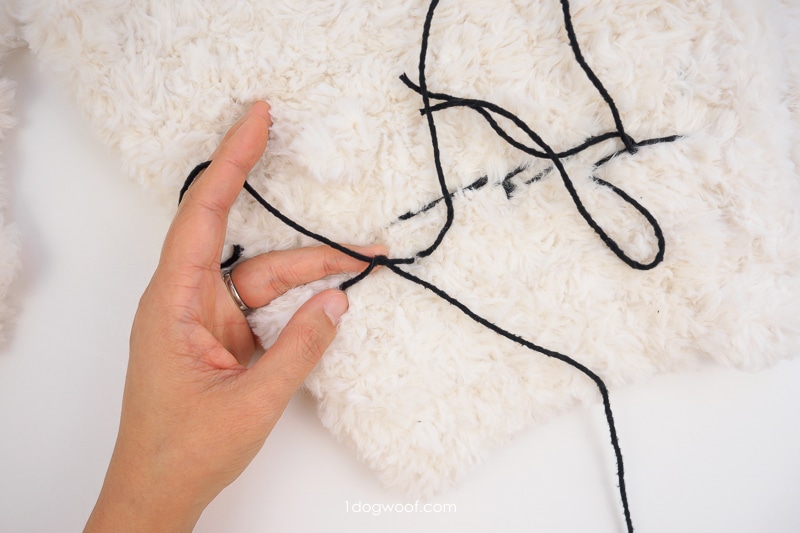
In general, the face assembly is a bit of a trial and error process. I suggest sewing the whole face on – eyes, whiskers, nose – through solid parts of the fur yarn, leaving all the ends loose. Also leave each stitch fairly loose, you want it to stick out from the furry fabric. If you pull too tightly on the black yarn, you’ll lose it in the fur completely. Only when you’re fully satisfied with the placement of all pieces, then turn the front panel around and tie the ends to each other. I found that you don’t really need to weave anything in, just secure the black yarn with knots to prevent anything from falling out. Then, because you left the stitches loose, you can adjust each whisker or nose piece as necessary to clear it from the fur, without pulling any ends out.
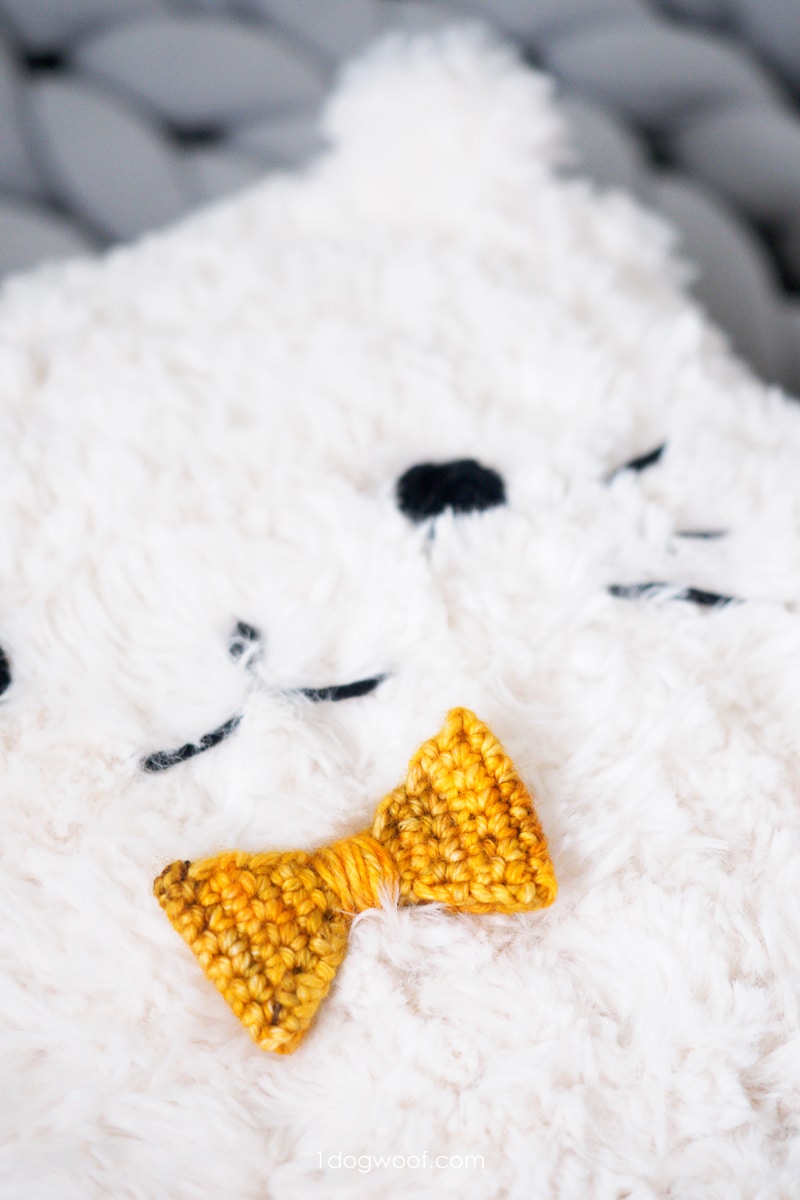
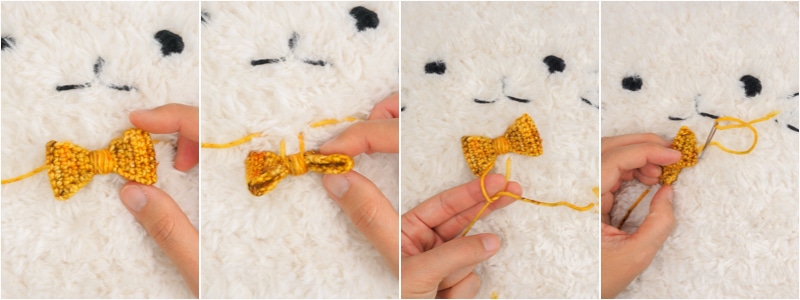
And finally, the cute crochet bowtie. The Mini Crochet Bowtie is a separate post with a free pattern and a picture tutorial. This is where you can get crazy and use any leftover bits of brightly colors, hand-dyed gorgeousness to dress up your dapper cat!
Dapper Cat Crochet Pattern
Supplies
- 4 (5 for margin of error) balls of Lion Brand Go For Faux Thick and Quick in Baked Alaska (120g/4.2oz, 24yds, 22m)
- Q/15.00mm crochet hook
- several yards of black yarn (shown in sample: Lion Brand Feels Like Butta in Black)
- G/4.00mm crochet hook
- Fiberfill stuffing
- Tapestry needle
- Scissors
- Stitch markers
- Mini crochet bowtie
Abbreviations and Stitch Guide (US terminology)
- st(s) – stitch(es)
- ch – chain stitch
- sl st – slip stitch
- sc – single crochet
- inc – increase: work 2 sc in same st
- dec – decrease: Insert hook into next st and pull up a loop, twice – there are 3 loops on hook. Yarn over and pull through all 3 loops.

Pattern Notes
- Skill level: Easy
- Gauge: 4 sts and 5 rows in 4 inches
- Finished size: 12 inches wide by 14 inches long (one size)
- This pattern entirely uses up all 4 skeins of the Go For Faux Thick and Quick. Be aware of your gauge as you work to ensure there’s enough yarn for completion.
- When working with faux fur, you’ll need to feel for the next stitch in which to insert your hook. This difficulty in seeing stitches means that mistakes are harder to see, and harder to fix.
- The ch 1 at the beginning of each row does not count as a stitch.
- The beginning tail should be on the bottom left when right-side facing.
- You’ll want the clumping type of polyester fiberfill for this project. The faux fur masks most of the holes made with the extra large hook, so the fiberfill won’t just fall out, but you don’t want the small loose stuff.
Instructions for Dapper Cat Crochet Cuddler
Front Panel
- Faux fur yarn
- 15.00mm crochet hook
Row 1: Starting with a short tail to conserve yarn, ch 13. Turn.
Row 2 (RS): Ch 1. Starting from the 2nd ch from hook, work 12 sc across. Turn. (12)
Row 3 (WS): Ch 2 (counts as st). Work 1 sc in same st. Work sc across to last st, inc in last st. Turn. (14)
Row 4 (RS): Ch 1. Work sc across, making the last sc in 2nd ch of ch 2 from previous row. Turn. (14)
Row 5-7: Ch 1. Work sc across. Turn. (14)
Row 8 (RS): Ch 1. Work 1 sc, dec, 8 sc, dec, 1 sc. Turn. (12)
Row 9-11: Ch 1. Work sc across. Turn. (12)
Row 12 (RS): Ch 1. Work 1 sc, dec, 6 sc, dec, 1 sc. Turn. (10)
Row 13-14: Ch 1. Work sc across. Turn. (10)
Row 15: Ch 1. Work 1 sc, dec, 4 sc, dec, 1 sc. Turn. (8)
Row 16-17: Ch 1. Work sc across. Turn. (8)
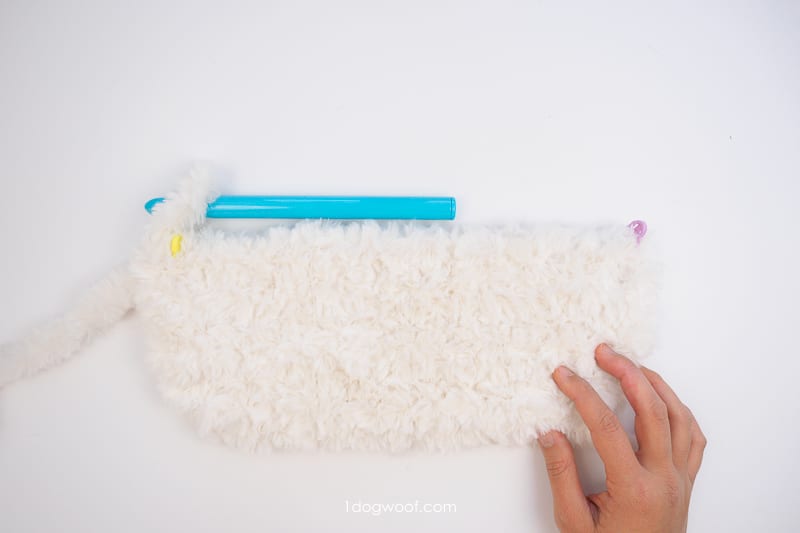
Row 18: Ch 2, sl st into the first ch st, sc into first st of row, 6 sc across, ch 2, sl st into first ch st, sc in last st.
Without fastening off, work sl sts evenly down the side, along the bottom, and up the other side. Fasten off just below the right ear. Note: You shouldn’t need to cut yarn in order to fasten off. There should be some yardage left for sewing front and back together.
Back Panel
- Faux fur yarn
- 15.00mm crochet hook
Repeat Rows 1-17 of Front Panel.
Row 18: Ch 1. Work sc across. (Do not make the ears on the back panel)
Without fastening off, work sl sts evenly down the side, along the bottom, and up the other side. Fasten off at top right corner. Weave in yarn end.
Eyes (Make 2)
- Black Yarn
- 4.00mm crochet hook
Start with a 6 inch beginning tail. Work a magic circle. Ch 2, work 8 hdc into magic circle. Do not join.
Cut yarn, leaving a 8 inch length.
Pull tail through last st and work an invisible join. Modification – work the invisible join into the first sc of the round, not the 2nd.
Face
With the Front Panel right side facing, place the eyes about a quarter of the way down from the top, evenly centered.
Insert the beginning tail of each eye through exactly where you want the eye to sit.
Insert the end tail of each eye to the back side, sewing as necessary to secure eye to fur. Double knot both tail ends together on back side to secure.
Cut a length of yarn, a few yards long. This is used to embroider the whiskers and nose. You’ll want to sew the whiskers fairly loosely because if they’re too tight, they’ll get lost in the fur.
Starting from the top right, bring the yarn from back to front for the top right whisker. Sew on 3 whiskers, then bring the yarn to the middle to embroider the nose. Following the nose, sew the “mouth”, leaving it slightly loose so it curls up in a smile. Bring the yarn to the left side and sew on 3 whiskers.
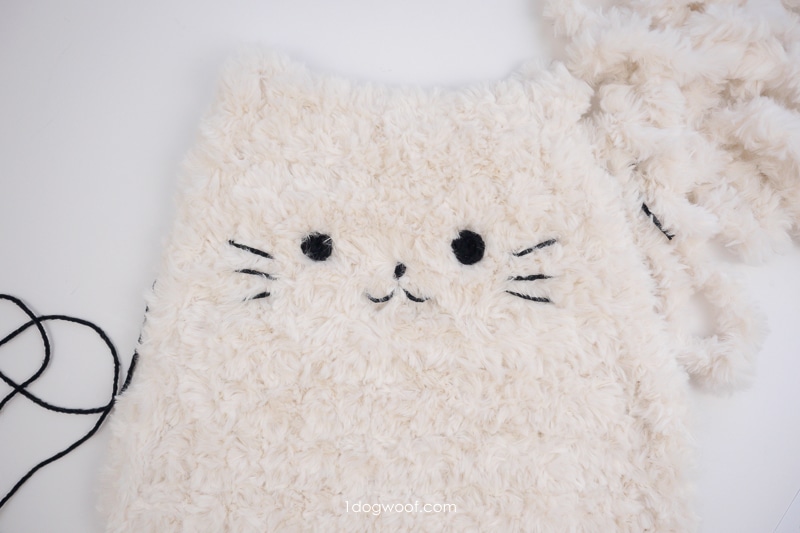
Secure the ends in the back by tying it to another loose end tail. You want to prevent the yarn ends from coming undone and through the fur, but still want to keep the whisker and mouth stitches loose for adjustments.
Attach the crochet bowtie centered and slightly below the face. (The photos below show the bowtie being attached after the cat cuddler is complete. It’s easier to attach the bowtie directly to the front panel before assembly.)
Assembly
Use the leftover faux fur tail end of the front panel to mattress stitch the two panels together.
** This is where you might need to break into another ball of yarn if you’ve used up 4 skeins of yarn for the panels themselves. You’ll at least a few yards of yarn to sew up the sides, since the yardage for the chunky fur goes quick. **
Thread the faux fur yarn onto large tapestry needles.
Work the mattress stitch across the top of the cat, working around the ears so they don’t get sewn into the seams. You may need to sew through the ear itself to secure the 2 panels, but the faux fur will cover up any errant stitching. Continue working the mattress stitch down the side, along the bottom, and halfway up the other side.
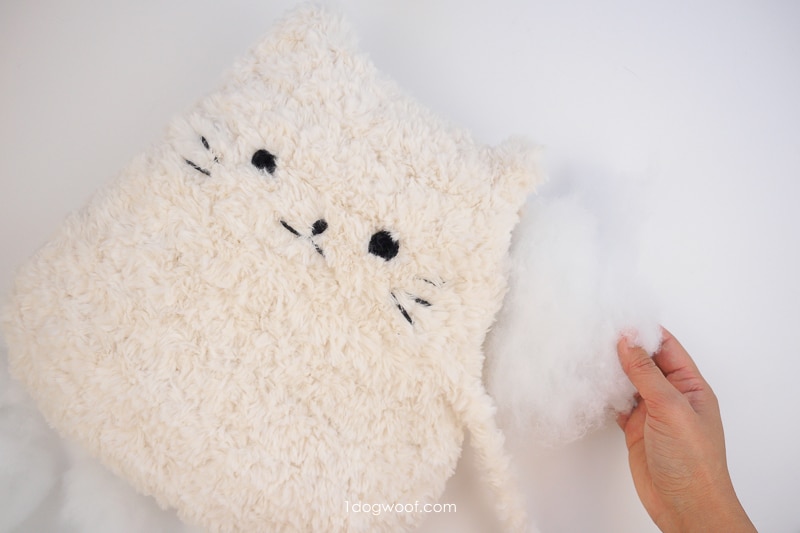
Stuff the cat loosely with large clumps of polyester fiberfill. Continue working mattress stitch to close up the rest of the cat. Fasten off and weave in the end.
And that’s it!


Love the kitty, will try to make for my great granddaughters. What is the Gray yarn used as a backdrop for the kitty? Thanks.
Thanks! The gray chunky blanket is from Ohhio, but they are now out of business. You can find a similar yarn at Lion Brand: http://bit.ly/yooge-yarn
He is awesome Chiwei !!! So pretty big for cuddles 🙂 and I can imagine the ‘nightmare’ to crochet such fluffy yarn 😉
Thanks for sharing as always.
Happy weekend !
What a fun kitty pillow. I loved crocheting with the faux fur yarn! So soft and sweet. I made a pillow form of the kitty with muslin and stuffed it with poly fiber fill .Then placed the pillow form in the crocheted kitty. Worked perfectly as a pillow filling. ???? My grand daughter is going to love this kitty too!
Aw~ What a cute pattern! This will be a great gift idea!
How about a puppy????
What a great use of the Go For Faux yarn!! Well done!!
Very cool toy. I think my baby will really like this gift. I wish your blog prosperity, very good and useful information.