
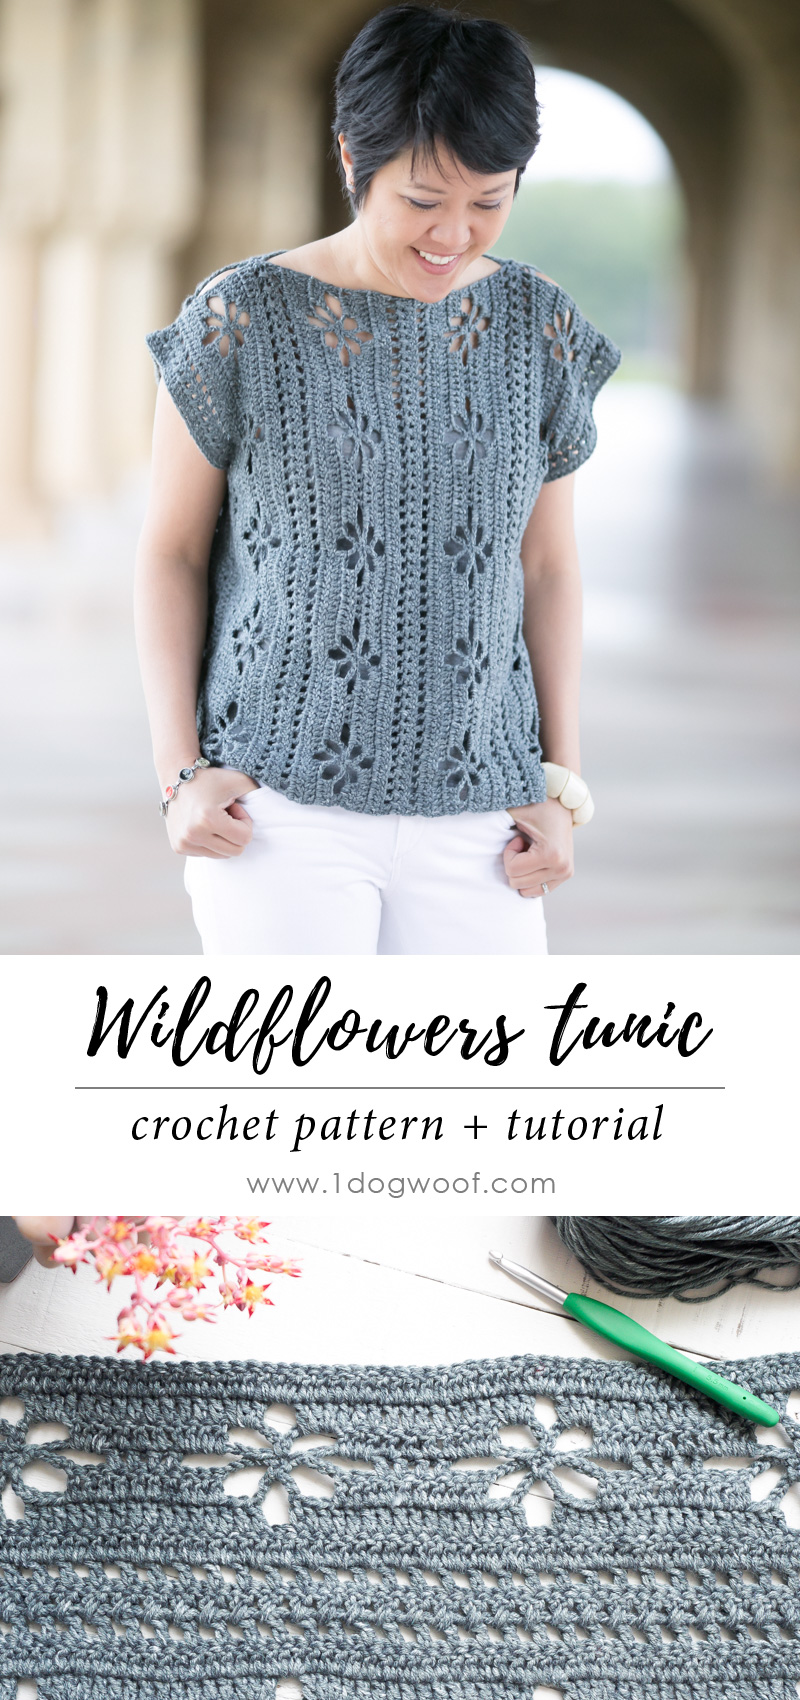
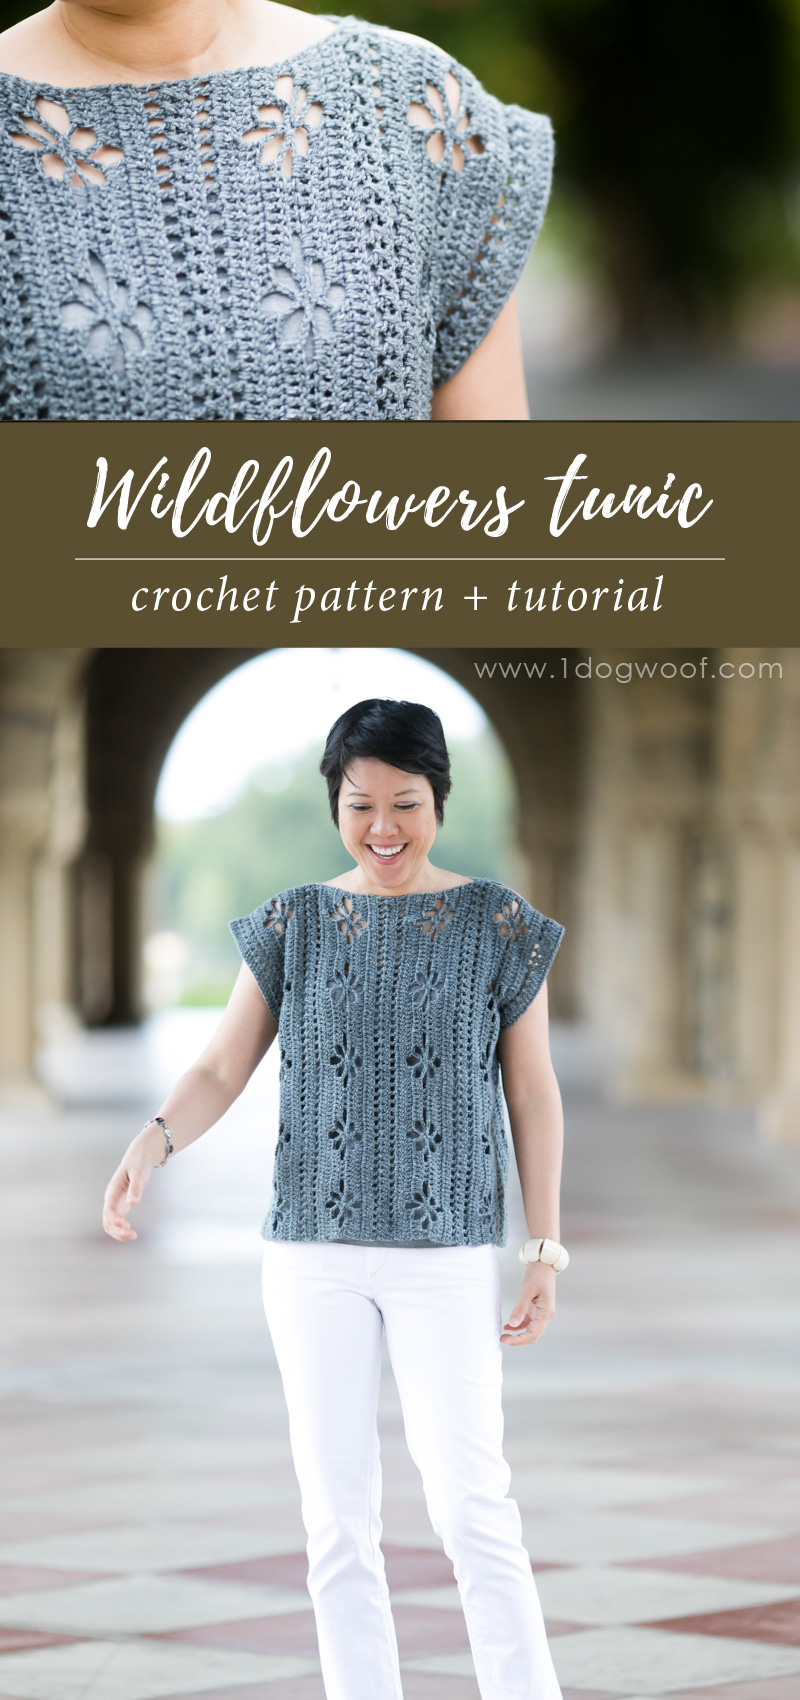
The Wildflowers Tunic top is a bit of a different thing for me, since I don’t normally make or wear anything lacy, preferring the more casual look. But I’ve had a particular stitch in mind for a while and finally decided to pair it with a simpler pattern to keep things light and not overly stuffy.
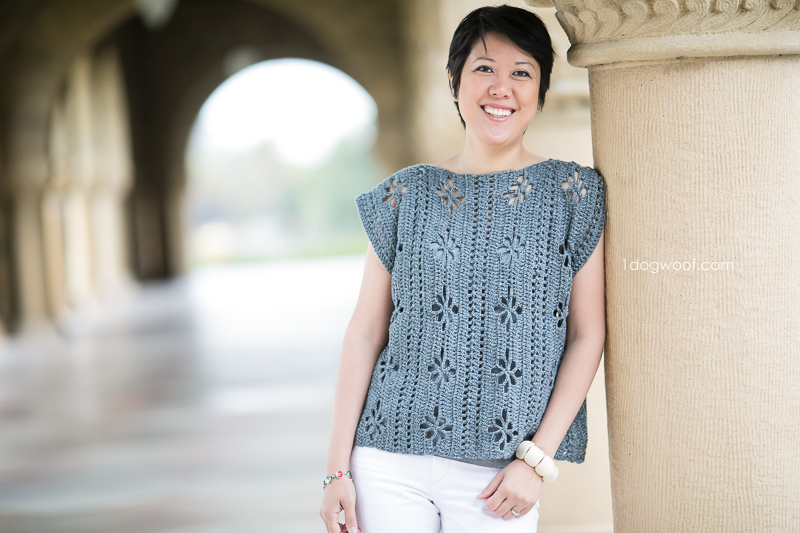
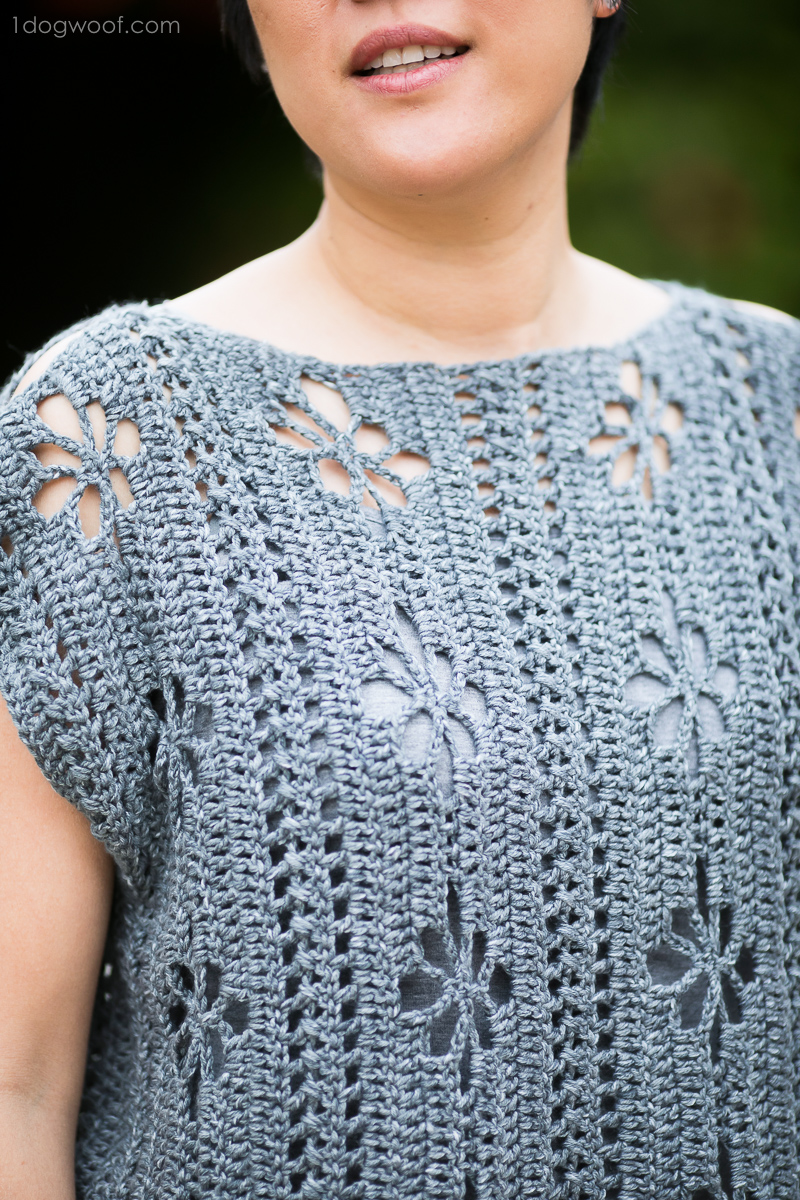
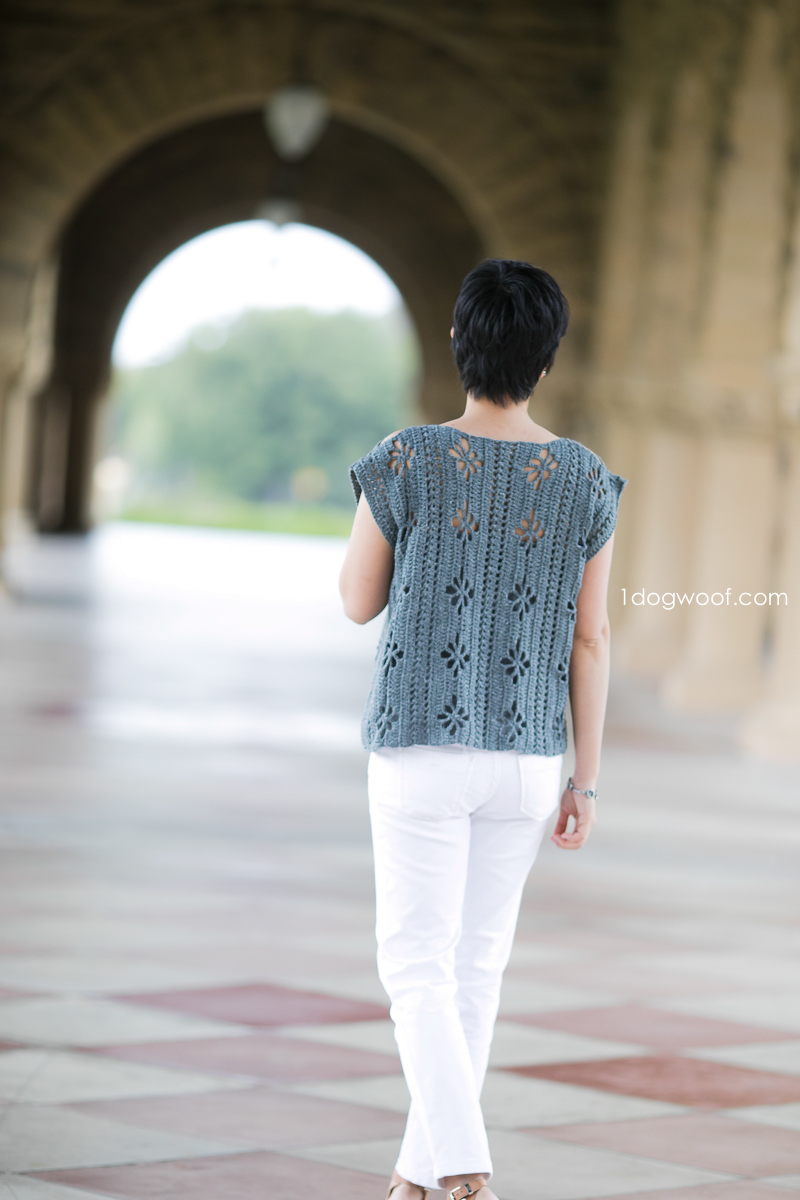
The stitch I was interested in is sometimes referred to as a spider stitch, because it has 8 “legs” that come out from center. But the negative space created by those legs look like petals to me, and a flower felt more fitting for what could be a really sweet project. I did a bit of online searching and learned that 1. Wisconsin has a very extensive website for identifying wildflowers, and 2. flowers sometimes have very strange names. I decided to rename this particular spider stitch (because I HATE spiders) to the Poppy Stitch, and the shirt represents a field of wildflowers.
For this top, I used Lion Brand’s Jeans yarn, because I am a huge fan of how soft this yarn is. The Tangram Wrap is one of my favorite scarves, made with Jeans yarn, and I just wanted another opportunity to wear this softness close to my skin. The colors in the Jeans collection represent different fades of denim, and each one is both accurate and beautifully neutral. I chose Vintage because I had it on hand, and it’d be easier to work with than the darker Stovepipe that I also had at home. This yarn isn’t as warm as Lion Brand’s Superwash Merino, so it works really well for a spring/summer top. I probably wouldn’t wear it in a heatwave though.

The construction of the Wildflowers Tunic is fairly simple, but the sizing gets a little harrowing because of the stitch pattern repeats. Below are the instructions for sizes S and XL so you can see how I’ve extended the patterns for 2 different sizes. Exact instructions, a stitch chart and a schematic are available to purchase for a small fee through my pattern shops.

At its core, this shirt is once again 2 rectangles seamed up the sides and along the shoulders. Because the motif is already quite lacy, I added shoulder slits to really give it an airy feel. Each panel of the shirt is worked side to side, not top to bottom, so additional rows in the panel give you additional width, while extra stitches give you additional length. Both the width and the length are dictated by stitch patterns repeated at specific intervals, so it’s hard to really create a custom size. That’s ok though, because this is meant to be a loose-fitting tunic top worn over a camisole, so you don’t necessarily need a very specific fit. I made myself a size S, but I could have comfortably worn a size M for a more oversized look. You can even make it extra large to use as a swim cover-up!
The length of the shirt is dictated by the number of stitches in the Poppy Stitch motif, which is the actual flower, plus a few stitches around it to give it structure. This is an 18 stitch repeat, so you can add in more poppies every 18 stitches. The width of the shirt is the number of rows you’re working. The entire Poppy Stitch is completed in 5 rows. Then there are 5 rows in the Spacer Motif. Repeat those 2 motifs to get the body of the shirt. You can think of this top as a big ol’ palindrome – the right side is the same as the left side, frontwards and backwards!
And that’s really it. There’s no edging to worry about; it’s just a very light and casual top that is sweet and feminine but literally with a bit of a rough edge. I guess it’s kinda like me, a little bit of different personalities and quirks!
As I mentioned above, I’ve given exact instructions for sizes S and XL so you can see how the pattern is sized up. You can do a bit of math to figure out the stitch counts for your preferred size, or head on over to my pattern shops to purchase an inexpensive PDF which includes details for sizes XS to 2XL, along with a stitch chart showing the exact repeats and a full schematic to follow. You can also purchase the Jeans yarn + pattern in a full kit from Lion Brand Yarn!
——————————————
Buy the pattern from Ravelry or add to your Ravelry queue
Buy the Wildflowers Top Crochet Kit from Lion Brand Yarn*
——————————————
Supplies
- S – 3 (XL – 5) Skeins of Lion Brand Jeans Yarn in Vintage (3.5oz/100g, 246yds/225m)
- Size I/5.5mm crochet hook
- tapestry needle
- scissors
Abbreviations
- st(s) – stitch(es)
- sk – skip
- ch – chain stitch
- dc – double crochet
- sc – single crochet
- sp – chain space
Pattern Notes
- Skill level Easy.
- The below pattern is written for S and (XL). Other sizes (XS, S, M, L, XL, 2XL) can be found in the paid PDF.
- Gauge: 15 sts and 8 rows in 4 inches.
- Dimensions: 24” (28.8”) long, 21.5” (29.5”) wide
- Model is wearing size S.
- This is constructed to be a loose-fitting oversized top, so you don’t need to have an exact fit. You can customize your fit based on how oversized you would like the garment to be.
- This top is worked sideways.
- To adjust length, add or subtract foundation stitches by multiples of 18. Each 18-stitch repeat will add 4.75” to the length of the garment.
- All Ch 3 counts as a stitch.
- Pattern Repeat (for each size) (P = poppy stitch motif, S = spacer motif)
- S: [dc, cross, mesh, dc], P S, P, S, P, S, P, [dc, mesh, cross, dc] = 43 rows
- XL: [dc, cross, mesh, dc, cross, mesh, dc], P S, P, S, P, S, P, S, P, [dc, mesh, cross, dc, mesh, cross, dc] = 59 rows
Wildflowers Tunic Crochet Pattern Instructions
SHIRT PANEL: (make 2)
Start with a long tail to sew up sides.
Row 1: Work 90 (108) foundation double crochet stitches. Turn.
Row 2: [crossed dc] Ch 3 (counts as st). *Sk 1, dc in next st. Work 1 dc in prev st.* Repeat from * until last st. Work 1 dc in last st. Turn.
Row 3: [mesh] Ch 3 (counts as st). *Work 1 dc, ch 1, sk 1.* Repeat from * until last st. Work 1 dc in last st. Turn.
Row 4: Ch 3 (counts as st).Work 1 dc in each st and ch sp across. Turn.
[For sizes XL]
Row 4a: [crossed dc] Ch 3 (counts as st). *Sk 1, dc in next st. Work 1 dc in prev st.* Repeat from * until last st. Work 1 dc in last st. Turn.
Row 4b:[mesh] Ch 3 (counts as st). *Work 1 dc, ch 1, sk 1.* Repeat from * until last st. Work 1 dc in last st. Turn.
Row 4c: Ch 3 (counts as st).Work 1 dc in each st and ch sp across. Turn.
Poppy Stitch Motif
Row 5: Ch 3 (counts as st). Work 1 dc in each of next 7 sts. Ch 7, sk 2. *Work 1 dc in each of next 16 sts. Ch 7, sk 2* Repeat from * 3 (4) more times. Work 1 dc in each of next 8 sts. Turn.
Row 6: Ch 3 (counts as st). Work 1 dc in each of next 4 st. *Ch 5, work 1 sc in ch 7 sp, ch 5, sk 3. Work 1 dc in each of next 10 sts.* Repeat from * 3 (4) more times. Ch 5, work 1 sc in ch 7 sp, ch 5, sk 3. Work 1 dc in each of next 5 sts. Turn.
Row 7: Ch 3 (counts as st). Work 1 dc in next st. Ch 5, work 1 sc in ch 5 sp, 1 sc in next st, 1 sc in ch 5 sp, ch 5, sk 3. *Work 1 dc in each of next 4 sts. Ch 5, work 1 sc in ch 5 sp, 1 sc in next st, 1 sc in ch 5 sp, ch 5, sk 3.* Repeat from * 3 (3, 3, 4, 4, 4) more times. Work 1 dc each of next 2 sts. Turn.
Row 8: Ch 3 (counts as st). Work 1 dc in next st. *Work 3 dc in ch 5 sp. Ch 5, sk 1. Work 1 sc in next st. Ch 5. Work 3 dc in ch 5 sp. Work 1 dc in each of next 4 st.* Repeat from * 3 (4) more times. Work 3 dc in ch 5 sp. Ch 5, sk 1. Work 1 sc in next st. Ch 5. Work 3 dc in ch 5 sp. Work 1 dc in each of next 2 sts. Turn.
Row 9: Ch 3 (counts as st). Work 1 dc in each of next 4 sts. Work 3 dc in ch 5 sp. Ch 2. Work 3 dc in ch 5 sp. Work 1 dc in each of next 3 sts.*Work 1 dc in each of next 7 sts. Work 3 dc in ch 5 sp. Ch 2, Work 3 dc in ch 5 sp. Work 1 dc in each of next 3 sts.* Repeat from * 3 (4) more times. Work 1 dc in each of next 5 sts. Turn.
Spacer Motif
Row 10: Ch 3 (counts as st). Work 1 dc in each of next 7 sts. *Work 2 dc in ch 2 sp. Work 1 dc in each of next 16 sts.* Repeat from * 3 (4) more times. Work 2 dc in ch 2 sp. Work 1 dc in each of next 8 sts. Turn.
Row 11: [mesh] Ch 3 (counts as st). *Work 1 dc, ch 1, sk 1.* Repeat from * until last st. Work 1 dc in last st. Turn.
Row 12: [crossed dc] Ch 3 (counts as st). *Sk 1, dc in next st. Work 1 dc in prev st.* Repeat from * until last st. Work 1 dc in last st. Turn.
Row 13: [mesh] Ch 3 (counts as st). *Work 1 dc, ch 1, sk 1.* Repeat from * until last st. Work 1 dc in last st. Turn.
Row 14: Ch 3 (counts as st).Work 1 dc in each st and ch sp across.
→ Repeat the Poppy Stitch + Spacer Motif 2 (3) more times.
→ Repeat the Poppy Stitch Motif.
Row 40 (50): Ch 3 (counts as st). Work 1 dc in each of next 7 sts. *Work 2 dc in ch 2 sp. Work 1 dc in each of next 16 sts.* Repeat from * 3 (4) more times. Work 2 dc in ch 2 sp. Work 1 dc in each of next 8 sts. Turn.
Row 41 (51): [mesh] Ch 3 (counts as st). *Work 1 dc, ch 1, sk 1.* Repeat from * until last st. Work 1 dc in last st. Turn.
Row 42 (52): [crossed dc] Ch 3 (counts as st). *Sk 1, dc in next st. Work 1 dc in prev st.* Repeat from * until last st. Work 1 dc in last st. Turn.
Row 43 (53): Ch 3 (counts as st). Work 1 dc in each st across. Turn.
[For size XL]
Row 53a: [mesh] Ch 3 (counts as st). *Work 1 dc, ch 1, sk 1.* Repeat from * until last st. Work 1 dc in last st. Turn.
Row 53b: [crossed dc] Ch 3 (counts as st). *Sk 1, dc in next st. Work 1 dc in prev st.* Repeat from * until last st. Work 1 dc in last st. Turn.
Row 53c: Ch 3 (counts as st).Work 1 dc in each st and ch sp across. Turn.
Fasten off with a long tail to sew sleeve ends.
ASSEMBLY
→ Lay the front and back panels together.
→ Seam up the sides using mattress stitch for approximately 14.5 (17.75)” / 55 (67) sts for an armhole size of 9.5” (11”)
→ Seam the shoulders from the outside edge in towards the neckline for approximately 2”. Skip 3.5 (7.5)” and then seam the panels together for another 0.5”. This leaves a neck opening of 9.5” (all sizes).
→ Remember to block your work to properly stretch out the poppy stitches!

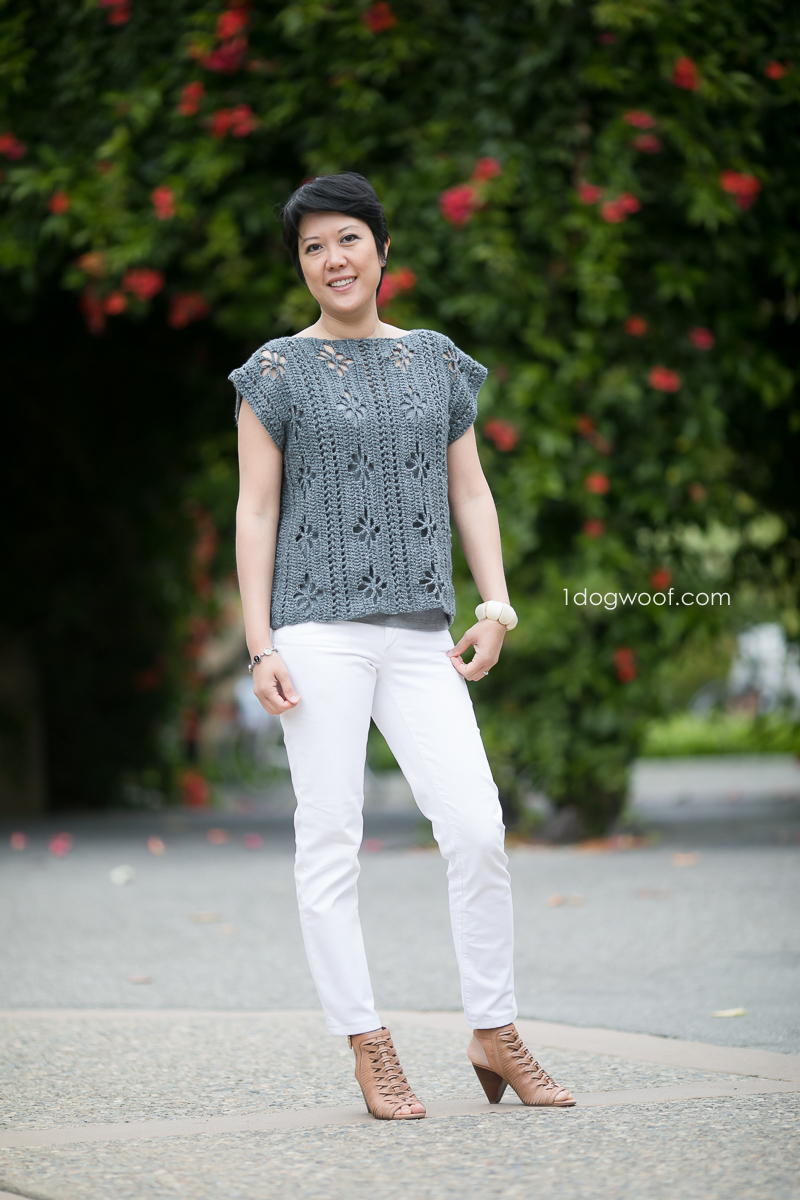
I can see myself wearing the Wildflowers Tunic top for all sorts of occasions. I probably sound like a clothing ad, but this can definitely be dressed up or down, depending on what you pair with it. When we were grabbing a few fun shots at the end of my photoshoot, I had changed to my “mom jeans”, but kept the top on, and it was a completely different look!
Check out my pattern shops on Ravelry and Etsy where you can purchase printable PDFs of my latest crochet patterns. These PDFs are formatted without comments or ads, and have instructional photos at the bottom for optional printing.
I sometimes include affiliate links in my supply lists. Purchasing from these merchants earns me a small commission with no extra cost to you, and goes towards supporting One Dog Woof.
Please be respectful and do not sell or distribute this pattern in any way, especially as your own. Instead, share the original blog post link! You can sell finished products made from this pattern by giving credit to One Dog Woof as the pattern designer and linking to the blog post. If you have any questions regarding distribution or translation of this pattern, please see my Terms of Use. Thank you for your consideration!


Do you have measurements for the different sizes? I’d like to know if chest measurement will fit me before buying….. I’ve found 2XL to be radically different between different designers.
Thank you
What a lovely top! Thank you for sharing this beautiful pattern, it looks like flower to me 🙂
What a beautiful top! I think you missed some ‘Ch5’ in Row 7:
Ch 5, work 1 sc in ch 5 sp, 1 sc in next st, 1 sc in ch 5 sp, * Sk 3, **ch 5**, work 1 dc in each of next 4 sts. Ch 5, work 1 sc in ch 5 sp, 1 sc in next st, 1 sc in ch 5 sp.* Repeat from * 3 (4) more times. Sk 3, **ch 5**, work 1 dc each of next 2 sts.
is there a stitch explanation for cross and mesh? I’m really confused.
“Poppy Stitch” is a good name for this stitch, as I hate spider too and also see more easily flowers than spiders ! Anyway, this tunic is stunning !
Yes, please post chest/width measurements for all sizes. If the included sizes don’t work I’ll likely purchase the pattern. Thank you.
Hi Cheri, Thanks for pointing it out! I’ve fixed it to match the stitch chart.
Hi Mary,
The exact measurements for all sizes are available in the pattern PDF. Thanks!
Hi Jeannie, Row 2 and Row 3 describe the cross and mesh stitch.
Hi Nanette, The 2XL is 31.5″ in width. The tunic can be worn with either a closer or looser fit, and the explanation I’ve given in the post will allow you to adjust for your needs. Thanks!
Hi! Working this pattern from the pdf and just wanted to mention that Row 7 in the version I have is still missing the 2nd ch5 in the repeat.
I love your new pattern, and really like your new hair style! I didn’t recognize you at first.
It’s a beautiful top and you look great in it! Thank you for another lovely pattern!
Quick ?…
I bought the pattern on Ravelry. Since I don’t know (haven’t taken the time to learn) foundation crochet stitches…how many chains should I make for the size M top?
Hi Vicky, you’d take the number of foundation crochet stitches, minus 1, which is the number of chains you’ll need. Then add 3 more chains to act as the first dc.
I’ve just found this super cute pattern – and would LOVE to make! But reading over pattern above is confusing – it jumps from Row 14 to 40! I’ve not sat down with yarn and hook yet, but this is totally confusing to me! and then to top it pattern for Row 40 reads. “Row 40 (50)” – I am guessing the 50 is for larger size?
But what about the jump from Row 14 to Row 40 – do the repeats really account for that jump?
Hope you see this and can respond, as I would love to make this top soon!
Thank you for sharing your talent and all this beauty with us!
Hi Carol, After Row 14, the directions say you need to repeat the different motifs a few times. Each motif is 5 rows, which accounts for the jump from Row 14 to Row 40. And yes, the numbers inside the parentheses are for the larger size. Hope that helps!
I, too, LOVE this top and want to make it! I’m doing a crochet cruise next year and would love to have this to wear for that cruise…
But, without yarn and hook in hand, I’m a bit confused reading this pattern. Row 4 starts with Crossed DC – but if just starting the row, how am I going to cross the dc? or – and this would make more sense, I guess, if it’s just starting with the ch 3 – and that there are crossed dc in the row?
if right at beginning of row, to where is it going to cross?
Sorry – hope this doesn’t sound too elementary, but don’t want to start and then not be able to finish!
Beautiful top! Thank you for all the beautiful work you share with the rest of us…..it is so inspiring! and even if I’m in one of those crochet ‘slumps’ when picking up the hook feels like a chore, if/when I see something like this top that loos doable, even for me, then the hooks and yarn come out and I get all excited about picking up my hooks again – and the ‘slump’ is GONE! HURRAY! and THANK YOU!
Hi! I am very excited about making this pattern but confused on the cross double crochets. When you say to dc in prev St is that the prev dc stitch or the skipped St? Am I supposed to skip 2 dc then dc in the last skip or skip 2 dc and dc in the last dc?
So I’ve figured out the cross double crochet. You skip one, dc next and go back and dc in the one you skipped making an x. But I find row 2 is confusing because between the * the are 2 skips, so I did cross stitches with a skip between each leaving me with 63 stitches in the row at the end. Unfortunately when I got to row 5 I realized I do need all 90 stitches from the beginning and will have to go back and redue those rows obmitting the extra skip written in.
I am loving the way this pattern is working out until I got to row 6. I am assumming that row 5ABC are for the xl size, so I went on to row 6. It says to SC in the chain 7 and then skip 3 and DC in the next 10 stitches, but row 5 states to DC 16 stitches between the chain 7’s. that leaves 13 stitches instead of the 16 in the previous row. Please help????
I just bought your .pdf pattern of the Wildflowers Tunic and am trying to find the tutorial that is mentioned. I’m somewhat new to crocheting so still dependent of tutorial help. It looks like I might need it after reading some of the comments from others.
It’s a darling pattern and I so want to make it.
Yes, I did the same thing. The pattern shows 2 skipped stitches between the **. So nie I’m just skipping one stitch and hope that’s right.
Typo correction. Sorry…..”so NOW I’m just skipping ………
I bought the PDF for this pattern a couple of months ago before reading the above comments. All mistakes are still there (thought i was doing something wrong) and after finishing the 1st panel which turned out quite out of shape, I have started another, correcting the mistakes to the best of my ability. I do love the look of your top and the flower motif.
Further to my comment above, would you please send me a modified and correct PDF for this pattern. I am still wasting a lot of time and yarn trying to get this right.
Thank you.
For a crossed double crochet, you skip 1 st, dc in the next st, then go back and dc in the skipped st. Hope that helps!
I see, and I’ve fixed the error. Thank you for pointing it out!
I’m not sure I understand. You are skipping stitches to create the flower pattern, so you will not work into all 16 sts of Row 5. You’ll only work 10, and skip 3 sts on either side.
Thank you so much for sharing the detailed pattern. I followed it to precision and the top turned out just like the displayed image. Only thing I changed was the final seam on the finishing sides to be mesh style instead of the mattress stitch.
Hi. I’m making a large and at the end of row 5 I have 13 stitches rather than 24 that I need to complete the row as described (16 DC +8 more DC to finish out the row). This is my 2nd time starting the pattern from scratch because the 1st time through I had the same issue and didn’t know where I messed up. Please if you could shed light on what I could have done wrong.
I purchased this pattern through Etsy. My 5th row isn’t working out like it should. I think it may be something to do with row 4 a-c. What’s does that mean? I ignored it and went on to the 5th row but like I said it’s not working out.
Rows 4a-4c are only applicable to certain sizes. If you are not working those sizes, you should skip those instructions. Hope that helps!
Can you email me directly at [email protected]? I don’t understand your stitch count. Thanks.
I’m having some trouble understanding some of the instructions. I purchased the kit from Lion Brand, and I really want this to turn out! Do you have a video tutorial I can download?
I don’t have a video tutorial for this (very few designers can afford to make video tutorials for all their patterns!), though you may be able to find the stitch or other related tutorials from other makers on YouTube.
Also great blog here with all of the valuable information you have. Keep up the good work you are doing her,Also great blog here with all of the valuable information you have. Keep up the good work you are doing her