
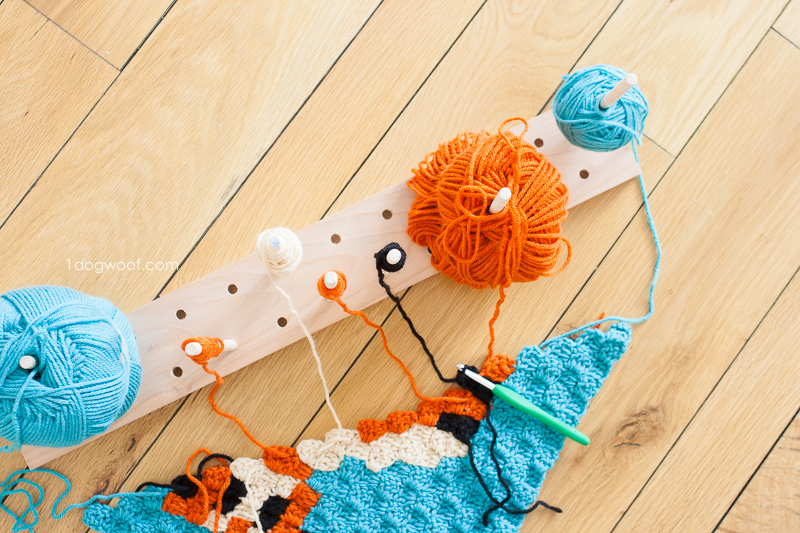
Today, I’m sharing my modular crochet bobbin holder – this is what I use to keep my yarn from getting tangled up while working on a C2C project that requires several active yarns (and colors) at the same time. It’s great for C2C projects, but also any large graphghan too. I’ve used it for all my Zoodiacs C2C squares, and best of all, it cost me under $10 to make!
I think after making about 2 of my Zoodiacs squares, I was ready to rip my hair out. Why? Because my yarn was EVERYWHERE. Not just all the yarn ends, those are bad enough, but I had several active yarns at the same time, and they kept getting tangled with each other. I did a quick search to see how other people kept their yarn from tangling, and saw different contraptions with clothes hangers and clothespins and embroidery floss bobbins. The concept was easy – keep all the yarn wound up until you need it. But I didn’t know how much I would need for each Zoodiacs square, and I didn’t want to keep cutting strands to wrap around a clothespin and then run out of yarn only to have to connect more.
My requirements for this project were simple and speak to my need to keep things flexible. I remembered my modular blocking station and wanted to have a modular bobbin holder as well. It had to:
- hold an entire skein, or just a short strand.
- hold several active yarns, and have the ability to move different yarns into different positions
- be stable and not tip over
- be small enough to carry around and keep my yarn neat so the husband doesn’t yell at me for stashing my project all over the living room (whatever, he still does it anyways).
Supplies
(2) 3/8″ diameter by 48″ length dowels
(1) piece of wood board. 2 feet by 3.5″ wide by 3/4″ deep
Rough grit (120) and fine grit (240) sandpaper
power drill, drill bit
vice(s) and clamps
Modular Crochet Bobbin Holder Instructions
1. Start with the dowels. Secure each dowel in a vice or clamp and cut them into 8 inch lengths. That means that a 48″ length of dowel will yield 6 8″ bobbins (give or take a bit on the length).
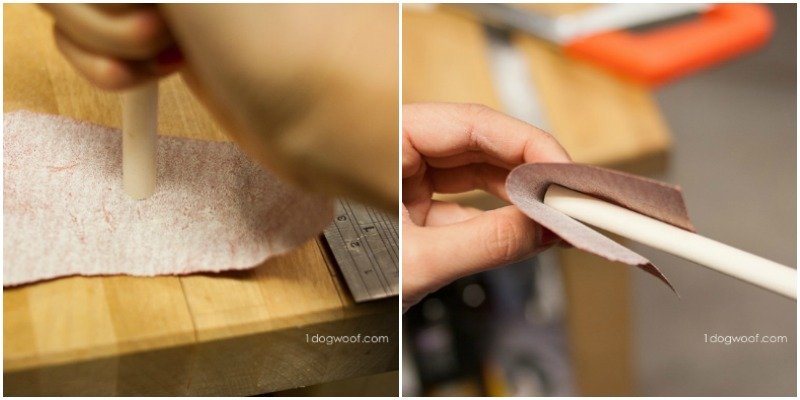
2. Put a piece of sandpaper on a table, and rub the ends of each dowel on the sandpaper. Then sand down the edges slightly. Wipe them clean. Those are your bobbins!
3. On to the wood board. Home Depot has a large selection of wood precut to different lengths and widths, of all different wood varieties. I like using Cherry or Poplar, as those are much lighter than the hardwoods like Maple or Oak. Heavy is ok, but on the off-chance you have kids that might pick it up and swing it around…..
4. Mark holes in the wood board where you’d like each bobbin. I marked a hole every 2 inches, and staggered them an inch apart on the second row.
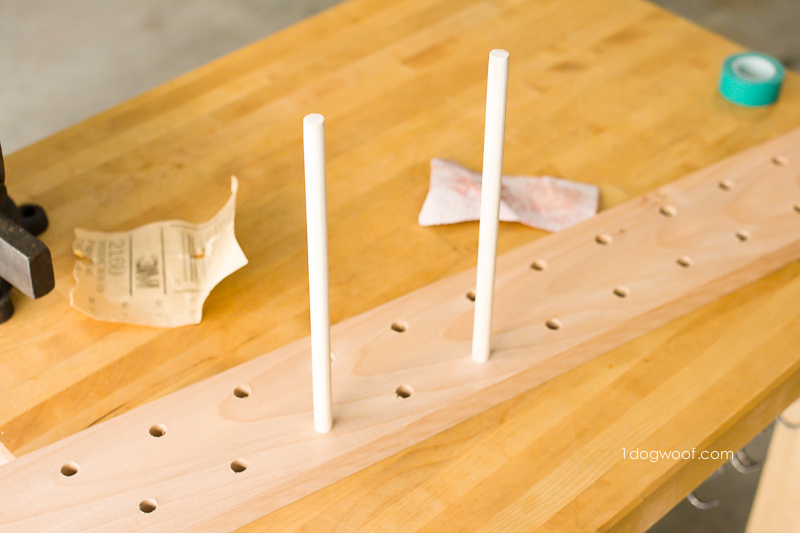
5. Pick the right drill bit. This might take a little trial and error, so having an extra piece of board to test the hole will be smart. You want the bobbin to fit in the hole very snugly, but not so tight that you can’t jam it in at all. You definitely don’t want any wiggle-jiggle room, so “very snug” is key. (I honestly don’t know what size drill bit I used, because the set that my husband has didn’t have markings on them. Go figure.)
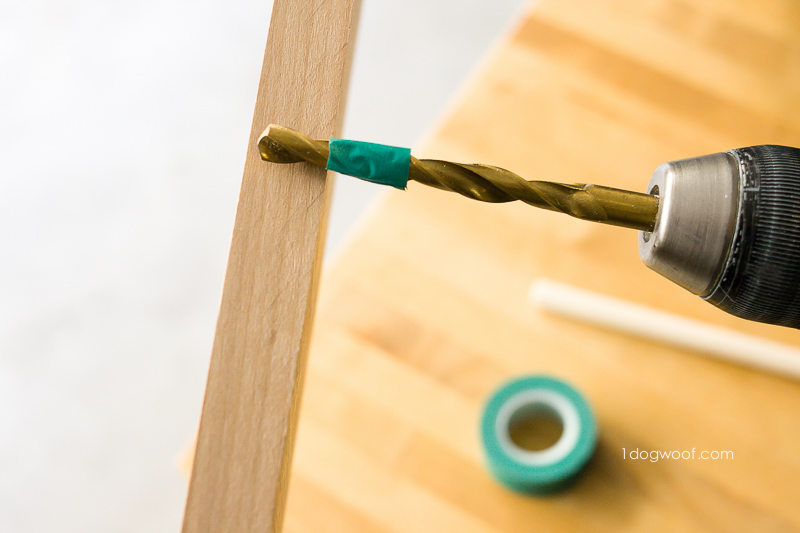
6. Clamp down the wood board to your work surface.
7. Drill each hole where marked. You don’t want to drill all the way through your board, so here’s a tip: line up your drill bit to the approximate depth you want to drill to, and mark it with a piece of tape (washi tape works great!). When you drill, stop when the tape gets to the top of the wood board.
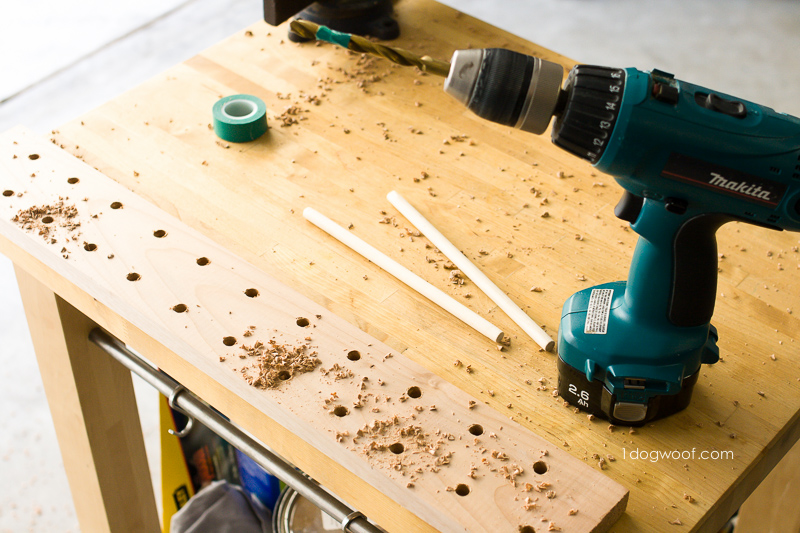
8. Sand down the ends and corners of the wood board. Clean up the sawdust from inside the drill holes. Voila! Now, how to use it….
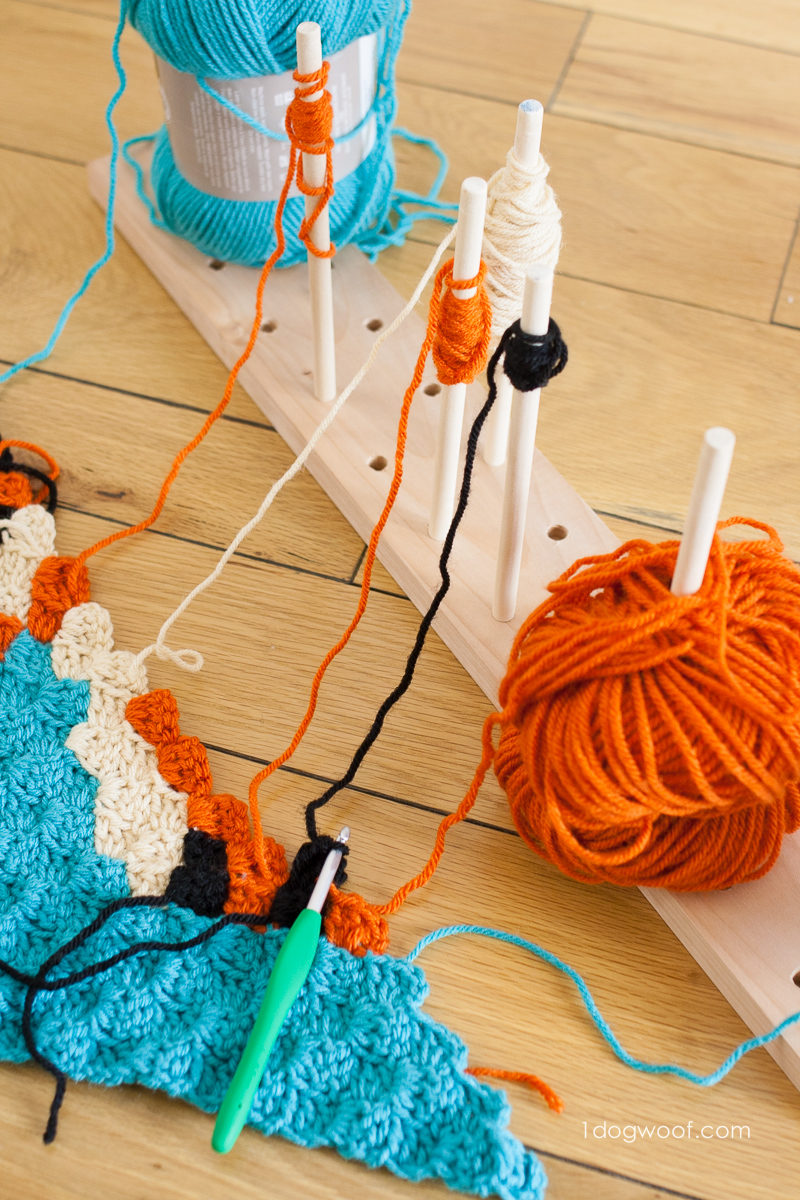
Usage
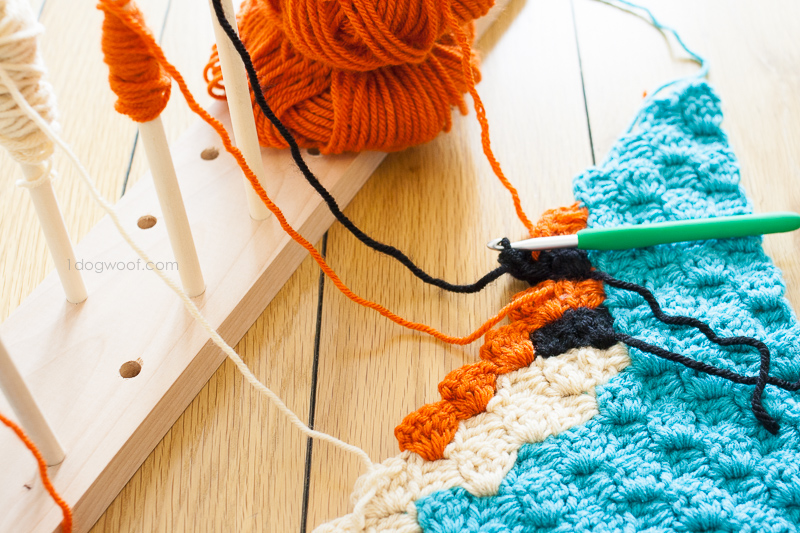
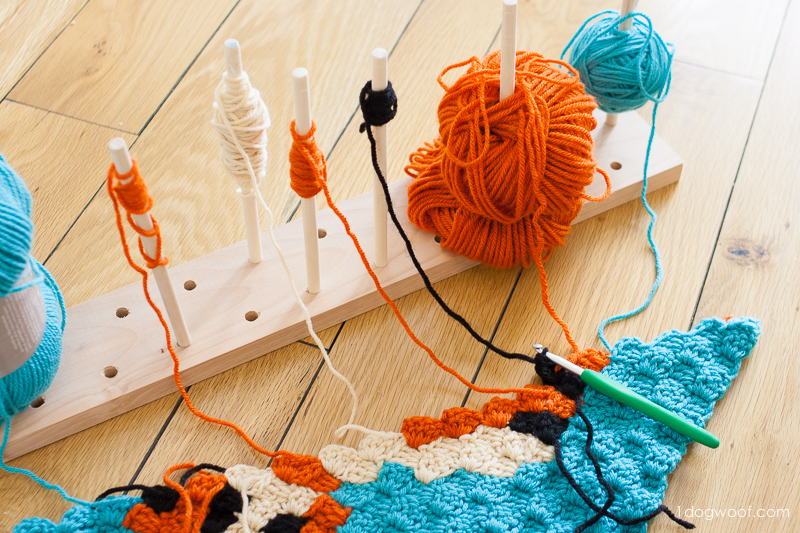
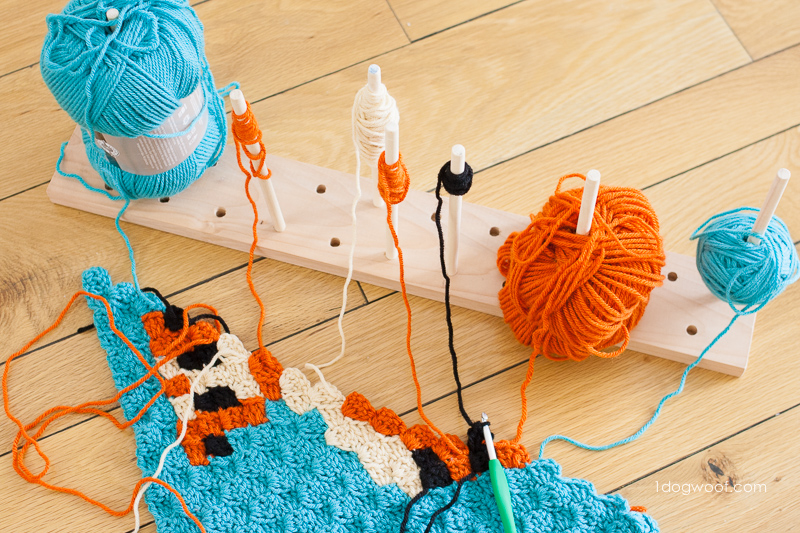
Once your project requires 2 or more yarns/colors simultaneously, it’s time to bust out the bobbin holder. If you have a center-pull skein, awesome. Throw that onto a bobbin and jam it into your wood board somewhere. Don’t worry, you can always change the bobbin position. If you are using scrap yarn or a shorter strand of yarn, simply wrap the yarn around the bobbin and place it somewhere on the wood board.
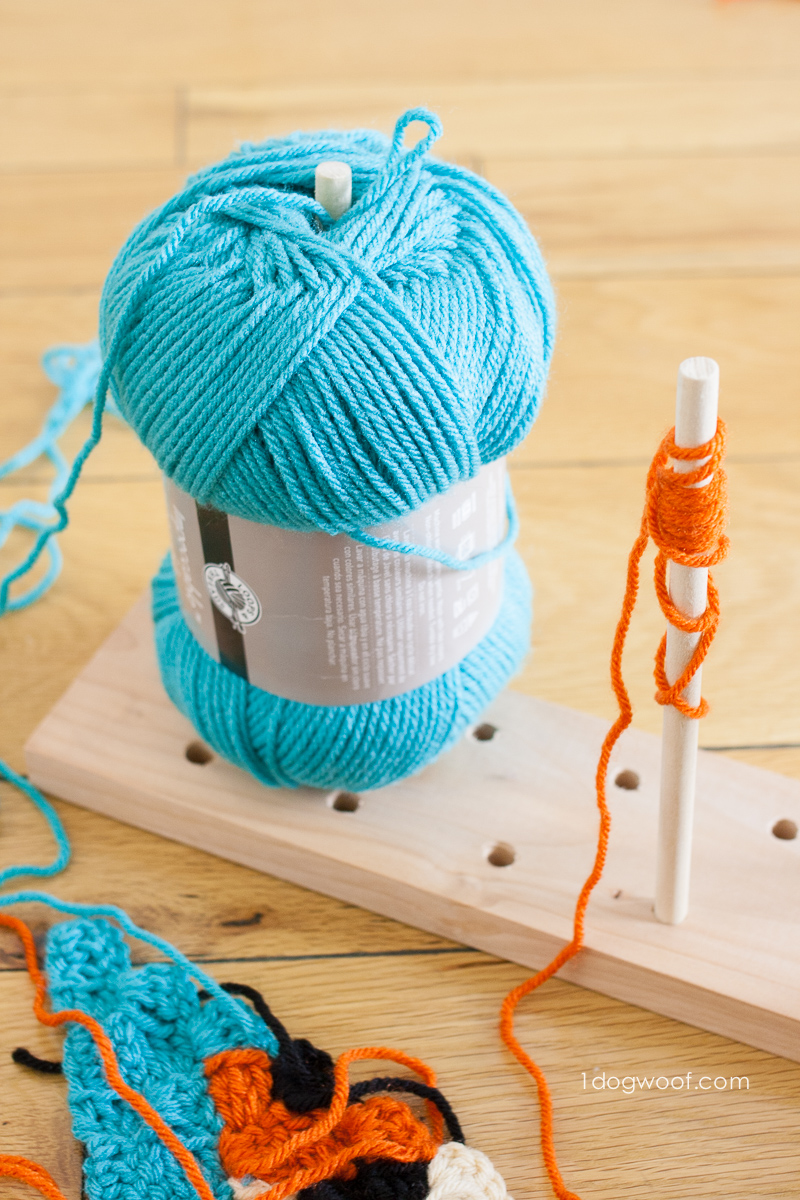
You want your bobbins placed in the same order that you’ll be crocheting. If a particular row moves from blue to orange to black to blue, that’s how the bobbins should be arranged. This is also why sometimes it’s nice having two skeins around, so you can work 2 skeins of blue at the same time.
(On the Zoodiacs squares, I highly recommend using 2 skeins of the background color; you’ll use about half of each skein, but it saves you from having to precut a lot of yarn.)
In C2C crochet, you have to turn your work at the end of every row. Now that your bobbins are organized well, you have two choices when you hit the end of a row.
-
- You can flip your entire bobbin holder so you’re always working in the same order as what’s on the bobbin holder.
- You can keep your bobbin holder steady, work one “right” row, flip and work the next row criss-crossed, then flip back to work another “right” row. The key here is to flip (and flip back) in the right direction.
But never fear, if you screw up, you can re-adjust all the bobbins! And as a little something extra, I found that my Clover Amour hook also fit into the holes perfectly, so when I needed to stop for the night, my yarn and my hook were all neatly lined up on my modular bobbin holder. Win!


Thank you! This is perfect and I’m getting my supplies tomorrow. Unless if my husband wants to pick them up today, I’m at work. Such a great idea!
Great idea! Thanks for posting the instructions too.
Thank you so much for posting this info. I made my first multi-skein project last month and spent so much time untangling my yarn. Wish I had seen this before I did it. You are so creative and helpful.
This is awesome! Thank you so much for the idea! I’ve already made myself a modular blocking board juat like your’s. Can’t wait to make this as well!!
Very cool! Thank You for sharing!
I have struggled with this problem for years but never really thought about how to fix it. I have used safety pins to hold small amounts in place, etc. but inevitably they still get tangled. I am going to make this this weekend! Thanks for the tip.
Fantastic!! Do not know how I managed to make squares before having this made for me (by my lovely father). Thanks for the directions!!
I must be dense. I still don’t see how to keep it untangled when you turn. Do you have a video showing how this works.
It will stay untangled while working on one side. Once you turn, the bobbin holder needs to turn with you so all the bobbins stay in the same place, relative to each other. Unfortunately, I do not have a video, sorry!
This is such a good idea, ChiWei! i’m def going to do this as I’m only 4 days into C2C and already have managed to make many large knots in my yarn!
Thanks Jess! Necessity (and tangled knots) is the mother of invention! 🙂
Thank you! This is perfect
This is a great idea, i love it…
Side note… for a “snug fit” using a 3/8″ dowel you would use a 3/8″ drill bit… but i understand the problem of them not being marked. My husband has a mason jar full of drill bits and you can’t see the sizes on most of them…
my brother made me one and gave it to me yesterday – i am SO excited to get a chance to use it!!
This is a fabulous idea! I have just started my first c2c project and was having trouble with the yarn knotting. I showed my husband this and when i got home from work he had all the materials and we made it tonight. Can’t wait to try it now! Thanks again for such a great idea!!
I got one made and I think it hard to use the wool I am looking to get bobbins to get the wool to come out more easley
I cannot even begin to thank you for this. I’ve been knitting and crocheting on a very novice scale for years despite my ability to make great stuff. I’ve always been too intimidated to attempt something that requires this much skill and your instructions made me feel capable for the first time. In this community it’s often a little overwhelming trying to read patterns (especially motifs and corner to corners even if you’re fairly confident in intermediate level patterns in knitting – the true test of skill! No tearing out there!!) and I’m admittedly pretty daft when it comes to complex lingo and the “career knitters” can come off as pretty out of my league . I actually feel like I can do the southwestern pattern from lion despite the unknown territory and I cannot even thank you enough. It’s like you get the folks like me that have a true passion but aren’t so good at diagrams and math. Hahah!! You’re an angel!! I’m going to be in the garage drillin’ and gettin my prep game in order. Bobbin and weavin.
I subscribed and plan on attempting anything you send! You put newstitchaday to pasture with your attention to detail and laymen’s terms!! No videos needed!! I’m so excited!!!
Thank you for the post. I spent 10 dollars and have enough supplies to make 3 boards.
????Thank you! This was exactly what I needed. Thanks for sharing your DIY bobbin holder.
This is working great. I’m a little confused when I turned my work. I have about 15 different pieces of wool on this gadget and I found I had to replug them all. Could you explain to me how to do this easily.
When you turn your work, you will need to turn the bobbin holder in the opposite direction to offset the twists. Or you can flip your work completely over the holder. Either way, it depends on the project – you need to see how you turn/twist the yarns and offset it.
Lilly I. Use a simple yarn winder to tidy up scraps. This makes a center pull ball in whatever size you need. Furniture polish like butchers wax on the spindles would help the yarn pull easier.
Thank -you. This was very easy and is adjustable. Hubby does scroll saw projects. He has a board And dowels in the garage. Making it now. I’m going to rub the dowels down with Butchers wax for smooth. Yarn pull.
Wanted to thank you for this! My father in law built it for me this past weekend and added a nice extra touch that I thought I’d pass along. He cut some PVC tubes that were slightly bigger than the dowels to be used for the yarn bobbins (as opposed to the full skeins). Basically the idea is that you wrap the yarn on the PVC tube and put the tube on over the dowel. That way the yarn spins as you use it (rather than staying stationary and you having to manually unwind it). Hope that makes sense – I took pictures that I’d be happy to show you if you’re interested.
Thanks again!
This is my next project! Thank you!!❤️
That’s a great idea! Thanks for sharing Kerry!
Thanks for the tips, and especially the measurements! All I have left is sanding down the edges and my 17 sections of yarn for my current C2C project will FINALLY stop getting tangled. As an added bonus I’ll even be able move my project and sit in a different spot in my living room. Woo hoo!