
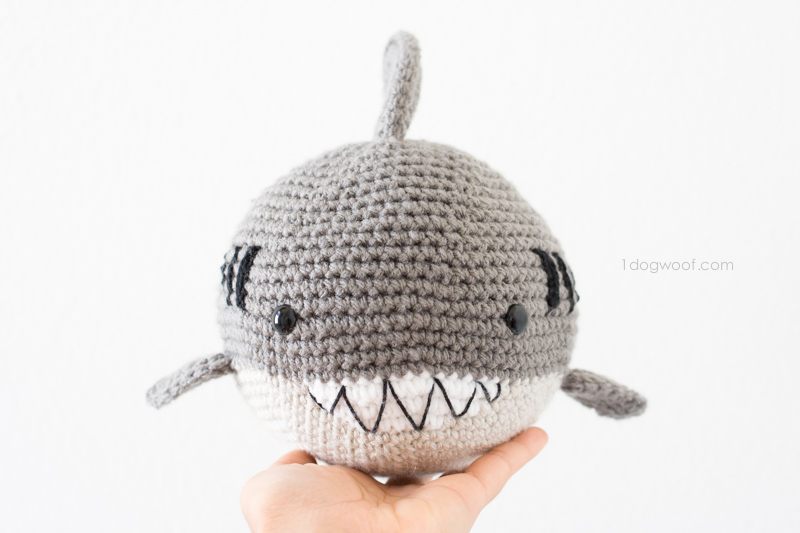
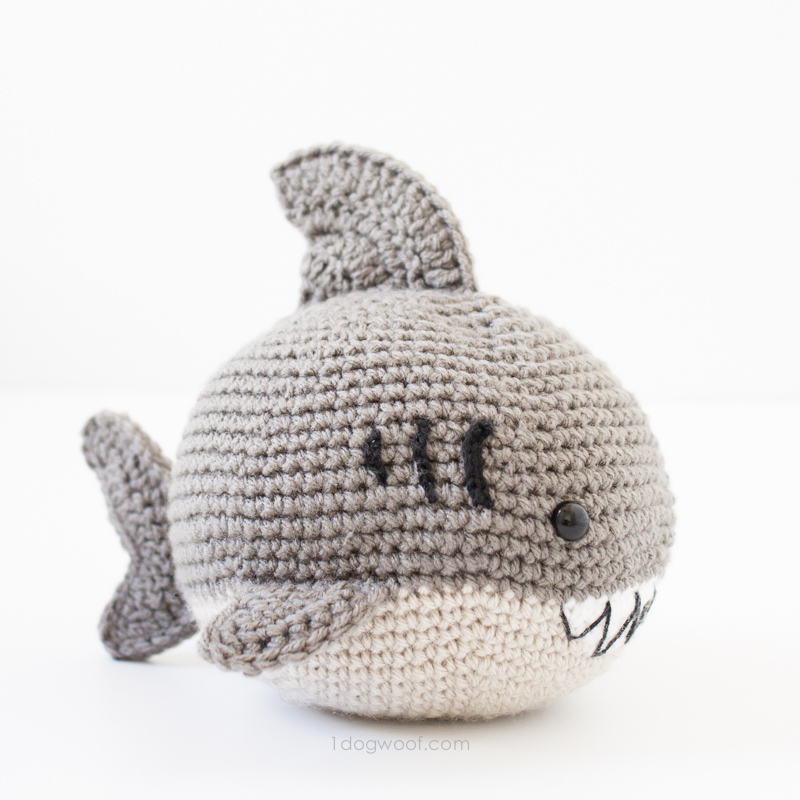
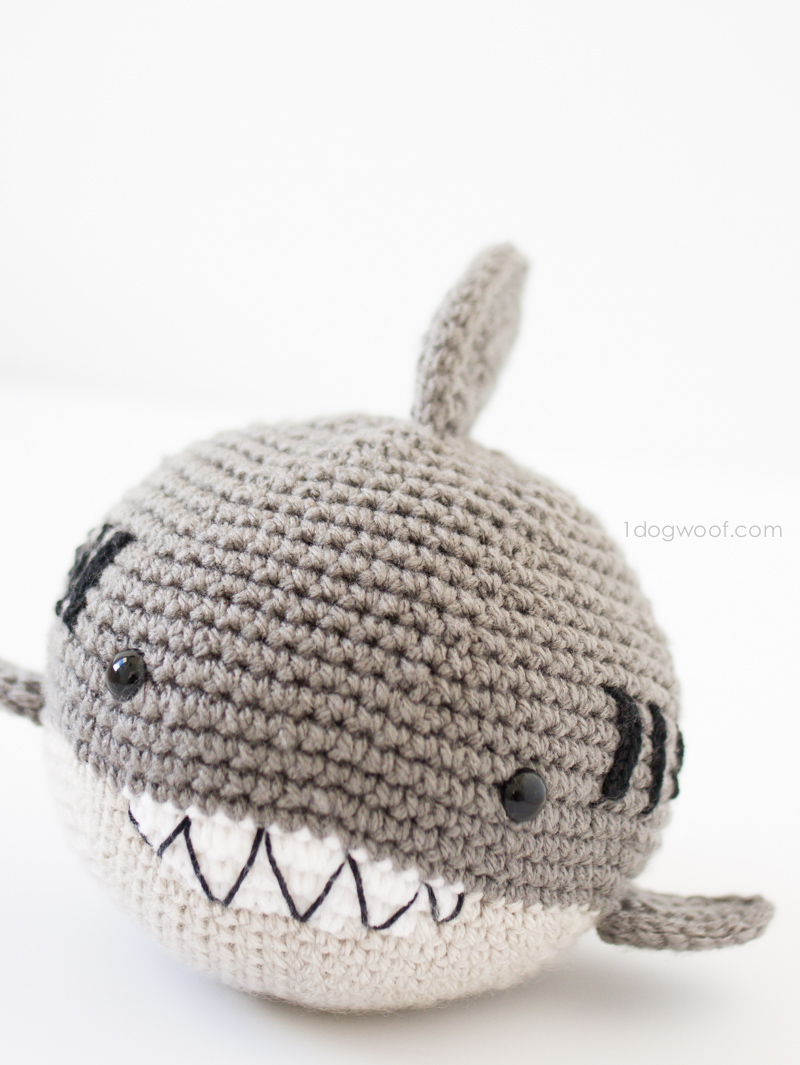
We’ve been singing Slippery Fish a lot in our house lately (that, and What Does the Fox Say?), and with Shark Week coming up, I thought I’d make a quick crochet shark stuffed animal to share with you all, and of course, for my kids! This crochet shark amigurumi is just a ball with fins, so we’ve named him Bernard the Ball Shark, and he works up pretty easily, but as always, the devil is in the details – the gills, teeth, and fins. I’ve tried to take step by step photos when I remember, so hopefully, they will make sense to you.
——————————————
You Might Also Like:
——————————————
For this toy, I used a dark gray yarn, a light gray yarn and a white yarn. I snagged some Red Heart With Love yarn a Walmart for under a dollar last Thanksgiving, and it’s finally being used! I also used my trusty Lion Brand Vanna’s Choice. I found that the Red Heart yarn was a little thicker than the Lion Brand yarn, even though both are considered worsted weight 4 yarn. The difference in weight didn’t hurt the result at all; actually, it provided a bit of texture difference – I used Red Heart With Love in white for the teeth, and it stood out nicely against the Vanna’s Choice and made it more clear that hey, those are teeth!

If you’d like to print this pattern, you can purchase an inexpensive, ad-free and comment-free PDF version of Bernard the crochet shark pattern on Craftsy (US only) as well as on Etsy (international buyers, start here!). The file will be available for download immediately after payment. Thank you for helping me continue to provide these fun free patterns!
Crochet Shark Amigurumi Supplies
- H (5 mm) hook (Clover Amour Hook*)
- Note: I normally use a size G (4 mm) for stuffed toys, but went up a size due to the thicker Red Heart With Love Yarn.
- Red Heart With Love in White, Red Heart With Love in Pewter, Lion Brand Vanna’s Choice Solids in Linen*
- Each color required less than 1 skein. The Pewter was the most used and that was maybe half a skein.
- 12 mm safety eyes
- Lion Brand BonBons in Black
- embroidery needle
- scissors
- polyester fiberfill
* denotes affiliate links
Abbreviations
sl st – slip stitch
ch – chain stitch
sc – single crochet
hdc – half double crochet
dc – double crochet
sc2tog – single crochet 2 together (joining/decreasing stitch)
Pattern Notes
- I joined my rounds using Planet June’s no-cut join method because I was designing on the fly, so the instructions reflect a joined seam. It’ll work just as well if you work in continuous rounds, it’s up to you.
- The eyes, gills and teeth embroidery are sewn into the body before it is stuffed and closed up. The fins are added after the body is complete.
- The positioning of the eyes, gills and teeth embroidery do not have to be exact, especially the gills and teeth marks. I’ve given my best estimate of where everything is attached, but I wouldn’t worry about being completely exact with positioning of all the pieces.
- LEFT FIN is the shark’s left fin and RIGHT FIN is the shark’s right fin, as if you are the shark.
Crochet Shark Instructions
Body
Round 1: With light gray (Linen), work 6 sc into a magic circle. Join with sl st to first sc. (6)
Round 2: Ch 1. Work 2 sc into each stitch around. Join with sl st to first sc. (12)
Round 3: Ch 1. *Work 1 sc into next stitch, 2 sc into next stitch.* Repeat around. Join with sl st to first sc. (18)
Round 4: Ch 1. *Work 1 sc into each of next 2 stitches, 2 sc into next stitch.* Repeat around. Join with sl st to first sc. (24)
Round 5: Ch 1. *Work 1 sc into each of next 3 stitches, 2 sc into next stitch.* Repeat around. Join with sl st to first sc. (30)
Round 6: Ch 1. *Work 1 sc into each of next 4 stitches, 2 sc into next stitch.* Repeat around. Join with sl st to first sc. (36)
Round 7: Ch 1. *Work 1 sc into each of next 5 stitches, 2 sc into next stitch.* Repeat around. Join with sl st to first sc. (42)
Round 8: Ch 1. *Work 1 sc into each of next 6 stitches, 2 sc into next stitch.* Repeat around. Join with sl st to first sc. (48)
Round 9: Ch 1. *Work 1 sc into each of next 7 stitches, 2 sc into next stitch.* Repeat around. Join with sl st to first sc. (54)
Round 10: Ch 1. *Work 1 sc into each of next 8 stitches, 2 sc into next stitch.* Repeat around. Join with sl st to first sc. (60)
Round 11: Ch 1. Work 1 sc into each stitch around. Join with sl st to first sc. (60)
Round 12: Ch 1. *Work 1 sc into each of next 9 stitches, 2 sc into next stitch.* 2x. Work 1 sc into each of next 8 stitches, changing color to white on last stitch. With white yarn, work 1 sc in next stitch, 2 sc in next stitch, 1 sc in each of the next 4 stitches, changing back to light gray on last stitch. (7 white stitches). With light gray yarn, work 1 sc in each of the next 5 stitches, then 2 sc in next stitch.*Work 1 sc into each of next 9 stitches, 2 sc into next stitch.* 2x. Join with sl st to first sc. (66)

Round 13: Ch 1. Work 1 sc into each of next 28 stitches, changing to white on last stitch. With white yarn, work 1 sc in each of next 11 stitches, changing back to light gray on last stitch. Work 1 sc into each of next 27 stitches. Join with sl st to first sc. (66)
Round 14: Ch 1. *Work 1 sc into each of next 10 stitches, 2 sc into next stitch.* 2x. Work 1 sc in each of next 5 stitches, changing color to white on last stitch. With white yarn, work 1 sc in each of next 5 stitches, 2 sc in next stitch, 1 sc in each of next 7 stitches, changing back to light gray on last stitch. (14 white stitches). With light gray yarn, work 1 sc in each of next 3 stitches, then 2 sc in next stitch. *Work 1 sc into each of next 10 stitches, 2 sc into next stitch.* 2x. Join with sl st to first sc. Change to the dark gray yarn. (72)
Round 15: With the dark gray yarn: Ch 1. Work 1 sc into each stitch around. Join with sl st to first sc. (72)
Round 16: Ch 1. *Work 1 sc into each of next 11 stitches, 2 sc into next stitch.* Repeat around. Join with sl st to first sc. (78)
Round 17-20: Ch 1. Work 1 sc into each stitch around. Join with sl st to first sc. (78)
Round 21: Ch 1. *Work 1 sc into each of next 11 stitches. Work 1 sc2tog.* Repeat around. Join with sl st to first sc. (72)
Round 22: Ch 1. Work 1 sc into each stitch around. Join with sl st to first sc. (72)
Round 23: Ch 1. *Work 1 sc into each of next 10 stitches. Work 1 sc2tog.* Repeat around. Join with sl st to first sc. (66)
Round 24: Ch 1. Work 1 sc into each stitch around. Join with sl st to first sc. (66)
Round 25: Ch 1. *Work 1 sc into each of next 9 stitches. Work 1 sc2tog.* Repeat around. Join with sl st to first sc. (60)
Round 26: Ch 1. Work 1 sc into each stitch around. Join with sl st to first sc. (60)
Round 27: Ch 1. *Work 1 sc into each of next 8 stitches. Work 1 sc2tog.* Repeat around. Join with sl st to first sc. (54)
Round 28: Ch 1. *Work 1 sc into each of next 7 stitches. Work 1 sc2tog.* Repeat around. Join with sl st to first sc. (48)
Round 29: Ch 1. *Work 1 sc into each of next 6 stitches. Work 1 sc2tog.* Repeat around. Join with sl st to first sc. (42)
Round 30: Ch 1. *Work 1 sc into each of next 5 stitches. Work 1 sc2tog.* Repeat around. Join with sl st to first sc. (36)
Round 31: Ch 1. *Work 1 sc into each of next 4 stitches. Work 1 sc2tog.* Repeat around. Join with sl st to first sc. (30)
Round 32: Ch 1. *Work 1 sc into each of next 3 stitches. Work 1 sc2tog.* Repeat around. Join with sl st to first sc. (24)
At this point, stop to install the eyes, the gills and the teeth. Also, time to stuff the shark with polyfill!
Round 33: Ch 1. *Work 1 sc into each of next 2 stitches. Work 1 sc2tog.* Repeat around. Join with sl st to first sc. (18)
Round 34: Ch 1. *Work 1 sc into stitch, then work 1 sc2tog.* Repeat around. Join with sl st to first sc. (12)
Round 35: Ch 1. *Work 1 sc2tog.* Repeat around. Join with sl st to first sc. (6)
Cut a tail, and pull the yarn through the last loop on hook. Weave the yarn from inside to outside of front loops only of each (6) stitch. Pull tight, fasten off, weave in ends.
Left Fin
Row 1: Ch. 9. Starting from the 2nd chain from hook, work 1 sc into each of next 8 chains. Ch 1. Turn. (8)
Row 2: Work 1 sc2tog, 1 sc in each of next 4 stitches, 1 sc2tog. Ch 1. Turn. (6)
Row 3: Work 1 sc2tog, 1 sc in each of next 2 stitches, 1 sc2tog. Ch 1. Turn. (4)
Row 4: Work 1 sc2tog, and 1 sc2tog. Ch 1. Turn. (2)
Row 5: Work 1 sc2tog. Ch 1. Turn. (1)
Row 6: Work 1 sc into the single stitch. Ch 1. Turn. (1)
Row 7: Work 2 sc into the single stitch. Ch 1. Turn. (2)
Row 8: Work 2 sc into each stitch. Ch 1. Turn. (4)
Row 9: Work 2 sc into first stitch, 1 sc into each of next 2 stitches, 2 sc into last stitch. Ch 1. Turn. (6)
Row 10: Work 2 sc into first stitch, 1 sc into each of next 4 stitches, 2 sc into last stitch. Turn. (8)
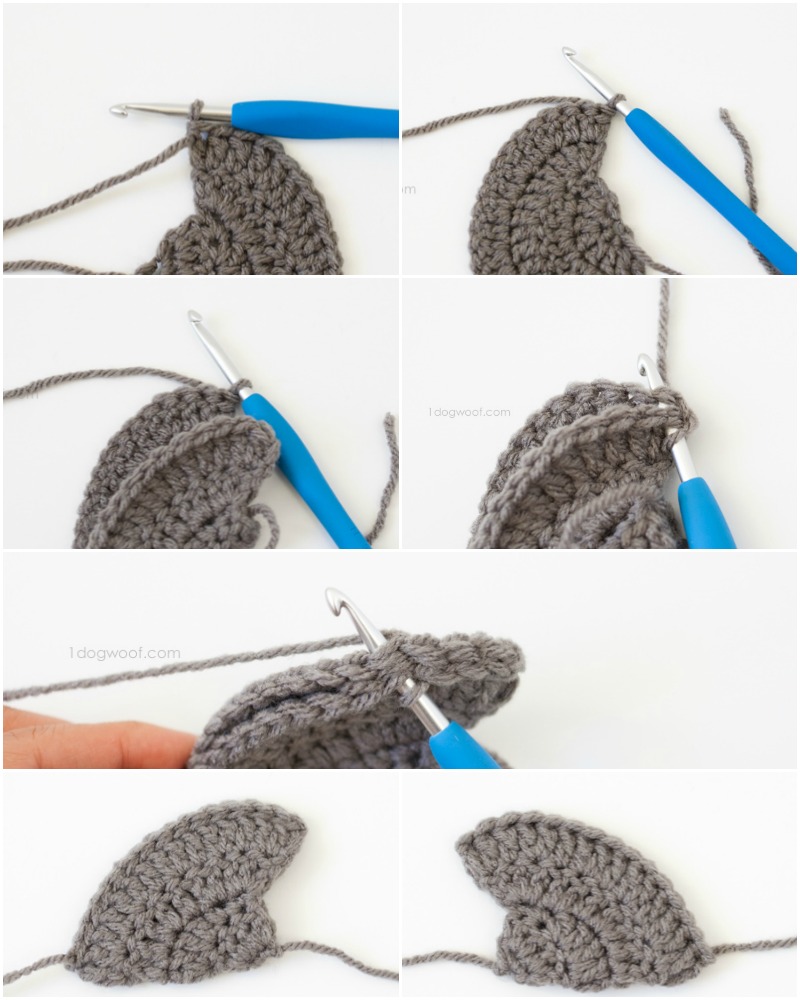
Fold the piece to create a triangle shape – you’ll be crocheting the two sides together. Insert hook into first stitch (there’s no chain stitch made) AND through both loops of the other side, work 1 sc. Working through all 4 loops, continue working 1 sc evenly across two sides of the triangle. Fasten off, leaving a long enough tail to sew onto the body.
Weave in the starting tail into the inside of the fin.
Right Fin
Row 1: Ch 2. Work 1 sc into first ch (2nd ch from hook). Ch 1. Turn. (1)
Row 2: Work 2 sc into the single stitch. Ch 1. Turn. (2)
Row 3: Work 2 sc into each stitch. Ch 1. Turn. (4)
Row 4: Work 2 sc into first stitch, 1 sc into each of next 2 stitches, 2 sc into last stitch. Ch 1. Turn. (6)
Row 5: Work 2 sc into first stitch, 1 sc into each of next 4 stitches, 2 sc into last stitch. Ch 1. Turn. (8)
Row 6: Work 1 sc2tog, 1 sc in each of next 4 stitches, 1 sc2tog. Ch 1. Turn. (6)
Row 7: Work 1 sc2tog, 1 sc in each of next 2 stitches, 1 sc2tog. Ch 1. Turn. (4)
Row 8: Work 1 sc2tog, and 1 sc2tog. Ch 1. Turn. (2)
Row 9: Work 1 sc2tog. Ch 1. Turn. (1)
Row 10: Work 1 sc into the single stitch. Turn. (1)
Fold the piece to create a triangle shape – you’ll be crocheting the two sides together. Insert hook into first stitch (there’s no chain stitch made) AND the other side, work 1 sc. Working both sides together, continue working 1 sc evenly across two sides of the triangle. Fasten off, leaving a long enough tail to sew onto the body.
Weave in the starting tail into the inside of the fin.
Dorsal Fin
Row 1: Leave an 8 in starting tail. Ch 2. Work 4 sc into first ch (2nd ch from hook.) Ch 2 – does not count as dc in next row. Turn. (4)
Row 2: Work 2 dc into each stitch across. Ch 1. Turn. (8)
Row 3: Work 1 sc in each of next 2 stitches. Work 2 dc in each of next 4 stitches. Work 1 sc in each of next 2 stitches. Ch 2. Turn. (12)
Row 4: Work 3 dc in first stitch. Work 2 dc in next stitch. Work 1 dc in next stitch, 2 dc in next stitch. Work 1 dc in each of next 4 stitches. Work 2 dc in next stitch, 1 dc in next stitch, 2 dc in next stitch. Work 3 dc in last stitch. Ch 2. Turn. (20)
Row 5: *Work 2 dc in next stitch, 1 dc in next stitch.* 5x. *Work 1 dc in next stitch, 2 dc in next stitch.* 5x. Turn (30)
Fold the bottom half of the fin up, and using the active yarn, work slip stitches across to join the two halves. Fasten off, leaving a tail to sew onto the body. Use the starting tail to sew the two halves of the back of the fin together.
Tail
You’ll make 2 tails and crochet them together. For the first one, fasten off both tails and weave in. On the second tail, weave in the starting tail, and use the end tail to crochet the two pieces together.
Row 1: Ch 16. Starting from 2nd chain from hook, work 1 sc into each of next 3 ch. Work 1 hdc into each of next 3 ch. Work 1 dc into each of next 3 ch. Work 2 dc in each of next 2 st. Work 1 dc in next stitch, 1 hdc in next stitch, 1 sc in each of next 2 stitches. Ch 1. Turn.
Row 2: Work 1 sc in each of next 2 st, 1 hdc in each of next 2 st, 1 dc in next st. Work [1 dc, ch 1, 1 dc] in each of next 2 stitches. Work 1 dc in each of next 2 st, 1 hdc in each of next 3 st, 1 sc in each of next 5 sc. Fasten off.
To join the 2 tails together, insert hook through both pieces, and work slip stitches evenly around. Fasten off and weave in ends. You’ll add a new piece of yarn to sew onto the body.
Assembly
Gill #1: Ch 9. Starting from 2nd chain from hook, work 1 sl st into each chain across. Fasten off. Leave tail to sew onto body.
Gill #2: Ch 7. Fasten off. Leave tail to sew onto body.
Gill #3: Ch 5.Fasten off. Leave tail to sew onto body.
- The eyes are positioned between rows 18 and 19, at around stitch 33, and around stitch 48. They should line up with the curve of the mouth.
- The gills are added about 3 stitches behind the eyes, with each gill separated by about 2 stitches apiece, in this order – #1, #2, #3. Use the tail to sew the gills onto the body, using a running stitch, and forcing a slight curve to the gills with the stitches.
- Zigzag the thin Black yarn over the white stitches to “draw” the teeth.
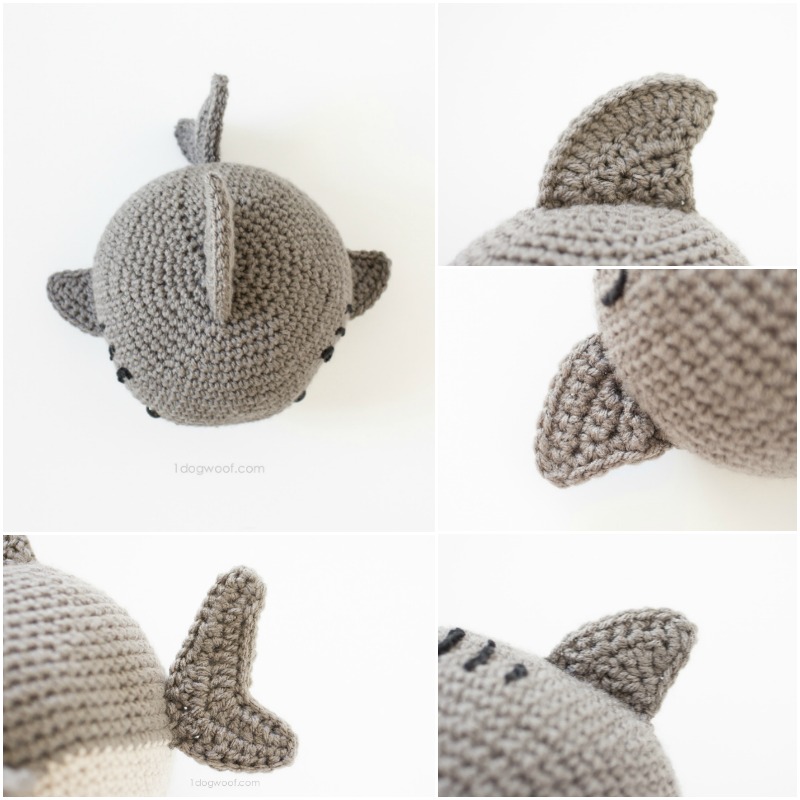
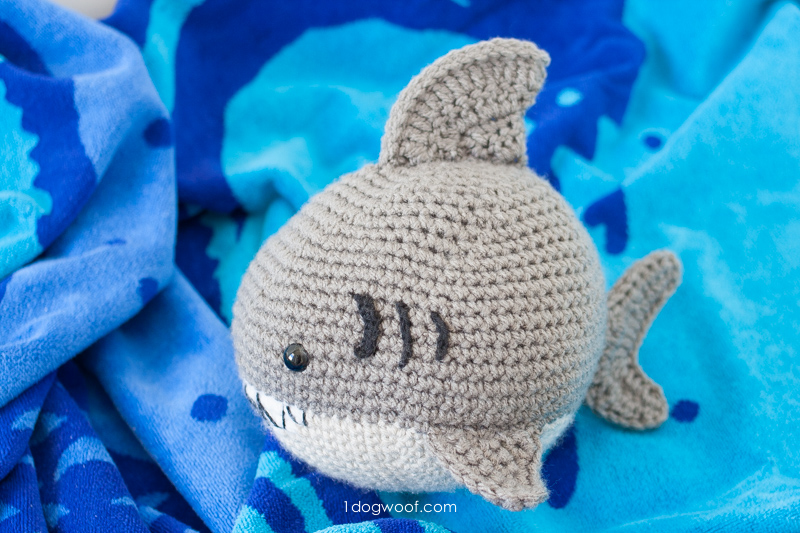
- The dorsal fin is attached to the top of the shark’s head, centered.
- Each side fin is attached to the body where the light gray and dark gray meets (row 22). The front of each fin lines up approximately with the 3rd gill.
- To join the tail to the body, cut a piece of yarn about a foot long, join it to the tail with a knot around a v-stitch (1 dc, ch 1, 1 dc), leaving enough yarn to sew to the body. The tail joins where the light gray meets the dark gray, aligned with the dorsal fin up top. Make sure all ends are secure and weave in all ends.
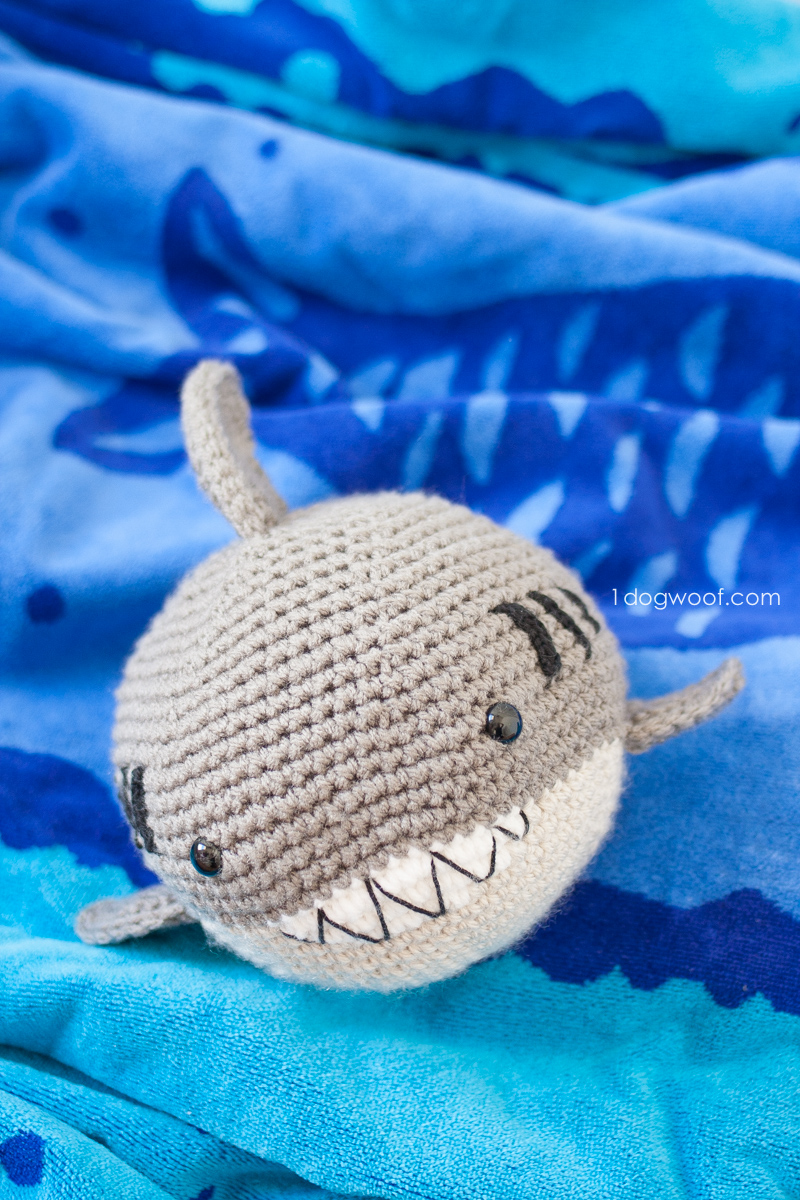
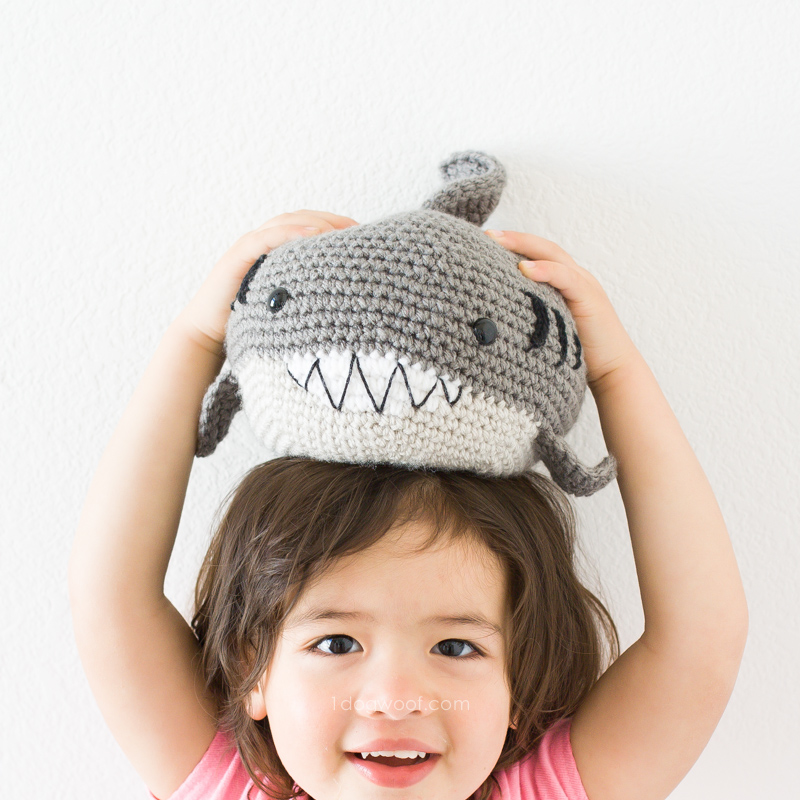
Whew! This little guy is a great hugger and a great sport – he’s being thrown around the house like a bouncy ball right now. Share your crochet shark creations with me on Facebook and Instagram with #1dogwoof, and happy #SharkWeek!
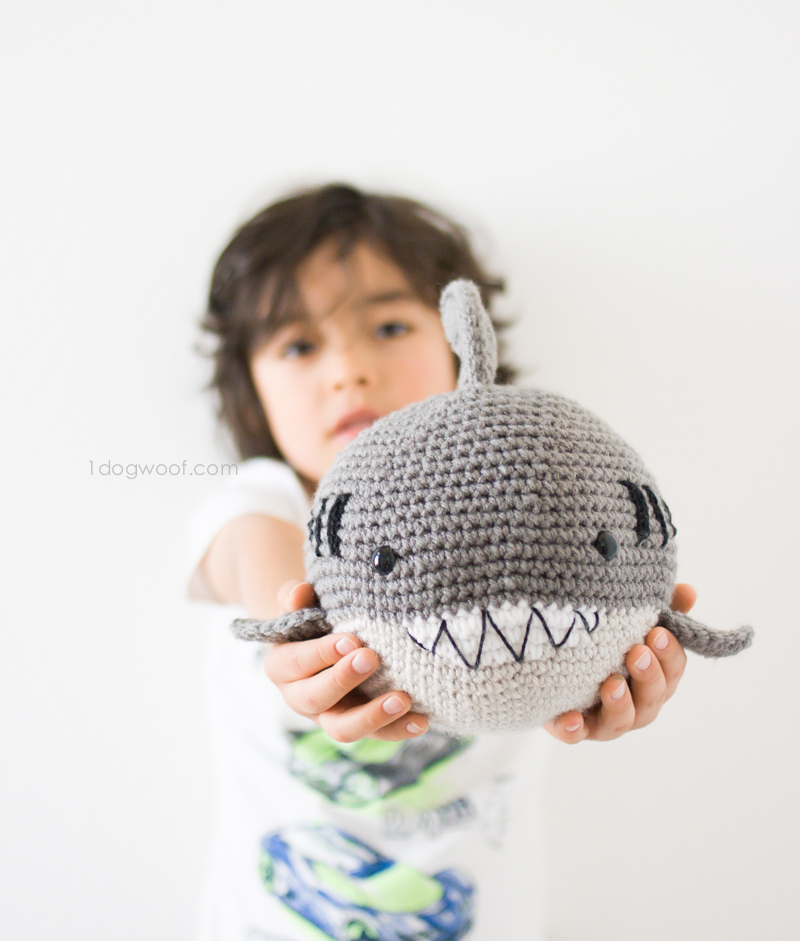


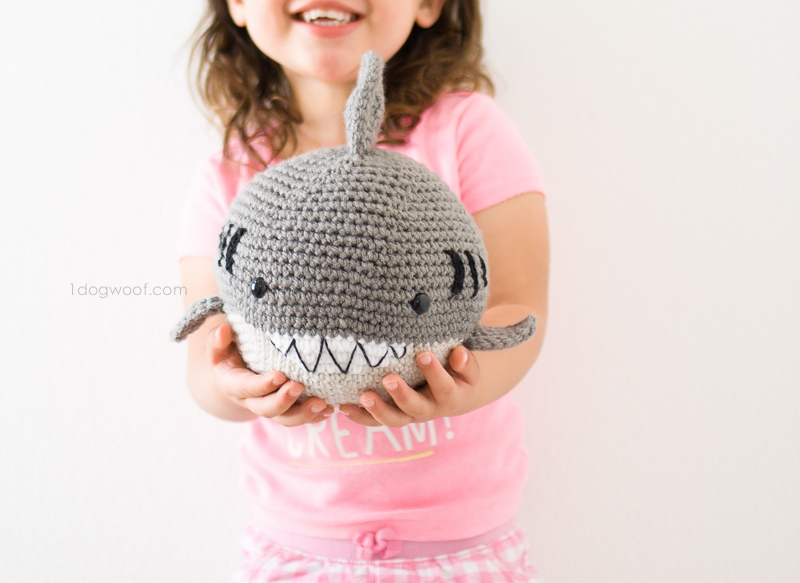
Awesome shark. I like the roundness. Little hands need plenty to grab hold of. Love it!
My nephew is autistic and he’s 14 years old. Anyhow he loves anything concerning sharks. I’m going to make this for him. He’s going to love this. Thank you for sharing.
Cute shark pattern and Thank you very much for sharing. But when do you change to the Pewter yarn looking at the pictures it looks like row 16, since 13, 14 and 15 is where you add the white for the teeth. Is this correct?
I was going to ask the same question as Ann Knoll 🙂
Looks like it should be row 16.
Thank you very much for sharing 🙂
C
Rather row 15, sorry.
As row 14 is the last to ad the white yarn.
Hi, yes, sorry for leaving out that detail! You switch to the Pewter after row 14. Row 15 is the first Pewter row, with 72 stitches in it. I’ve updated the post.
Looking at the picture, you turn to white again for the bottom of whale, at what time do you change to white?
I was looking all over for a dorsal fin shape! I’m making Baby Shark from a cartoon my grandbaby loves. This is perfect! Thank you! Thank you! Thank you!
Haha, glad you like it! Thanks for visiting!
Trying this for a gift!
What is your policy on selling items made from your patterns? I would love to sell this and donate part of the profits to Ocean Conservation during the summer months! <3 Im literally #SharkWeek 's number one fan.
Hi there! Thanks for this amazing pattern, I would definately make it soon! I would just like to ask you something: could you give us approximate dimensions for the finished shark? I’d like to get an idea of how big it’s gonna be.
Thanks again!
Best,
Laura
I made this as a Hanukkah gift for my friend who adores sharks. It turned out absolutely adorable and I’m sure he’s going to love it, thank you for posting this!
That’s a pretty big detail to leave out. I just bought this pattern and it was not updated 🙁
What a lovely shark! Thank you for sharing! Can’t wait to try it.
Hi! First of all, thanks for sharing this cute pattern.
I’m making this for a friend who loves sharks. I’m trying to make this in spiraling rounds instead of joining rounds just like you suggested in the notes because I don’t want a seam. So do I just skip doing the slip stitch and the chain in the instructions and instead just sc in the first stitch to start a new round after final sc in the last round? But will the shape be affected? I guess the final stitch number of each round will also be different from the instructions?
(I’m sorry if this is a basic conversion technique that everyone should know. I’m a beginner just learning to crochet)
Thanks again for the pattern!
Hi Katie,
Yes, if you want to work in a seamless spiral, you can skip the slip stitch join. The shark may end of a bit lopsided as happens when you work in a spiral, but the number of stitches in each round should not change. Hope that helps!
ChiWei
Love this little guy. With the “Baby Shark” craze here in CA right now, my two-year-old granddaughter loves him! Thanks for posting this!
Hi there thank you so much !
I have question ???? .. what is the meaning of ( .2x) ??
Looking for clarification on right fin. Looks like it ends up being a diamond shape where bottom gets folded to top. Since you’re at the top now…before seaming sides…you have two open sides with the last single crochet at the top. When you sc down the first side, the next adjacent side is the fold (bottom)…already “solid”. So does this mean you sc around the posts of the stitches across the fold to make it seem a mirror image to the other fin? If so, you might want to annotate for clarity on the pattern. It took me a while to wrap my brain around it.
I love it. Thanks for the pattern. I made it for my boy for Christmas. I like taking animal patterns, doubling up the yarn (or using blanket yarn) and then using an L (8.0 mm) hook so I am left with a BIG animal. Worked great for this shark!
So cute, worked up fast, have received lots of comments on him and requests for additional sharks.
Thanks for sharing
I just finished the shark and he is adorable!! I have dyslexia and really struggle with reading patterns. Your pattern is so well written that I really didn’t have any problem! Thank you so much for such a great pattern. I am a huge shark and Jaws fan so my guy will be named Hooper in honor of Richard Dreyfuss from Jaws.
I have never finished a project I started with a pattern because it get so complicated and I lose interest, but this fellow took me a day to make and complete, really love your pattern.
Thanks a million.
Thank you for this comment! I also got stuck with that detail, and assumed I had done something wrong before. But working over the already closed side turned out pretty well.
I had issues with the fins and the dorsal fin. I couldn’t even understand the instructions and got confused very easily.
Other than that, I loved making this! I made it for a friend as a late Christmas present! Its adorable and I will be making another one for my 4 year old nephew!💜
How big is this shark? My adult son thought about the size of an adult man’s hand. Help! I would love to make it. Hope to hear soon. Thanks. Your patterns are so easy to follow.
I just made 2 left fins. I feel like the right fin is missing a row. Hope this helps
Hi Eleanor,
It is about 6-8 inches wide and long.
I don’t understand how you get the white belly. I have read the instructions numerous times. It is very possible I am missing something. Can you please help? Thanks.
The belly is the light grey yarn, so it’s the yarn you start with at the beginning of the pattern, before introducing the white for the teeth and the dark grey for the top half of the shark. Hope that helps!