

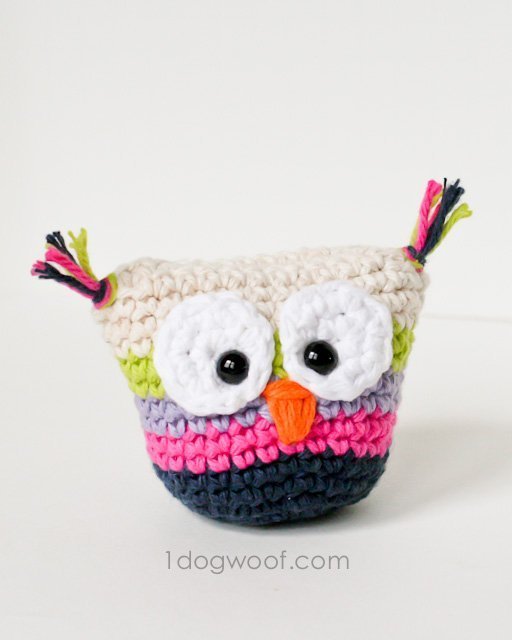
Owls are all the rage right now, flying all over Pinterest like that scene from Harry Potter where they land on every available space in the yard. Well, I wanted to get in on it, but still do something a little different, so here’s my contribution to the owl trend – my very own crocheted owl pouch.
These pocket darlings can be made in a variety of colors and patterns and can hold any little thing your heart desires. This is a free pattern, so feel free to sell your finished creations. However, please do not sell or distribute the pattern in any way, and if you can, link back to this post in your listing so your clients know where you got your inspiration! Thanks!
Owl Pouch
Supplies
Cotton or Worsted Weight yarn
G size hook
tapestry needle, scissors
small button
9mm animal eyes
Note: This is not crocheted in a spiral; it is crocheted in individual rounds. Joining rounds normally gives a moving seam, so I chose to join my rounds using the No-Cut Join method as described by Planet June for a straight seam. The instructions here will include a short description, but head over to Planet June to see a full tutorial and videos on this joining method.
The instructions below are to create the owl shown above.
BODY
Round 1: Start with a magic circle. Work 6 SC into ring and join. (6 stitches)
Round 2: CH 1. Work 2 SC into each stitch. Joining: Remove hook from last SC. Insert hook into first SC from back to front. Add loop from the last stitch onto the hook and pull through tightly. (12 stitches)
Round 3: CH 1. Work 1 SC into current stitch (the one where you joined), then 2 SC into next stitch. *Work 1 SC into next stitch, followed by 2 SC in next stitch* around. Repeat no-cut joining method. (18 stitches)
Round 4: CH 1. Work 1 SC into current stitch, and 1 SC into next stitch. Then work 2 SC into next stitch. *Work 1 SC into each of next 2 stitches, followed by 2 SC in next stitch* around. Join. (24 stitches)
Round 5: CH 1. Work 1 SC into current stitch, and 1 SC into next 2 stitches. Then work 2 SC into next stitch. *Work 1 SC into each of next 3 stitches, followed by 2 SC in next stitch* around. Join. (30 stitches)
Round 6: CH 1. Work 1 SC into each of 30 stitches around, starting with the current stitch (where you joined the previous round). (30 stitches)
At the end of Round 6, change colors to create stripes. To join new yarn, I used Planet June’s Invisible Join method: after the last stitch, cut yarn leaving a tail, and pull tail through stitch. Insert hook into the 2nd stitch in the round from back to front under both bars and pull tail through. Then insert hook into last stitch in round from back to front through only the back loop and pull tail through. (It’s easier to watch the video.)
Round 7-8: CH 1. Work 1 SC into each of 30 stitches around, starting with the current stitch. (30 stitches). Change yarn color.
Round 9-10: CH 1. Work 1 SC into each of 30 stitches around, starting with the current stitch. (30 stitches). Change yarn color.
Round 11-12: CH 1. Work 1 SC into each of 30 stitches around, starting with the current stitch. (30 stitches). Change yarn color.
Round 13-15: CH 1. Work 1 SC into each of 30 stitches around, starting with the current stitch. (30 stitches). Join.
Row 16: CH 1. Work 1 SC into next 15 stitches. CH 1. Turn.
Row 17: Starting with the 2nd chain from the hook, SC 2 stitches together (sc2tog). Work 1 SC into each stitch in the row (11 stitches) until there are 2 stitches left. SC2tog the last two stitches. CH 1. Turn. (13 stitches)
Row 18: Starting with the 2nd chain from hook, sc2tog, then work 1 SC into each of next 9 stitches. SC2tog last two stitches. CH 1. Turn. (11 stitches)
Row 19: Starting with the 2nd chain from hook, sc2tog, then work 1 SC into each of next 7 stitches. SC2tog last two stitches. CH 1. Turn. (9 stitches)
Row 20: Starting with the 2nd chain from hook, sc2tog, then work 1 SC into each of next 5 stitches. SC2tog last two stitches. CH 1. Turn. (7 stitches)
Row 21: Starting with the 2nd chain from hook, sc2tog, then work 1 SC into each of next 3 stitches. SC2tog last two stitches. CH 1. Turn. (5 stitches)
Row 22: Starting with the 2nd chain from hook, sc2tog, then work 1 SC into next stitch. SC2tog last two stitches. Do not turn. (3 stitches).
Border: Work slip stitches down side of flap, around back of pouch opening and back up other side of flap. Make last slip stitch in the 3rd stitch of Row 22. CH 5. Slip stitch into 1st stitch of Row 22. Fasten off and weave in ends.
EYES (make 2)
Round 1: Start with a magic circle. Work 6 SC into ring. Join. (6 stitches)
Round 2: CH 1. Work 2 SC into each stitch around. Join. (12 stitches)
Fasten off with long tail.
Finishing
Push plastic eyes through a point between the 1st and 2nd rows of the eye piece (not through center of circle). Using the tail and a tapestry needle, attach eyes so that plastic eye is pushed through the body, centered and between Rounds 12 and 13, counting from the bottom. Push backing of plastic eye on securely.
Attach button to the center of the back of the body between Rounds 11 and 12, counting from the bottom.
Using a tapestry needle, create a beak centered right below the eyes.
Cut strands of leftover yarn and create the tufts using a lark’s knot where the body meets the flap.

If you have any questions, leave a comment and I will try to answer them as they come up. Please look through the comments and see if your question has already been asked. I’d love to see your creations – leave a link on my Facebook page!
For this project, I used Lily Sugar’n Cream Yarn (affiliate link). I love this yarn, as you can tell from some of my other projects and patterns!


Большое спасибо! Обязательно попробую!
Oh my gosh, so cute! I love these little guys! They look like they’d make a great little coin purse. Are they big enough for a gift card, or folded up money? That would be such a cute way to give a gift–a homemade owl with a little surprise inside 🙂 Thanks for sharing the pattern!
Hey thanks Rachel! I can fit folded up money in there easily, and a gift card will fit too but it does distort the bag a bit – won’t look round and fluffy. It’ll look like an owl that just swallowed a gift card 🙂
I LOVE this!
Chi Wei this rocks! It is so cute! I have to admit I’m still not a crocheter…. I was planning on taking your beginners class but never got to it (still on my list though). So this is yet another pattern I will add on to my pinboard of things to crochet when I learn….or I might just pass the pattern on to my sis (who can crochet), maybe she’ll whip one up for me 😉
I LOVE this and cannot wait to make one! Thanks for the pattern! ~Stephanie
Chi Wei,
These are adorable! Thanks for linking up at the Inspiration Gallery!
~Sarah
hi charming owls. so happy too see them perfect gift for two I know teens thanx soooo . your blog is tops .
This is ADORABLE! New follower via facebook and pinterest!
I have absolutely NO IDEA how to make one of these, but they are so cute! I’m pinning it to my Owl board. 🙂
Very nice project! We recommended this!
http://home-sweet.ru/archives/27034
these are so cute! thanks for sharing
So stinkin’ cute! This so makes me wanna learn to crochet! Thanks for linking up to Monday Funday!
Beautiful pattern! I’d like to try this right now! Can you give a bit more guidance on making the beak? As well as the lark’s knot? Thanks! 🙂
Love the owl pouch. I think it would be cute with a long braided handle to use as a purse.
That’s a great idea! Or add a keychain and attach it to a bag 🙂
The beak is just a strand of orange yarn looped over and over through the piece to create the shape, with the two ends tied in the back and woven in. For the lark’s knot to create the fuzzies, fold a few yarn strands in half, insert the folded end of the strands through a stitch, and pull the yarn ends through the loop. Pull tight to secure. Hope that helps!
Thanks! I think I’m good to go now! I have the rest of it made already and it’s SO adorable!!
super cute. 🙂 do you have videos on this?
This looks awesome!!! We would love it if you would link up at our linky party:
http://www.lifewiththecrustcutoff.com/two-girls-and-a-party-link-up-29/
Live every Wednesday to Sunday.
Hosted by:
http://www.lifewiththecrustcutoff.com/ Parrish @ Life with the Crust Cut Off
http://thissillygirlslife.com/ Dana @ This Silly Girl’s Life
We hope to see you there!
Ann, I’m sorry I don’t. I have not yet ventured into video posts 🙂
Omg I just made one of these owls they’re so cute. I don’t have the size eyes needed,but I’m quite sure black puff paint will do. Thank you for posting this cute pattern.
This is so cool, I am definitely pinning this to make ASAP. I especially love your colour choices.
This is so adorable! I always love it when cute things are useful too. When I craft something cute myself I always try to come up with some sort of use for it, to justify my crafting, haha xD
Love these little owls, will definately have to make – thanks for sharing pattern
Oh, dear! That’s absolutely adorable. I love it. I’m going to Pin this and follow you on FB!
So cute! Thanks for sharing 🙂 Am going to try one, then try again with smaller hook and thread. That way I can stuff it with a tea bag or something scented to be used on Christmas tree! Thanks again 🙂
Whoa, that’s a great idea! I never thought of using it as a Christmas ornament! You’ll have to share a photo with us!
These are brilliant!! My niece would love one of these – I am so going to make her one!!
can you tell how you made the flap for pouch|?
thank you
rami
OMYGOD these are ADORABLE!! I want to make these for my granddaughters and nieces, thank you for sharing!! 🙂
You’re so welcome Aida! I hope the girls love them!
Hi Rami,
The flap for the pouch is included in the instructions. You stop crocheting in the round and start crocheting in rows, but crochet 2 stitches together at the beginning and end of each row – this decreases the number of stitches in each row and creates a triangular flap. I hope that helps!
thank you
i am still a beginner in crochet so thought of asking before doing this beautiful pouch
thank you once again
rami
Adorable! I think I’m going to crochet this pattern for my mother-in-law when I’m done with the scarf I’m making. What are the finished dimensions of the pouch? Thanks!
Thanks Heather! Good luck on all your projects! Let’s see, when the owl is finished, it’s about maybe 4 inches wide – you can stuff a gift card in there, but it distorts the shape. If you happen to stuff it with stuffing just to see the shape, it’s about the size of a decent apple – not crab-apple and not one high on antibiotics either. Hope that helps!
Thanks! I might make my owl pocket pouch just a wee bit bigger.
I love this pattern, I would love to make one and link back to your blog post with the pattern. Would that be okay?
Thanks,
Megan
Megan,
I’d love it if you created your own and linked back! Good luck and enjoy!
i have almost finished my first owl but i’m not sure how to make the loop to fasten it over the button at the back, can you help?
just answered my own question by reading the pattern again *MORE CAREFULLY!* will post on fb when he’s finished!
He’s soo cute! I love him. I’ve made one but I used 12mm eyes on mine (thats all I had) 🙂 I’m definitely gonna make more for gifts. Thanks for sharing.
You’re so welcome! I think bigger eyes would be totally cute!
charmin, soooooo cute !! Thanks for sharing this pattern !! Leelou from France
You’re so welcome Leelou! I hope you make lots 🙂
This is so cute, I’ve been looking for something to keep my Bluetooth earpiece in when not in use as have broken a couple and lost my last one!!!!…. Think I’ve just found the solution, Thank you!
That would be an awesome use for this pouch, and it’d fit perfectly! Thanks for stopping by!
Going to make these to hold a pacifier. So cute!
Seriously, I cannot believe I didn’t think of that! Total genius! It’s the perfect size, and you can add a lanyard or something to attach it to your purse too. Great idea, thanks Carrie!
Can you tell me what the dimensions of the finished item are? I can’t see them in the directions. These are very cute.
Melanie, the finished pouch is about 4 inches wide. When it’s flat, it can fit a credit card. When it’s round, it’s about the size of an average apple. In the comments, readers have suggested using them for ear buds or pacifiers (See above!)
Thanks for the info. They are so cute. It looks like I can whip them up in a jiff with scrap yarn, just in time for Christmas to put tiny treasures inside!
This is soooooo pretty. Thank you for lovely pattern ………. 🙂
Hi there…these little guys are a real hoot to make…easy to work up & just adorable! I noticed someone wanted to know if they could fit a gift card into one…well i ended up making mine with an H hook because I couldnt find my G, & a gift card actually fits perfectly, no distortion at all! just thought I’d share that.
Thanks for the awesome pattern, I will be making up a bunch of these for craft fair season & gifts!
Oooh, thanks so much Michelle! I guess the larger hook just made it large enough to fit a gift card – great tip!
Thank you so much for this owl pattern it’s adorable. I just posted the one I made on my blog if you’d like to check it out http://clairettetricote.wordpress.com/2014/02/11/chouettes-chouette-chouettes-owls-owls-owls/
with a link to your blog of course!
i need help with the flaps it not doing right i wish you had a video…
Thank you for the tuto ! This owl is so cute ! I made one, it’s on my blog !
See you soon !
Thank you!
I’m sorry I don’t have a video for you, but if you want, you can email me and I can try to help you out!
Thank you for the “Owl Pouch” idea, it’s really cute. This has sparked a whole load of new ideas; cat’s, puppy dogs… could I make the flap into a horse face, or, riendeer at Christmas??? I’ve made similar from my own pattern as mini ‘Easter egg wallets’, for the boys in my class in school. I decorated them with a large button. For the girls, I made them into a mini handbags, by adding handles and decorated with them with buttons, flowers and a cute handmade charm. Thanks again my head is buzzin now! Ps) I’m definitely going to use your Alien Egg Monster for the children’s Easter gifts next year! I’m so glad I found your Blogg 😀 <3
oops typo should have been ‘reindeer’
Thank you so much Sue!
I can’t wait to make one of these! It will be a great gift for my son’s girlfriend. She loves owls so I am always on the lookout for owl items. Thanks for the cute pattern1
Glad you like the pattern Lisa!
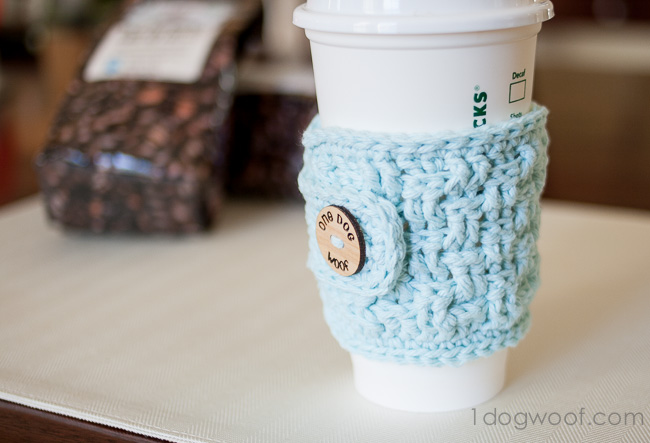
These little owl pouches are adorable! I’m also totally digging that coffee cozy….so cute!
Thanks Brandy!
I absolutely love this and it was interesting and easy enough to make that it was a great project. My mother asked me to consider making amigurumi. It was fun to learn a little of this fascinating art. Thank you for sharing this pattern! I intend to make more.
Thanks Melanie! I’m glad you like it and helped you start on the road to amigurumi! It’s pretty addictive so don’t be surprised if you start looking for cutie things to make all the time!
Thank you for sharing this cute pattern! The tutorial links were very helpful. I can’t wait to put the finishing touches on my little guy.
You’re so welcome Tina! Enjoy!
Thanks so much for this pattern. It is just what I need for my daughter’s baby shower. I am stitching up about 100 of these to give as the favors. I can’t decide on a favorite and I know they will be a big hit and something our friends can use over and over n
Wow, that’s a great favor for a baby shower, I’m sure the guests will LOVE them! And that’s a lot of work for you too, kudos! And congrats of course on the grandbaby. Enjoy!
Just finished making the lovely owl pouch for my sis-in-law who loves owls. Thanks for sharing.
Just finished making the owl pouch for my sis-in-law who loves owls.
Thanks for sharing.
Hi,
This is a lovely pattern, thanks a lot ! Here are my little guys.
These are too cute, so glad I ran across it during the CAL. I will be making one of these for each of my little girls for Christmas this year.
I hope your girls love them!
I love owls in any form,,, crochet is just right. Your little pouches are ideal for toting most anything Thanks so much for sharing your talent with us SMILE
Thank you so much Helen!
Hi, I got to step 17 but can’t go any farther. I don’t understand what you mean by stitch 2 SC together. Stitching two stitches to each other somehow?
Stitching 2 sc together is a decreasing stitch. You can look for a decreasing tutorial under my Crochet category : http://www.1dogwoof.com/2013/02/cal-increasing-and-decreasing.html Hope that helps!
Is the planet june website closed?? I have tried several times to go look at the info on the invisible joins, but I can never get the site to come up. I wanted to see her tutorial before attempting this! 🙂
I don’t think so. I accessed it recently.
they came out great!!!
Hello, Thank you for posting this cute creation. I made it for my daughter and she loves it. You are so creative and I love your site. Your tips have helped to respark my interest in crochet. It is so relaxing and satisfying. Thanks again for sharing.
It’s so great to hear that you find this relaxing!
Excellent way of explaining, and nice paragraph to get data regarding my presentation focus, which i am going to convey in academy.
Thiss site truly has all of the information I wanted concerning this subject
and didn’t know who to ask.
Hello,
can i translate this pattern to Dutch for my Facebook group?
I hope I can!
greatings from the Netherlands!
Thank you , Thank you , Thaaaaaank you
I
DID
IT
thanks for your effort 🙂
This is the second of your patterns I have finished tonight! So well written I sure do appreciate the free patterns. Owl came out perfectly. LOVE IT – Thank You!