
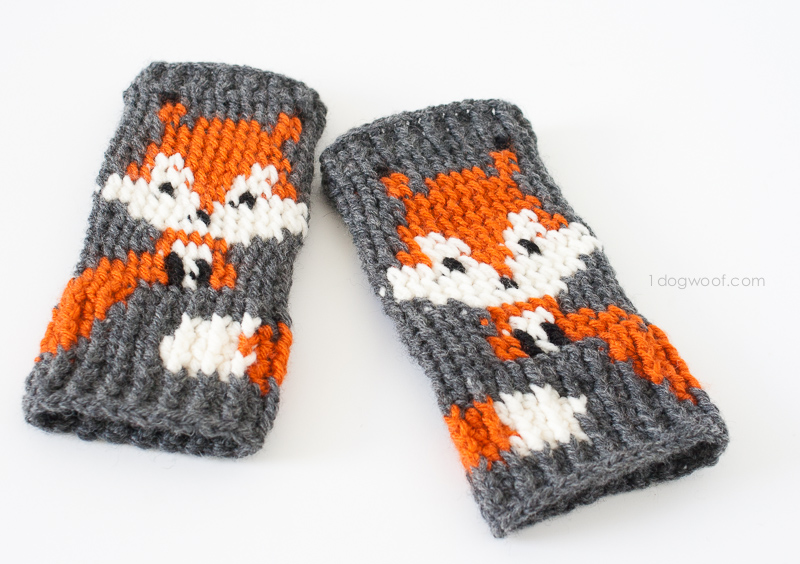
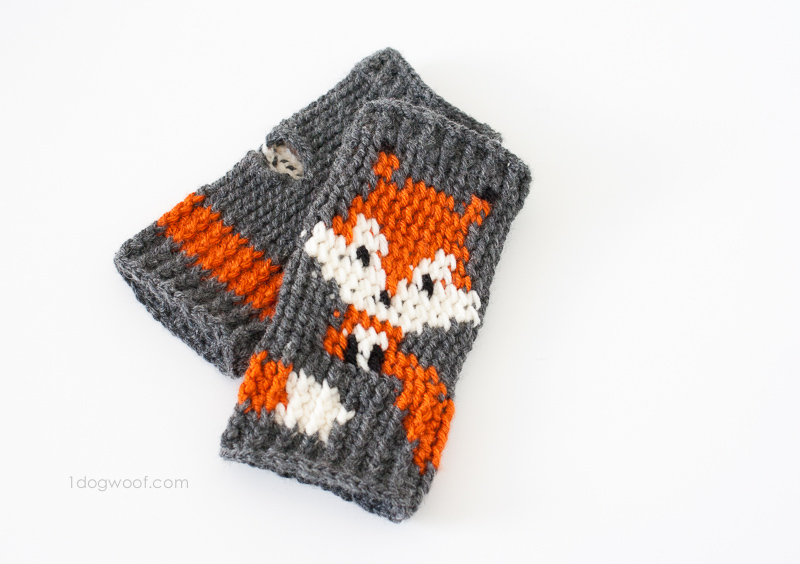
Banish the winter doldrums with this fun fingerless gloves crochet pattern that features a cute fox on each hand that wraps its bushy tail around your wrists.

The other day, I made this heart cup cozy using front post half double crochets. These crochet gloves use similar front post single crochet stitches to create the ribbing like look at the wrists and fingers.
Choosing the Right Yarn
For these fingerless gloves, you’ll want to choose yarn that is soft and comfortable against your hands. Especially in wintertime, many people have trouble with dry skin or eczema, and a scratchy wool can aggravate those conditions. If your hands sweat a bit, you may want to use a soft 100% merino wool that wicks away moisture while keeping your hands warm. Even a soft acrylic yarn will work beautifully!
Choose your favorite orange and cream yarn, and put it against a dark neutral background. I chose a grey so that both the cream and black accents stand out. You can also use a complementary color like blue or green that highlights the brightness of the fox itself.
You’ll want to use the same brand of yarn for all the colors so that all the yarn weight are exactly the same. This will help keep your stitches even, especially in the colorwork sections.

Constructing Your Fox Fingerless Gloves
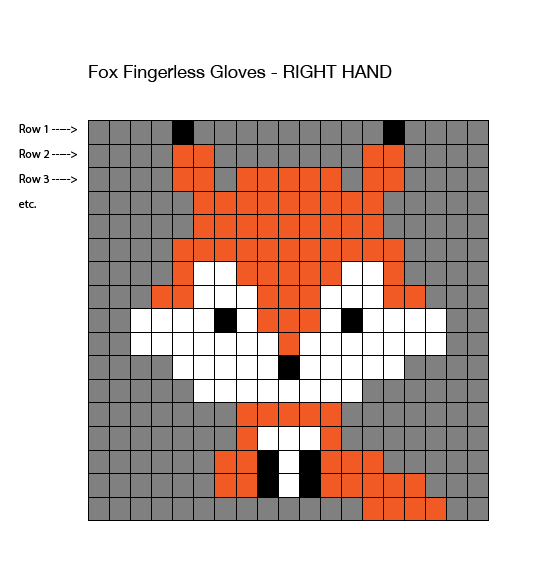
These crochet fingerless gloves are worked in the round, and is actually worked from fingers to wrist, which means you’ll read the graph from top to bottom.
Be careful of you tension in this project. I tend to make ribbing loosely, so I used my main hook for the colorwork, and then a smaller hook for the ribbing so that my tension equalizes out. Using different hook sizes is a great way to make sure all your stitches come out evenly even when your tension varies. You’ll need to find what works best for you!
——————————————
You Might Also Like:
——————————————
There’s also obviously a lot of colorwork in this fingerless gloves crochet pattern. You can choose to carry each color yarn all the way around, cut the yarn on each round, or carry the yarn back and forth on the back side of the project.
I chose the third option, where I carried the yarn across the main fox motif, and then brought the yarn back to my active stitch for each round. If you do this, make sure to leave enough slack for the gloves to stretch! I also worked my stitches over any carried yarn to hold them in place. Again, you’ll need to stop and check the stretch as you go, so you don’t end up with gloves that are too tight!
You can use the free pattern below, or purchase an inexpensive, ad-free and comment-free PDF of this fox handwarmer pattern on Ravelry or Etsy. The file will be available for download immediately after payment. Thank you for helping me continue to provide these fun free patterns!
——————————————
Get the Fox Fingerless Gloves PDF from Ravelry
——————————————
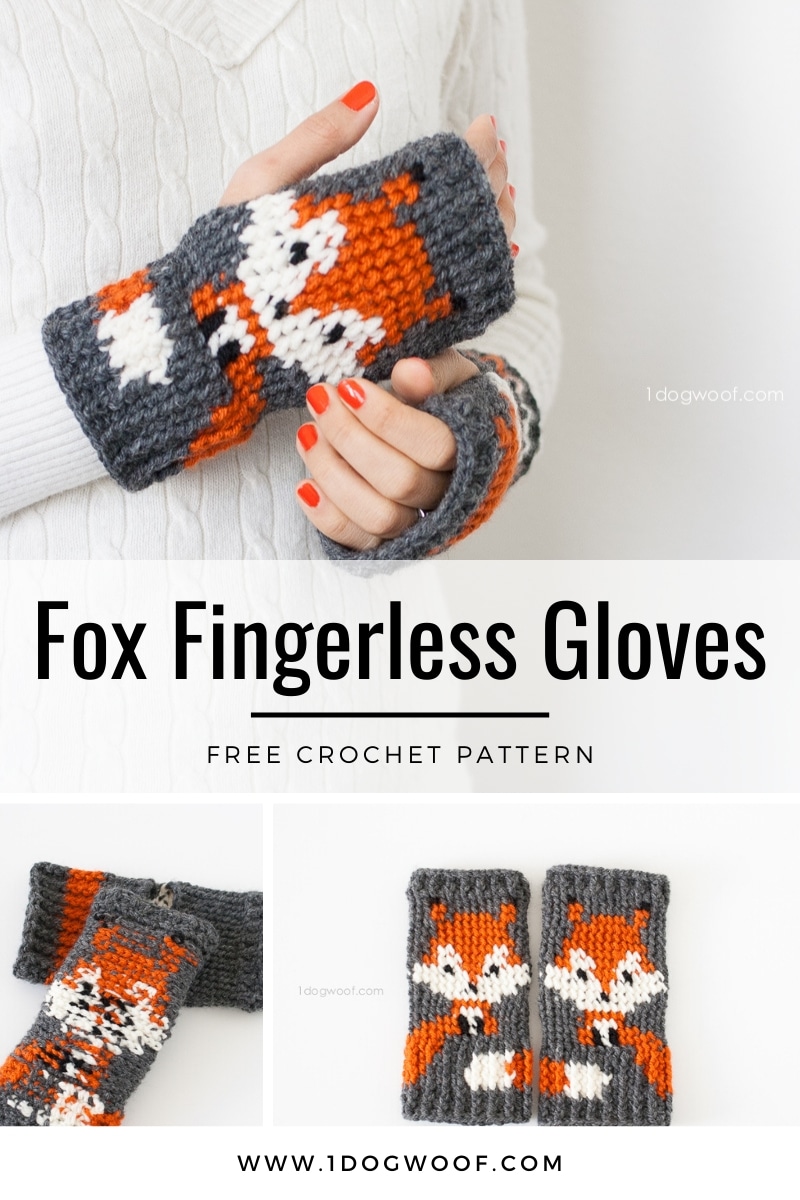
Click here to Pin it for later!
Fox Fingerless Gloves Crochet Pattern
Supplies
- Worsted weight yarn in orange, white, black, and a background color. I used:
Lion Brand Vanna’s Choice in Terracotta*, in White*, and in Black*
Patons Classic Wool in Dark Grey Mix - 7 (4.5 mm) and G (4.0mm) hook – Clover Amour Hooks*.
- scissors
- embroidery needle
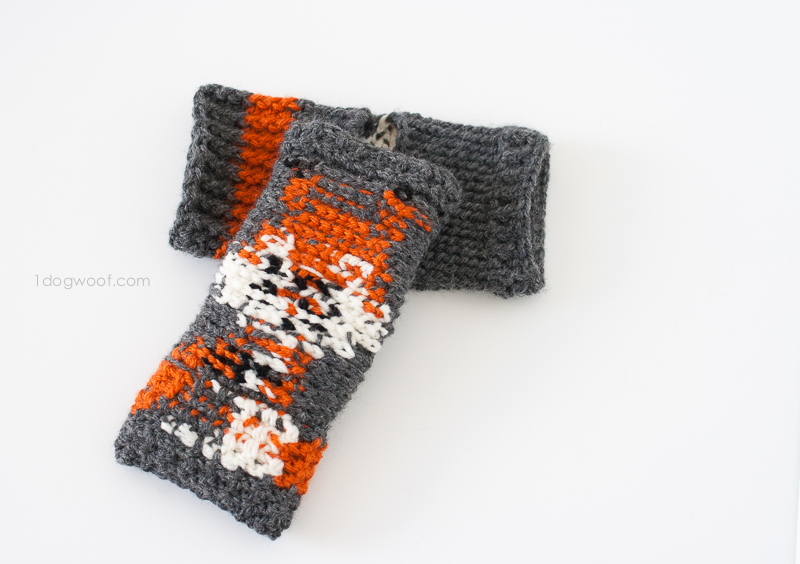
(The hook size, yarn and your level of stress during construction will determine the size of your finished handwarmer. You can see the difference in this pictures – both was using the same size hook, but I was more relaxed when creating the right-hand glove. The left one had turned out a bit tight for my hand, so I was also consciously keeping my gauge a bit looser when I worked up the right hand one.
Abbreviations
sl st – slip stitch
ch – chain stitch
st – stitch
dc – double crochet
fsc – foundation single crochet
fpsc – front post single crochet
fpdc – front post double crochet
Instructions for Fox Fingerless Gloves
RIGHT HAND
Top Ribbing
Round 1: Using the smaller size (G) hook. FSC 35. Join to first fsc.
Round 2: Ch 2. Work 1 dc in same st. [Work 1 fpdc in next stitch, 1 dc in next stitch] around. Join to first dc.
Round 3: Repeat Round 2.
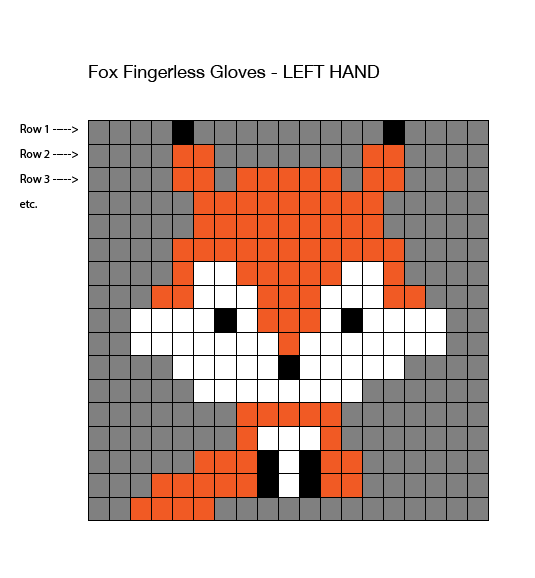
Fox Graph – every stitch is a fpsc. Each round starts with a ch 1, and the first fpsc is worked into the same stitch as the chain stitch.
Round 1-10: Switch to the larger size (7) hook. Ch 1. Work 1 fpsc in next 16 st, then follow the chart on Rows 1-10. Join to first st.
Round 11: Ch 1. Work 1 fpsc in next 12 st, ch 5, skip 5 st. The 5th skipped stitch is the first stitch on the chart. Work 1 fpsc into next stitch (2nd stitch on Row 11 of the chart) and continue to follow the chart through the end of the round.
Round 12: Ch 1. Work 1 fpsc in next 12 st. Work 5 sc in the ch 5 space. The 5th sc is the first stitch on the chart. Work 1 fpsc into next stitch (2nd stitch on Row 12 of the chart) and continue to follow the chart through the end of the round.
Round 13-17: Ch 1. Work 1 fpsc in next 16 st, then follow chart to end of round. Join to first st.
Wrist Ribbing – ch 2 at the beginning of the round does not count as stitch.
Round 1: Switch to a smaller size (G) hook. In gray, ch 2. Work 1 dc in same st. [Work 1 fpdc in next st, 1 dc in next st] 14x. In orange, while carrying the gray, [work 1 fpdc in next st, dc in next st] 2x. Work 1 fpdc in next stitch. In gray, work 1 dc in next st. Join to first st.
Round 2: In orange, ch 2. (pull the gray yarn tight, and it’ll look like it disappears). Work 1 dc in same st. [Work 1 fpdc in next st, 1 dc in next st] 9x. Work 1 fpdc in next stitch. In white, while carrying the orange, work 1 dc in next stitch. [Work 1 fpdc in next st, 1 dc in next st] 2x. In gray, while carrying the orange, [work 1 fpdc in next st, 1 dc in next st] 2x. Work 1 fpdc in next st. In orange, work 1 dc in next st. [Work 1 fpdc in next st, 1 dc in next st] 2x. Join to first st.
Round 3: In orange, ch 2. Work 1 dc in same st. [Work 1 fpdc in next st, 1 dc in next st] 10x. In white, while carrying the orange, [work 1 fpdc in next st, 1 dc in next st] 2x. Work 1 fpdc in next st. In gray, while carrying the orange, work 1 dc in next st. [Work 1 fpdc in next st, 1 dc in next st] 2x. In orange, [work 1 fpdc in next st, 1 dc in next st] 2x. Join to first stitch.
Round 4: In orange, ch 2. Work 1 dc in same st. [Work 1 fpdc in next st, 1 dc in next st] 9x. Work 1 fpdc in next st. In white, while carrying the orange, work 1 dc in next st. [Work 1 fpdc in next st, 1 dc in next st] 2x. In gray, while carrying the orange, [work 1 fpdc in next st, 1 dc in next st] 3x. Work 1 fpdc in next st. In orange, while carrying the gray, work 1 dc in next st. [Work 1 fpdc in next st, 1 dc in next st] 1x. Join to first st.
Round 5: In gray, ch 2. (pull the orange yarn tight, and it’ll look like it disappears). Work 1 dc in same st. [Work 1 fpdc in next st, 1 dc in next st] around. Join to first st.
Round 6-7: In gray, ch 2. Work 1 dc in same st. [Work 1 fpdc in next st, 1 dc in next st] around. Join to first st.
Fasten off. Turn the glove inside out and weave in all ends.
LEFT HAND
Top Ribbing
Round 1: Using the smaller size (G) hook. FSC 35. Join to first fsc.
Round 2: Ch 2. Work 1 dc in same st. [Work 1 fpdc in next stitch, 1 dc in next stitch] around. Join to first dc.
Round 3: Repeat Round 2.
Fox Graph – every stitch is a fpsc. Each round starts with a ch 1, and the first fpsc is worked into the same stitch as the chain stitch.
Round 1-10: Switch to the larger size (7) hook. Ch 1. Work 1 fpsc for each stitch shown on Rows 1-10 in the chart. Once you get to the end of each row, work 1 fpsc in next 16 st. Join to first st.
Round 11: Ch 1. Work 1 fpsc for each stitch shown on Row 11 in the chart, until the 2nd to last stitch in the row. (18 stitches) Ch 1, and skip the last stitch shown for Row 11 in the chart. Ch 4, skip 4 st. Work 1 fpsc in next 12 st. Join to first st.
Round 12: Ch 1. Work 1 fpsc for each stitch shown on Row 12 in the chart, until the 2nd to last stitch in the row. (18 stitches) Work 5 sc in the chain 5 space from the previous row. (The 1st sc in the ch 5 space is the last stitch on the chart). Work 1 fpsc in next 12 st. Join to first st.
Round 13-17: Ch 1. Work 1 fpsc for each stitch shown on Rows 13-17 in the chart. Work 1 fpsc in next 12 st. Join to first st.
Wrist Ribbing – ch 2 at the beginning of the round does not count as stitch.
Round 1: Switch to a smaller size (G) hook.In gray, ch 2. Work 1 dc in same st. In orange, while carrying the gray, [work 1 fpdc in next st, 1 dc in next st] 2x. Work 1 fpdc in next st. In gray, work 1 dc in next st. [Work 1 fpdc in next st, 1 dc in next st] 14x. Join to first st.
Round 2: In orange, ch 2. (pull the gray yarn tight, and it’ll look like it disappears). Work 1 dc in same st. [Work 1 fpdc in next st, 1 dc in next st] 2x. In gray, while carrying the orange, [work 1 fpdc in next st, 1 dc in next st] 2x. Work 1 fpdc in next st. In white, while carrying the orange, work 1 dc in next st. [Work 1 fpdc in next st, 1 dc in next st] 2x. In orange, [work 1 fpdc in next st, 1 dc in next st] 10x. Join to first st.
Round 3: In orange, ch 2. Work 1 dc in same st. Work 1 fpdc in next st, 1 dc in next st. Work 1 fpdc in next st. In gray, while carrying the orange, work 1 dc in next st. [Work 1 fpdc in next st, 1 dc in next st] 2x. In white, while carrying the orange, [work 1 fpdc in next st, 1 dc in next st] 2x. Work 1 fpdc in next st. In orange, work 1 dc in next st. [Work 1 fpdc in next st, 1 dc in next st] 10x. Join to first st.
Round 4: In orange, ch 2. Work 1 dc in same st. Work 1 fpdc in next st, 1 dc in next st. In gray, while carrying the orange, [work 1 fpdc in next st, 1 dc in next st] 3x. Work 1 fpdc in next st. In white, while carrying the orange, work 1 dc in next st. [Work 1 fpdc in next st, 1 dc in next st] 2x. In orange, [work 1 fpdc in next st, 1 dc in next st] 10x. Join to first st.
Round 5: In gray, ch 2. (pull the orange yarn tight, and it’ll look like it disappears). Work 1 dc in same st. [Work 1 fpdc in next st, 1 dc in next st] around. Join to first st.
Round 6-7: In gray, ch 2. Work 1 dc in same st. [Work 1 fpdc in next st, 1 dc in next st] around. Join to first st.
Fasten off. Turn the glove inside out and weave in all ends.


Gorgeous fingerless gloves. I love them. The Clover Amour Hooks are my favorites. Great GiveAway.
Have a pleasant weekend, Margaret
These are lovely make some. However, I’ve never done anything like this. I can’t wait to try it. I’ve only ever made blankets. If I want more of a thumb on it, how would I go about it? Thank you for sharing this amazing pattern.
I love the Amour hooks. Perfect for arthritic hands. Love the fox pattern. Can you turn the gloves in to mittens?
These are gorgeous! Thanks so much for the pattern and the giveaway. <3
Thanks for the opportunity. I have a few of these Clover hooks and like them…would love to have more!
It bugs me just a little that so many blogs depend on Instagram and Twitter – because many of US don’t want to join those sites…I barely have time to visit Facebook, let alone my own email – and don’t want any more “social” internet connections.
I have filled out all the possible entries above – without Twitter and Instagram – and will just hope for the best.
Hi, thanks for the lovely pattern!
I was just trying to make it and i dont think i am getting the bigninng right. It looks too big like a lacy collar for a dog. could you explain a little more about the foundation single crochets and th first two rows?
Thanks so much!
How can I get ‘one dog wolf’ buttons from you? I like your cozies so I’m making some.
Thanks for sharing your thoughts on Gardening.
Regards
There is certainly a great deal to find out about this subject.
I love all the points you’ve made.
These are so cute!! Thank you for sharing 🙂
My daughter and I love your patterns (thank you for sharing!!) but they are really difficult to print out. If I just press print, its 31 pages long. I was wondering if you might think about providing downloadable PDF documents in the future?? Thank you, Charlene 🙂
Hi! Would it be possible to crochet this as a flat panel and then just sew up the side to create the mitt?
I’m not the creator of this pattern, but thought I’d let you know that I didn’t know how to do fsc either and looked it up on YouTube. There is a tutorial on how to do it and it’s pretty simple. I also came out with big collar like but I made the stitches just a tad tighter…enough to fit the hook through w/o struggling. Hope this helps!
That’s what I’m doing now. I just figured I would follow the stitches minus the fox?
Update on original answer..since I’m not making the fox, I just took 2 foundation single crochets off so it’s 33 and not 35, then on the thumb hole took 2 stitches of from number of crochets, so instead of 12, I did 10. Fits better, not so loose.
So Jealous! I so wish I could crochet, but alas – it’s not in me. My daughter, however, can crochet, and I will be hitting her up to make me these. They are just too cute!
Thank you!
Probably, but I’d have to think it through.
Hi Charlene, you can find this pattern on my Etsy site: https://www.etsy.com/listing/295161505/fox-handwarmerfingerless-gloves-crochet?ref=shop_home_active_5
I am new to crochet so I have been buying hooks when needed, be so nice to win a set. Lovely pattern, thanks so much.
Help! I’m having SUCH A HARD TIME with this pattern. I’ve googled, youtube, and researched and I can’t seem to get it. I’ve re-done it like 10 times now and still I just don’t understand the ribbing and rounds. I’m going to keep trying until I get it, but any way of getting some pictures to explain it? I’m confused in Round 1-10. I am doing the pattern upside down like you said, but then I get to the round 1-10 and it says to follow the chart. What chart? The fox graph? And am I doing the stitches around or vertical or horizontal?
I just need a little perspective because I’m just so frustrated to the point of angry tears at myself for not getting it. Any advice would help!
It’s truly a great and useful piece of information.
I am happy that you simply shared this helpful info with us.
Please keep us informed like this. Thank you for sharing.
love this pattern, going to have to make it!
I’m having some trouble with these fox gloves. I have redone the first couple rows a few times with making tighter stitches & using a smaller hook, but they’re still too big for my hands. Any suggestions?
I love Susan BAtes. They hook the yarn better. I think the rounded ones get caught easier on other pieces for me than the susan bates. Also, they do have crochet hook grips. They are just like pencil grips. They slide on the susan bates or any really that don’t have built in handles and work miracles. They are soft and spongy. Just an idea for the susan bate hooks you have, or the ladies who love the head of those better. Thanks for that pattern. Cant wait to give it a try!!
I used this pattern to make a gift for one of my besties and she loves it! the pattern is very clear and well written. It was my first time making gloves with such color work and I’m glad I chose this pattern. Thanks for sharing it with us.
These are absolutely adorable. My 3 year old granddaughter would love these. Any way to make them smaller? Would going down a hook size or 2 do the trick? Has anybody made them smaller for a child?
Thanks Amanda for your helpful hints! I’m going to attempt the Fox pattern for me daughter (last name Fox) so this will be perfect … if I can manage it. I’m not sure I understand how to work this “upside down” but I’m going to give it a try … suck a cute pattern. ????
omg, I’ve frogged this 4 times now. Just reread it AGAIN and realised I was doing the WHOLE chart and not stopping when I got to row 10! My thumb hole was so far down, but now I understand why. Ok, 5th attempt! I may even just do the chart in SC and only the cuffs in fpsc, works up much faster!
Hello thank you for your patterns. I just finished the fox purse (with some of my own touches ????). Can’t wait to try the hand warmers.
Hello ChiWei! I love this pattern so much and decided to make a knitted version of it. Crocheting was my first love (and I still love it), but I took up knitting and wanted to create a knitted version. Would it be okay if I posted a video tutorial of my knitted version? I would be happy to provide a link back to your pattern, as you provided the inspiration for my knitted version. Thank you! -Sam
Thank you! You can share a video tutorial of your version, as long as you don’t provide the entire pattern in the video. Thanks!
Thank you, ChiWei! No problem. The knitted pattern will be completely different. The only part that is similar is your fox chart. I will provide a link back to your website so that viewers can get the full crochet pattern from here. Thanks again for your wonderful, creative patterns!
I would LOVE that!! Esther Rose