
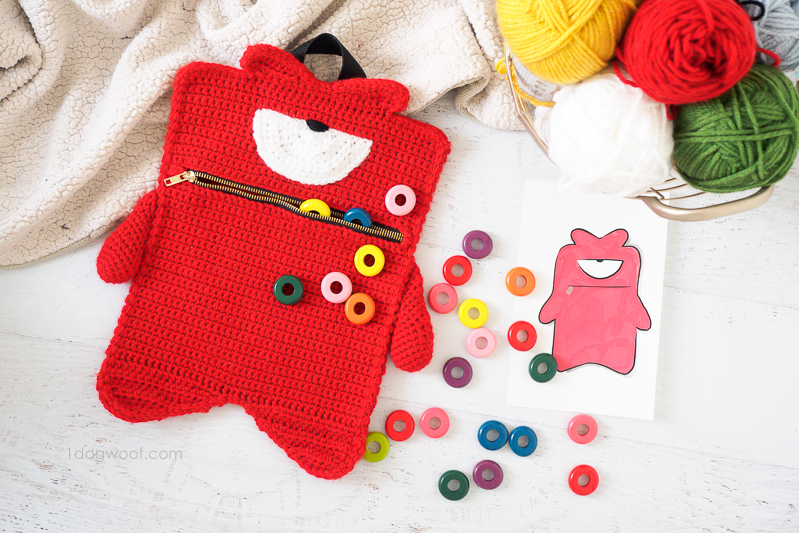
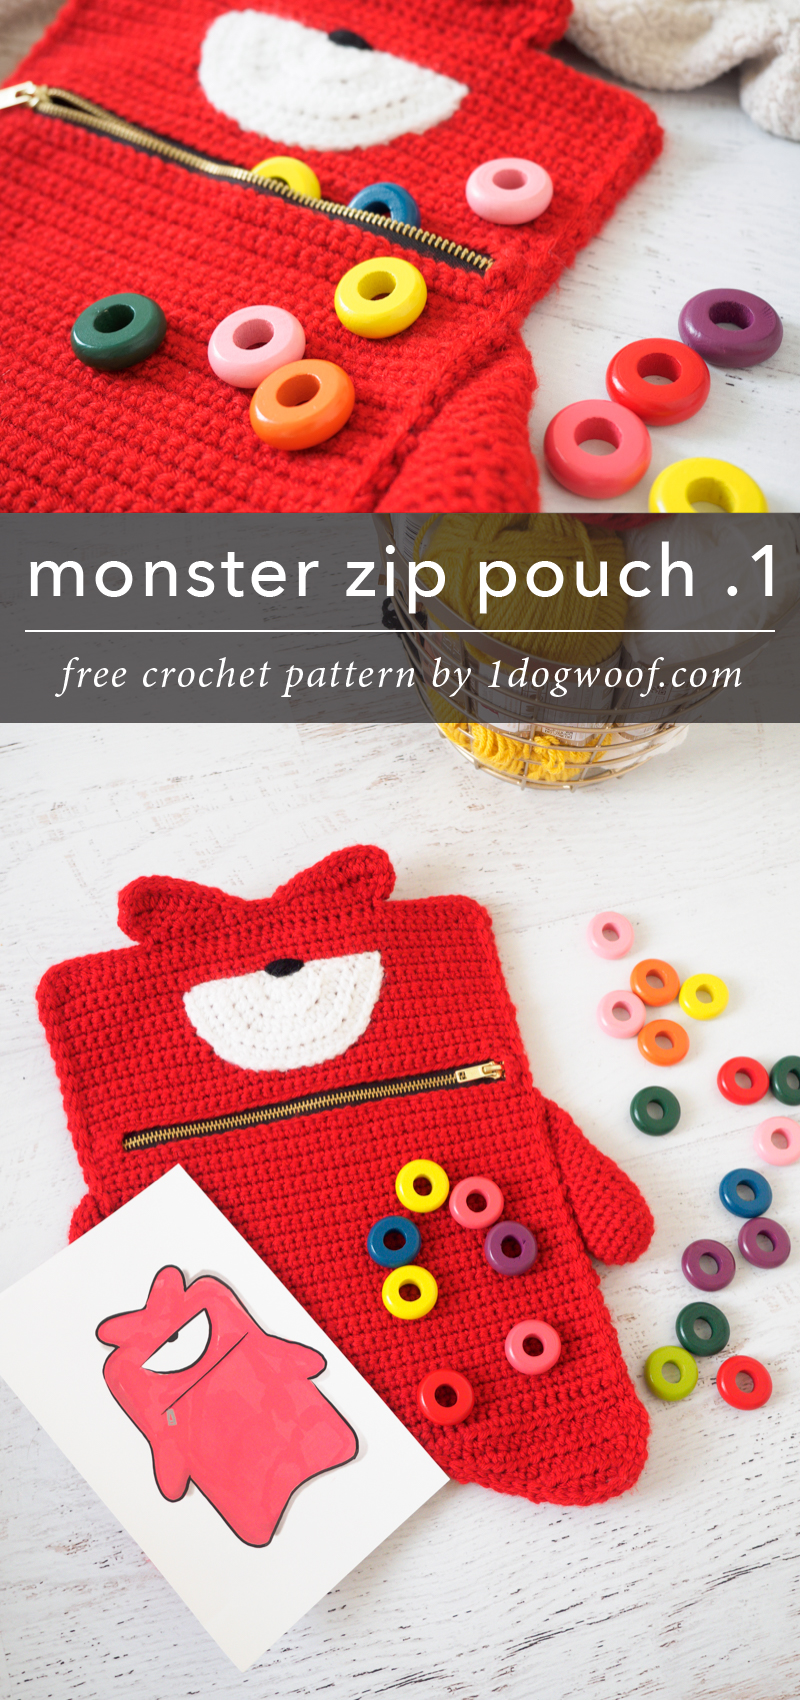
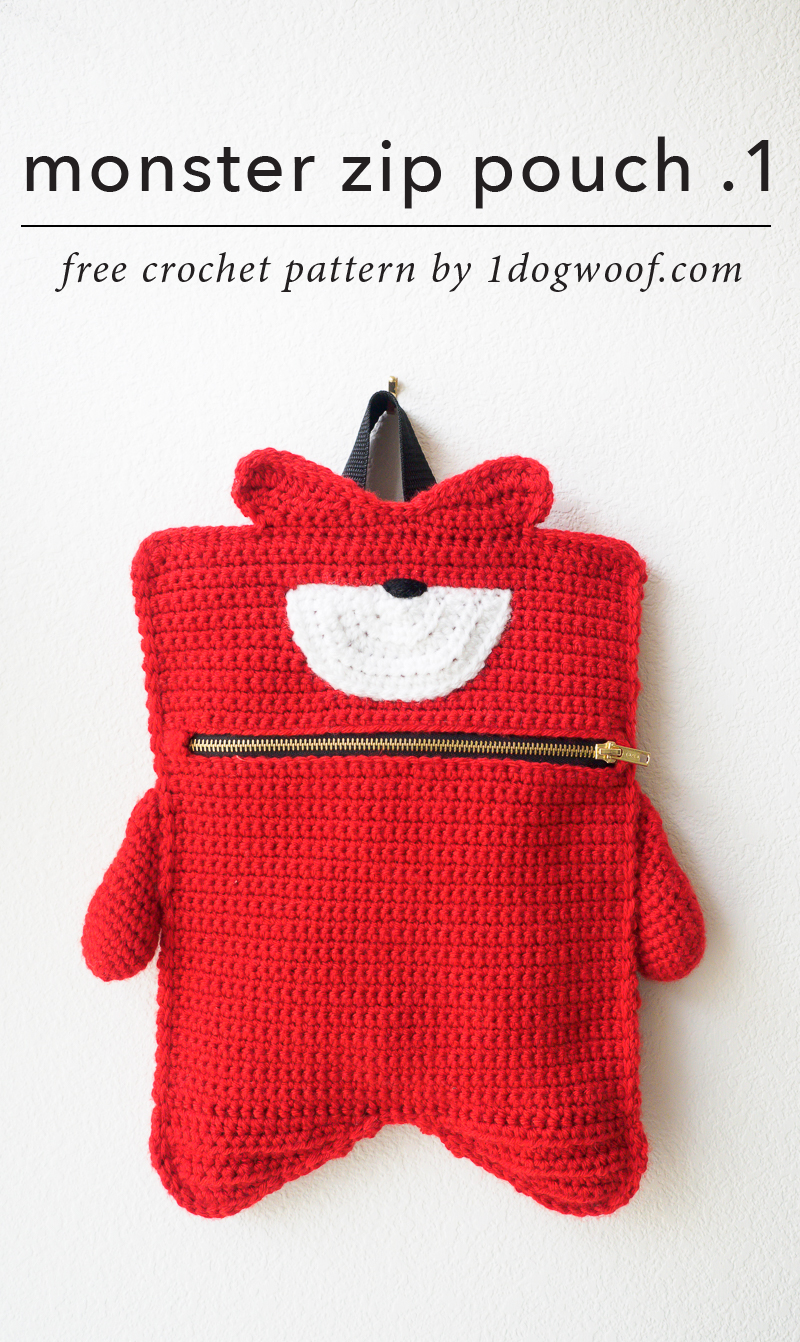
This here is Kelvin, the first of 5 cute and funny monster zipper pouches that would make a great gift for any kid to hold her treasures. Especially as we near Easter, how fun would this monster zipper pouch be as a fun, alternative Easter basket!
As with most of my projects, I find inspiration everywhere and make whatever tickles my fancy. In this case, I saw an adorable kitty bag on Instagram where the mouth was the zipper. I thought it was ingenious in my own crazy way, so I seized that idea and ran with it….all the way to the design pod at the office.
Every time I think about the difficulties of juggling a corporate job with a blogging job with a mom-ing job and a wife-ing, I get stuck on a never-ending merry-go-round of loving it all too much to give any one of them up. Well, the mom-ing and the wife-ing is a no-brainer. But I work with such a talented group of creative people in my day job that despite the lack of time to do the blogging, having friends like them help with the blogging. Because who else can I gush to about my latest Etsy purchase or crafty fail?
I asked my friend Ivan on the design team if he could draw me 5 monsters that were cute, colorful, and wait for it, easy to crochet. Because shaping is hard to do! And why 5? Because these were supposed to be CHRISTMAS presents. (hangs head in shame) Now you know. But you know what? These work even better for Easter to hold candy and trinkets, so it all worked out!
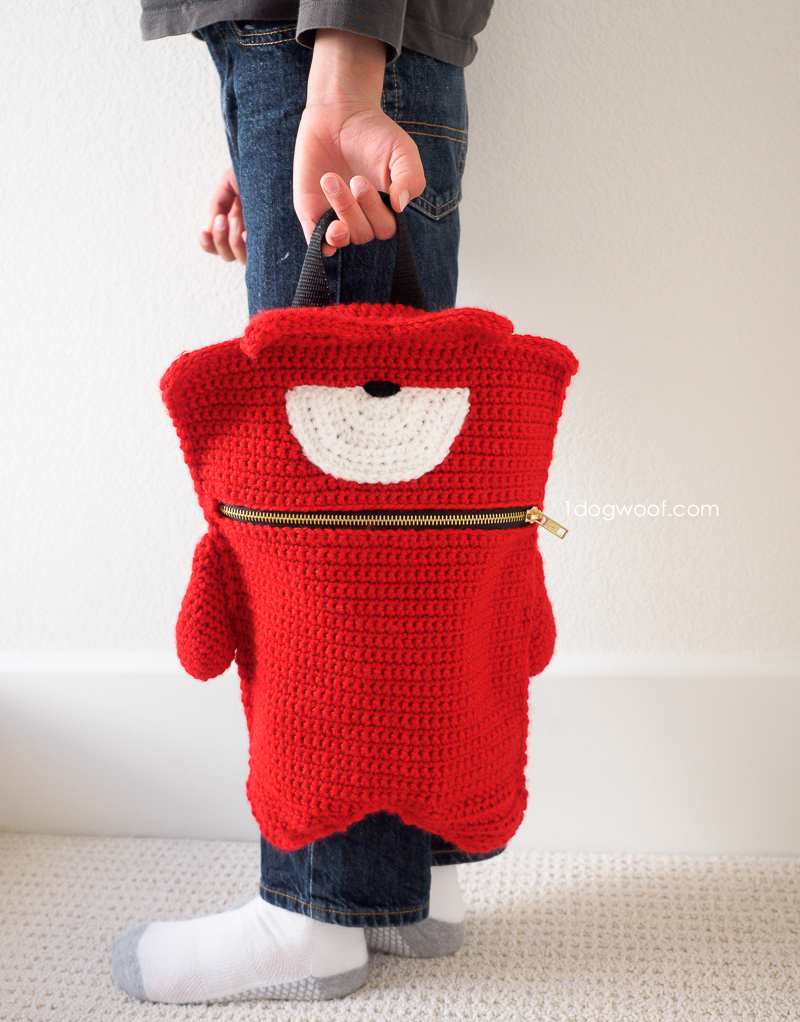
So, this is Kelvin. He is the first of 5 monster buddies. (You can sign up for my newsletter or follow me on Instagram if you don’t want to miss the others!)
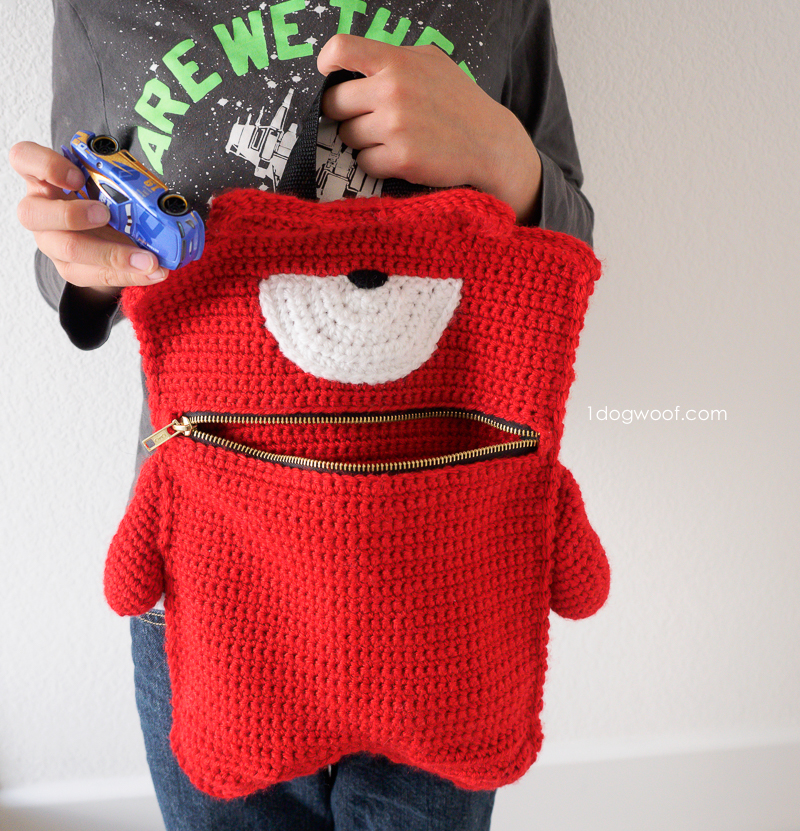
Kelvin eats treats, including toy cars, fake food, marbles, and all those random little plastic pieces that always seem to find a way into the house by way of goody bags. Kelvin is sweet and lively and rolls his eyes nearly as well as my 7 year old does when I tell him to do his homework. Kelvin has not eaten any homework. Yet.
The Yarn
For Kelvin, I fell back on my perennial favorite when it comes to non-wearable, colorful and kid-friendly crochet projects, Lion Brand’s Vanna’s Choice worsted weight yarn. The colors in this collection just make me happy with its vibrancy and many options. The yarn is durable, soft but not too soft that it falls apart if you pull on it, and oh so affordable. Kelvin is made using the color Scarlet, which is a gorgeously bright, true red.
The Construction
This zipper pouch is made with 2 skeins of Vanna’s Choice. One skein is used to work up the front face, and one skein to work up the back. I started with the back, to get the general shape correct, and used it as practice to get all the extra pieces worked out as well. You do have to crochet a few different pieces, cut the yarn, start at a different row and flip back and forth to get all the shaping correct and properly mirrored. I know crochet does have a front and back look to the stitches, but it doesn’t matter as much here.
After you familiarize yourself with all the protuberances beyond the big rectangle of Kelvin’s face, you can work up the front side. It’s basically the same, except you have to leave a few rows open to attach the zipper where his mouth should be. Again, you’ll need a separate length of yarn to work one side of the opening, while using the main skein to work the other side and continue the rest of the rectangle.
My best advice on following the pattern instruction is to follow it line by line. The stitch counts might be a little strange, but it does all work out in the end.
Make the eye, and the arms and put them aside.
If you’re like me, stare at the zipper, procrastinate a bit, stare at the zipper, pull out your sewing machine, read the manual AGAIN, sew the zipper and tear it out a few times, and finally get it secured.
Once you have all the pieces ready to go, just slip stitch him together as if he were two flat pieces of paper!

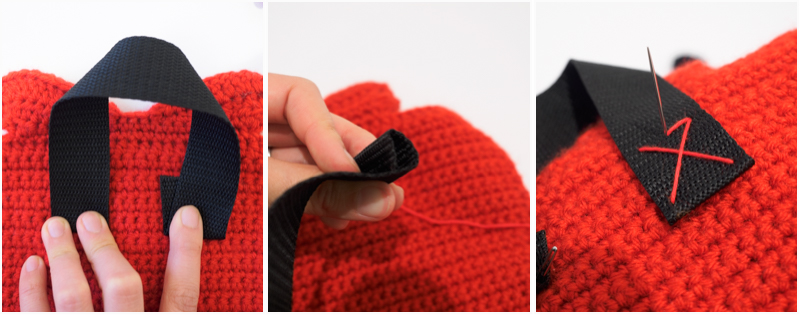
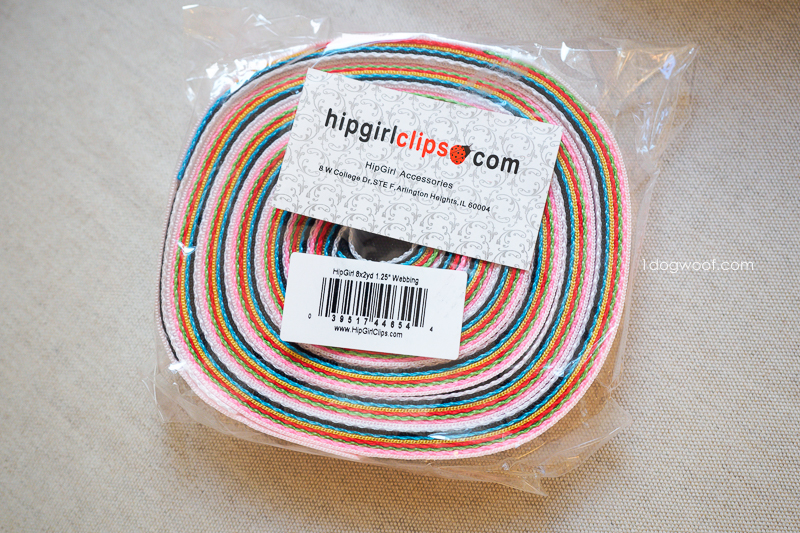
I couldn’t quite decide if I wanted to add backpack straps or just carry straps, so I asked my kids, and they preferred small carry straps, which was way easier for me, so hooray! I purchased a pack of colorful webbing from Amazon, and did some (rather amateur) hand sewing to attach the straps to Kelvin’s backside.
Now knowing what I know, I may attach the straps before I sew the front and back together. I might even use a sewing machine if I can figure out how to change needles so as not to break them on the thick fabric.
This pattern, along with the other 4 forthcoming, will be available for free on the blog and as a printable PDF through my Etsy and Ravelry shops.
——————————————
——————————————
See more of my gift ideas for kids and One Dog Woof crochet tutorials!
Supplies
- 2 skeins each of Lion Brand Vanna’s Choice in Scarlet*
- Size H/5.0mm crochet hook*
- Tim Holtz Eclectic Elements 9″ Closed Zipper
- Sewing thread and needle to match zipper and backpack straps
- Tapestry needle
- Polyester fiberfill
- Scissors
- Scrap length of black yarn
- Optional: Backpack straps*
Abbreviations
- st – stitch
- ch – chain stitch
- sc – single crochet
- hdc – half double crochet
- dc – double crochet
- hdc inc – hdc increase: work 2 hdc in the same stitch
- sc inc – sc increase: work 2 sc in the same stitch
- dec – sc decrease
Pattern Notes
- Skipped stitches are counted in the stitch count for each row.
- Gauge = 17 sts, 20 rows in 4 inches
- Overall width = 10 inches
Monster Zipper Pouch #1 Pattern Instructions
FRONT
Row 1: Work 40 foundation single crochet stitches. Turn. (40)
Row 2-55: Ch 1. Work 1 sc in each st across. Turn. (40)
Row 56: Ch 1. Skip 2. Work 3 hdc in next st. Work 1 hdc in each of next 34 st. Work 3 hdc in next st. Sl st in last st. Fasten off.
BACK
Row 1: Work 40 foundation single crochet stitches. Turn (40)
Row 2-35: Ch 1. Work 1 sc in each st across. Turn. (40)
Row 36a: Using a separate strand of yarn, skip 37 st. Work standing sc on 38th st, then 1 sc in each of next 2 st. Turn.
Row 37a: Ch 1. Work 1 sc in each of next 3 st. Fasten off.
Row 36b: Using yarn continued from Row 2. Ch 1. Work 1 sc in next 2 st. Turn.
Row 37b: Ch 1. Work 1 sc in next 2 st. Turn.
Row 38: Ch 1. Work 1 sc in next 2 st. Ch 35. Work 1 sc in each of next 3 st from Row 36a. Turn. (40)
Row 39-55: Ch 1. Work 1 sc in each st across. Turn. (40)
Row 56: Ch 1. Skip 2. Work 3 hdc in next st. Work 1 hdc in each of next 34 st. Work 3 hdc in next st. Sl st in last st. Fasten off.
FEET
Starting at the outside edge of Row 56 of the FRONT piece:
Row 1: Work ch 2 (or standing hdc. Counts as st), 1 hdc in next 13 st, 1 sc in next 4 st, 1 sl st in next st. Turn. (19)
Row 2: Ch 0. Skip 1. Work 1 sl st in next st, 1 sc in next st, 1 hdc in next 16 st. Turn. (19)
Row 3: Ch 2 (does not count as st). Work 1 hdc in next 13 st, 1 sc in next 2 st, 1 sl st in next st. Turn. (16)
Row 4: Ch 0. Skip 1. Work 1 sl st in next 2 st, 1 sc in next 2 st, 1 hdc in next 8 st, 1 dec, 1 hdc in last st. Turn. (15)
Row 5: Ch 1. Work 1 sc in next st, 1 hdc in next 6 st, 1 sc in next st, 1 sl st in next st. Turn. (9)
Row 6: Ch 0. Skip 1. Work 1 sl st in next st, 1 sc in next st, 1 hdc in next st, 1 dc in next 3 st, 1 hdc in next st, 1 sl st in next st. Fasten off. (9)
Flip the body to work the other foot, again starting at the outside edge.
Then repeat both feet for the BACK piece.
HEAD
Work for both BACK and FRONT pieces. Work the BACK piece first.
Row 1: Skip 10 st. Starting at the 11th st, work 1 sc in next 20 st. Turn. (20)
Row 2: Ch 2 (counts as st). Work 2 hdc in same st, 1 hdc in next 18 st, 3 hdc in last st. Turn. (24)
Row 3a: Ch 2 (counts as st). Work 1 hdc in same st, 1 hdc in next 7 st, 1 sc in next 2 st, 1 sl st in last st. Turn. (12)
Row 4a: Ch 0. Skip 1. Work 1 sl st in next st, 1 sc in next st, 1 hdc in next 2 st, 1 dc in next 3 st, 2 dc in next st, 2 dc in next st, 1 sl st in next st. Skip the last st. Fasten off. (14)
Row 3b: Turn your work. Starting from the 2nd chain of the ‘Ch 2’ from Row 2, repeat Row 3a.
Row 4b: Repeat Row 4a. Fasten off. At the end of the FRONT piece, leave a long tail for seaming FRONT and BACK together.
ARMS
Make 2:
Round 1: Work 6 sc into a magic circle. Join to first st with sl st. (6)
Round 2: Ch 1. Work 2 sc into each st around. Join to first st with sl st. (12)
Round 3: Ch 1. Work [1 sc into next 3 st, 2 sc into next st] 3x around. Join to first st with sl st. (15)
Round 4: Ch 1. Work [1 sc into next 4 st, 2 sc into next] 3x around. Join to first st with sl st. (18)
Round 5: Ch 1. Work 1 sc in each st around. Join to first st with sl st. (18)
Round 6: Ch 1. Work 7 sc, 4 hdc, 7 sc. Join to first st with sl st. (18)
Round 7: Ch 1. Work 1 dec, 5 sc, 4 hdc, 5 sc, 1 dec. Join to first st with sl st. (16)
Round 8: Ch 1. Work 1 dc, 4 sc, 1 hdc, 2 hdc inc, 1 hdc, 4 sc, 1 dec. Join to first st with sl st. (16)
Round 9: Ch 1. Work 1 dc, 12 sc, 1 dec. Join to first st with sl st. (14)
Round 10: Ch 1. Work 1 dec, 4 sc, 2 sc inc, 4 sc, 1 dec. Join to first st with sl st. (14)
Round 11: Ch 1. Work 1 dec, 10 sc, 1 dec. Join to first st with sl st. (12)
Round 12-14: Ch 1. Work 1 dec, 3 sc, 2 hdc inc, 3 sc, 1 dec. Join to first st with sl st. (12)
Stuff lightly with poly fill.
Squeeze round together, work 6 sc across to close. Fasten off.
EYE
Row 1: Work 4 sc into a magic circle. Do not join together. Turn. (4)
Row 2: Ch 2 (counts as st). Work 1 hdc in same st, 2 hdc in each of next 3 st. (8)
Row 3: Ch 2 (counts as st). Work 1 hdc in same st. Work 1 hdc in next st, 2 hdc in next st, 1 hdc in next st. Work [1 hdc, 2 hdc] 2x. Turn. (12)
Row 4: Ch 2 (counts as st). Work 1 hdc in same st. Work 1 hdc in next 2 st, 2 hdc in next st, 1 hdc in next 2 st. Work [1 hdc in next 2 st, 2 hdc] 2x. Turn. (16)
Row 5: Ch 2 (counts as st). Work 1 hdc in same st. Work 1 hdc in next 3 st, 2 hdc in next st, 1 hdc in next 3 st. Work [1 hdc in next 3 st, 2 hdc] 2x. Turn. (20)
Row 6: Ch 2 (counts as st). Work 1 hdc in same st. Work 1 hdc in next 4 st, 2 hdc in next st, 1 hdc in next 4 st. Work [1 hdc in next 4 st, 2 hdc] 2x. Turn. (24)
Row 7: Ch 1. Work slip stitches along flat edge, ch 1 at the corner, then work slip stitches along the curve, ch 1 at the corner. Join to 1st st with sl st. Fasten off, leaving a long tail for sewing onto the face.
ASSEMBLY
- Make sure all ends (except the eye tail and the long tail from the FRONT head piece) are woven in.
- Sew the eye onto the FRONT piece to create the face.
- Use a scrap length of black yarn to embroider on the eyeball in the top center of the eye.
- Sew on the zipper, either using a sewing machine or by hand-sewing, to the FRONT face.
- Hold the FRONT and BACK pieces together right sides facing out, FRONT face on top. Use the long tail at the end of the HEAD piece to slip stitch both pieces together. Starting at 4 rows below the zipper, sandwich the arm in between the FRONT and BACK pieces and work through the arm and slip stitch all 3 pieces together. Continue working through the arm for ~10 rows. Continue working the FRONT and BACK pieces together around each leg, and up the other side. Again, sandwich the arm in between the pieces so that this arm is at the same position as the other arm. Continue working the FRONT and BACK pieces together around the head piece until joining to the first slip stitch. Fasten off and weave in ends.
- Optional: add strap by sewing the strap to the back of the pouch.
SO. Who’s going to be getting monster Easter buddies this year?
I sometimes include affiliate links in my supply lists. Purchasing from these merchants earns me a small commission with no extra cost to you, and goes towards supporting One Dog Woof.
Please be respectful and do not sell or distribute this pattern in any way, especially as your own. Instead, share the original blog post link! You can sell finished products made from this pattern by giving credit to One Dog Woof as the pattern designer and linking to the blog post. If you have any questions regarding distribution or translation of this pattern, please see my Terms of Use. Thank you for your consideration!


Aw~~ This is so adorable!! Thank you so much for the pattern!! Bookmarked and I will definitely try it!!
He’s adorable!
Adorable! Just a note though, I think you have the front piece and back piece labels backwards. ????
When will we see the rest of the monsters ? Any girl monster’s ?