
For I love the idea of using your yarn stash to make baskets to hold your yarn stash. But crocheting a basket BIG enough to hold that blanket you’re working on, that might take a while unless you’re using very chunky yarn. Here’s a way to make a coiled crochet basket that’s quick and easy, and allows you to use up scraps of thinner yarn in the process.
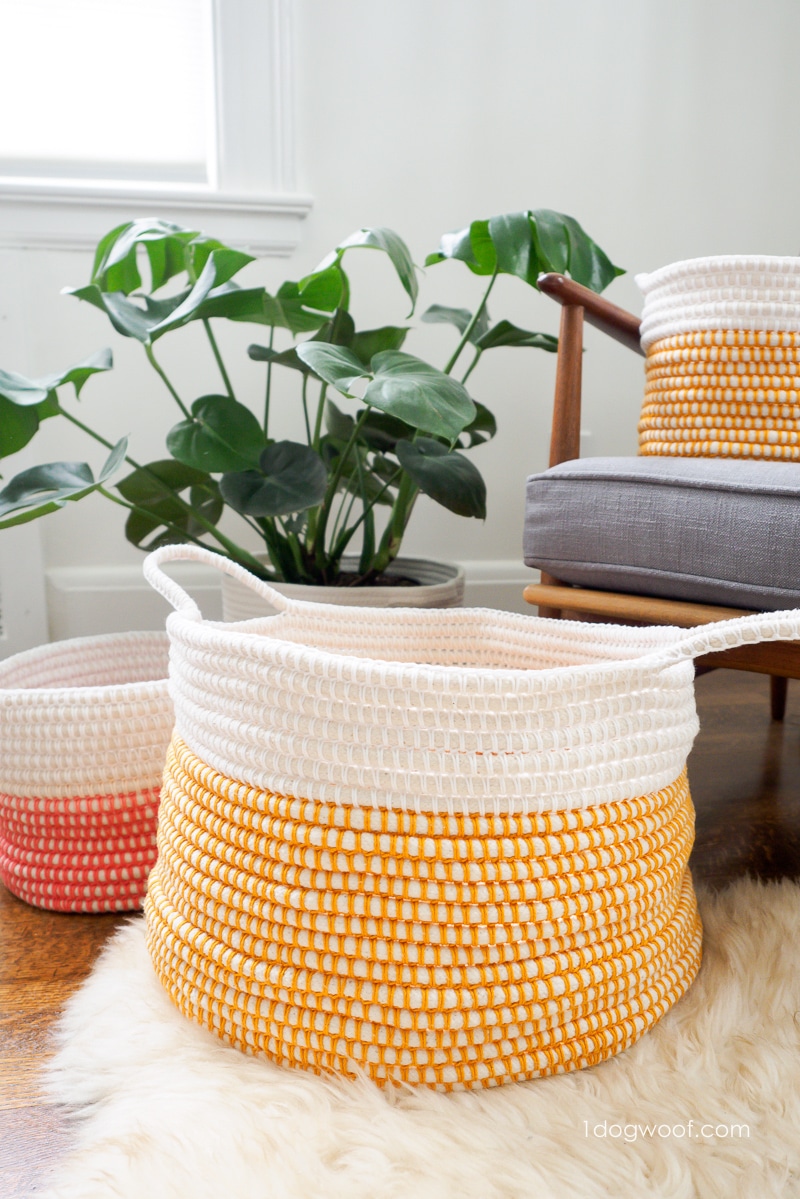
As you know, all projects start with an inspiration. Mine was that $5 Target Dollar Spot basket that I spotted one day. Would you believe it, I actually walked by and didn’t buy the whole shelf? Somehow, I told myself I didn’t need more baskets, HA. The next time I walked through a Target, I was smarter, but also sadder, because there was only 1 basket left. I took it home, yes, but I realized my folly – you can NEVER have enough baskets. So, like the rest of the world, when you can’t get your hands on something you want, it’s time to Do-It-Yourself.
——————————————
Get an Offline Copy
——————————————
Choosing Your Core Material
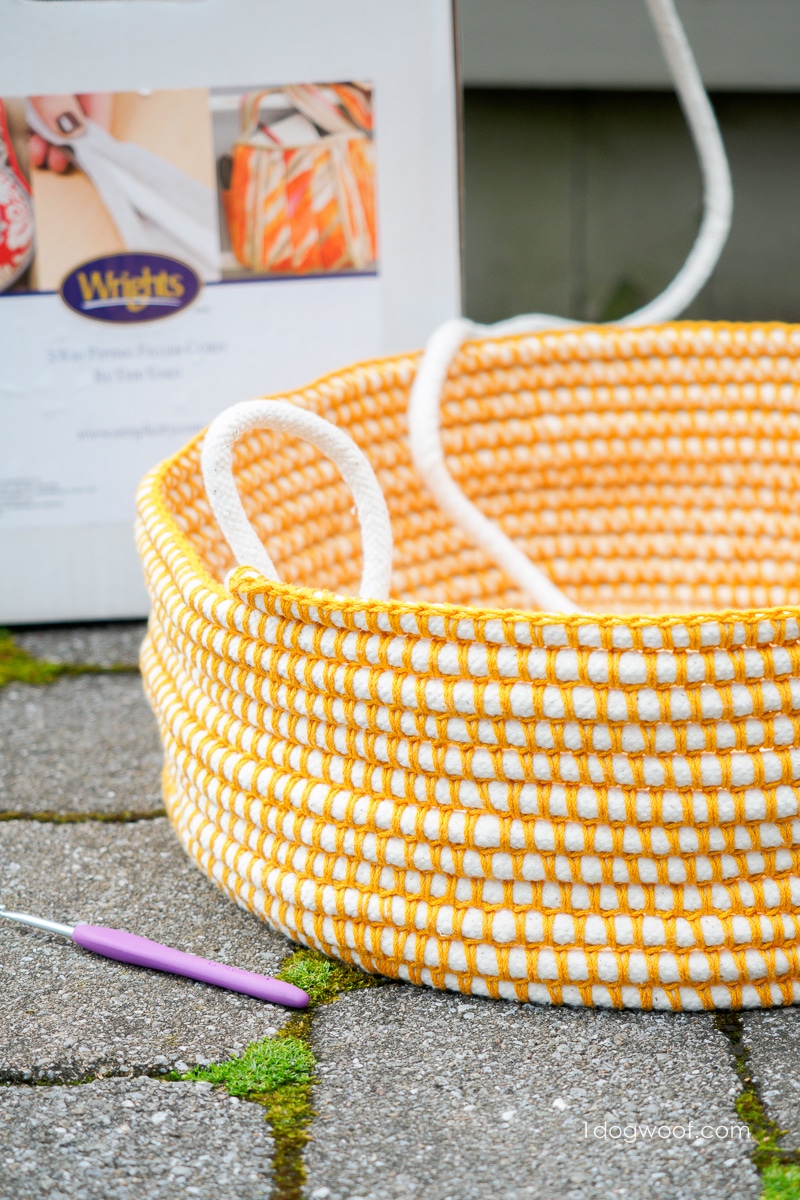
The construction of this basket, worked bottom up, is the same as pretty much every basket or bowl ever woven, coiled out of clay, or crocheted with yarn. But picking the right materials and using the right yarn gives the final product a completely different feel. Like many commercial baskets, this one is coiled using a continuous core material. In this case, I used 3/8″ Piping Filler Cord. This is the stuff that’s usually wrapped in fabric and sewn to the edges of pillows and sofas for that rounded edging.
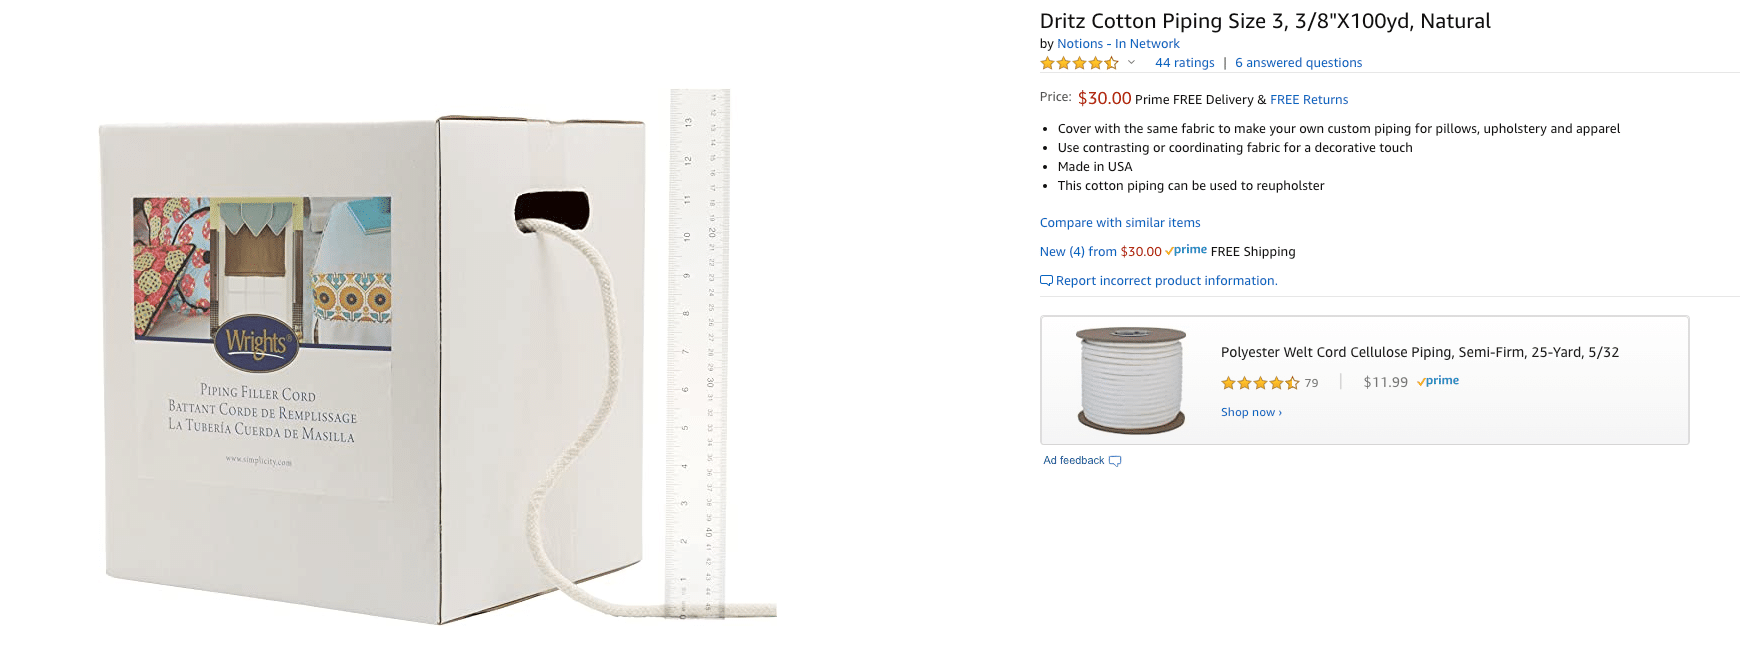
Piping filler cord comes in all sorts of sizes and lengths. For this specific project, I bought a 100yd box of 3/8″ piping cord, out of which I made 4 medium baskets and 1 gigantic basket. The total price for the cord was around $30, so the cord $0.30/yd. On the other hand, buying the piping at a craft store can cost $1/yd, so buying in bulk is the way to go if at all possible.
There are also many different widths of piping cord. The 3/8″ cord I used seems to be on the slightly thicker end of the bulk cord I was able to find. Any width cord will work – it just depends on the cost per yard of the material, and then how much time and yarn it’ll take to wrap your cord to get the basket size you want. For instance, thinner cord is probably more readily available for purchase. However, you’ll probably need more yardage and more yarn to build up to the same size. Alternatively, ultra thick piping cord would make an amazing, chunky basket, but I imagine large quantities of it might be expensive.
——————————————
Related:
Chunky Crochet Basket with Scrap Yarn Accents
——————————————
Could you use rope or macrame cord? I don’t see why not. Although my guess is that rope will be expensive or hard to find for the same width at large quantities. The other consideration is that rope is more dense, so the same quantity may be much heavier than the piping. The piping filler cord is a very soft and flexible cord that has a very light, woven casing around what is probably just polyester filling. Rope consists of several strands of fiber twisted together so you’d get something much sturdier, but also much heavier and/or less flexible.
That may be your thing though, so there’s no reason not to try rope if that’s what you have available. I wanted my baskets to be light and pliable, just like the soft basket I got from Target, so I went with piping filler cord instead.
Choosing Your Wrap Yarn
Then, there’s the yarn you use to crochet around this filler cord. I tried a few different types of yarn before settling on a mercerized cotton cord, specifically, Lion Brand’s 24/7 Cotton yarn. It’s inexpensive, tough, has minimal stretch, no fuzz, and comes in an array of gorgeously bright colors. Pair any of them with a pure white skein to make a minimally modern and sleek coil basket. Here are some other yarns to consider as you choose your wrap yarn:
Acrylic, twisted-ply, light worsted weight yarn: Acrylic can be a bit stretchy, which can cause inconsistencies in your tension. I also wasn’t a fan of the overall fuzziness. But that’s just personal preference.
Single ply, or roving yarn: Nope. As you build the basket, you pull the yarn with moderate force, so any yarn that breaks or tears easily is a no-go.
Kitchen cotton, worsted weight: It works, but it doesn’t slide very easily, which tired out my hands very quickly.
Any dark yarn, or yarn that attracts fuzz: If you’ll be storing knit and crochet projects in these baskets, you may not want to make your basket from yarn that attracts any shedding fibers that may cross-contaminate future projects. Also, the dark yarn with fuzz on it just looks unattractive, unless you want to lint-roller it every day.
I think for the most part, the yarn you choose is based on personal preference and how you’ll use the basket. The only yarn to really stay away from is the roving or single-ply yarn. As I mentioned, you’ll be tugging on the yarn quite a bit, so you don’t want anything that can easily break in the middle.
Constructing Your Basket
There’s a few specific things steps to making this coiled crochet basket. I go over them all in the tutorial video below, but here’s a quick breakdown for you:
Starting the basket: Getting your wrap yarn around your core material is a little tricky at the beginning. You’ll want to start with a complete round worked into a magic circle, then join your core material as you work the second round.
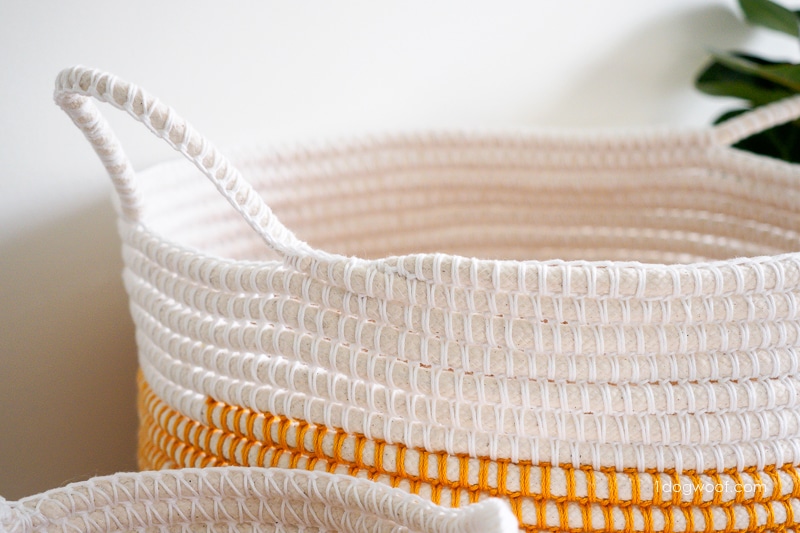
Turning from the base of the basket to the walls: In crochet, you often work in the back loop to change the direction of your crochet fabric, but we don’t do that here. To change directions here, you’ll manipulate the piping filler cord itself.
Changing colors: You don’t need to change colors, but if you do, there’s an easy to do it without adding any more ends to weave in.
——————————————
You Might Also Like:
T-shirt Yarn Hanging Crochet Basket
——————————————
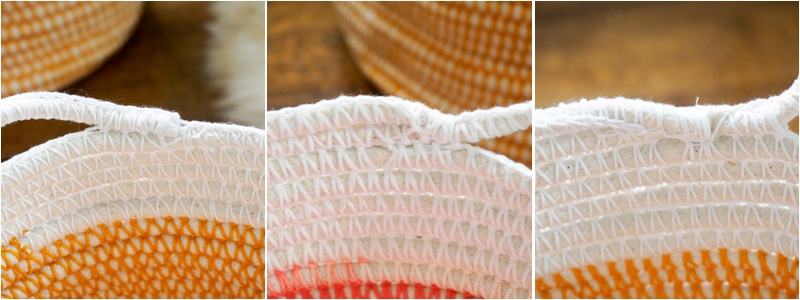
Making handles: The hardest part about making handles is deciding how big you want them!
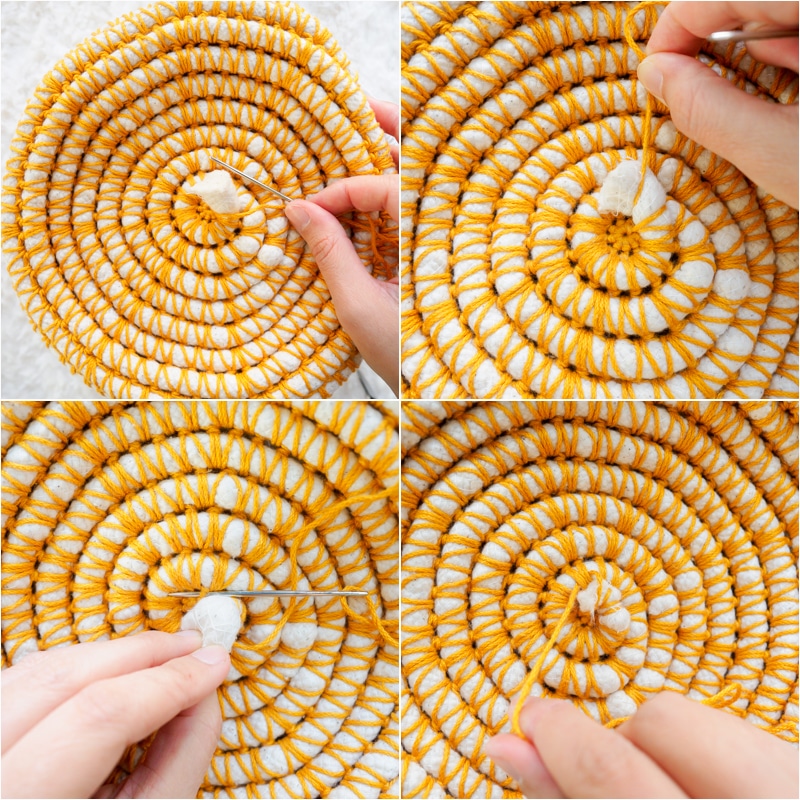
Closing up: You’ve got this piping filler cord that, once cut, frays IMMEDIATELY. How do you bind off your basket securely and as invisibly as possible? I made 3 different baskets and bound-off in 3 different ways. Although the concept is the same, the execution can differ each time, since there isn’t an exact sequence that works in all cases.
Check out the video below for all the step-by-step instruction. You can also see the coiled basket tutorial on YouTube. Make sure to subscribe to my YouTube channel!
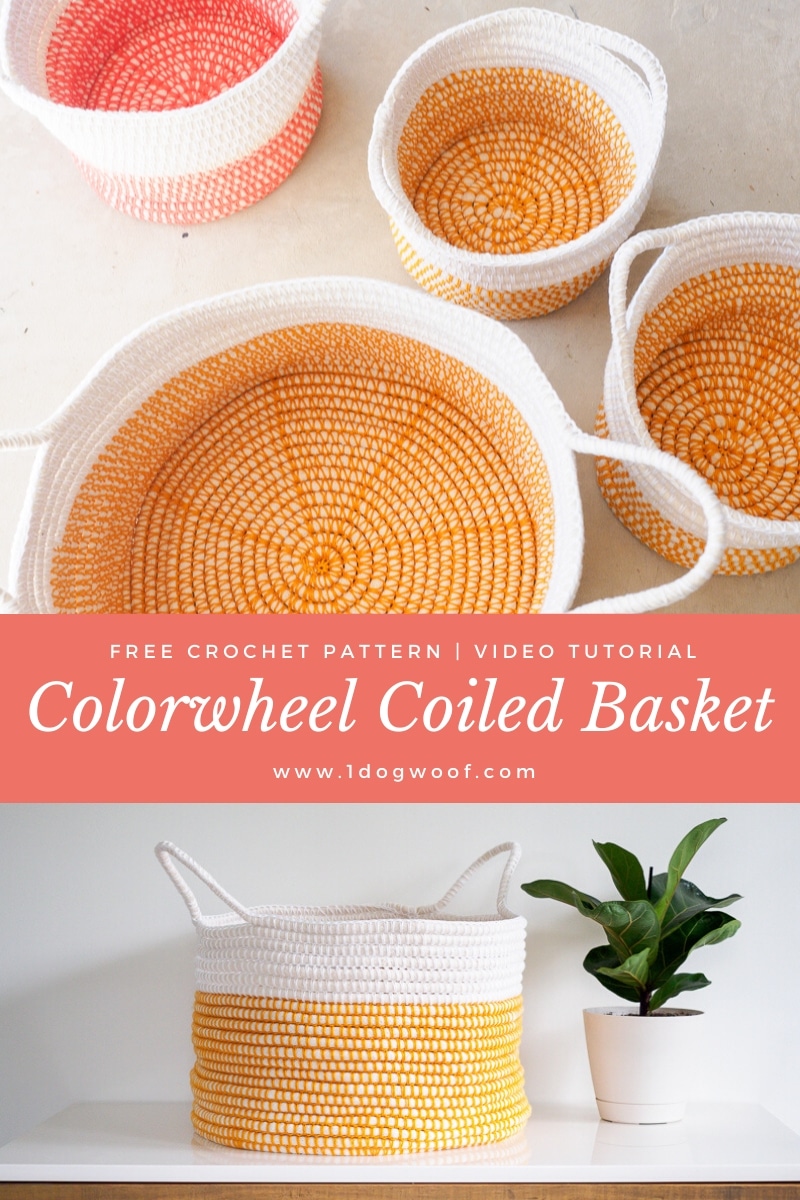
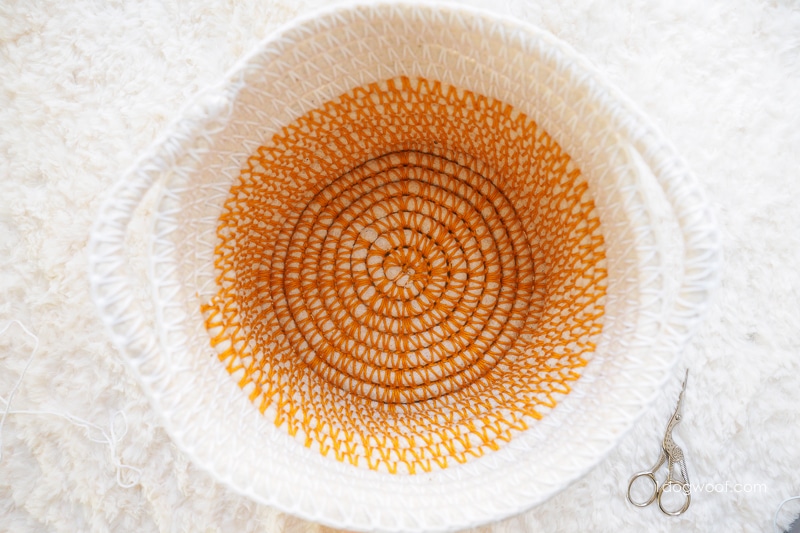
Color Wheel Coiled Crochet Basket Pattern
Supplies
- Main Color (MC): Lion Brand 24/7 Cotton Yarn (3.5oz/100g, 186yd/170m): Yardage will depend on the size of your basket. A medium basket needs 1 ball.
- Alternate Color (C1): Lion Brand 24/7 Cotton Yarn (3.5oz/100g, 186yd/170m): Yardage will depend on the size of your basket. A medium basket needs 1 ball.
- G/4mm crochet hook
- 3/8″ piping filler cord: Yardage will depend on the size of your basket. A medium basket uses approximately 15yds/14m. UPDATE: It looks like the original 3/8″ piping is no longer available. This 1/2″ cotton piping should also work well.
- Tapestry needle
- Scissors
- 1 removable stitch marker
- cellophane (Scotch) tape
Gauge (after blocking)
- Approximately 12 sts, 8.5 rows in 4″/10cm. However, row gauge is dependent on the width of the piping filler cord.
Finished Size
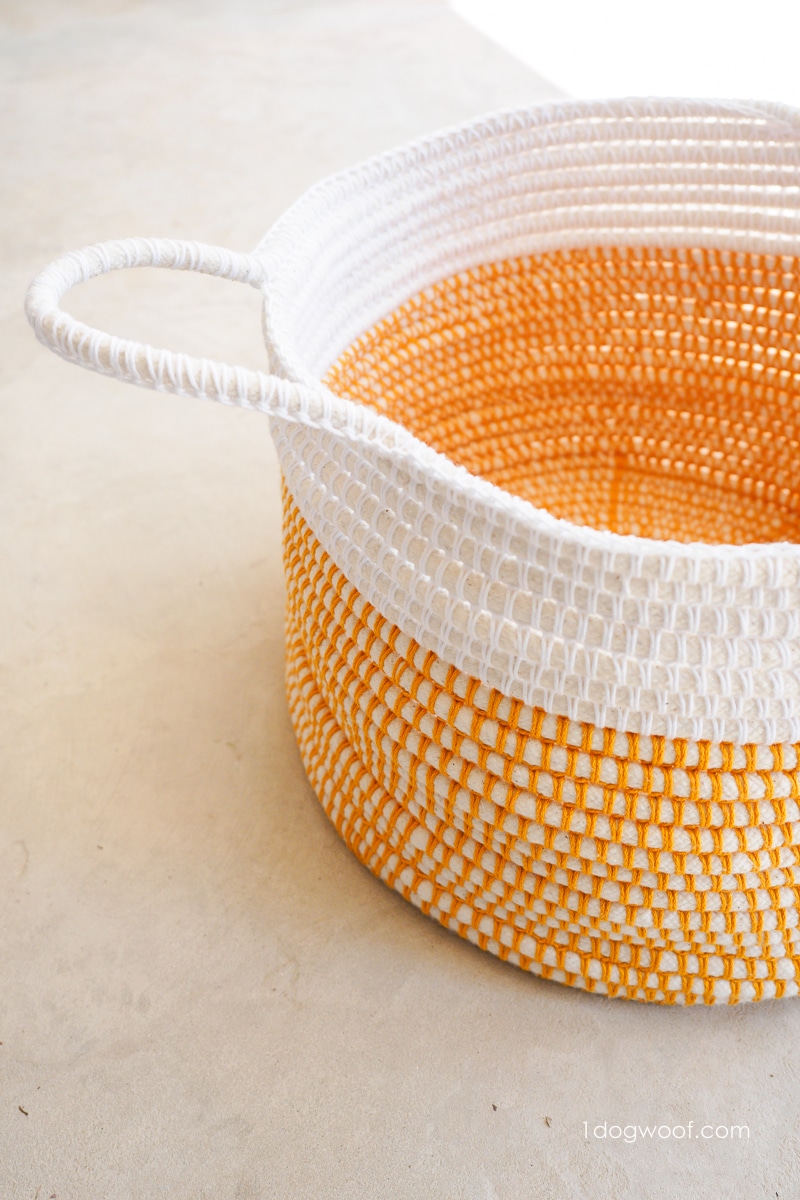
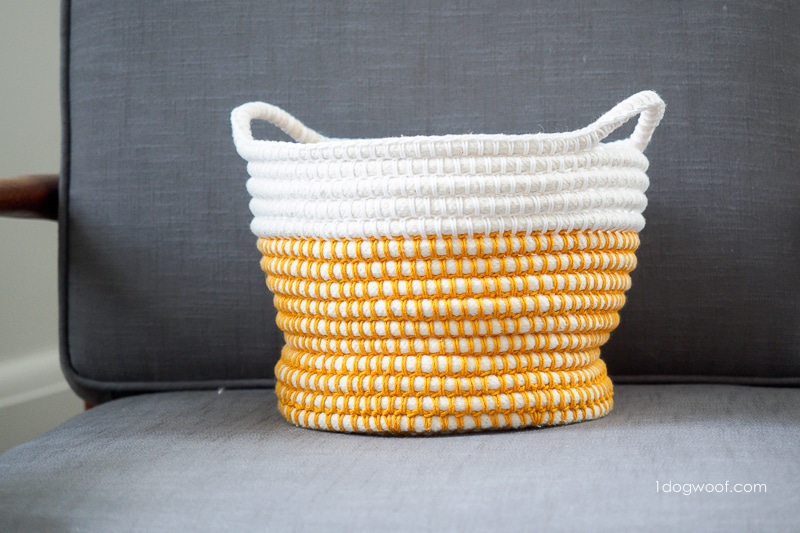
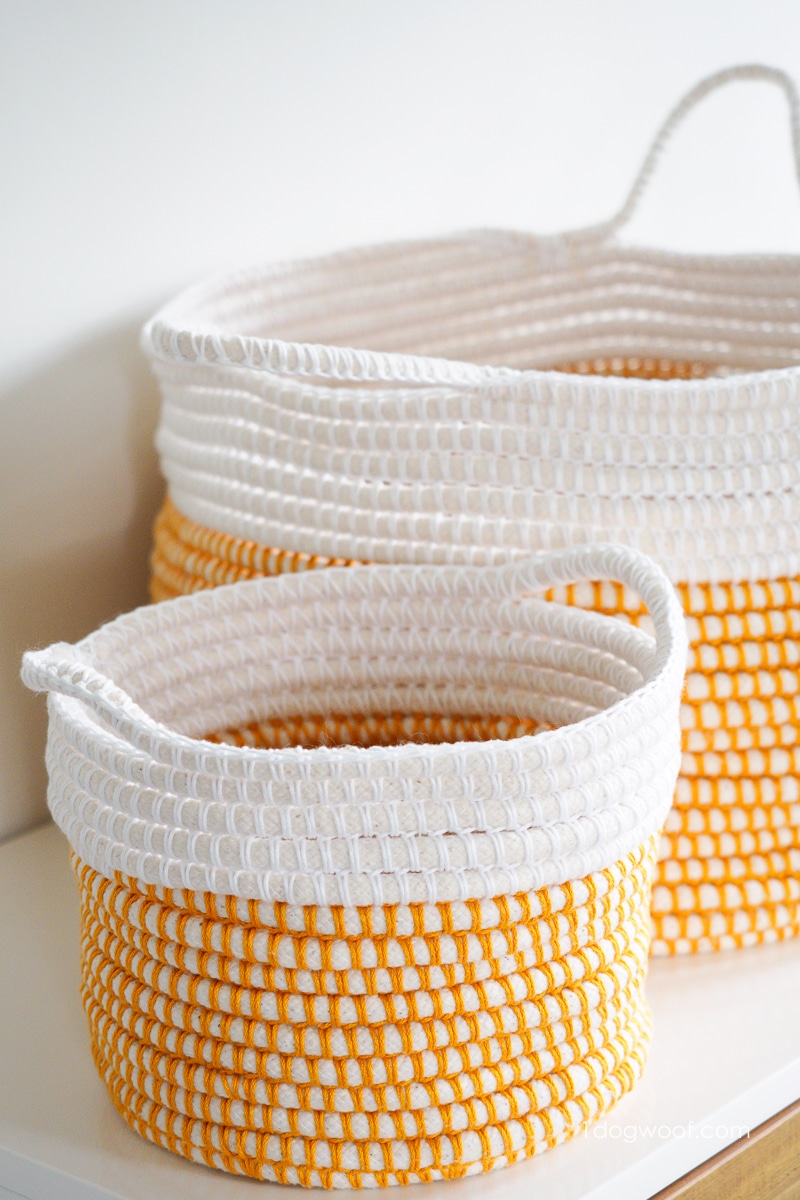
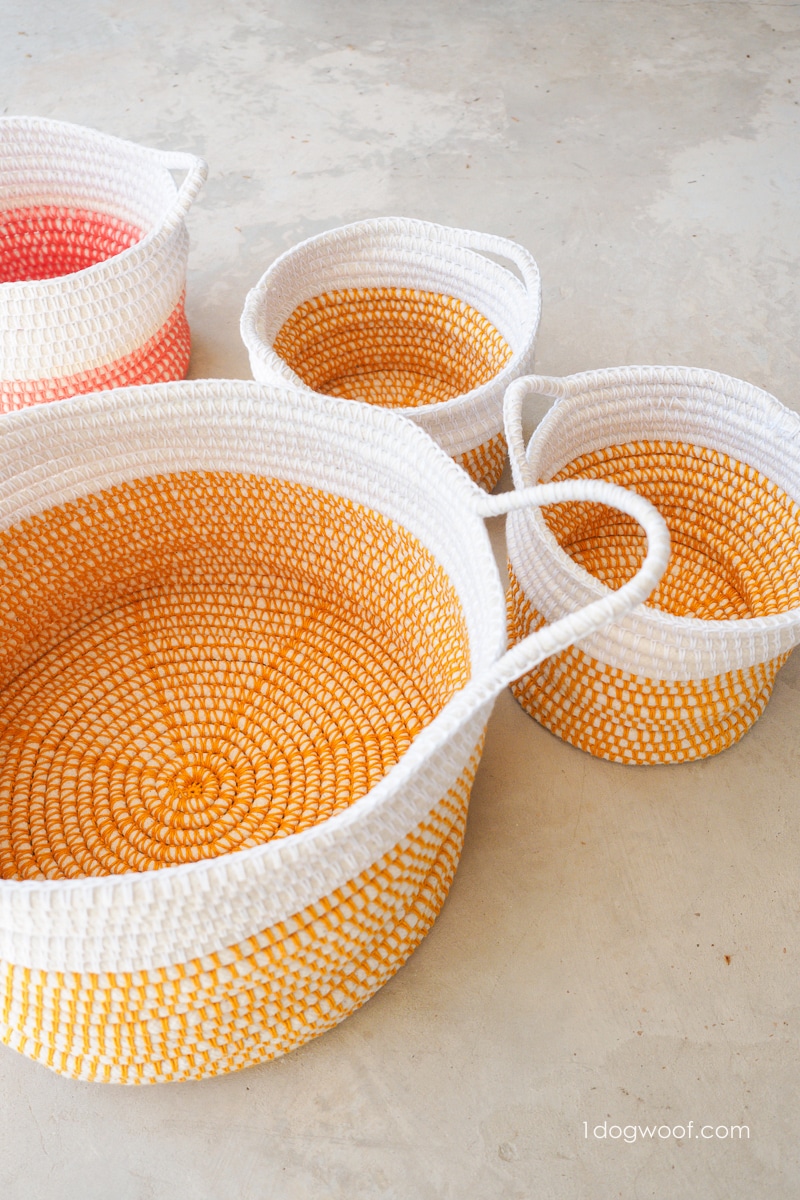
Finished sample size is 8.5″/21.5cm in diameter and 7.5″/19cm tall
Abbreviations (US terminology)
- st(s) – stitch(es)
- ch – chain stitch
- sl st – slip stitch
- sc – single crochet
- inc – increase: work 2 single crochet in same stitch
Pattern and Construction Notes
Coiled crochet basket is worked in continuous rounds. Use a stitch marker to help indicate start (or end) or round.
When constructing the base, do not tug on the cord as you crochet around it. You want it to stay loose so that it can lay flat as the base of the basket.
Make sure your stitches are not too loose, as that will create gaps between the coils, but they should be loose enough to not warp the piping cord.
You will no longer need the stitch marker once you start working on the walls of the basket, as the walls are worked in a continuous spiral.
If you’re worried about fraying even after securing it with the yarn, you can wrap the ends with adhesive tape.
The tension on the piping filler cord will dictate the shape of the basket. Tightening the tension will create a slope inwards, while loosening the tension will result in a flared look and a wide mouth.
Coiled Crochet Basket Pattern Instructions
Starting with MC:
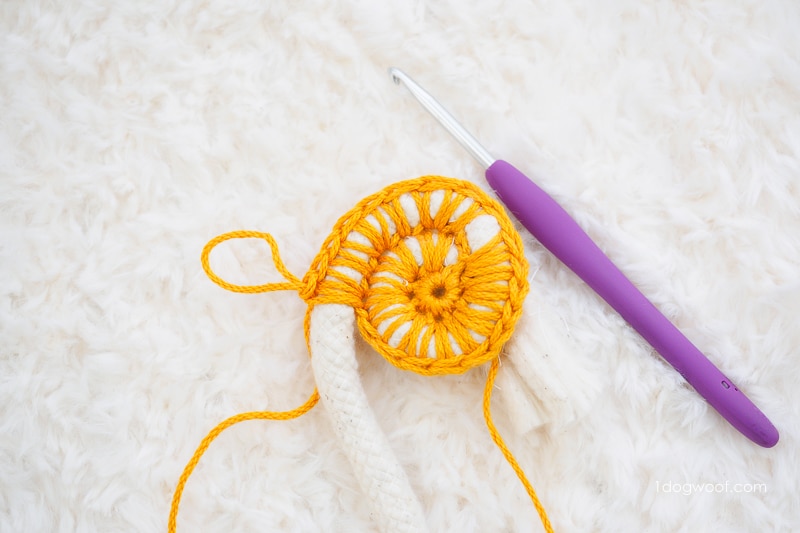
Round 1: Leaving a 12″/30cm tail, work 8 sc in magic circle. Attach stitch marker to indicate end of round. (You can also use a stitch marker to indicate the first stitch of the round. Either way works!)
Round 2: Wrap adhesive tape around the end of the piping filler cord. Prop the piping filler cord on top of the active yarn. Complete a chain stitch AROUND the piping filler cord to lock it in place. Ch 1. Work 2 sc in each st around. Each st is worked around the piping filler cord. Allow the cord to curl around round 1 freely.
Round 3: Work [1 sc, inc] 8 times around. Each st is worked around the piping filler cord.
Round 4: Work [2 sc, inc] 8 times around. Each st is worked around the piping filler cord.
Round 5: Work [3 sc, inc] 8 times around. Each st is worked around the piping filler cord.
Round 6: Work [4 sc, inc] 8 times around. Each st is worked around the piping filler cord.
Round 7: Work [5 sc, inc] 8 times around. Each st is worked around the piping filler cord.
Round 8: Work [6 sc, inc] 8 times around. Each st is worked around the piping filler cord.
Round 9: Work [7 sc, inc] 8 times around. Each st is worked around the piping filler cord.
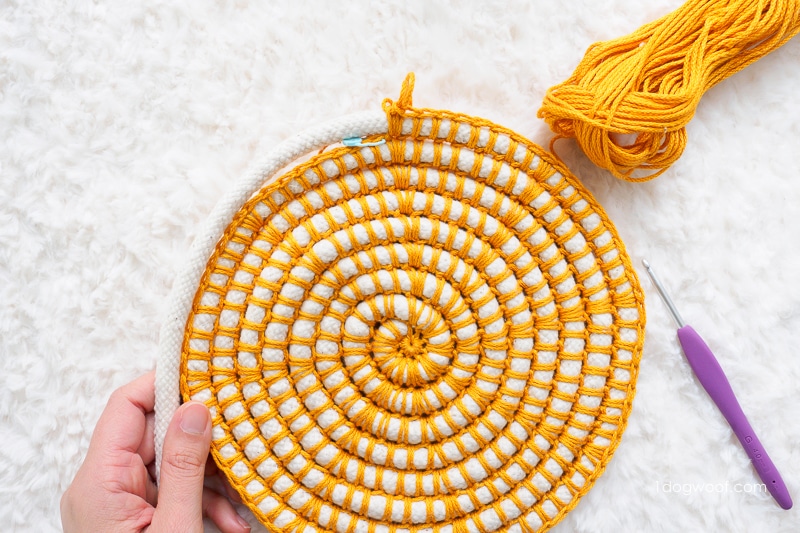
Round 10: Work 1 sc in each st around, tugging lightly on the piping filler cord so that it lays on top of the previous round to create the first round of the basket wall. You don’t want to increase the base diameter of the basket, so you’ll need to tug on the cord and tuck it behind the previous round to change “direction”.
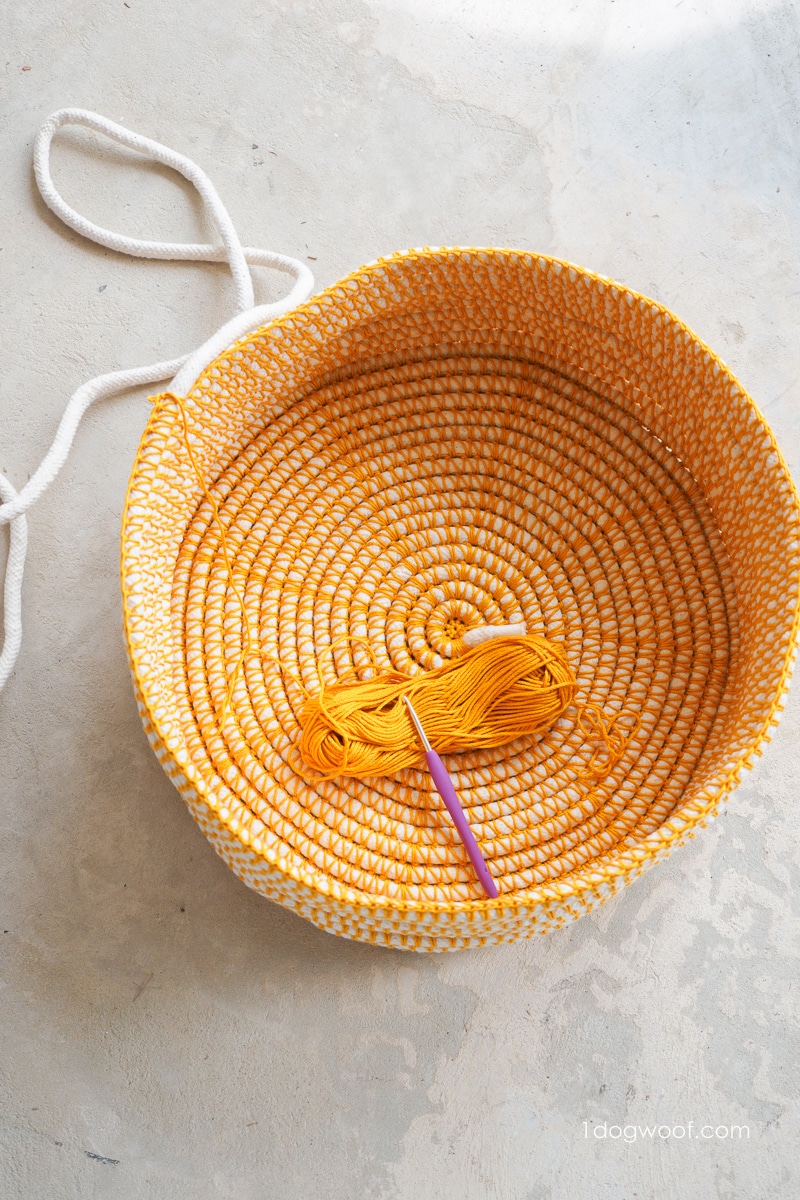
Work 1 sc in each st around until the basket is approximately 7.5″/19cm tall, keeping an even tension on the piping filler cord. You may need to lightly tug on the cord occasionally to prevent it from flaring outwards, but do not tug too hard as that will tighten the shape of the basket. When working on the wall, you no longer need the stitch marker since there are no more increases to make. From this point on, you can work sc freely until your desired height.
You can change colors about 2/3 of the way off the walls of the basket. An easy way to change color is to simply cut the old yarn, tie the new yarn to the old yarn, and continue working sc as usual.
Handles
Work 13 sc directly around the piping filler cord, without inserting hook into the st from the previous row, skip 8 sts. Continue work 1 sc in each st until you reach the opposite side of the basket. Work 13 sc around the piping filler cord, skip 8 sts. Work 1 sc in each st until 3 sts before the first handle
Cut the piping filler cord just short of the first handle. Work 1 sc in each of the last 3 sts carefully around the cut piping, cut yarn leaving a 12″/30cm tail, and fasten off. Using the tail, whip stitch the piping end securely to the basket to prevent fraying. You can turn the piping inwards and secure in order to make the end less visible. Weave in ends.
Go back and secure the piping at the bottom of the basket using the beginning tail. You can whip stitch through the bottom of the basket to secure the piping. Be sure to knot your yarn and weave it in.
What color will you make your Color Wheel Basket?


Inwould love to purchase the Coilef crochet basket pattern in PDF, but I cant find it on Ravelry or Love Crochet. Can you direct me?
You mentioned a video tutorial for the Colorwheel Coiled Basket…can’t see anything to click on for my viewing pleasure. Thank you so much for sharing your wonderful ideas!
I’m so sorry you can’t see the video. You can also find it on YouTube here: https://youtu.be/Xn-PGOSeQQA
Yes, you can find it on Ravelry here: https://www.ravelry.com/patterns/library/color-wheel-basket
I love this!! The basket pattern is very pretty!
My wife likes stitching, she tried this project and the result was awesome. She will make more based on your tutorials.
This is amazing – never occurred to me that you could make baskets. For sure linking this. Thanks!
This pattern is so beautiful. Its attractive ideas for crocheters who love to crochet.Thanks for the helpful ideas. really it’s so creative and useful for everyone.
Love this project! And already working on my second basket. Can you tell me how many rounds you did for your large sample?
What a great product to make! I would like to add this on my to-dos this quarantine.
I never thought this is such a huge task to do. I thought that crochet is just easy.
So excited to try to make this!
I wanna try making this! I’m excited!
Have you put one of the baskets through a washing machine yet? Do they hold up well?
Have you put one of the baskets through a washing machine yet? Do they hold up well?
I have not put any baskets through the washing machine. I’d probably put it in a delicates bag if I were to wash it.
I can’t keep my sides straight. I know it has to do with the tension, but does anyone have any hints on how to keep the sides all the same size? I’ve wondered if I could construct some kind of blocking device to sit inside as I work around. Thanks for any tips!
Do you think the coiled crochet basket could possibly work with tee shirt yarn around the cording? It would be pretty thick, but I wonder if it would work at all. The tee shirt yarn is also very stretchy.
I started to make the backet. I am using 6mm macrame cord and peaches n’ cream cotton yarn. It started coming along well, I haven’t pulled on the cord at all. I wanted to make a bigger basket so I continued with increase rounds. It has now started to bowl up. Do you think I am crocheting too tight? I guess I am going to have to frig some rounds and try to loosen up. Just wondered if you had any ideas before I did this. Thanks.
You are probably pulling on the cord a bit more than you think. Or the weight of the bottom is just dragging it down a bit?
I don’t know if it would work – you’d have to try it out! 🙂
I created one of these baskets using macrame cord. It was a lot thinner of cord, so I had to make some adjustments. But I like how it turned out. I think I will try either thicker cord or find some piping to make another one. I did tag you in my post on my page as well as mentioned your page with a link. Thank you for such an easy to follow pattern.