
Today, my friend Sarah is here with a guest post on how to add embellishments to a crocheted piece! If you’ve ever tried one of her hat patterns, or a pattern for a crocheted animal, you’ll know that even though it looks hard, it’s really just little pieces put together. But there’s always a trick or two to make things easier or look better, so I can’t wait to learn what Sarah has to teach!
Hello Crocheters! My name is Sarah and I am the crafter, crocheter and crockpoter behind the blog Repeat Crafter Me. I am a stay-at-home mom to my two preschool age boys who I enjoy crafting and cooking with. Crocheting has quickly become my favorite hobbies over the past couple years and I enjoy writing my own patterns and sharing them with you for free on my blog. I hope you will stop by and say hi! I would love to have you following along 🙂
I am so excited to be taking part in this fabulous Crochet-A-Long that ChiWei has put together! I am here today to talk about one of the most frequently asked questions that I get in my e-mail box: How do you sew on crocheted embellishments to character hats? It sounds like most people are having the most trouble with ears and eyes. I don’t think there is an exact science to the process of attaching one crocheted piece to another but I am more than happy to show you my method and hopefully it will help you out!
You will need a tapestry needle and long piece of yarn or embroidery thread that matches the piece you are attaching to your hat or project. I like to leave a long tail of yarn at the end of the piece I am going to need to attach and use that to stitch the pieces together. I would avoid using hot glue. I can get messy and it doesn’t let the fabric stretch.
Lets start with eyes. Depending on how large your eye is, you might want to leave two long tails for sewing it on. One closer to the middle and the other on the outer edge. This will ensure that your piece doesn’t bubble in the middle and lays down flat. If your crocheted eye is small or will have a button in the middle, then just one long tail at the edge of the eye will work fine. I am going to use one of the eyes to my owl hat as an example.
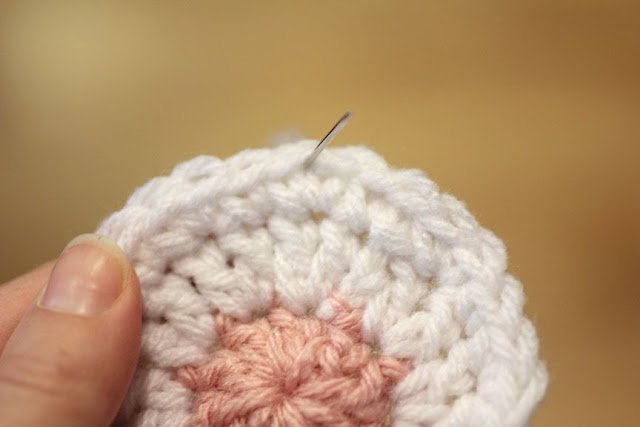
First position your crocheted eye where you want it. You may want to take the time to lay out the entire face before deciding where you will stitch it on. Eyes usually are best around the middle – lower half of the hat so they will be seen when being worn. You will want to stitch the eye on by weaving the yarn in and out under the top of the last round of crochet stitches as in this picture:
Here is a video tutorial which shows how to sew on the eyes to my owl hat:
Now lets talk about sewing on ears. I think the trick to this is that you want to sew on as much of the bottom of the ear as possible to the hat to make sure it is secure and that it will stand up straight (if that is what you want it to do). I made a video of how to sew on the ears to my Mickey Mouse inspired hat. You can use the technique in the video to sew on any ears to any hat:
For more videos on how to sew on embellishments, you can visit my Repeat Crafter Me Youtube Channel.
Happy Crocheting! -Sarah
And for those of you wondering, there will be a link party next week where you can share all of your cowls – I can’t wait to see all of your great work!


Helpful info.! I love Sarah’s blog and have a lot of her patterns flagged for when I learned to crochet! And now I can thanks to tackling this CAL!
Great really helpful! thanks x
need to know how to sew on embellishment without showing stitches. Without going from front to back
Would love a tutorial
Thank you
Honestly, and what I would do in your shoes… Hot glue. 🙂