
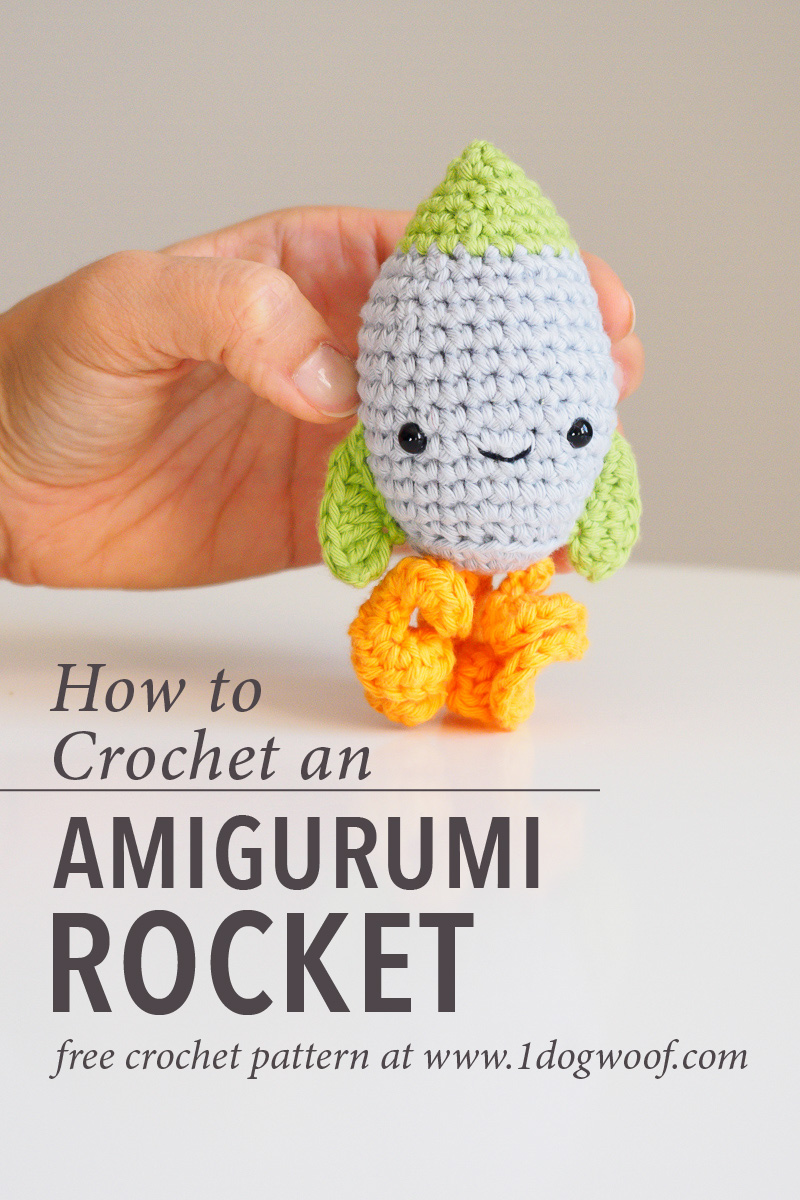
Today’s amigurumi rocket is the first pattern in Week 2 of the Amigurumi Advent CAL! Like the belly basket amigurumi, you can make this in any color you’d like, fit for girls, boys, and astronauts of all ages.
——————————————
Purchase the PDF from Ravelry or Add to your queue
——————————————
This is the first time, but probably not the last, that I’ll reflect on how fun it is to simplify a concept down to make it feasible for a 3 inch amigurumi. A rocket is a complex thing, but at the end of the day, it’s still recognizable as a simple shape with flames coming out the bottom and a few side fins to help it navigate. Maybe it’s a bit stereotypical, but it sure is necessary when you’re trying to make sure it’s no wider than 36 stitches around!
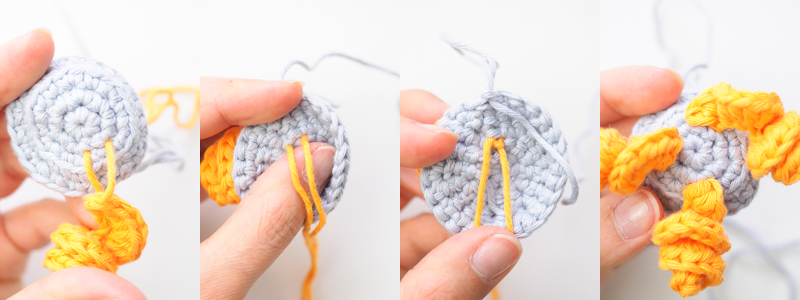
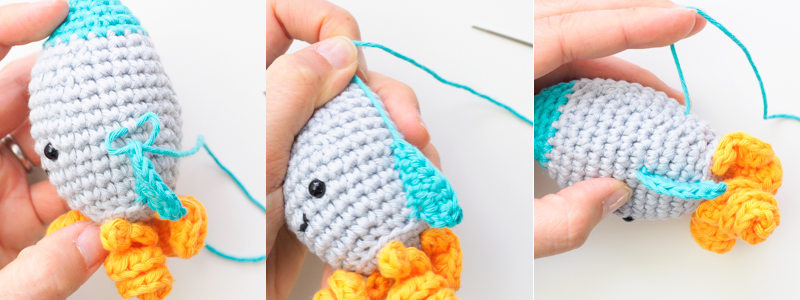
The construction of the rocket is similar to many of the amigurumis that have come before in this advent crochet-along. It’s worked seamed to keep everything on an even keel, with just the tip being a different color. But instead of attaching a stem or a star at the end as we’ve done before, the flames actually need to be attached while working on the rocket body. Ok, maybe not HAVE to. But it’s so much easier to pull the tails of the flames into the body before you stuff it. Once the flames are in place, then just work the rocket all the way up to the top. Then the side fins can be added at the end.
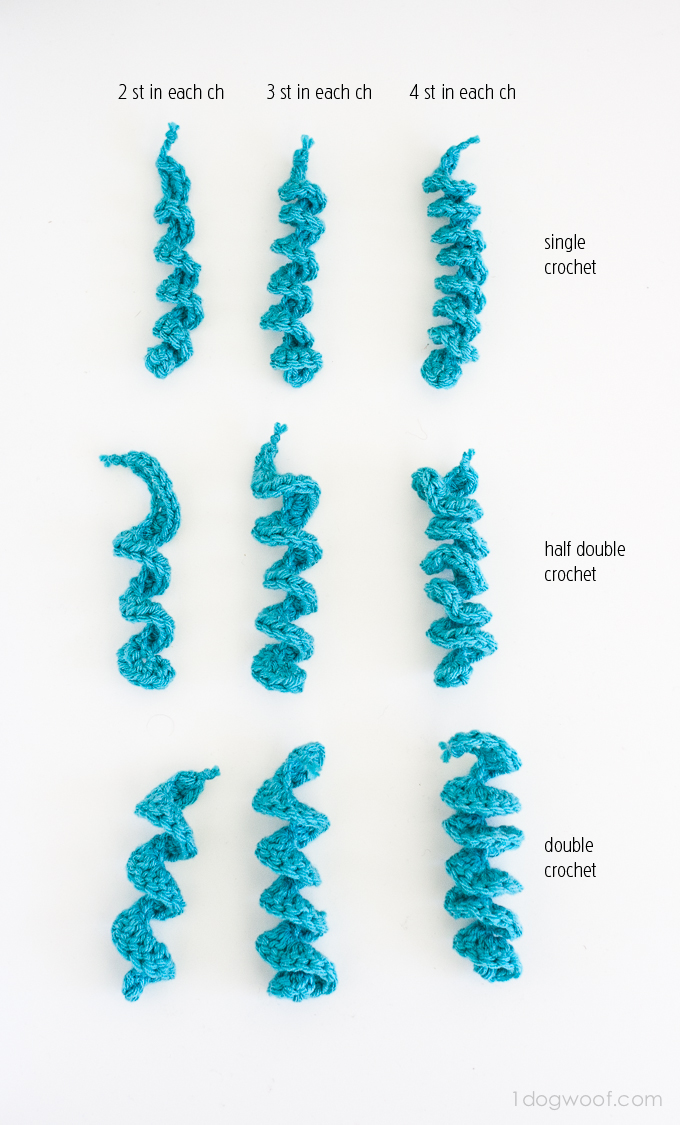
It took a bit of thought to figure out how to work the rocket booster flames. I could have made them like the one in the Amigurumi Candle, but for the sake of simplification, I decided to make them as small curly-cues. You have the freedom here to make the curly-cues any way you’d like, long and thin, or short and fat. You can even take a look at my study of curly-cues to decide which ones you like best. The flames are reminiscent of my jellyfish tentacles; they’re made the same way, and even attached the same way.
If you need help with starting amigurumi, or with the seamless join, you can always check out the Amigurumi Flan video tutorial, which goes over the same techniques used for the rocket.
Supplies
- MC: Paintbox Cotton Aran Stormy Grey or color of your choice
- C1: Paintbox Cotton Aran Lime Green or color of your choice
- C2: Paintbox Cotton Aran Mandarin Orange or color of your choice
- F/3.75mm crochet hook
- D/3.25mm crochet hook
- Cluster fiberfill
- 6mm safety eyes
- scissors
- embroidery thread or lightweight yarn in Black
Abbreviations
- st(s) – stitch(es)
- sl st – slip stitch
- ch – chain stitch
- sc – single crochet
- hdc – half double crochet
- dc – double crochet
- inc – increase: work 2 sc in same st
- dec – decrease: work 2 sc together
- BLO – back loop only
Pattern Notes
- Rounds in rocket body are worked with a seam and joined with a seamless join.
- Eyes are placed approximately 1.0-1.25 inches apart.
- Amigurumi can be closed using this technique.
- Flames should be made first, as they need to be attached to the rocket body early on.
Amigurumi Rocket Instructions
FLAMES (Make 3)
- Worked in C2.
Row 1: Start with a 6 in tail. Ch 12. Turn.
Row 2: Starting in the 4th ch from hook, work 3 dc in each ch to end of row.
- Fasten off, close, leaving a 6 in tail.
BODY
- Worked in seamed rounds.
- Worked in MC.
Round 1: Work 6 sc into a magic circle. Join to first sc with sl st. (6)
Round 2: Ch 1. Work 2 sc into each st around. Join to first sc with sl st. (12)
Round 3: Ch 1. Work [1 sc, inc] 6x around. Join to first sc with sl st. (18)
Round 4: Ch 1. Work 1 sc in BLO of each st around. Join to first sc with sl st. (18)
Round 5: Ch 1. Work [2 sc, inc] 6x around. Join to first sc with sl st. (24)
- Pull both tails of flames up through the bottom of the rocket. Tie securely and weave in ends. Repeat for all 3 flames.
Round 6-7: Ch 1. Work 1 sc in each st around. Join to first sc with sl st. (24)
Round 8: Ch 1. Work [3 sc, inc] 6x around. Join to first sc with sl st. (30)
Round 9-10: Ch 1. Work 1 sc in each st around. Join to first sc with sl st. (30)
Round 11: Ch 1. Work [8 sc, dec] 3x around. Join to first sc with sl st. (27)
Round 12: Ch 1. Work 1 sc in each st around. Join to first sc with sl st. (27)
Round 13: Ch 1. Work [7 sc, dec] 3x around. Join to first sc with sl st. (24)
Round 14: Ch 1. Work 1 sc in each st around. Join to first sc with sl st. (24)
Round 15: Ch 1. Work [2 sc, dec] 6x around. Join to first sc with sl st. (18)
- Add eyes between Rounds 8 and 9.
- Sew mouth between Rounds 7 and 8, centered between the eyes.
- Switch to C1.
Round 16: Ch 1. Work 1 sc in each st around. Join to first sc with sl st. (18)
Round 17: Ch 1. Work [4 sc, dec] 3x around. Join to first sc with sl st. (15)
Round 18: Ch 1. Work [3 sc, dec] 3x around. Join to first sc with sl st. (12)
- Stuff the amigurumi.
Round 19: Ch 1. Work [2 sc, dec] 3x around. Join to first sc with sl st. (9)
Round 20: Ch 1. Work [1 sc, dec] 3x around. Join to first sc with sl st. (6)
- Fasten off, close, and weave in ends.
FINS
- Worked using D hook.
- Worked in C1.
Row 1: Start with a long tail. Ch 6. Turn.
Row 2: Starting from the 2nd ch from hook, work 1 sc, 1 hdc in each of next 2 ch, 1 dc, and 3 dc in last ch.
- Fasten off, close, and weave in ends.
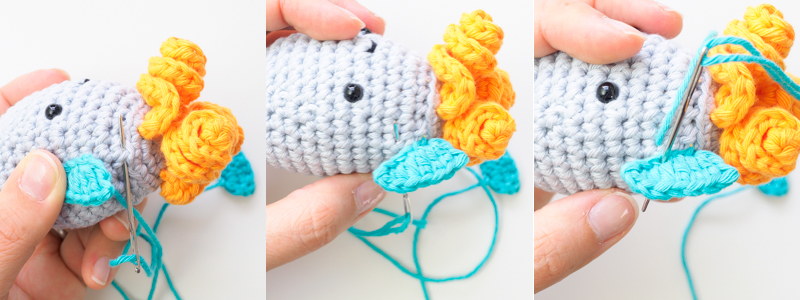
- Sew fins to either side of the rocket body, with bottom edge of fin lined up with the BLO (Round 4) of the rocket. Fin should be sewn across ~5 rounds of the rocket body.
If you enjoyed this pattern and are showing it off to the world, make sure to tag me @1dogwoof with the hashtag #AmigurumiAdventCAL. I can’t wait to see all your creations! You can also head over to the Amigurumi Advent Calendar intro post to see the entire collection!

Check out my pattern shops on Ravelry and Etsy where you can purchase printable PDFs of my latest crochet patterns. These PDFs are formatted without comments or ads, and have instructional photos at the bottom for optional printing.
I sometimes include affiliate links in my supply lists. Purchasing from these merchants earns me a small commission with no extra cost to you, and goes towards supporting One Dog Woof.
Please be respectful and do not sell or distribute this pattern in any way, especially as your own. Instead, share the original blog post link! You can sell finished products made from this pattern by giving credit to One Dog Woof as the pattern designer and linking to the blog post. If you have any questions regarding distribution or translation of this pattern, please see my Terms of Use. Thank you for your consideration!


Genuinely no matter if someone doesn’t know then its up to other viewers that they will
assist, so here it occurs.
This is so adorable. My daughter loves rockets. I’ve never learned to crochet; however, I am now inspired and will be reviewing your tutorials to begin my education.