
Welcome to the first pattern in the 2018 Amigurumi Advent Calendar Crochet-Along! This amigurumi flan is the first of 25 amigurumi patterns to fill your Advent boxes for the upcoming holidays. Each of these posts will include a quick intro, some helpful tips, and then the pattern itself. There’s also a video tutorial where you can watch me make the amigurumi, since I can’t always put every personal quirk in writing.
![]()
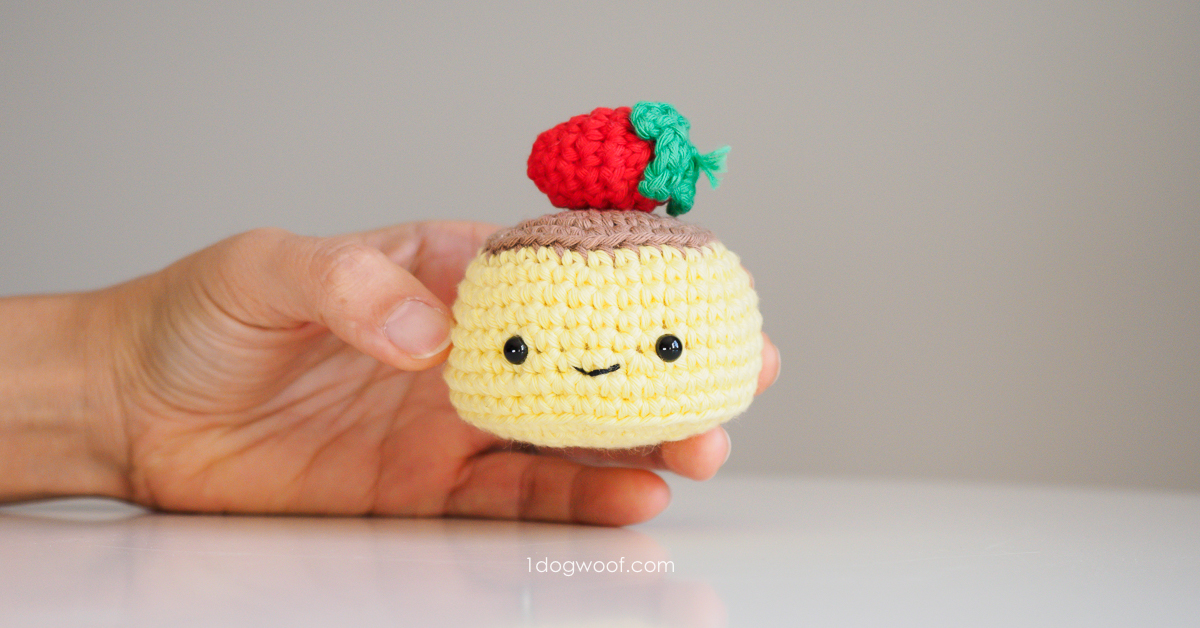
Making amigurumi and working at this small scale take a bit of getting used to (the whole thing is less than 3 inches big), so we’ll start off with an easy pattern. That way, you can get used to the different skills and techniques you’ll need for many of the later amigurumi. You can always go back to the introduction post to see the full list of materials, skills tutorials, and where you can find help or support as you make your Advent Calendar. Let’s get started!
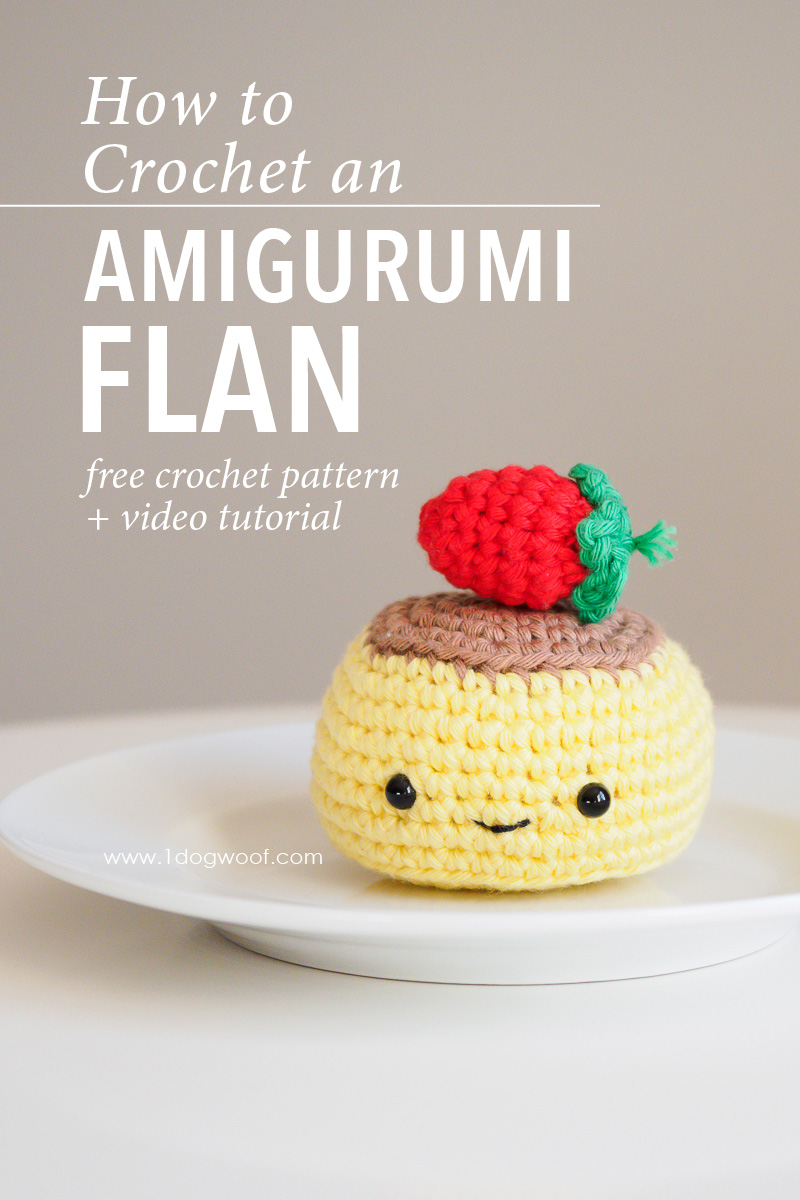
This first amigurumi is for a cute kawaii flan! I was originally going to top it with just a simple basil leaf, but my daughter said it looked like the pudding from Sushi Go card game, and requested a strawberry instead. The strawberry pattern is included below. I left my strawberry separate from the flan/pudding itself, but you can attach it with a bit of yarn if you’d like.
——————————————
Purchase the PDF from Ravelry or Add to your queue
——————————————
The instructions include where I placed my eyes and mouth to create the face. I placed the eyes about 1″ to 1.25″ apart, with the mouth in the center, slightly lower than the eyes, on the opposite side of the seam. For maximum cuteness, the face should sit below the half way point on the amigurumi.
As for stuffing, some of the amigurumi are more over-stuffed than others. For the flan, I kept the stuffing fairly light so that the top and bottom of the flan don’t budge too much. The strawberry is more tightly stuffed to accentuate its shape, especially because it’s so small.
Here’s the video tutorial for the amigurumi flan, and continue scrolling down for the pattern!
Supplies
- Paintbox Cotton Aran Daffodil Yellow (~0.32 oz) or other yellow
- Paintbox Cotton Aran Soft Fudge (~0.07oz) or other brown
- Paintbox Cotton Aran Rose Red (~0.09) or other red
- Paintbox Cotton Aran Grass Green (~0.04oz) or other green
- F/3.75mm crochet hook
- Cluster fiberfill
- 6mm safety eyes
- scissors
- embroidery thread or lightweight yarn in Black
Abbreviations
- st(s) – stitch(es)
- sl st – slip stitch
- ch – chain stitch
- sc – single crochet
- inc – increase: work 2 sc in same st
- dec – decrease: work 2 sc together
- BLO – back loop only
Pattern Notes
- Rounds in flan are worked with a seam and joined with a seamless join.
- Rounds in the strawberry accent are worked continuously.
- Eyes are placed approximately 1.0-1.25 inches apart.
- Amigurumi can be closed using this technique.
Amigurumi Flan Instructions
- Worked in seamed rounds.
- Start with BROWN
Round 1: Work 6 sc into a magic circle. Join to first sc with sl st. (6)
Round 2: Ch 1. Work 2 sc into each st around. Join to first sc with sl st. (12)
Round 3: Ch 1. Work [1 sc, inc] 6x around. Join to first sc with sl st. (18)
Round 4: Ch 1. Work [2 sc, inc] 6x around. Join to first sc with sl st. (24)
Round 5: Ch 1. Work [3 sc, inc] 6x around. Join to first sc with sl st. (30)
- Switch to YELLOW
Round 6: Ch 1. Work 1 sc in BLO of each st around. Join to first sc with sl st. (30)
Round 7: Ch 1. Work [4 sc, inc] 6x around. Join to first sc with sl st. (36)
Round 8: Ch 1. Work 1 sc in each st around. Join to first sc with sl st. (36)
Round 9: Ch 1. Work [11 sc, inc] 3x around. Join to first sc with sl st. (39)
Round 10: Ch 1. Work 1 sc in each st around. Join to first sc with sl st. (39)
Round 11: Ch 1. Work 7 sc, inc, 12 sc, inc, 12 sc, inc, 5 sc. Join to first sc with sl st. (42)
Round 12-13: Ch 1. Work 1 sc in each st around. Join to first sc with sl st. (42)
Round 14: Ch 1. Work 1 sc in BLO of each st around. Join to first sc with sl st. (42)
- Add eyes between Rounds 10 and 11.
- Sew mouth between Rounds 11 and 12, centered between the eyes.
Round 15: Ch 1. Work [1 sc, dec] 14x around. Join to first sc with sl st. (28)
Round 16: Ch 1. Work [2 sc, dec] 7x around. Join to first sc with sl st. (21)
Round 17: Ch 1. Work [1 sc, dec] 7x around. Join to first sc with sl st. (14)
- Stuff the amigurumi.
Round 18: Ch 1. Work 7 dec around. Join to first sc with sl st. (7)
- Fasten off, close, and weave in ends.
Crochet Strawberry Instructions
- Worked in continuous rounds.
- Worked in RED
Round 1: Work 6 sc into a magic circle. (6)
Round 2: Work [1 sc, inc] 3x around. (9)
Round 3: Work 1 sc in each st around. (9)
Round 4: Work [2 sc, inc] 3x around. (12)
Round 5: Work [3 sc, inc] 3x around. (15)
Round 6: Work 1 sc in each st around. (15)
Round 7: Work 7 dec around. Note: this is not a completed round.
Fasten off and weave in ends.
- Worked in GREEN
Round 1: Start with a magic circle. *Ch 2. Work 1 dc into magic circle, ch 3. Sl st into the side of the dc, then sl st in the magic circle.* Repeat from * 3 more times.
- Fasten off, leaving a tail to sew the leaves onto the strawberry.
The strawberry can be attached to the flan, or left separate. Up to you!
If you enjoyed this pattern and are showing it off to the world, make sure to tag me @1dogwoof with the hashtag #AmigurumiAdventCAL. I can’t wait to see all your creations!
Check out my pattern shops on Ravelry and Etsy where you can purchase printable PDFs of my latest crochet patterns. These PDFs are formatted without comments or ads, and have instructional photos at the bottom for optional printing.
I sometimes include affiliate links in my supply lists. Purchasing from these merchants earns me a small commission with no extra cost to you, and goes towards supporting One Dog Woof.
Please be respectful and do not sell or distribute this pattern in any way, especially as your own. Instead, share the original blog post link! You can sell finished products made from this pattern by giving credit to One Dog Woof as the pattern designer and linking to the blog post. If you have any questions regarding distribution or translation of this pattern, please see my Terms of Use. Thank you for your consideration!


Hi!
I’m so excited to start working on these little cuties as you release them.
Unfortunately, the video link doesn’t seem to be working though 🙁
So sorry about that! I just published it, should be there now!
I am so excited for this! I was counting the days down. I looked at my inbox for the email with the pattern but I didn’t get one, even though I am subscribed. I saw that you posted a pic for it on your instagram and had to look it up on your website. I saw the pattern and started it (almost done!) a subscribed again just in case, but I still haven’t gotten it 🙁 I looked in my spam folder just in case but it wasn’t there :/
Is something wrong with my email? Is there a way to fix it?