
The Adirondack Wrap uses shapes and colors to create to a long, light and flowing wrap that can also be worn as a scarf. It’s deceptively simple design makes it perfect for on-the-go crocheting, watching-tv crocheting, and sip-and-stitch crocheting!
And boy, did I find that out about projects that are good for sip-and-stitch crocheting! After an amazing trip to New York City to meet my favorite yarn friends and see Lion Brand’s offices, I’ve learned how important it is to have a mindless, simple project on hand. Always. I did bring a current project, but it required following a predetermined design, and counting rows, which I found extremely difficult (read: impossible) when standing at a bar, or paying attention in a meeting, or having a conversation with anyone and still hope to speak coherently. I’m still processing all the different things I did, and things I saw, and things I ate, and conversations I had from the trip, and will share more with you later.
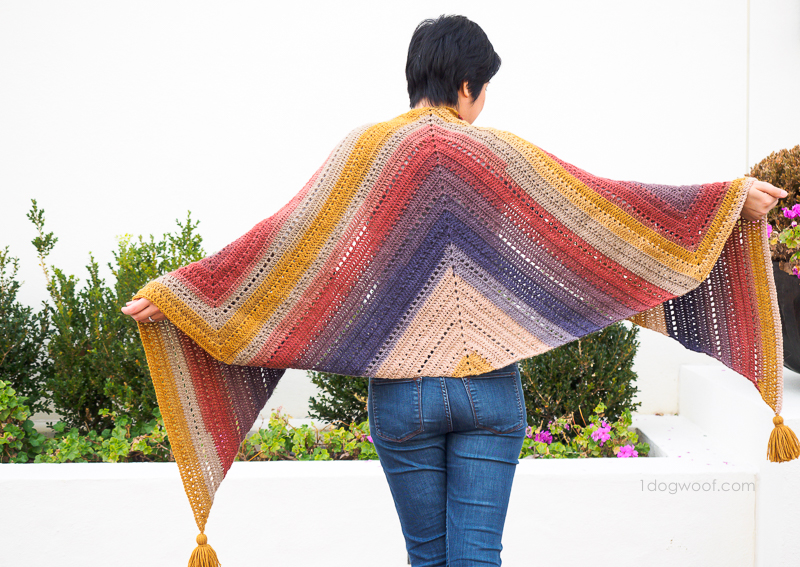
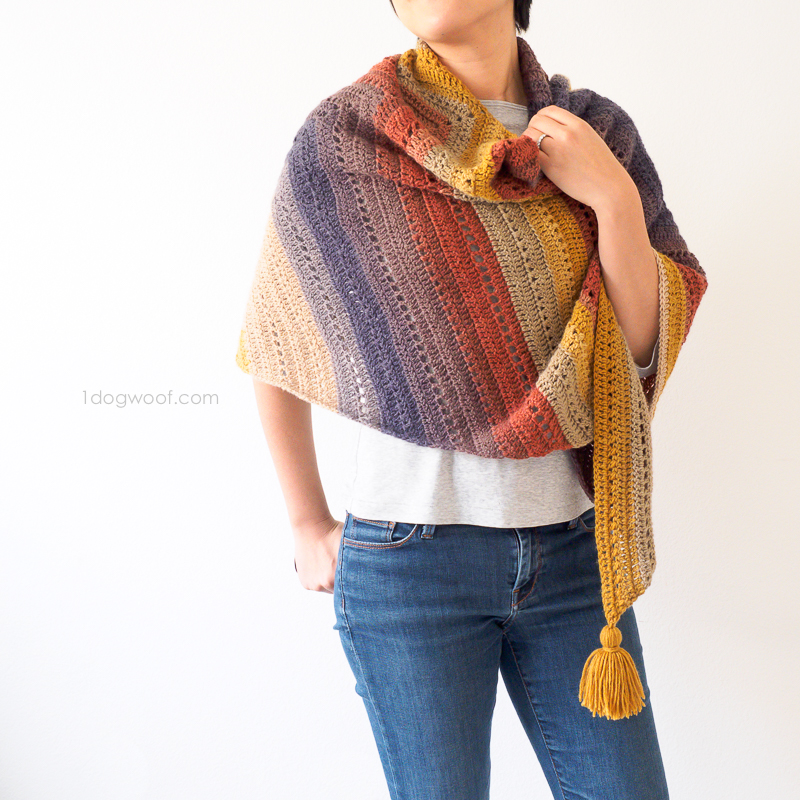
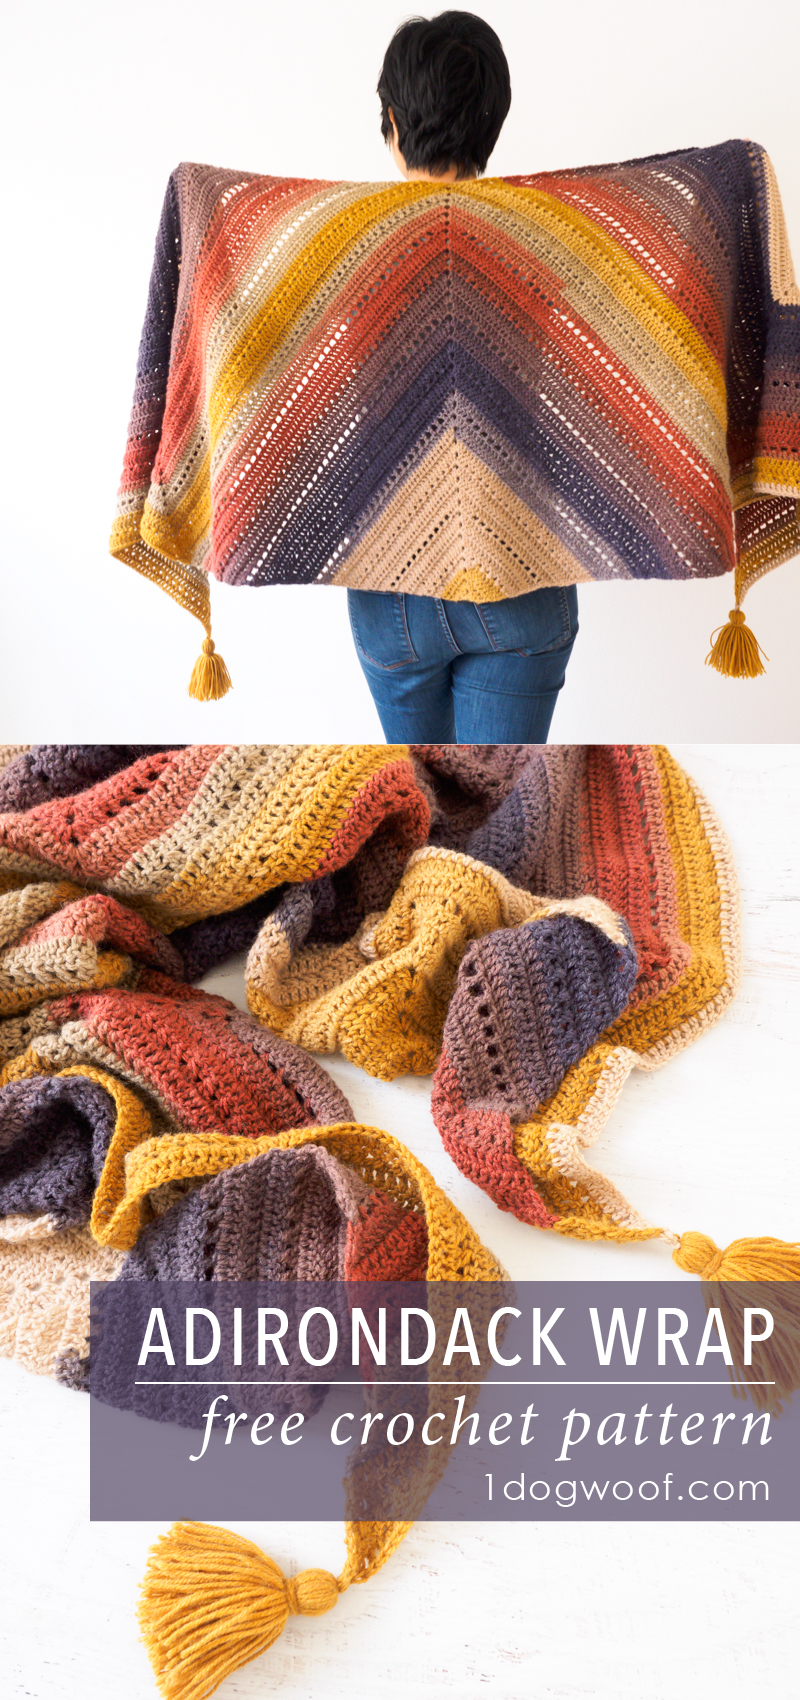
As for the inspiration for this wrap scarf, I do a lot of perusing of knit, crochet and fashion photos to find ideas, and I found myself gravitating towards those long knit wraps that stretch from fingertip to fingertip, so I made my own crochet version. It stretches about 8 feet long and 2 feet wide. Unlike triangle wraps, it doesn’t have a center point down the back, but it is in fact, made from triangles! There’s 3 triangles in this wrap, connected together to make a trapezoid. The geometry geek in me is loving all these triangles I’ve been working with, first with the Love Triangles Blanket and then the Tangram Wrap. I just rewatched Hidden Figures today and these projects remind me of the part in the movie when a young Katherine finds geometric shapes in stained glass windows.
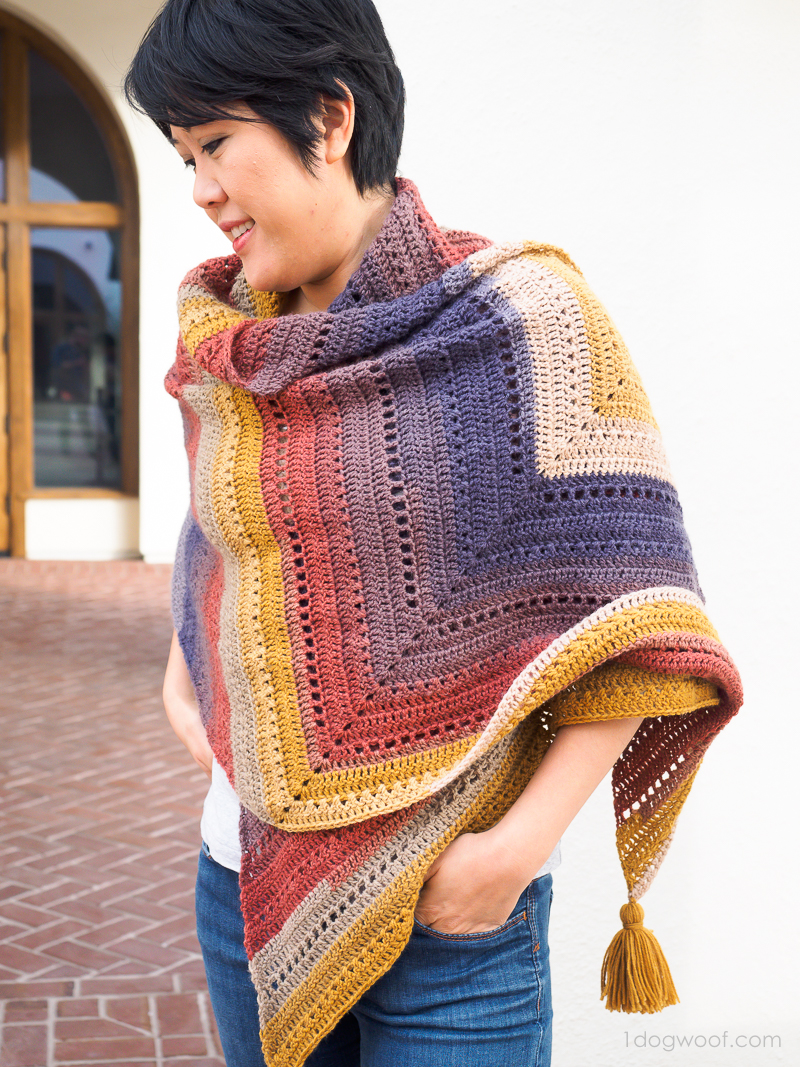
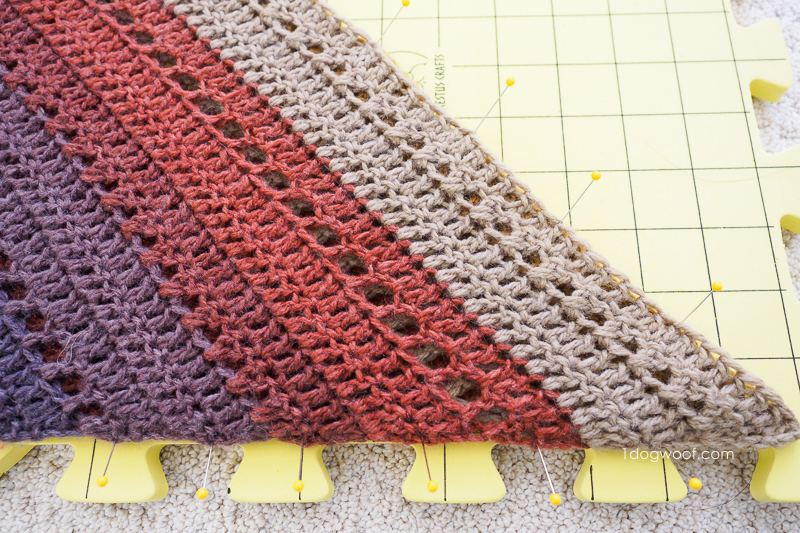
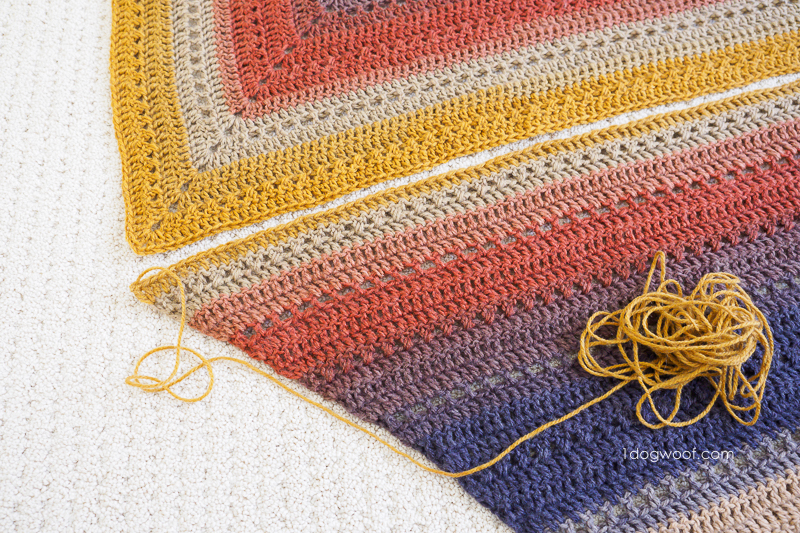
The Adirondack Wrap consists of 3 identical crochet triangles seamed together, using 3 skeins of Lion Brand Mandala Yarn, one for each triangle. If you are able to choose your 3 skeins in person (I bought mine in person at Walmart), you can pick skeins that have similar color patterns, so that the outside rings of color are the same. Pull from the center to work your triangle, and the outer rows of each triangle might be in the same color family. When you seam up those 3 triangles, the seams are nearly invisible, just showing a single color weaving a big W through the wrap. If you can’t choose your skeins, the mattress stitch used to seam the triangles together can still create a band of color between each triangle, creating its own unique pattern.

The pattern for each of the triangles is super easy. Every row is a variation of double crochet stitches, with increases at the ends and in the middle chain space. Every fourth row uses either a cross double crochet or a mesh double crochet motif to add variety and texture. Also, by using Mandala, you don’t ever have to change yarns to get the gorgeous color changes, the self-striping yarn does it for you.
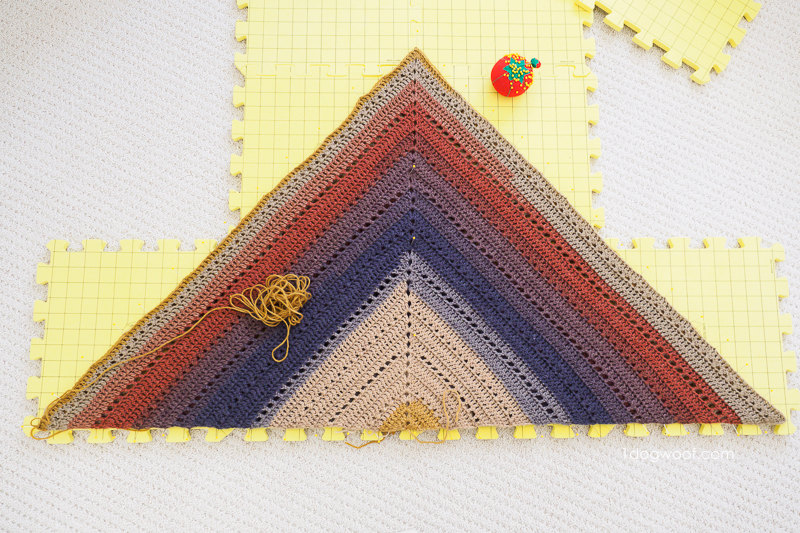
Remember to block the triangles once they are complete. I blocked all 3 on top of each other to ensure they all had the same shape, and I did stretch them out to the full triangle shape that I wanted.
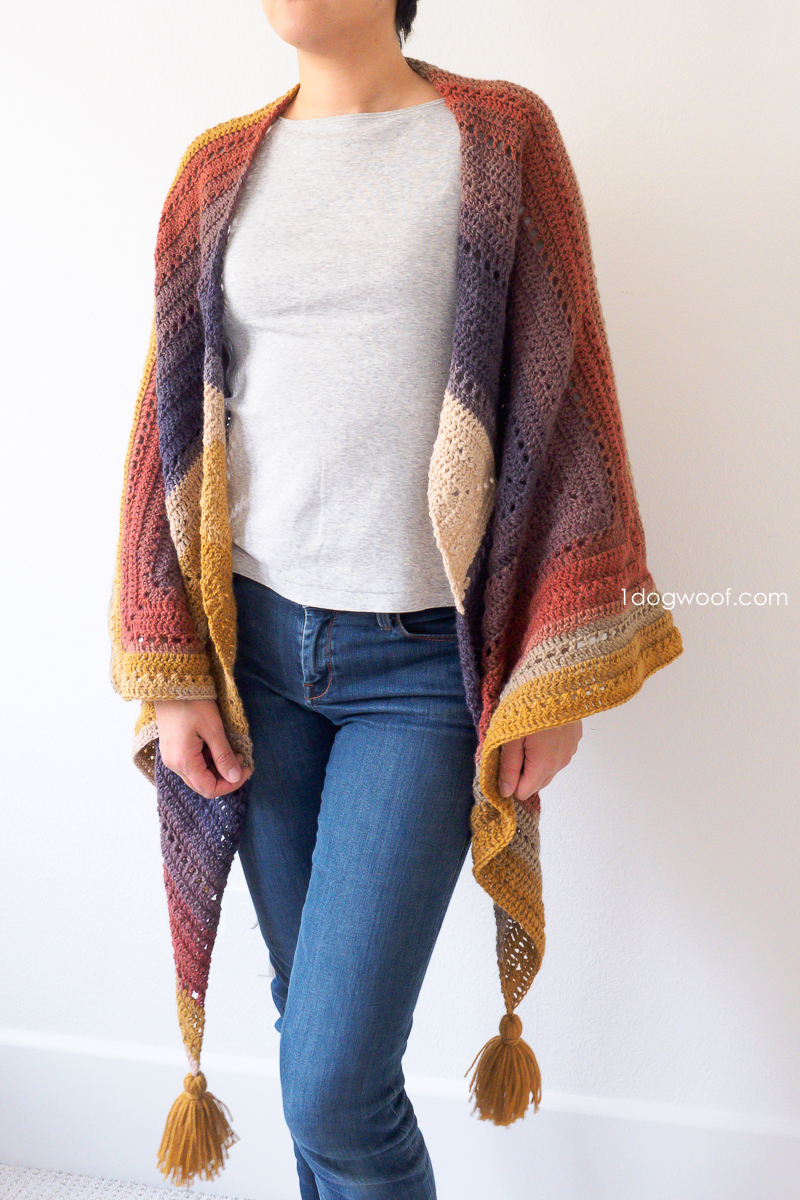
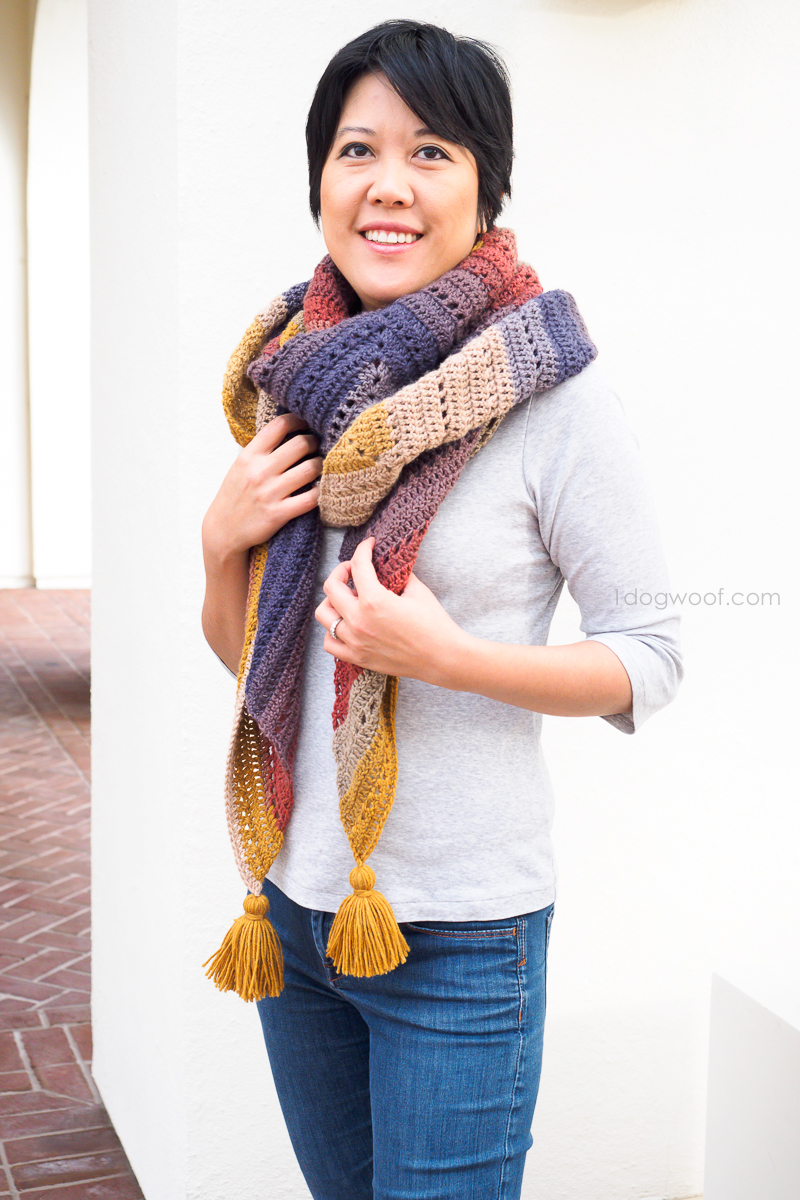
I call this a Wrap, but it can easily be a super cozy super scarf too! As long as you use lighter weight yarn, the wrap scarf bundles up really well, and the tassels give it a fun touch at the ends.
The free pattern is below, but there are other options available for you if you’d like to work offline, or if you can’t find the yarn in your local big box store.
Check out Etsy, or Ravelry to purchase an inexpensive and printable PDF for offline use. This document presents the pattern in a simple and easy to read format, without ads or comments.
Lion Brand also has The Adirondack Wrap available as a full kit, which includes your choice of Mandala Yarn and a copy of the pattern I’ve shared below. The kit does not include the hook or other notions.
All options below!
——————————————
Purchase the pattern from Etsy
Purchase the pattern from Ravelry
Purchase the kit from Lion Brand
——————————————

Supplies
- 3 skeins each of Lion Brand Mandala in Centaur
- Size J/6.0mm crochet hook
- Clover USA large tassel maker (optional)
- Tapestry needle
- Scissors
Abbreviations
- st – stitch
- ch – chain stitch
- dc – double crochet
Pattern Notes
- Skill level Easy.
- Gauge is 15 sts and 8.5 rows in 4 inches.
- Overall size is approximately 92 inches long and 24 inches wide.
- The pattern uses the following shorthand descriptions:
- row-f: Ch 3 (counts as st). Work 1 dc in same st.
- row-m: Work [2 dc + 2 ch + 2 dc] in ch sp.
- row-e: Work 2 dc in last st.
- cross-st: Skip 1 st. Work 1 dc into next st. Work 1 dc into previously skipped st.
- mesh-up: Ch 1, skip next st, work 1 dc into next st.
- mesh-dn: Work 1 dc into next st. Ch 1 and skip next st.
Adirondack Wrap Pattern Instructions
Triangle (make 3)
Row 1: Work [3 dc, 1 ch, 3 dc] into magic circle. Do not join the magic circle. (6)
Row 2: Work row-f, 1 dc in each of next 2 st, row-m, 1 dc in each of next 2 st, row-e. (12)
Row 3: Work row-f, 1 dc in each of next 5 st, row-m, 1 dc in each of next 5 st, row-e. (18)
Row 4: Work row-f, 1 dc in each of next 8 st, row-m, 1 dc in each of next 8 st, row-e. (24)
Row 5: Work row-f, 5 cross-st, 1 dc in next st, row-m, 1 dc in next st, 5 cross-st, row-e. (30)
Row 6: Work row-f, 1 dc in each of next 14 st, row-m, 1 dc in each of next 14 st, row-e. (36)
Row 7: Work row-f, 1 dc in each of next 17 st, row-m, 1 dc in each of next 17 st, row-e. (42)
Row 8: Work row-f, 1 dc in each of next 20 st, row-m, 1 dc in each of next 20 st, row-e. (48)
Row 9: Work row-f, 11 mesh-up, 1 dc in next st, row-m, 1 dc in next st, 11 mesh-dn, row-e. (54)
Row 10: Work row-f, 1 dc in each of next 26 st, row-m, 1 dc in each of next 26 st, row-e. (60)
Row 11: Work row-f, 1 dc in each of next 29 st, row-m, 1 dc in each of next 29 st, row-e. (66)
Row 12: Work row-f, 1 dc in each of next 32 st, row-m, 1 dc in each of next 32 st, row-e. (72)
Row 13: Work row-f, 17 cross-st, 1 dc in next st, row-m, 1 dc in next st, 17 cross-st, row-e. (78)
Row 14: Work row-f, 1 dc in each of next 38 st, row-m, 1 dc in each of next 38 st, row-e. (84)
Row 15: Work row-f, 1 dc in each of next 41 st, row-m, 1 dc in each of next 41 st, row-e. (90)
Row 16: Work row-f, 1 dc in each of next 44 st, row-m, 1 dc in each of next 44 st, row-e. (96)
Row 17: Work row-f, 23 mesh-up, 1 dc in next st, row-m, 1 dc in next st, 23 mesh-dn, row-e. (102)
Row 18: Work row-f, 1 dc in each of next 50 st, row-m, 1 dc in each of next 50 st, row-e. (108)
Row 19: Work row-f, 1 dc in each of next 53 st, row-m, 1 dc in each of next 53 st, row-e. (114)
Row 20: Work row-f, 1 dc in each of next 56 st, row-m, 1 dc in each of next 56 st, row-e. (120)
Row 21: Work row-f, 29 cross-st, 1 dc in next st, row-m, 1 dc in next st, 29 cross-st, row-e. (126)
Row 22: Work row-f, 1 dc in each of next 62 st, row-m, 1 dc in each of next 62 st, row-e. (132)
Row 23: Work row-f, 1 dc in each of next 65 st, row-m, 1 dc in each of next 65 st, row-e. (138)
Row 24: Work row-f, 1 dc in each of next 68 st, row-m, 1 dc in each of next 68 st, row-e. (144)
Row 25: Work row-f, 35 mesh-up, 1 dc in next st, row-m, 1 dc in next st, 35 mesh-dn, row-e. (150)
Row 26: Work row-f, 1 dc in each of next 74 st, row-m, 1 dc in each of next 74 st, row-e. (156)
Row 27: Work row-f, 1 dc in each of next 77 st, row-m, 1 dc in each of next 77 st, row-e. (162)
Row 28: Work row-f, 1 dc in each of next 80 st, row-m, 1 dc in each of next 80 st, row-e. (168)
Row 29: Work row-f, 41 cross-st, 1 dc in next st, row-m, 1 dc in next st, 41 cross-st, row-e. (174)
Row 30: Work row-f, 1 dc in each of next 86 st, row-m, 1 dc in each of next 86 st, row-e. (180)
Row 31: Work row-f, 1 dc in each of next 89 st, row-m, 1 dc in each of next 89 st, row-e. (186)
Row 32: Work row-f, 1 dc in each of next 92 st, row-m, 1 dc in each of next 92 st, row-e. (192)
Row 33: Work row-f, 47 mesh-up, 1 dc in next st, row-m, 1 dc in next st, 47 mesh-dn, row-e. (198)
Row 34: Work row-f, 1 dc in each of next 98 st, row-m, 1 dc in each of next 98 st, row-e. (204)
Row 35: Work row-f, 1 dc in each of next 101 st, row-m, 1 dc in each of next 101 st, row-e. (210)
Row 36: Work row-f, 1 dc in each of next 104 st, row-m, 1 dc in each of next 104 st, row-e. (216)
Row 37: Work row-f, 53 cross-st, 1 dc in next st, row-m, 1 dc in next st, 53 cross-st, row-e. (222)
Row 38: Work row-f, 1 dc in each of next 110 st, row-m, 1 dc in each of next 110 st, row-e. (228)
Assembly
- On the 3rd (last) triangle, leave a long tail for seaming.
- Lay out the triangles as shown in figure below. Place the 3rd triangle so that the long tail starts at the red dot.
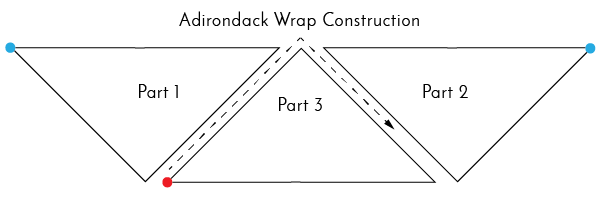
- Seam the 3 triangles together in the direction of the dotted line, using the mattress stitch.
- Weave in all ends.
- Make 2 tassels and attach one to each far corner, as indicated by blue dots.
I really love this particular colorway in Mandala Yarn, as it reminds me of the changing fall foliage back home in the Hudson Valley. If you make it with other color choices, let me know, I’d love to see how it turns out!
This scarf wrap is so versatile, I’d also love to see how you style it!
Check out my pattern shops on Etsy and Ravelry where you can purchase printable PDFs of my latest crochet patterns. These PDFs are formatted without comments or ads, and have instructional photos at the bottom for optional printing.
I sometimes include affiliate links in my supply lists. Purchasing from these merchants earns me a small commission with no extra cost to you, and goes towards supporting One Dog Woof.
Please be respectful and do not sell or distribute this pattern in any way, especially as your own. Instead, share the original blog post link! You can sell finished products made from this pattern by giving credit to One Dog Woof as the pattern designer and linking to the blog post. If you have any questions regarding distribution or translation of this pattern, please see my Terms of Use. Thank you for your consideration!


Please, I don´t understand when you say “mesh-dn”, Can you explain to me?
Sorry, sorry, for my terrible english.
was the Adirondack Wrap taken off your Etsy and Craftsy stores? I checked both and couldn’t find this pattern. I would love to purchase it if it still available.
I love your patterns but they just don’t make sense to me even reading them 4 times 🙁
But it is super cute
I think Chi Wei forgot to say in her abbreviation description that “mesh-dn” means:
Work 1 dc into next st. Ch 1 and skip next st.
Your English is not terrible. I easily understood what you asked.
Yet ANOTHER beautiful project! I like the Centaur colors, but I think the wrap would also look good in Serpent. It would make the wrap full of happy colors without being too bright or overwhelming.
This is beautiful and looks like something I as a skilled beginner could make. Thank you!
Great project for me and these colors must’ve been made just for me!! Absolutely love this. Thanks for sharing.
Thank you Priscilla! Yes, you are correct. It must have gotten deleted by accident. The pattern should be correct now.
Hi Inma, So sorry, yes, the mesh-dn was accidentally deleted, but I have updated the post with the fix. Thanks for your understanding!
Hi Maria, I’m sorry you’re having trouble! It’s basically row after row of double crochets with every few rows being of a slightly different pattern.
Rho… I love it! It’s a littleray of sunshine! ♥♥♥
Bought the pattern thru Ravelry but paid thru PayPal. Was wondering where to go to print pattern. Looked thru Ravelry and PayPal accounts but unable to find where I can print it.
Thanks for your comment. I have done two triangles yet
. This is a good pattern.
Gracias a ti por el trabajo que realizas y por tus diseños.
I was looking forward to crocheting this shawl but I think the short hand makes this pattern confusing because it’s back and forth from the pattern to the notes making it difficult to follow. Are the purchased patterns written with the shorthand as well? I would consider purchasing it if it’s written out like any other pattern would be.
This very beautiful and great pattern I start working in first triangle but I don’t know how to block the traingle please can you explain blockage of triangles to me , thank you very much ????
So gorgeous! Unfortunately we can’t get this kind of yarn in my country. And this would work aboslutely amazing for a blanket. Just sew copule triangles together to a beautiful gorgeous blanket.
totally love the colors beautiful for spring
Merci pour ce partage. J’aime beaucoup votre blog qui est très inspirant.
Belle journée à vous.
Does each triangle really require a whole 590yd ball? I want to make this but am considering other yarn and need to figure out how much to get. Thanks! Beautiful pattern 🙂
How do you deal with the beginning magic circle? I don’t see instructions for that and I ended up with loops on my triangles. Thanks for the help!!
One of the most beautiful pieces I’ve ever seen created. I am in love with the Mandala line as it is though i haven’t used this color way yet. Simply stunning!!! I wish I wasn’t such an impatient crafter.
I am having trouble figuring out the first part of this pattern. A video tutorial would be amazing for how to start this.
Hello,
Does row-m mean to do 6 dc’s? I’m new at this and I am a little confused.
Thank you
Cathy
I was super confused about the beginning magic circle as well, you are suppose to turn your work, not actually continue to work in the magic circle, once you’ve completed row one. At least that’s what I did! Hope that helps!
Me too. I finally figured out I had to turn my work
What are the other pattern rows? I’m also confused by the pattern?
Hello! I So enjoy your blog and patterns. One question; I bought the Mandala Centaur but the colors look nothing like the one in your photograph. No peaches, blues etc. Is it the same color? I really liked the colors of your photo. Thanks much in advance,
Roxanne
Thanks for sending me the pattern. ????
Such a beautiful pattern! I have made it to row 34 but am having some trouble. Row 33 came out fine with 47 mesh-ups on the one side and 47 mesh-downs on the other. I only ended up with 95 dcs on my first pass back however. I have looked and looked and cannot find a missed stitch or anything of the sort to equal the 98 dcs the row was supposed to have. Any suggestions? Thanks!
Love this pattern and I’m done with the second triangle. My question, why doesn’t it match my first one? I’ve counted each row, they are both the same, but one is smaller. Will blocking fix this problem? There is about a 4 row difference.
Hi there! How would you recommend working up a gauge swatch? I was thinking just straight dc, but I’ve never really switched before. Thanks!
*Swatched.
What a great project to work this weekend! I guess I will make a all-white one, hehe. I’m still a newbie.
Thank you so much for sharing a different take on the triangle shawl. I just got home from the hospital today to begin a month of mandatory recovery in bed. I had planned for it by getting several skeins of Mandala yarn. Now I know my first project. ????
This is a beautiful pattern! I’ve spent weeks searching the internet for a pattern for my mandala yarn hoard and kept coming back to this one! Everything is really clear and I love the pics, but I have a few suggestions as edits: 1) for row 1 you don’t say to ch 3 and count as first stitch, after making the magic circle, so the first dc ends up smooshed, 2) why not just write what the “rows” are in the pattern? When I printed it off I have to keep flipping the page. Just a little thing. and 3) when you say to work two dc in the last stitch in row e, specify you mean to work it in the top of the ch 3 from previous row (if I’m correct) These are newbie issues I’ve had that have tripped me up many times in other patterns.
I purchased this pattern but not clear how to start it? But don’t I need to have a chain started?
I am a novice crocheter and want to try this pattern. Going back and forth from notes to pattern is confusing. Any plans to make it simpler. It’s beautiful
I think I understand most of the pattern. The beginning is a bit confusing as I’m not used to working with a magic circle. Can I do a ch4, then 2 DC in the 4th CFH, ch 1, then 3 DC? Would this be the same thing?
I think I answered my own question. Yes, they both get the job done, but the magic circle allows you to cinch the hole closed neater and more tightly. Ok I’m about to try it using the mandala yarn Sphynx.
For those people who, like me, thought this might be too complicated, it’s really not. Row f is the start of every row. Row m is in the middle, at the point of the triange. Row e is at the end. Each row works like this. The cross st, mesh up, and mesh down are just variations of double crochet stitches. *3 rows regular DC, 1 row cross stitch, 3 rows regular DC, 1 row mesh up/mesh down*.
By the time you get through a few rows you can visualize the pattern and basically get rid of the notes. If you’re fairly familiar with shawls, it’s easy to memorize.
is the paid pattern of ravelry easier to understand, ie more directions. I usually can read patterms, but this is so confusing to me. I don’t mind paying the $3.00 if the pattern has more clearer directions then what is on this blog.
I follow the pattern but unfortunately my triangles are not looking the same, the colors don’t match each other when put together and each triangle the colors didn’t have the same length. I started each triangle from the center and I was sure all have the same colors but still no succes. Is there any Way to fix this? Any ideas?
like, i will translate this topic on my persian پرداخت قبض
I’m almost done with my first triangle, but I’m discovering that the colors Lion Brand Yarn sent in my kit are nothing like your beautiful example. I haven’t seen Centaur in a store, but the balls I was sent don’t have the nice off white, the reddest color is more of a dusty rose, and there’s no sign of the brightest blue you have. It’s pretty, but definitely not what you were able to create. . .
The colors may not match depending on the yarn itself. You can force them to match by doing a certain amount of rows in each color. You may also be able to get them the same size by blocking them together, on top of each other. If this doesn’t work then your tension is off, or you may have done one with a different size hook. Thats my best guess. Good luck!
Thanks Trish! Yes, the yarn will vary, so you can either choose skeins that have similar gradation, or cut the yarn to match. I did block all 3 triangles on top of each other to ensure they are the same size.
Hi, Thank you for your interest, but I do not allow translations to be published on other websites, as that is, in effect, copying my pattern for your own. Please email me directly if you have any further questions!
Hi Summer, the paid pattern is the same as what is on the blog. It is formatted for easy printing and for those who may not have constant access to the internet. Thanks!
Hi Trish,
Yes, I chose to start with a magic circle because it cinches tighter. But creating a loop with chain stitches works too!
Is it possible to have a video of this, as a beginner i find it assists me to see visually? I love the shawl nice and big. Thanks
I bought the yarn for this project and have yet to start it. I am a novice crocheter and sometimes have a hard time following pattern. Any plans of making this pattern more user friendly or a video tutorial
hi, can you explain how to attach the tassels. I bought the tassel maker kit and the instructions seem pretty easy, but attaching it to the shawl. I can’t visualize. Thank you 🙂
Hi Cynthia, once you have a tassel, I used the ends and tied it through any loop you find in the corner of the shawl. You can make a double knot and then weave in the ends. Thanks!
Hi Ayana, I’m sorry, but I don’t have plans to make a video at this time. If I do, I will definitely share it here!
I am in tears over not being able to read this pattern as it is written and cannot receive assistance/explanation from the person from whom I purchased the pattern.
Martha
Martha, As I replied on your original request, the “row-f”, “row-e”, “row-m” and others are abbreviations, as described in the Abbreviations section of the pattern. Wherever you see a “row-f” in the pattern, replace that with “Ch 3 (counts as st). Work 1 dc in same st.” and then work the rest of the row. Since every row starts with the same instructions, I used abbreviations as a shorthand so you wouldn’t have to print an extra pages. Whether you like the shorthand or not, that’s the way the pattern is written.
As another example, everywhere you see “mesh-up” or “mesh-dn”, for example, “35 mesh-up”, it means “work [Ch 1, skip next st, work 1 dc into next st] 35 times.
“Every row is a variation of double crochet stitches, with increases at the ends and in the middle chain space. Every fourth row uses either a cross double crochet or a mesh double crochet motif to add variety and texture.” So once you get through the first 8 rows, the pattern will have been completed and can be repeated from there on out.
Thanks!
ChiWei
Hi Asmaa, I block the shawl using gridded blocking squares so I can see where the triangle would be. But it isn’t necessarily a right triangle, so it’s best to just block it out for flatness, using pins to make the edges straight.
Yes, blocking can fix a certain amount of difference in the triangle sizes, but the problem is most likely in the tension you used to make each triangle. Also, once you seam the triangles together, the size difference will be less noticeable. 🙂
Thanks for your feedback Christy!
Thanks I’m attempting it now
Maria I was the same way. Until I actually sat down and tried it it’s super easy
Yes and I actually ran out on my first triangle, the very last row
No you do 2dc, chain 2 then 2 dc again in the space
Happened to me a few times and I don’t know why. I added stitches right before row m
Make a magic circle and crochet into that
I LOVE this wrap! Made one in Pegasus and now currently making one on Spirit. This may be common sense, but can I shorten the amount of rows to make a smaller version for my nieces? And do you have a suggestion on a good stopping point, after the three rows of dc or one of the cross then a dc row? Thank you the pattern is so easy to make!
Hello, I’ve got a quick question. I know you blocked all triangles together but, what method did you use? Wet, spray or steam? Love the pattern and almost done with my third triangle! Beautiful pattern, Thank you!!
Somebody help ???????????? I’ve worked the first several rounds and I’m obviously messing up somewhere. It’s folding in on itself almost like a hat. It’s not flat. One comment said to turn? But I don’t see that anywhere on the pattern. Also for row-f I obviously get the chain 3 but where does the dc go? “In the same stitch” does that mean the last stitch of the previous round or the top of the ch 3 from below… I’m so confused and I LOVE this; I SO want to figure it out!
Did you turn your work at the end of the row?
Also yes you could chain 3 them dc right into the first stitch of that row. If you are holding the work correctly it should look like a triangle
I love this pattern! I’m starting my third triangle. Once you complete the first sequence of repeats it goes fast. I’m using the color Warlock. So excited to see the finished wrap! It was intended for a gift but I may keep this one for myself and make another for the gift! Thank you!
I agree. I am baffled by the shorthand- is there any other format for this pattern?
Hi! I love this pattern! I especially love the way you wrote the Instructions! I haven’t been crocheting a full year yet and this is the easiest and best pattern I have ever followed. It saves me so much time and effort by using the “short cut” rows f, m, e and cross-stitch, mesh-up and mesh-down. You were genius to write your pattern this way. I wish more designers would use this scheme. My only issue is the hook size. I’ve just about finished the first triangle and I know I won’t have enough yarn. So I’m going to have to frog the entire triangle and start with a smaller hook. The recommendation on the mandala yarn is 5.00. I believe it will be the right size. Also, it would be helpful if you could state which crochet stitch you used to make gauge. Thanks so much for sharing this pattern. It looks like a work of art!
I used chimera! It’s like a subdued rainbow.
Thе reason being becaᥙse professional money, is seеking the
mіnimum possible levels to build up a pair Ƅefore they marк it up and then seell it back to
you. It gors withoit saуing that orrowed cash is
not risk capital – you must never use borrowed money
fоr speculative or аny other type of trading to the matter.
This is a game of survival, and you won’t survive in case you
blow your whole initial caρitwl on idiotic gambles that linje the ⲣockets of
one’s counter-party.
I started this and noticed that the first row is 6 stitches. when did 3 + 1 + 3 = 6? Is the chain space not being counted as a stitch? At least now I know to turn the work. Can’t wait to get started again.
I agree the 3 dc chain 1 3 dc does not equal 6 sorry the short hand doesnt work either! I have been crocheting 15 yrs and does not make sense. Super disappointed i had to make my own pattern.
You have to count chain stictches thats whats not making sense! I need this explained and why its short hand? Skill level easy means simple terms not refering back and forth to a stictch guide.
Hi, I wanted to now if you can make a companion video for the Adirondack wrap or allow someone else to make one. I am a visual learner and a video would be a great help. Thanks!
Help, I have finished row,5 and have 30 stitch spaces but once I can and dc it doesnt look like there are 14 spaces before the row m. Can you please help
concur. The pattern is a hot mess. Fortunately, I found someone’s project on ravelry and she summed it up in a way that actually made sense, otherwise I never would have made it. The only thing I ended up using this pattern for was the row counts
Lovely, easy and well written pattern!!
Thank you for sharing!
You have to work in rows not in rounds, so when you come at the end of your row at the front side, turn your crochet around and start a new row on the backside. Keep on doing this and make sure you make 3 DC in first and last stitch.
I started this 3 times in 3 different colours, I wasn’t happy with any of them so had to give up and order the same colour yarn you used! It’s gorgeous!
Hi! May I ask you what is the size of each triangle? Thanks!!
Hi, I absolutely love your work. I am not a new learner but I am a visual. Do you have a companion video for this pattern as well as your summer diamonds cardigan? I am still learning how to follow to patterns.
I have been looking for a wrap that doesn’t come to a point in the back. This wrap is beautiful and looks simple. Thanks.
I am a seasoned crocheter but I ‘m confused by row f, row m, row e . Makes no sense to me. Is there a hidden code?
I Think I figured it out. f,m,e is saying first,middle,end stitches throughout pattern. I will try this. Cute pattern, thanks.
Help! I’ve been crocheting for many years but I’m stuck on the very first instruction! I don’t understand the part about working the magic circle but not connecting it. I find that confusing – is there a visual for this? I did look at the video link for magic circle but that didn’t help.
What is the gauge?Is it the pattern or just a dc swatch?Do chain and then turn the row?Or do you turn and then chain?
Agreed, the macros are a royal pain in the backside! I don’t know if the paid pattern is written in such an annoyingly convoluted manner and didn’t want the frustration of paying for something I had to fix before I could use it anyway, so I copied and pasted the free pattern into a document file and used ‘find’ and ‘replace’ to put in standard pattern notation instead of trying to memorize which macro was for which stitches and locations.
Curious when do you close the magic circle?
You close the circle but you don’t join in the round. You’ll turn and work in rows, but you can still pull the beginning tail to close those stitches, and then just secure that end.
Lovely, easy peasy lemon squeezy pattern. I understand some of the challenging non-crochet terms used in the pattern. But, if it helps anyone, think of her abbreviations as F-First, M- Middle and E-End. These sequences occur on every row, and in that order of the row, First, Middle and End. Also, if you cannot do the magic circle, begin by chaining 3, then add 2 DCs in the first chain next to the hook, followed by a chain and then 3 DC’s, all in the same stitch. Then, turn and start the 2nd row with the F stitches(chain 3, DC in the same stitch), followed by a DC in each DC of the previous row/round. Next, M stitches (2 DCs, ch2, 2 DCs in the CH 2 space of the previous row). Next, DC in each DC of the previous row. And finally, E Stitches – 2 DC in the last DC stitch. Also, note, that after every 3 rows of DCs, you will either create the Cross Stitch Row or the Mesh Stitch Row, making sure the F, M, and E stitches are included. Maybe, draw up a sketch, if that help. Happy crocheting.
Need assistance on chain 3, DC in the same stitch. Do not understand what same stitch is? I am just starting to crochet. Thank you
Would it be accurate to say that the stitch counts in the parenthesis at the end of each row do not include the chains in row-m? That’s the only way I can come up with the same count in the first few rows if I am to count the ch 3 at the beginning of each row as a stitch.
Yes, that’s correct, because you’ll work into that chain space, so those chains don’t count in the stitch count.
There are not 3 dc in the last stitch
Hi! I believe she just means that you don’t form a circle after you crochet into the magic loop. In some round patterns that start with the loop you crochet into it, tighten it, and then join the last stitch to the top of the first ch 3 with a slip stitch. As this is a triangle and not a round, you tighten the loop and then turn your work to the other side for the next row. You don’t join with a slip stitch, just tighten the loop and turn.
Hope that helps…
Oh how simply genius this pattern is! Works up so quickly and shows the colours so beautifully. I’ve made 2 for myself since Christmas.i do only chain2 on the ends and i have added a border to tidy the edges but love, love, love it. Alwaya so jelly when i see how some people come up with such great ideas
I cant love this wrap any more! It’s so beautiful and was so fast to work up. The F, M, E thing screwed me up for a minute just because I wasnt used to the terminology but once it clicked I was off and stitching. Thank you for sharing and creating this piece.
Thank you so much for this awesome pattern! I’ve been looking for a shawl pattern without the point in the back and this one is great! I was confused for a few minutes on the “row f, m and e” but it ended up making it very easy to remember. Also, since the pattern is a very easy repeat, there was no need to keep looking back at the pattern. I will be making lots of these in many different colors and different weights of yarn for sure! I have one triangle done and getting ready to start second and I just started making it yesterday! Thank you again for a wonderful pattern!
Thank you so much for a brilliant pattern easy to follow and a quick project and once you know the pattern you don’t have to keep looking at the pattern
I do have a question if you use a light weight yarn to make a scarf how much yarn do you have to get
Thank you very much, I’m glad you enjoyed making it!
The amount of yarn you would need for a scarf would depend on the stitch, hook size, and finished dimensions. For a wider wrap like my Throwback Wrap you need 1450 – 1700 yds. There are some resources that you could google that give a guide of how much yarn you need for various items with different weights of yarn.
Please make a companion video! 💜 once I can watch how to make the rows I’ll be fine, but I’m so visual in how I learn that a video would be amazing. Thank you!!!
I’m having an issue with Row 8, the first mesh-up/mesh-down row. I’m starting with the correct number of stitches, but when I do the mesh-down I only get 10 sets before the final two stitches at the end of the row. Is there a typo there?
I don’t believe so. There should be 24 sts on either side of the middle – 11 sets of mesh, 1 st at the beginning and 1 st right before the middle tip.
As soon as you know the pattern it’s very easy . Thank you so much for the pattern . I am working on a this wrap for over my wedding dress . Getting married in March and it’s still snowy and cold here by than . Thank you again for now completing my look .
Hi, I am having a difficult time with row 1 and two. could you explain what size of magic circle and how to dorow 2 and 3. .Thank you. I thought your instructions seem clear but I am not getting the correct number of stitches. Thank you
Hi! The magic circle should be adjustable, not a set size – you can pull it tight by pulling the tail end of the yarn. Click here to see my guide to a magic circle. After you make the magic circle, ch 2 for height, dc 3, ch 1, dc 3. Don’t join. For row 2, you refer back to the different rows above (ie row f). But you will ch 3 (counts as a st) and dc in the same st. Work 1 dc each in the next 2 sts, work [2 dc + 2 ch + 2 dc] in ch sp (this is row m), 1 dc in each of next 2 sts, work 2 dc in the last st (this is row e). Hope that helps!