
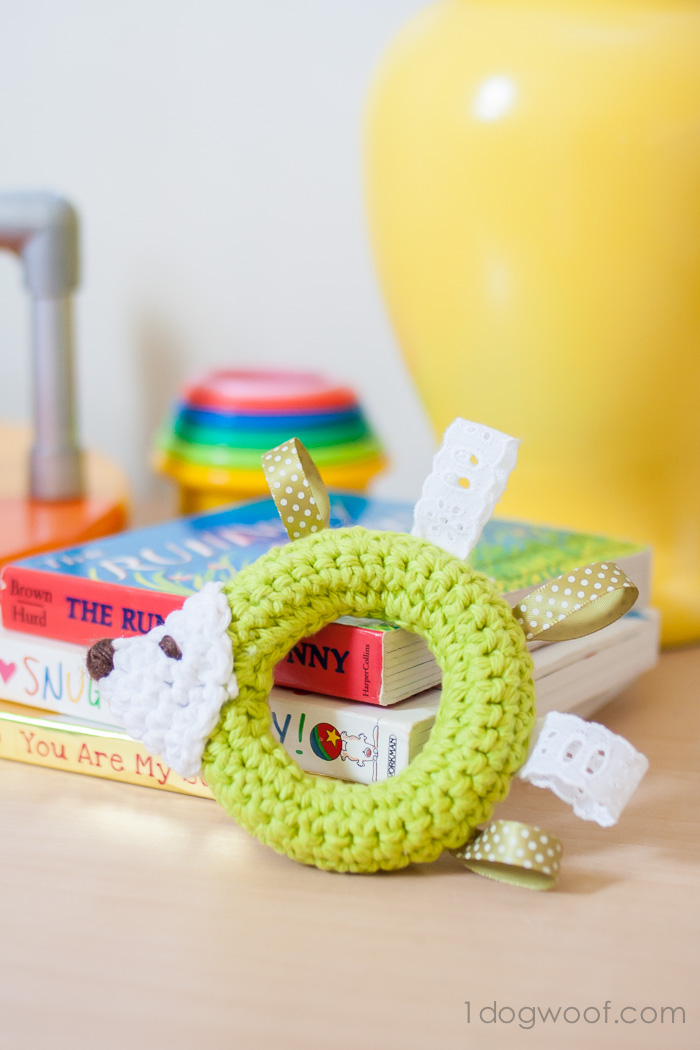
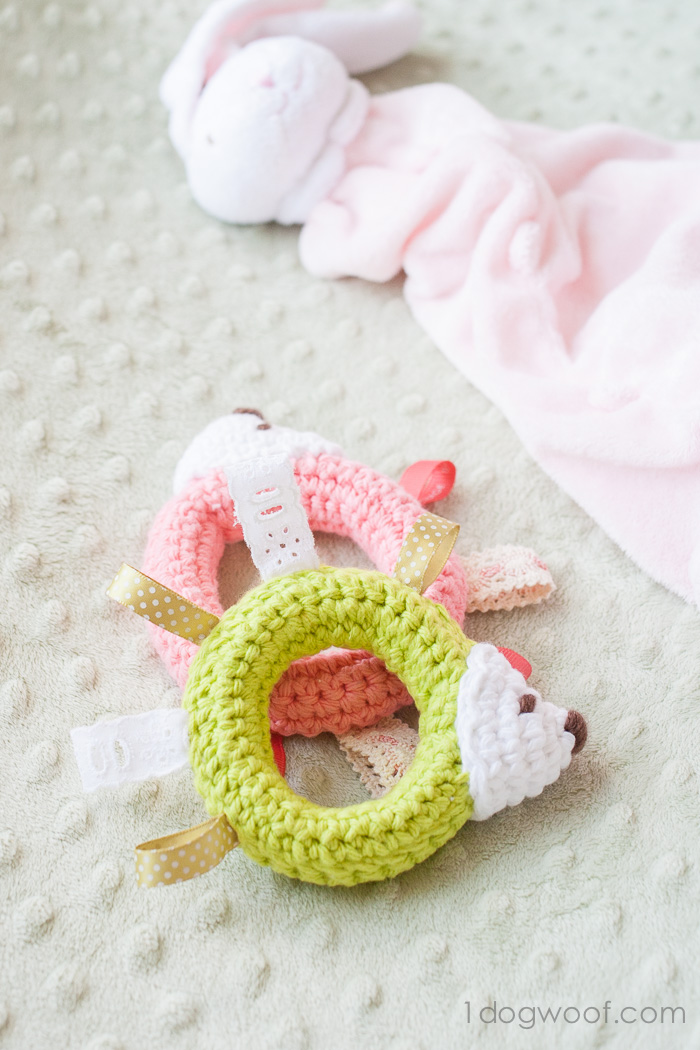
There I was, sitting on the sofa, completely out of inspiration. I look down and see LM playing with the zipper pull on my fleece. When that was over, she looked around for something else to stuff into her mouth. Teething, I get it. My life is one big slobber ball. Burp cloths dot the living room landscape like damp tumbleweeds. Attractive, no? But it gave me inspiration to make this hedgehog taggie baby toy, so maybe LM won’t gnaw on my knuckles as much!
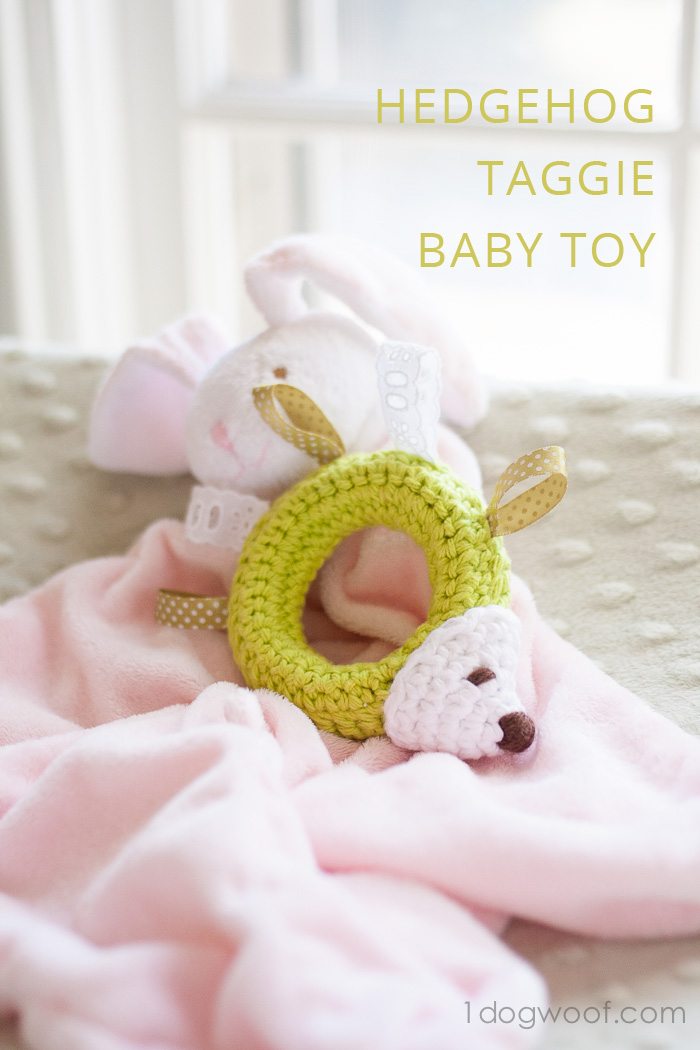
My pattern is inspired by this hedgehog teether, but I knew I wanted to use ribbons instead of crocheting the whole thing. I’m a sucker for mixed media, and my daughter is a sucker for tags. Hmm, sucker. Literally.

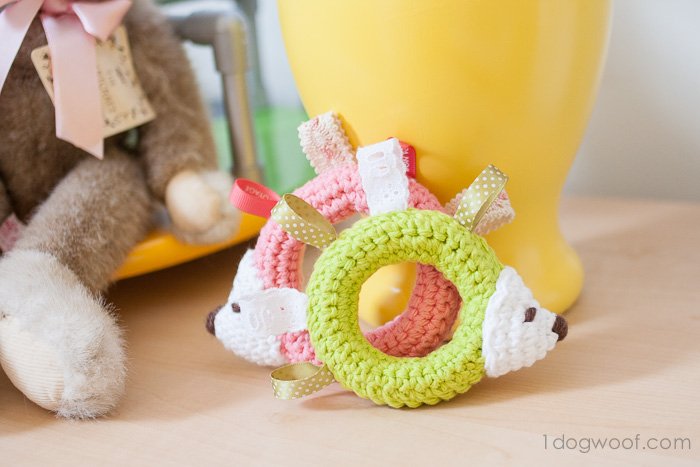
This project took me a while to figure out. My first try came out a little lopsided, but attempt number two came out much better, so that’s what I’m teaching you today. Let’s get started!
I’m trying a bit of a pictorial this time around, since I found it a bit hard to explain (to myself) what I did.
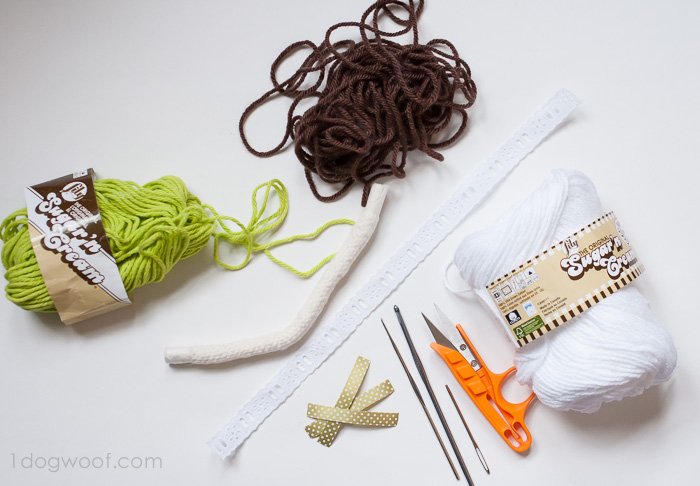
You’ll need yarn, of course, and the usual crocheting implements. You’ll also need the ribbon for the tags. For the stuffing, I chose to use a 1/2″ cotton piping which I magically found in my stash. I imagine regular ol’ polyfill should also work, but this tutorial assumes you’re using piping. I think I bought mine at JoAnn’s, but who knows really.
The ribbon pieces should be cut a bit longer than twice the length of the desired tag, think of it as a seam allowance. So, if your tag is 1 inch, then you should cut the ribbon to be maybe 3 inches. Ok, off to the pictures! And don’t worry, the entire pattern is down below.
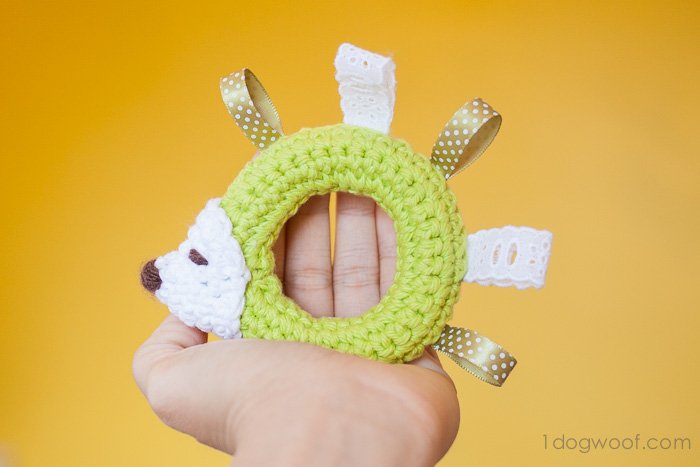
And ta da! There you have it! No, not really. All you have right now is a ring with no head, but it’s a lovely ring.
Here’s the full pattern:
Supplies
Lily Sugar’n Cream Cotton yarn in white, brown, and color of choice
Size F crochet hook
Yarn needle
Scissors
Sharp Crochet Hook or pin for poking holes in the ribbon
5 pieces of ribbon for the tags
9 inches of 1/2″ cotton piping
small amount of fiberfill (optional)
Instructions
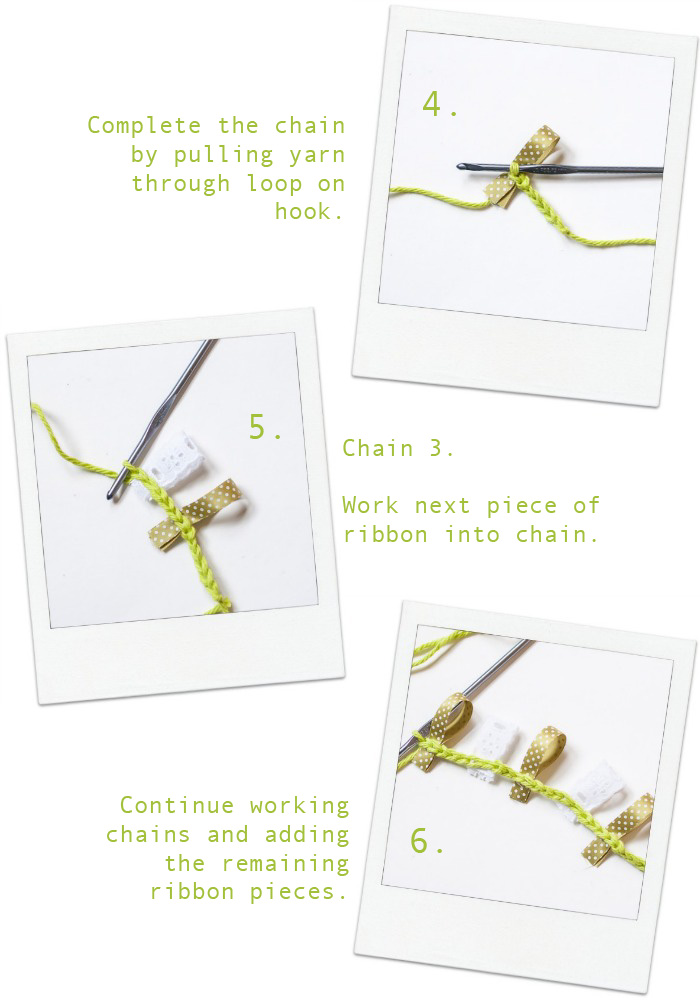
1. Chain 6.
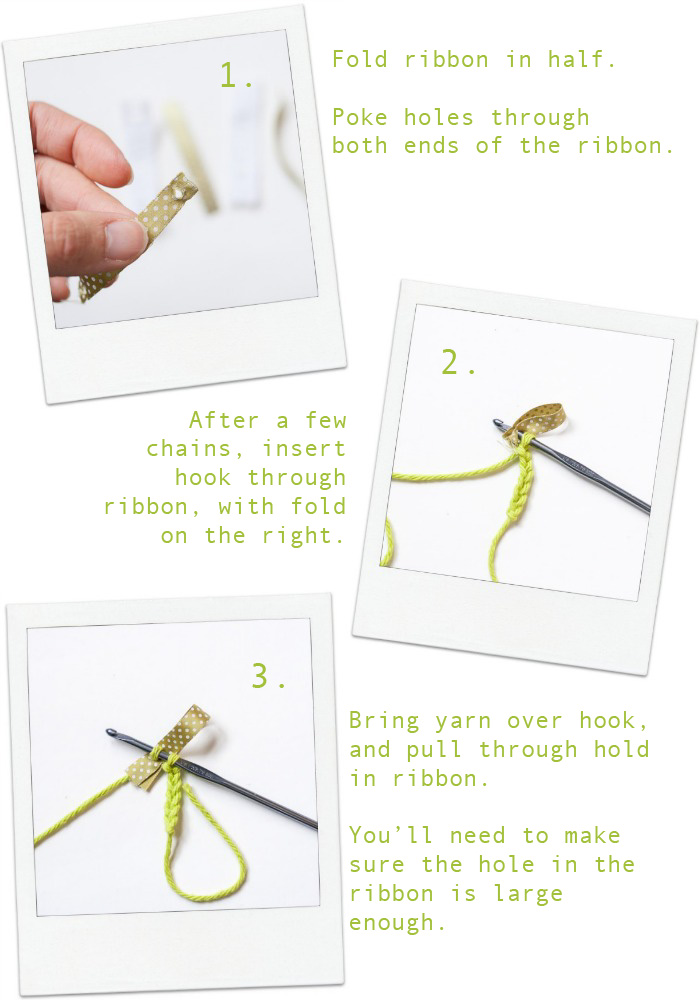
2. *Work 1st piece of folded ribbon onto chain. Chain 3.* Repeat until all 5 pieces of ribbon are worked onto chain.
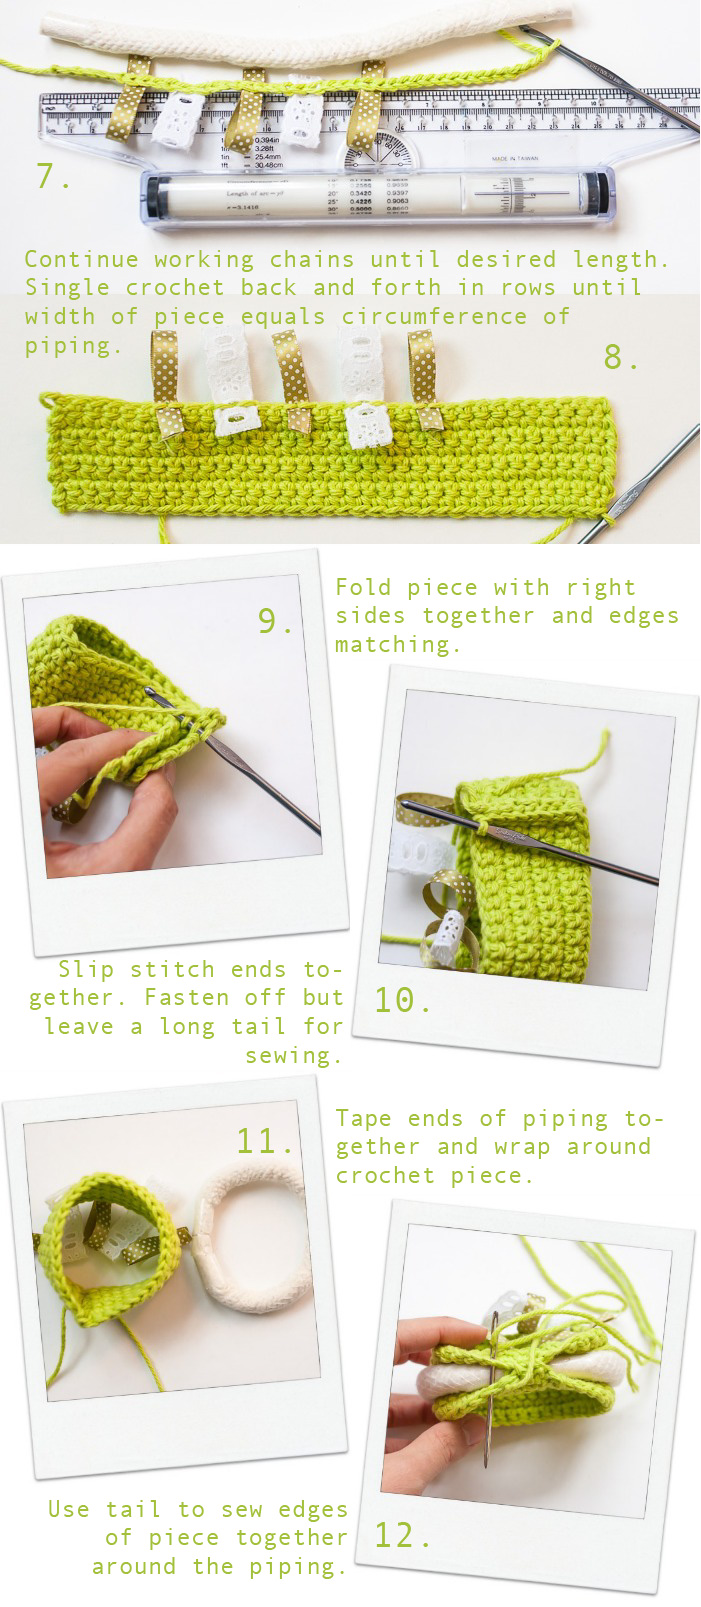
3. Continue chain until total number of chains is 36. Turn. (36 sts)
(Note: The number of stitches will depend on the length of your piping and how big you want the ring to be.)
4. Row 1 – 8: SC into second chain from hook. Work 1 SC in each stitch across. Chain 1. Turn. (36 sts)
(Note: I used 8 rows, but the number of rows will vary depending on your gauge and size of piping. The crocheted piece needs to wrap around the piping, so you’ll need to check as you go.)
5. Fold piece cross-wise with right sides facing each other, wrong sides facing out. Align the rough edges.
6. Slip stitch through both edges/ends across the width of the piece.
7. Fasten off. Cut yarn but leave a very long tail. The tail will be used to close the seam around, so make sure you leave enough yarn to get you home.
8. Tape the ends of the piping together to form a ring.
9. Put the piping ring around the outside of the crochet piece. The wrong side of the crochet piece should be touching the piping.
10. Use the yarn tail to whip stitch the crochet seams together, and enclose the piping. It may be helpful to count your stitches before you start so they line up correctly. You’ll be stitching through the ribbon tags, with the ribbon allowance being tucked into the piece.
11. Fasten off, and weave in ends.
Head
Round 1. With white yarn, SC 4 into a magic circle.
Round 2. *SC 1 in next stitch, sc 2 in next stitch.* Repeat from *. (6 sts)
Round 3. Work 2 SC into each of next 3 sts. SC 1 in each of remaining 3 sts. (9 sts)
Round 4. Work 2 SC into each of next 3 sts. SC 1 in each of remaining 6 sts. (12 sts)
Round 5. Work 2 SC into each of next 3 sts. SC 1 in each of remaining 9 sts. (15 sts)
Round 6. Work 2 SC into each of next 3 sts. SC 1 in each of remaining 12 sts. (18 sts)
Fasten off. Cut yarn, leaving a long tail for sewing.
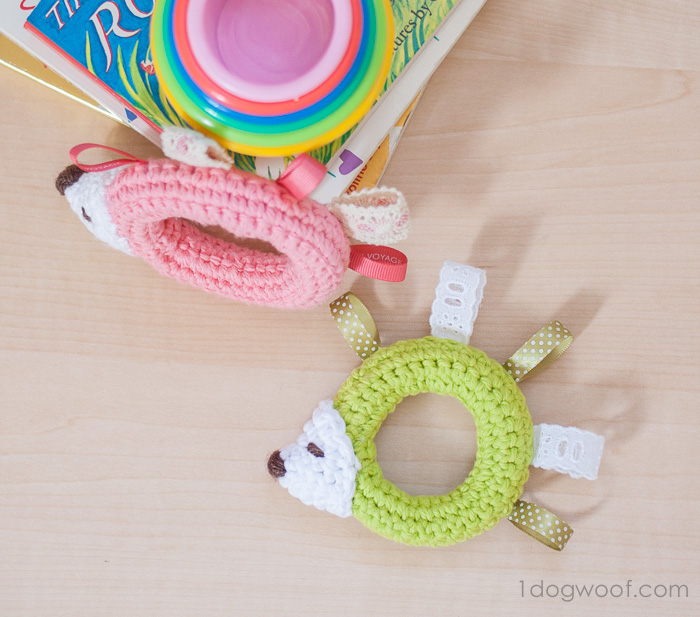
The head is a lopsided cone, and should be positioned with the nose upwards. Use the brown yarn to embroider a nose where the magic circle is. Add eyes with the yarn, or use safety eyes.
Using the white yarn tail, attach the head to the ring where the joining seam is. Optionally, you can stuff the head with a bit of fiberfill to give your hedgehog some puffy cheeks.
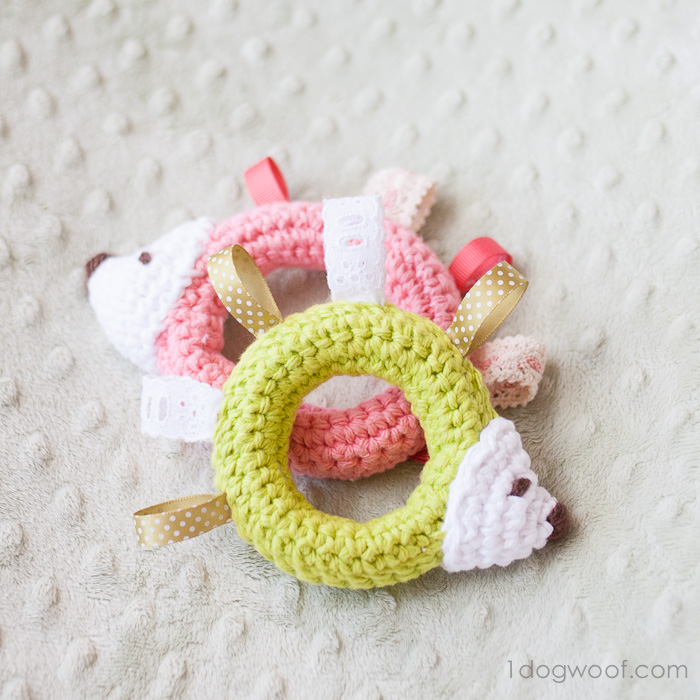
Wouldn’t this be great for a baby shower? And I didn’t have to pull out the sewing machine for it either, hurrah!
I’ve got some other baby gift ideas too, both using crochet and without, so check them out before you go!


Ridiculously cute, ChiWei! Can’t wait to make one for Darcy! (And I love how you did your photo tutorial–so cute and easy to follow.)
very cute project and would love to make it but wonder about using pipe cleaners and if there was any substitute (or could I just not use it)… simply because they also contain metal and wondered whether in time it would rust from baby’s saliva and the constant need to wash it…
Hi Karen,
There are no pipe cleaners in this project. The filling is cotton piping, or welt cording, usually used as trim on sofas and chairs. I think most quilt shops or fabric shops should sell them. I’m not sure if they go by any other names. No metal for baby 🙂
Thanks Rachel! I figure the whole ribbon with crochet thing gets a bit involved, so the pictures might help 🙂 I hope Darcy loves it!
So so cute!! Shared it today 🙂
Love this pattern! I just made one and it turned out great! One question. My neighbor asked if I sell them and I wanted to know if it’s ok to sell items made with this pattern?
aye yi yi that is so cute. What a great idea. Oh, and so beautiful baby. 🙂
Thank you so much for posting this! I can’t wait to make one!
Piping is great for so many things!
Cute pattern! What kind of tape did you use? Thanks!
Thanks Shirley! Do you mean to tape the piping together? Just normal scotch tape. 🙂
You’re welcome!
Thank you!
Thank you Tiffany! Yes, go right ahead, sell and share the love! If you are selling online, I just ask that your listing gives credit back to this post and pattern.
Thanks Kara!
OMG that is soooo cute im getting my supplies right now to try it out for my grandaughter thanks so much for the pics in the pattern makes it sound so easy 🙂
Just thinking that maybe you could use wooden curtain rings as babies love something hard to chew ??
That’s a great idea! I don’t know where to get wooden curtain rings though – if I find them, I’ll definitely give that a try!
Haha thanks Julliann. Enjoy!
Seriously this is so cute! I just love it!
Ha, thanks Emily!
very-very- very cute and nice toys))
Ingenious method for joining the ribbon! Awesome idea. Thanks so much for sharing.
Great idea – I must make one for my grand-daughter. Love the way you attached the ribbon – now what else can we add tags to………hmmmmm
Love this and will definitely be making one for my baby arriving in about 6 weeks!
Congrats Nicole! And enjoy!
I know! That’s what I keep thinking too 🙂 What else can I add ribbons to? And can I go shopping for more ribbons?
Thanks Michelle!
Thank you Olga!
this is such a sweet project. The pictures are so helpful…makes me think even I could do this!
Thanks Nancy!
Soooooo very very 😉 cute .thank you so much (~ ~)
You’re welcome!
This is really too cute! I know a mama expecting in June, this would be really good! Bwt thanks for linking up at Tamara Kelly’s party. I would never have found you otherwise.
THANK YOU FOR A FREEEEE PATTERN!!!!!!!!!
You’re welcome!! Thanks for stopping by 🙂
Oh this makes me want to learn to crochet!!!! So very sweet!
Wonderful and adorable pattern. Think I’ll make some just to have on hand for the next necessary baby gifts – thank you!
This is adorable!!! Thank you for sharing it!
Hi ChiWei .
Love the patt. Is it a cotton wool ,I cant get sugar and spice where i live
Thanks phil.
adorable! thanks for sharing!
You’re welcome!
Hi Phil, yes, it’s cotton yarn so it doesn’t fuzz or pill when babies chew on it.
Thank you!
I had wondered the same thing. I think it’s a U.S. thing as we think of Cotton Piping as a pipe cleaner. I was thinking however that a plastic ring would work great for this. Or those plastic zip ties even. Just another idea to pull around your mind.
Karla
Thank you so much for sharing this adorable tutorial!! I am making two, one in orange and one in blue for my cousin’s baby shower!! Love mixing the yarn and the ribbons 🙂
Love this…. Just made a few for baby shower gifts.
Thanks Sylvia! I hope the recipients love them!
The possibilities are so endless and so much fun, aren’t they? Makes me want to buy more ribbon, but my husband would kill me…
This teether is absolutely adorable! 🙂
I’m wondering if I made these out of flannel….what size circle would I use?
Thanks a lot for sharing your beautiful works with us!!!!
You are a super-woman! ))
Aww, thank you so much Maria!
The teethers are precious. Thanks for sharing!
I made it today for a vriend I only thake a cotton yarn and made a cord of it .
It worked perfect.thanks.
Hi there,
For some reason I am really struggling with the head. I am only a beginner crocheter and have done the body absolutely perfectly but not so much the head. It just isn’t working at all!
Is there any chance you can do a photo or video tutorial on how to do the head? Or is there a tutorial somewhere that you know of?
How did you do the nose? can you make a video or post pictures?
Quick question…have you washed this? If so, how did you do it? DId you hand wash and hang dry, did you machine wash and machine dry? I’ve made a couple, I don’t have anyone having babies yet so my daughter claimed them for her dolls. Ha, mostly I made a couple to see if I could and they are so cute, I’ll be making more. I liked the idea of a wooden ring that someone mentioned, again, how would you wash it? Babies chewing on this are going to make it icky after a while. I just wondered if you’d done that yet before I try a few ideas. No sense in recreating the wheel if you have already done it. 🙂
Yup, I’ve washed it. Handwash, lay flat to dry. A good teether-quality wooden ring shouldn’t have any problems getting wet either.
Hi! I don’t have a video for this, as I am just starting my video-making journey! Thanks!
Super cute baby shower gift plus well written directions (with a little help from YouTube for magic loop) made this newbie crocheter jump right in! I am using things I have in my “left overs” drawer from other knitting projects and gift wrap. I think the only thing I have to buy is the cord! Thanks so much!
This post is on 11 spot in google’s search results,
if you want more traffic, you should build more backlinks to
your posts, there is one trick to get free, hidden backlinks from authority forums, search
on youtube: how to get hidden backlinks from forums