
I’ve seen a lot of crocheted and woven and braided rugs out on the internet; it was even one of the first things I pinned to Pinterest, but I never got around to trying one of my own until now. I always thought it was going to be difficult, but actually, it’s really quite easy, and no fancy instructions needed! Here’s how I made my own crochet rug from repurposed t-shirts!

Step 1. Acquire fabric. In this case, I used XXL men’s t-shirts from Goodwill. Choose t-shirts that are mostly or 100% cotton, and have no or very little print on them, preferably, only above the arm line. You’ll also want the fabric weight to be fairly consistent, so don’t try to pair up a Hanes t-shirt with a paper thin cotton shirt from BR.
Step 2. Create your yarn. There are oodles of t-shirt yarn tutorials out on the internet. Feel free to choose any one of them, or try this one on for size. Cut the shirt below the arm line and below any print (hence the no or little print rule). Fold the t-shirt from one side to the other side but leave it about 1 inch short from actually meeting ends – this is your 1 inch allowance. Now cut the t-shirt into 1.5 inch strips, avoiding the 1 inch allowance. Thicker strips will give you thicker yarn. Thinner strips give you thinner yarn. Don’t cut too thin, or the yarn won’t form. Open up the shirt to see your 1 inch allowance. Cut starting from the hem, on a slant, from 1 strip to the next across the allowance – this connects all the strips together.
The basic idea is that the shirt is already in the round, so you’re cutting a continuous strip from the bottom hem up to the armpit. Actually, remove the hem before cutting – it doesn’t curl well (or, at all). Once you have the big strip, stretch the strip and allow the knit in the t-shirt to curl in on itself, thus creating the yarn.

Step 3. Ball up your yarn. This is actually pretty important, but once I started to crochet, I realized I twisted the yarn as I balled it, so there was a lot of tension. I ended up unraveling the whole darn thing before crocheting, which kind of defeats the purpose of balling it up in the first place. C’est la vie.

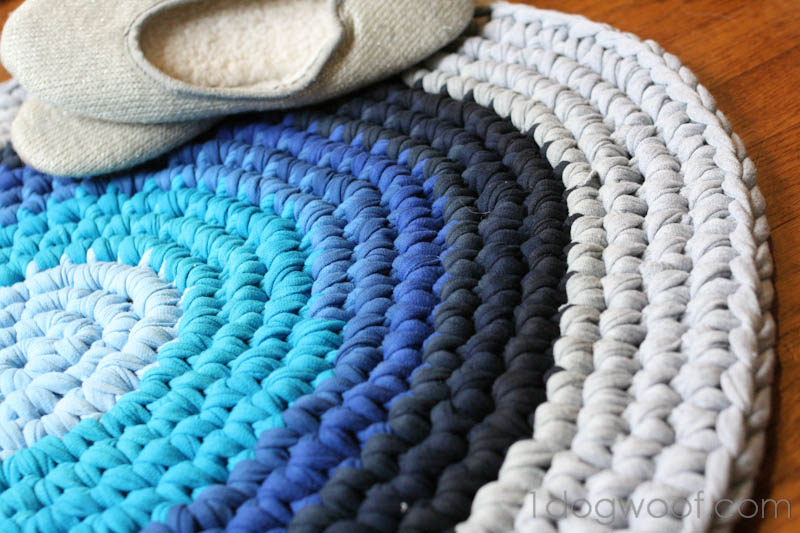
Step 4. Crochet. I used a single crochet here for a dense weave. You’ll be crocheting in the round, so start either with a magic circle or the Chain 2 method. Both are described in this post. For a quick look at the single crochet, head over to this post, or check out the other crochet tutorials I have!
I used the largest crochet hook I had on hand, which was a size Q and started with 6 SC in the first round, doubled it to 12 in the second round, and slowly increased by multiples of 6 beyond that. In retrospect, I think I would also try starting with 4, doubling to 8, and then actually counting my way around.
1st round: 6 SC
2nd round: 2 SC in each stitch (12 stitches)
3rd round: *1 SC in next stitch, 2 SC in next stitch, repeat from * (18 stitches)
4th round: * 1 SC in next 2 stitches, 2 SC in next stitch, repeat form * (24 stitches) and so on.

Or, you can be like me and just make it up as you go, increasing as necessary to keep the piece flat. If the work is curling up, you need more stitches in the round. If the work is ruffling, you can either take it apart and not increase as many stitches, or do a round with no increases, sort of to bound the problem. I also tried to alternate where I made the increases so as to keep a circle shape. I’ve noticed that if I increase in the same spot each round, I end up with a polygon instead of a circle because of the bulge that extra stitch makes.
When you’ve come to your desired size, or to the end of your t-shirt stockpile, pull the end through the last loop and pull tight. Then weave in your ends.
Sorry this isn’t a very detailed tutorial, nor is it a class on crochet. My mind wasn’t really focused last week due to some family issues and this was an easy mind-numbing project!
If you’d like to see more UPCYCLED inspiration, check out these projects from my favorite girls, I mean, #MyFavoriteBloggers!

Crochet Rug from T-shirts from One Dog Woof
Rustic Mason Jar Vase from Suburble
Upcycled No-Sew Fun for Kids from Creative Capital B
Wipes Container to Craft Storage from It Happens in a Blink
Fabric Crochet Coaster Pattern from Petals to Picots
Upcycled Newspaper Beads from Do Small Things with Love
DIY Silverware Kitchen Clock from The Benson Street


This is AWESOME! I love the colors you went with. Hope things are better for you this week. 🙂
This is GORGEOUS! I make a similar rug with shirts but I don’t make a ball of yarn. I suppose that’s why yours looks so much better than mine!
I LOVE THIS! Looks awesome!
awesome! I am pinning this one! The colors your choose are great!
This is absolutely gorgeous. Wow, you crocheted your own rug. How many of us can say that?! Hope this week is better for you!
nice rug!!!
This is beautiful
i would love for you to join us at our weekly link up
hope to see you there
xx
http://live-love-laugh-interiordesign.blogspot.com.au/
Gorgeous!
That is awesome. I sure have a lot of old shirts around here- now I know what to do with them.
Very cool Chi Wei. You never cease to amaze me.
Your rug looks fabulous! I have been wanting to make a crochet rug for months – but never had the time to figue it out, so thank you!!!
The blues you choose for the rug look so neat. I have been working on a braided rug from old t-shirts. Since I have been handsewing the rug together it is taking a really long time. I like this idea much better.
My grandmother used to make these – room size, too, if you can believe that. But this is sew beautiful – thanks for sharing.
So super cool! Love the idea of recycling and creating something new and improved!
We’d love for you to link up to our new weekly blog hop- photo friday- any of your fav. pictures from any posts are welcome!
Love LOVE this! It looks so pretty with the gradation of colors you’ve used. Thanks so much for sharing! Found you from tater tots and jello.
This is so cool, you did an awesome job!! thanks for sharing.
Wow! That’s incredible! I would love to try this some day!
This is a fabulous idea and the results are beautiful. I love all things recycled / repurposed. Fantastic!!
<3 Christina at I Gotta Create!
Wildly Original Round Up party is open!
Very awesome looking,with the blues done that way. Have a wonderful weekend.
http://jennylynndesignz.blogspot.com/
What a great way to reuse old shirts! Would love for you to come visit my Get Social Sunday link party and show off your awesome blog!
http://alivedinhome.blogspot.com/2012/08/get-social-sunday_18.html
This kind of project is exactly why I want to learn to crochet. Maybe someday . . .
Oh man, this is great! I NEED to learn how to crochet. Beautiful work!
Featuring YOU today! 🙂
Ginger @ gingersnapcrafts.com
http://www.gingersnapcrafts.com/2012/08/take-look-at-you-my-favorites_23.html
Love this rug!!
This is gorgeous! I would love to feature this on Reduce, Reuse, Upcycle. Feel free to stop by and grab a featured button. Thanks!
Amazing stuff, even i wont find any idea before, but now i will definitely try to make rugs from my useless hanes t shirts stock
This is gorgeous!
This is a really great idea 🙂 I will finally use up all of those old T-shirts. I just have one question, which hook size did you use? thanks!
I used a big blue one, I think Q?
The big blue one..I had to laugh 🙂 well Q is the biggest one around.. I’ll have to get it..thanks for the answer 🙂
All of these are really cool shirts! stay cool and feel comfortable with cool color cheap tees to look adorable and
smart!
design a t shirt
print on shirts
digital t shirt printing
custom tee shirts
create t shirts
Featured in my blog. First pattern featured.
http://lifeasthedomesticduchess.blogspot.com/
I love this tutorial!! Thank you so much! I can’t wait to go gather some tshirts now and get started! One question, and you may have already answered it but that’s a lot to read, LOL…what size hook did you use? Never mind…just saw where you already answered that!! Thanks again!!!
I actually went out and bought a crochet hook specifically to follow this tutorial because I love the design. Mine doesn’t look as good as yours, but I’ve only been crocheting for a day, so I don’t expect it to be exactly picturesque. =P
Thanks for the tutorial; this is just the sort of project I needed.
Thank you for this tutorial! I made a ton of t-shirt yarn, and was looking for a round rug tutorial! I excited to get started
This is just what I needed. Thanks for sharing!
I LOVE this!! I need one in my front hall – maybe with some anti-skid spray on the bottom… 🙂
Bev Q
http://www.bevscountrycottage.com
Oh, how pretty this is!
Thank you for sharing 🙂
Hugs
Frida
http://fridaspeach.wordpress.com/
Very cool. How many shirts did you use to have the amount of yarn for your rug? And how big was your final product?
Yes, how many t-shirts did you use for this rug? I need to make a 4 or 5 foot diameter rug. I love crocheting and can’t find an outdoor run I like. This one is perfect!
*rug*
Hi, I think I used about 12-15 mens xxlarge t-shirts, and the rug came out to maybe a little over 2 feet in diameter. I’m sorry I can’t remember exactly, but because you don’t use the whole t-shirt, each shirt doesn’t go very far, especially as the rug gets larger.
These are really nice and really a productive use of men’s t shirts .This is really creative.
http://www.apparelnbags.com/mens-t-shirt-cotton.htm
it’s really great creativity. It’s an perfect example of best from west. Such a great innovative thinking about to use t shirts.
t shirt screen printing
I love to go to thrift shops to repurpose things just because. This is just beautiful. About how many shirts did you use?
I love to go to thrift shops to repurpose things just because. This is just beautiful. About how many shirts did you use?
I used 12-15 mens xxlarge t-shirts.
ChiWei, I LOVE this rug….what great project and a great use of t-shirts! Genius!
I love this! I have a bunch of old ones and will now go out and scour thrift shops for more. I have one question though. How wide did you cut the strips for your rug?
Using the same concept, CLEAN tube socks cut into strips make very hefty potholders! I was given a bag of trim pieces from a sock factory years ago, and made some of the thickest, most durable potholders/hot pads I’ve ever seen. I would recommend using a metal potholder loom instead of plastic. (Likewise, the loom hook needs to be equally strong.) Potholders made from sock strips are stouter & more challenging to work with than nylon potholder loops, but there’s no comparison to the quality of the product!
Thank you Debbie! I think cut the strips around 1.5 inches wide. It’ll depend on how fine you want the crochet to be. I did find that 1in strips rolled up two small, and 2 inches tended to get too bulky to crochet properly. But it’s personal preference!
So what size of hook do I use for this?
Hook size was ………?????????????
Hello just wanted to give you a quick heads up.
The words in your content seem to be running off the screen
in Safari. I’m not sure if this is a formatting issue or something to do with internet browser compatibility but I thought I’d
post to let you know. The design look great though! Hope you get the issue resolved soon.
Thanks
Did you cut the circles in two so you had long strips
I saved all of my son MATT’S t-shirts – he passed away 5/24/2012. I will be making t-shirt necklaces and I think I will also try this rug.
I have 2 huge plastic garbage bags of his shirts, so think I will get a lot of yardage from them.
I’m so sorry about your son’s passing! But those 2 big bags of shirts will definitely be able to produce something beautiful to honor his memory!
I’m totally blown away! This is so neat. Instead of throwing away old tees, I’ll be doing this instead!
Thanks Meghan! I’m waiting for my husband to start discarding tees so I can make a crazy colored one. Although with guys, the colors are all in the grey/green/blue family anyways. Glad I inspired you, and thanks for coming by!
I was wondering how you stopped it from folding up? I been trying and mine folds up like goes all crinkled? Thanks Lady Ukkey
What do you mean folding up? It’ll all depend on the number of stitches you have in each round. If there’s too few, the rug will curl up. But if there’s too many, you’ll start to see ripples and the edges kind of bunch together. It takes a little experimenting. Hope that helps!
My mom saw this (from the blog hop) and told me that she’s going to start collecting t-shirts to make it. It’s a hit!
Love this upcycle, ChiWei! 🙂
Aww thanks Tara! I want to collect more t-shirts to make this, but my husband will think I’m a hoarder…he might already think I am one…
Fabulous project! I have a friend recovering from a massive stroke. She’s lost the use of her left side, but recovering. I really think this will be a good project for us to share, to help her have victory!
Thank You so much for sharing this. ♡
Love this, but need a picture to figure out how to make the diagonal cuts across the 1″ portion that keeps the shirt in oe single strand for crocheting.
It occurred to me while reading this post that, old flannel sheets would also work well for crocheted rugs. In fact, not just flannel but any old sheets or pillow cases. Dang! Now I have to go find our old sheets.
They should! I wonder if the sheets would fray as you crocheted, so if you do it, let me know, because I’ve got a lot of old sheets hanging around!
This article gives clear idea in favor of the
new visitors of blogging, that really how to do blogging.
I think it is a wonderful idea but as a beginner, I’m just not grasping the idea of how to cut the t-shirt. Everyone knows what a ball of yarn/material looks like so I guess I would of preferred to see a picture of the shirt cutting in some stage. I’ve got lots of t-shirts that my son outgrew and I’m sure he would love a rug in his bathroom made out of his old shirts.
Know that we support you in prayer.
Thanks Carol! I think I’ve got some photos hanging around that I can use for a cutting tutorial, so stay tuned!
Thank you for posting the free rug pattern! It is fabulous:) I have included it on my blog Karla’s Making It (linking to your pattern, of course)! You can view it here http://www.karlasmakingit.com/free-crochet-patterns/free-crochet-rug-patterns
How do you get it to NOT curl while you are making the rug in rounds… I have tried everything I could think of and it just wont stop curling.
Thanks in advance!
If the rug curls, it’s probably because there’s too few stitches in the round. If it flutters along the edge, that means there’s too many stitches. Hope that helps!
Hello,
I am wondering about the tension you used?
Thanks! Beautiful work!
I don’t normally think about tension, to be honest. But in this case, I’d recommend to keep it loose so the rug stays flat.
So cute! Recycling old t-shirts this way and making an absolutely different item (a rug in this case) out of them is so clever idea. Thank you for this smart tutorial. Links are great too!
Hello there, You’ve done a fantastic job.
I’ll certainly digg it and personally recommend to my friends.
I’m confident they will be benefited from this site.
Hi I just stumbled across this and think it’s great. Exactly what I need for my spare room! I am just wondering if you know how many t-shirts you used and approximately how big your rig was at the end?
Not sure how many shirts to buy, I need a pretty big rug 🙂
Hi I just stumbled on this post and it is great! Just what I need for my spare room.
Do you know how many t-shirts you used? And approximately how big your rug was at the end. I have to do a pretty big one and wondering how many t-shirts to buy.
I made an oval rug like this by starting with a chain of 12 to 15, or approximately 18 inches. If I made it again I would mark the 18 inches as I go, so the increases would be in the circle part of the rug. When I learned to cut the T-shirt my directions said to practice on a plastic grocery bag by cutting off the bottom edge. This was a smart idea as I could see what was going on and how it looked after the cutting. When I wound my “one inch” strips into a ball I kept the strips flat. As I crocheted, it curled just right. I did keep turning the ball to keep the strips straight. When I added the next ball I overlapped the strips about an inch or so and sewed them with a needle and thread rather than tying them. With strips an inch and a half you don’t tie a small knot. There is also a lot of lint as you make this rug, but it was fun.
wow – beautyfull rug, I am also using cotton for my rag rugs
Hi ???? I just started making this rug and there are a lot of spots where you can see the seam of the tee-shirt (where it’s sewn together on the sides). I don’t see any seams in your rug. Did you notice this was an issue or am I maybe doing something incorrectly?
Thanks
I do see the seam occasionally, I just ignore it 🙂
Thanks ????
Love your choice of colors!
Can you explain how you did stripes without the “jog” or “seam” of the color change showing? I’m assuming you crocheted in a spiral rather than joining each round since I don’t see a seam from that. Thanks so much!
How many tshirt did you buy and Wht diameter is it
I bought 15 of the largest Mens tshirts I could find. The rug is about 2 feet wide.
Hi Bev, there are jogs where the color changes – you can see it if you look closely. 🙂 I just ignored it kept right on truckin’.
===========================================================================
High Quality Silk Screened T-Shirts – Shipped Daily
This is our gift to you, oh beautiful world. Nowhere on the internet will you find such a large variety of quality printed t-shirts at such a ridiculously low price. While other online t-shirt businesses charge three times the price, and deliver one-third the quality, click here to read more ..
I love these colors! I have a whole stash of old t-shirts that I’ve been trying to cut up for ages (I have two boys under age 3 and lots of distractions!), intending to make a rug of my own. Seeing yours is inspiring me to get back to it! Thanks!
I don’t know whether it’s just me or if perhaps everybody else encountering problems with your site.
It appears as if some of the text on your posts are running off
the screen. Can somebody else please provide feedback and let me know if this is happening to
them too? This may be a issue with my browser because I’ve had this happen before.
Many thanks
Body jewelry has never been in such high demand.
Nevertheless, for optimum results, use equal elements water and ammonia
in your answer.
Cool
This is great! I do it with my old clothes, i have two young boys and the accumulation of shirts is not stopping. 😉
I Love This And Likr Your Blog Too Much
Thank you for this amazing tutorial! I’ve made so many types of Rug but this is the best by far.
Nice article! You shared such a great idea to Repurposed old t-shirts or any clothes. Your crochet rug is amazing. I definitely gonna make one for through your instructions. Thanks for sharing.
Excellent article. I’m facing many of these issues as well..
I have made these for years from family shirts. I use all I can, so cut sleeves too, and where hems are wide, cut those rounds also. To connect my strips, I cut a slit in each end. With ends of two strips in hand, slip one the through the other, then slip one of the far ends through. Pull tight. You can carefully trim a bit to round edges. Although there are still “bumps”, this means no knots.
Gd day miss. I like very much yr table clocth crochet wit pineapple .can i get that nice tablecloth pattern?thank you
Hello,
I love this rug! Is there anyway to make it an oval?
Thank you,
Liz
Yes, you can make an oval. My advice is to search for crochet oval on Google, and follow existing patterns.
cool good for you