
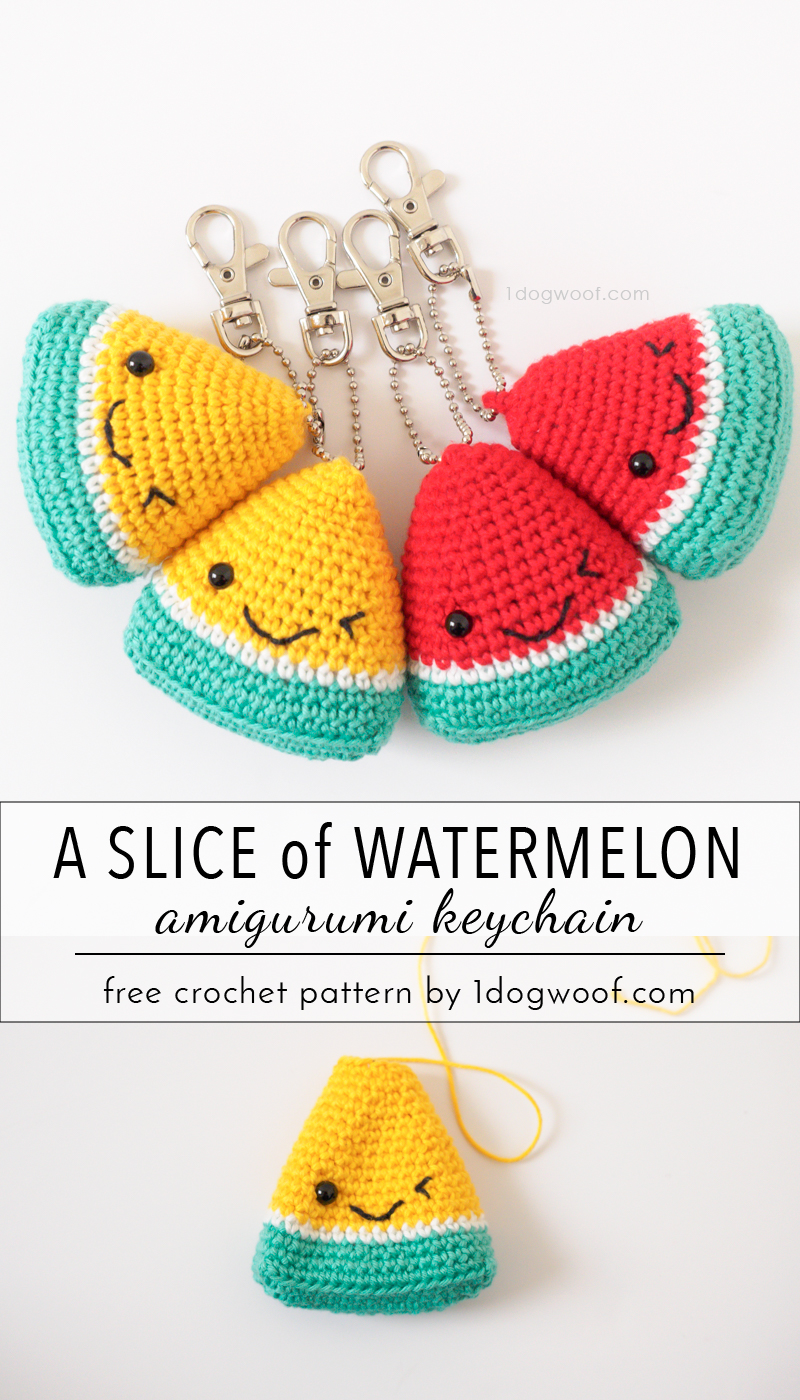
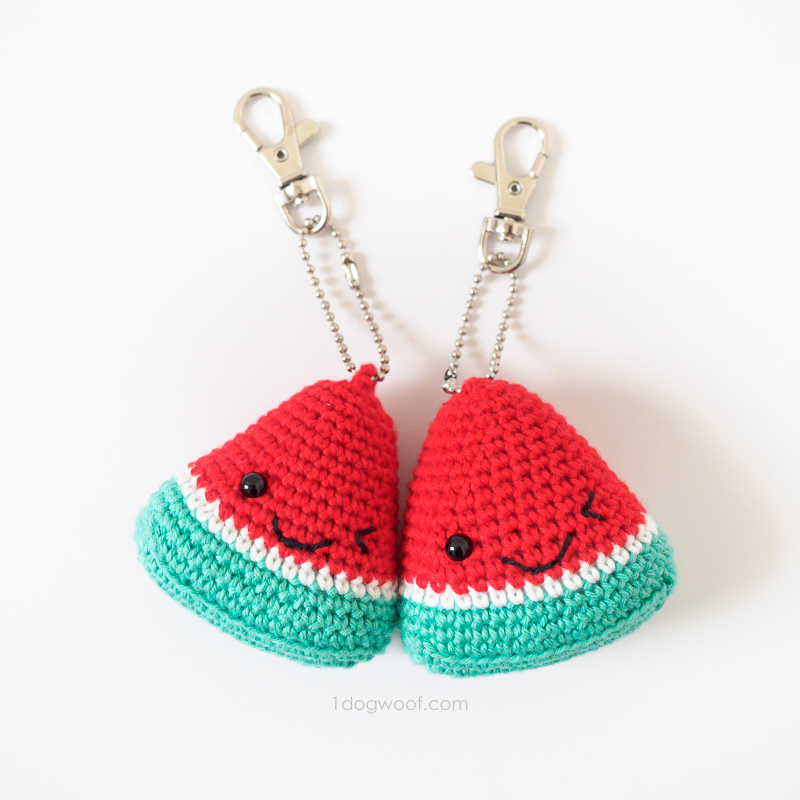
Welp, it’s been 3 months, and I’m finally publishing the pattern for my Watermelon Amigurumi Keychain. It’s a simple project and makes for a great teacher’s gift, whether you give it at the end of a school year like I did, or at the beginning of the year, or for the holidays as a stocking stuffer. It’s cute, it’s small, and you can whip up a batch of these in an evening for all the people on your list!
This post is supported by an ongoing collaboration with Lion Brand. All opinions, text and photos are 100% my own.
So, back in May, I needed gifts for J’s school teachers. I thought now that he’d entered Kindergarten, I’d only have to come up with 1 gift at occasional times of year, but he’s in an After School program since both my husband and I work, and there’s a whole group of awesome teachers and caretakers that I wanted to show my appreciation for.
Of course, the quickest and easiest gift is to grab a handful of gift cards from my local Target or Starbucks, but c’mon, I’m a blogger and should be a little more P’interesting, right? Not that gift cards are bad, especially if given in a cute gift card holder, but I gifted the Snowman Gift Card Holder at Christmas and I can’t rightly do it again. Plus, I needed 7 of them, so what better way to bring on the summer than with little smiling slices of watermelon!
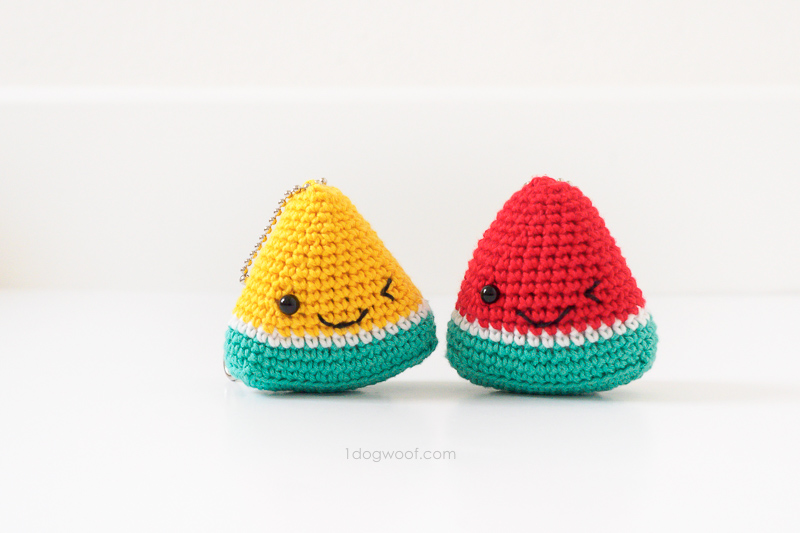
Are you familiar with yellow watermelon? I realized that not everyone grew up knowing there is such a thing as a yellow watermelon, so the yellow keychains didn’t go over as well as the red ones, although I personally think they’re cuter, but I’m a sucker for yellow.
The watermelon slices are made using Lion Brand BonBons in Beach, which is a lightweight cotton yarn that is super useful for little projects like my Goldfish Teether. I also like using the Black BonBon as a replacement for embroidery thread for all sorts of things. I always keep a pack or two of Beach’s bright, primary colors on hand. With 1 package of BonBons in Beach, you can make at least 1 red and 1 yellow watermelon. The watermelon is worked in rounds and sewn together at the top. I didn’t leave a loop for a keychain, and just pushed a ball chain through, and then attached a lobster clasp on top. This was the most lightweight and inexpensive keychain option I found. You can purchase them on Amazon through my affiliate links here and here.
I made these for the summer, but as we head into craft fair season, I think they would sell great as stocking stuffers too!
——————————————
You Might Also Like:
Candy Conversation Hearts Keychain
——————————————
SUPPLIES
- 1 package of Lion Brand BonBons in Beach, using the red, green, yellow, white and black
- 1 Clover USA crochet hook C/2.75mm*
- 1 6mm safety eye
- scissors
- tapestry needle
- ball chains with clasps*
- lobster claw swivel clasps*
ABBREVIATIONS
- sl st – slip stitch
- ch – chain stitch
- sc – single crochet
- sp – space
- corner – [1 sc, 2 ch, 1 sc]
- BLO – back loops only
- sc2tog – single crochet decrease: Insert hook into front loop of next st. Without yarning over, insert hook into front loop of next st. Yarn over. Pull through 2 loops on hook. Yarn over, pull through remaining loop on hook.
PATTERN NOTES
- Skill level Beginner.
- Gauge doesn’t matter on this project, as long as it’s tight enough to prevent the stuffing from coming out.
- Pattern is worked in seamed rounds.
- First st in each round is worked into same st as join.
Watermelon Amigurumi Keychain Instructions
Round 1: (in GREEN) Ch 14. Work 1 sc into the 2nd ch from hook. Work 1 sc in each of next 11 st, [1 sc, 2 ch, 1 sc, 2 ch, 1 sc] in next ch (this turns the corner), 1 sc in each of next 11 st, [1 sc, 2ch, 1sc, 2 ch] in last ch. Join to first sc with sl st.
Round 2: Ch 1. Work 1 sc in each of next 13 st, 1 corner in ch 2 sp, 1 sc in next st, 1 corner in ch 2 sp, 1 sc in each of next 13 st, 1 corner in ch 2 sp, 1 sc in next st, 1 corner in ch 2 sp. Join to first sc with sl st.
Round 3: Ch 1. Work 1 sc in each of next 14 st, 1 corner in ch 2 sp, 1 sc in each of next 3 st, 1 corner in ch 2 sp, 1 sc in each of next 15 st, 1 corner in ch 2 sp, 1 sc in each of next 3 st, 1 corner in ch 2 sp, 1 sc in next st. Join to first sc with sl st.
Round 4: Ch 1. In BLO, work 1 sc in each sc st around, skipping ch sp. Join to first sc with sl st. (44)
Round 5: Ch 1, Work 1 sc in each st around. Join to first sc with sl st. (44)
Round 6: Ch 1. Work 1 sc in each of next 4 st, 1 sc2tog, 1 sc in next st, 1 sc2tog, 1 sc in each of next 17 st, 1 sc2tog, 1 sc in next st, 1 sc2tog, 1 sc in each of next 13 st. Join to first sc with sl st. (40)
Round 7: (in WHITE) Ch 1. Work 1 sc in each st around. Join to first sc with sl st. (40)
Round 8: (in RED) Ch 1. Work 1 sc in each of next 11 st, 1 sc2tog, 1 sc in each of next 5 st, 1 sc2tog, 1 sc in each of next 11 st, 1 sc2tog, 1 sc in each of next 5 st, 1 sc2tog. Join to first sc with sl st. (36)
Round 9: Ch 1. Work 1 sc in each st around. Join to first sc with sl st. (36)
Round 10: Ch 1. Work 1 sc2tog, 1 sc in each of next 9 st, 1 sc2tog, 1 sc in each of next 5 st, 1 sc2tog, 1 sc in each of next 9 st, 1 sc2tog, 1 sc in each of next 5 st. Join to first sc with sl st. (32)
Round 11: Ch 1. Work 1 sc in each st around. Join to first sc with sl st. (32)
Round 12: Ch 1. Work 1 sc2tog, 1 sc in each of next 7 st, 1 sc2tog, 1 sc in each of next 5 st, 1 sc2tog, 1 sc in each of next 7 st, 1 sc2tog, 1 sc in each of next 5 st. Join to first sc with sl st. (28)
Round 13: Ch 1. Work 1 sc in each st around. Join to first sc with sl st. (28)
Round 14: Ch 1. Work 1 sc2tog, 1 sc in each of next 5 st, 1 sc2tog, 1 sc in each of next 5 st, 1 sc2tog, 1 sc in each of next 5 st, 1 sc2tog, 1 sc in each of next 5 st. Join to first sc with sl st. (24)
Round 15: Work 1 sc in each st around. Join to first sc with sl st. (24)
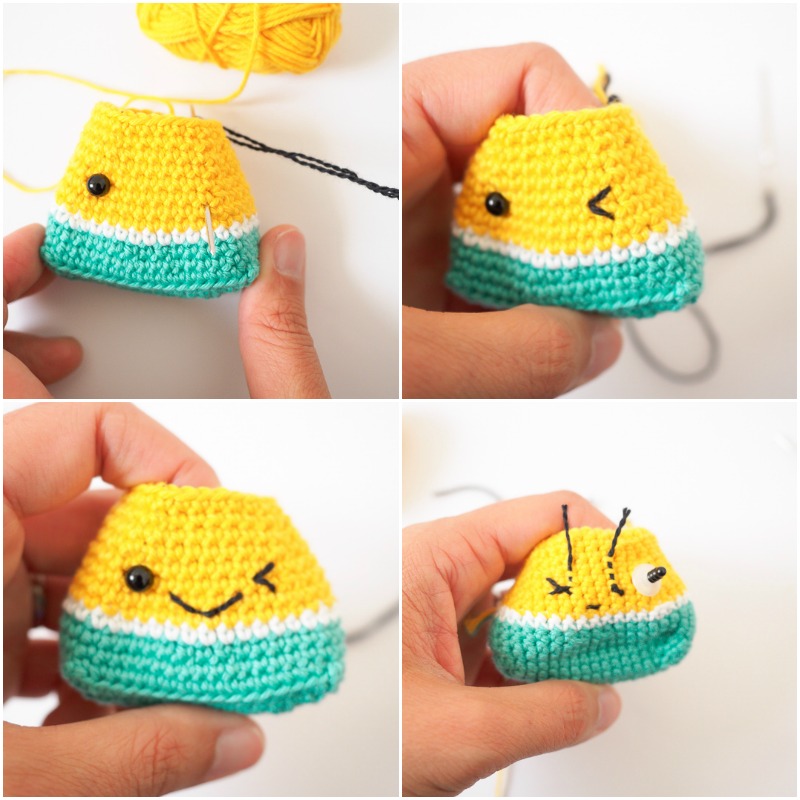
Add the eyes and mouth
- Eye – Insert safety eye between the 3rd and 4th red rounds, 2 st to the right of the sc2tog st.
- Wink – With black yarn, insert needle from inside out, between the 2nd and 3rd red rounds, 2 st to the left of the sc2tog st (starting point). Insert the needle outside in, between the 3rd and 4th red rounds, approximately the same width as the safety eye (middle point). Insert the needle inside out, between the 4th and 5th red rounds, directly above the starting point (end point). Insert the needle outside in, at the middle point, to complete the wink.
- Smile – Embroider on a smile centered and just slightly below the eyes.
Round 16: Ch 1. Work 1 sc2tog, 1 sc in each of next 3 st, 1 sc2tog, 1 sc in each of next 5 st, 1 sc2tog, 1 sc in each of next 3 st, 1 sc2tog, 1 sc in each of next 5 st. Join to first sc with sl st. (20)
Round 17: Ch 1. Work 1 sc in each st around. Join to first sc with sl st. (20)
Round 18: Ch 1. Work 1 sc2tog, 1 sc in next st, 1 sc2tog, 1 sc in each of next 5 st, 1 sc2tog, 1 sc in next st, 1 sc2tog, 1 sc in each of next 5 st. Join to first sc with sl st. (16)
Round 19: Ch 1. Work 1 sc in each st around. Join to first sc with sl st. (16)
Round 20: Ch 1. Work 2 sc2tog, 1 sc in each of next 4 st, 2 sc2tog, 1 sc in each of next 4 st. Join to first sc with sl st. (12)
** Stuff the watermelon firmly to fill out the shape.
Cut yarn, leaving a tail. Squeeze the round together, aligning the 4 sc to the 4sc. Use the mattress stitch to close. Fasten off and weave in ends.
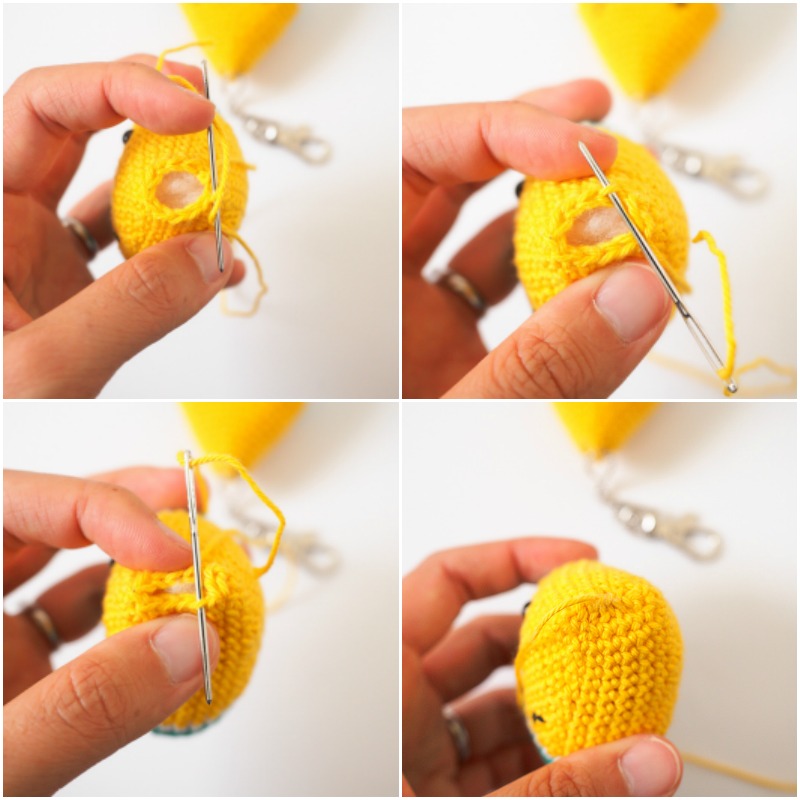
Insert the ball chain clasp through any available stitch on the top of the watermelon. I used a needle to help things along – it takes some effort, but you can always find a small gap to get the chain through. Once the chain is attached, just close the ball chain around a lobster clasp and you’re all set!
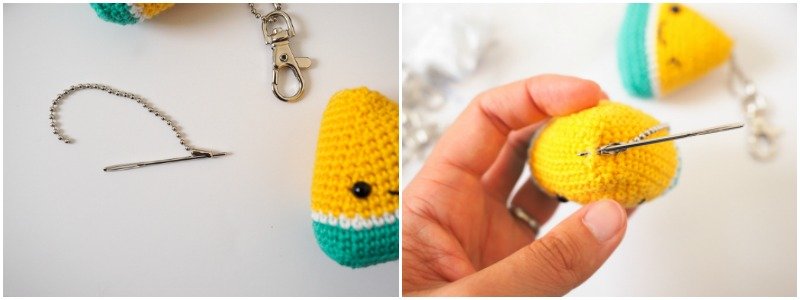
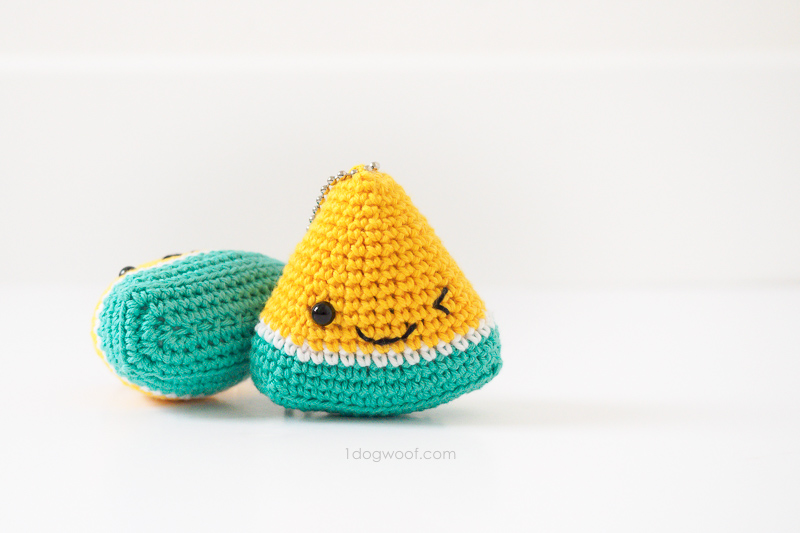
On my first keychain, I created a loop at the top of the watermelon to insert the ball chain, but it looked a bit weird, so I adjusted to insert the ball chain straight through the top of the watermelon instead.
Please share your watermelon slices with me on Facebook (One Dog Woof) or Instagram (@1dogwoof)! Remember to tag your post with #1dogwoof!
Check out my pattern shops on Etsy and Ravelry where you can purchase printable PDFs of my latest crochet patterns. These PDFs are formatted without comments or ads, and have instructional photos at the bottom for optional printing.
I sometimes include affiliate links in my supply lists. Purchasing from these merchants earns me a small commission with no extra cost to you, and goes towards supporting One Dog Woof.
Please be respectful and do not sell or distribute this pattern in any way, especially as your own. Instead, share the original blog post link! You can sell finished products made from this pattern by giving credit to One Dog Woof as the pattern designer and linking to the blog post. If you have any questions regarding distribution or translation of this pattern, please see my Terms of Use. Thank you for your consideration!


These are just too darn cute. Love them.
Hey ChiWei,
These are so darn cute! I love yellow watermelon, then again I love all melons!! lol Thanks for sharing!!
the yellow melons are called Champagne Melons in Australia.
You could turn these into candy corn too! Love the idea!
Thank you for the beautiful pattern. if you want to make a small pillow, can I double the amount of stitches? Is it okay?
Sou iniciante de crochê e estou apaixonada por esses amigurumi ….São muito fofoos????????????????????
very good jobs 🙂
very good jobs 🙂 very pretty
Gosoaria de receber receitas de chaveiros.
Obrigada
Maria Inês
Hermoso Podrían traducir al castellano GRACIAS
is your ch1 counted as a stitch, and where do you put your sl st is it in the ch1 st or the first sc after the ch1
Hi Sandra,
My Ch 1 at the beginning of rounds do not count as a stitch, and the slip stitches to end rounds are worked into the first sc, not the ch 1.
Hello, when you say 2 ch in the first row : do you mean 2 singke crochet in the same stitch ( Increase) thank you
Hi, yes this paragraph is genuinely nice and I have learned lot of things from it on the topic of
blogging. thanks.
Thank you for the lovely pattern.
Can I translate into korean and share it?
Many koreans like this pattern.
I will write this posting URL with translation.
I look forward to hearing from you.
Hi, I do not allow translations of my patterns to be published elsewhere. Please contact me directly at [email protected] if you’d like to contribute a translation to this website to share with your users.
I love they way these melons look. I can’t seem to make them the right way though, for some reason mine is all wrong on the back. You see a sort of diagonal line where the rounds come together. What am I doing wrong?
Hi, I just would like to know if what do you mean by this procedure “1 corner in ch 2 sp, 1 sc in next st, 1 corner in ch 2 sp” thank you
helooooo
Good
nohu club11
ZingPay.Mobi Kênh nạp thẻ chính thức VNG
Muito obrigada
Can i get the pdf format plzz??
There’s no PDF version of the pattern at this time!