
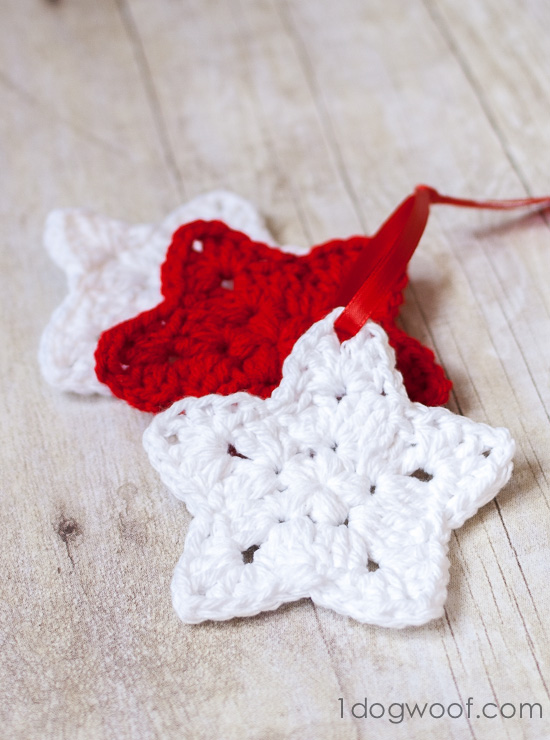
I don’t know about you, but I get a lot of inspiration while wandering through Pinterest, and when I saw these crocheted stars (while you’re there, consider following me on Pinterest!), I knew I wanted some. But there was no pattern at the end of that rainbow, so I fall back on my “I saw, I want, I conquer” process. This involves me, on a couch with some cheap yarn, a hook and a lot of crocheting and uncrocheting. Still, I got something that works and looks similar enough, so here’s the crochet star ornament pattern at the end of your rainbow. Or for your Christmas tree.
Crochet Star Ornament Pattern
Supplies
Worsted weight yarn. I used both cotton and acrylic yarn.
G size hook
yarn needle
scissors
Abbreviations
puff stitch – *Yarn over, insert hook into ring, yarn over and pull through*. Repeat from * 2 more times. You should have 7 loops on your hook. Yarn over one last time, and pull hook through all the loops on your hook.
Crochet Star
Start with a magic ring.
Round 1: *Work 1 puff stitch. Chain 2*. Repeat from * 4 more times for a total of 5 puff stitches. Slip stitch into the top of the first puff stitch.
Round 2: Chain 2. In the same stitch, work (2 DC, Chain 1, 3 DC). In the next 4 puff stitches, work (3 DC, Chain 1, 3 DC). Slip stitch into the first DC to end the round.
Round 3: *Chain 1. In the chain space from the previous round, work (1 HDC, 2 DC, Chain 2, 2 DC, 1 HDC). Chain 1. Slip stitch into 3rd DC from hook.* Repeat from * 4 more times. The last slip stitch should end the round.
Fasten off and weave in ends.
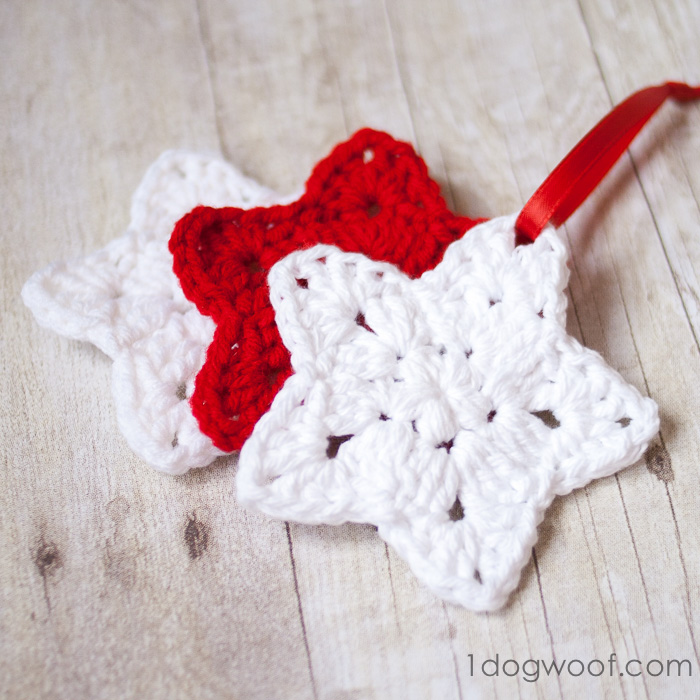
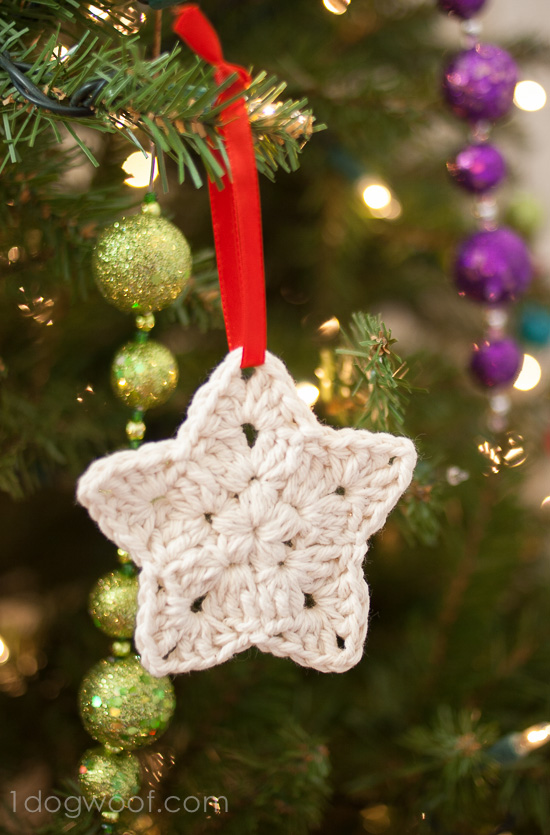
Thread a ribbon through the star to hang it on your tree!
Or, if you like this pattern, head on over to my Crochet page and see what other quick project patterns I have for you!


This is awesome! I too have seen that pin and loved it! I looked at it just this morning and finally pinned it, thinking to myself that I could probably figure it out! I just now saw this and am thrilled I don’t have to figure it myself! Thanks Sara
Lovely pattern 🙂
Hi this crocheted ornament is so pretty and thanks for sharing, I pinned it.
Julie
These are so sweet, Chi-Wei! I love their simplicity.
Pinned!
oh so pretty! I’ve pinned this to make next year… I think I’m done with Christmas projects for this year… {I know! Blogger blasphemy!!} EMily
Thanks Emily! I keep telling myself I’m done, but then I think up one more thing to do. I’m trying to be done by this weekend so I can enjoy the last two weeks of the year!
Thanks Tara!
Thanks so much for the pin Julie!
Thank you Steph! It’s a quick one to work up 🙂
My pleasure Sara! I’ve had that pin on my to-do list for ages. Of course, I wait until the week before Christmas to sit down and figure it out. But I’m glad you like it and will use it! Happy Holidays!
Thank you so much for the pattern. I’m all done crocheting snowflakes – I must have done 100! This is a lovely change – I’ll be making some tonight. 🙂
thanks so much for pattern nice little quick project
Maybe I am just a little slow this afternoon, but how many chain stitches to do the circle?
I use a public computer so really shouldn’t download this in order to print it. How can I print without downloading? Really want to try this star! Thanks!
I’m not sure I understand why you would need to download anything. You can print directly from the browser or copy the pattern to a text file and print from the text file. Thanks!
Hi Frances, you do not work any chain stitches in the circle. You start with a magic circle so that it can be closed all the way, and the puff stitches are worked directly into the magic circle. Hope that helps!
Thanks Donna!
Thanks for this pattern! I just finished it and it looks very similar to yours!!!! Thanks again!!! Love your website!!!!
Thanks so much….don’t think I had ever heard of a magic circle before, but I have now downloaded the instructions for it! I appreciate the assistance!
Definitely making these for next year! Had our Christmas early as we are expecting a new little one in January and doc told her to stay close to home! Going to use glitter yarn to “sparkle” them. Also using blues to have an “icy” theme I think Thanks for the pattern
Any tricks to getting started with the puff stitch in the magic circle? I seem to b e having diffculty making it work.
Thank you for this pattern. It is just what I would have liked to make before Christmas. I have plenty of time now, to have some ready for next Christmas. Thank you. Helen
Thankyou for this pattern ChiWei. Just going to have a peek at your crochet page.
Best wishes for the upcoming bundle of joy! And what a great idea it is to use sparkle yarn! Have a great New Year!
You’re welcome Frances!
Hi Mary, to be honest, I had to practice several times to get the puff stitch to look right. Every time you yarn over, try to keep the tautness of the yarn consistent, and then once a puff stitch is complete, you might need to fidget a bit and tighten it up by pulling on some yarns.
Great pattern, worked up quickly and perfectly. Thanks
That’s so great to hear Debby! Thanks for letting me know 🙂
I have added link to this post on my Facebook wall – hope it is ok 🙂 Great pattern and thank you sooooo much !
I’ve just made one of your stars and I love it! What a great pattern. Thank you 🙂
Thanks Wendy, glad you like it!
I’ve never done a magic ring, but would like to try this pattern. What I’m not clear on is how many stitches should be done initially to make the ring. All the YouTube videos I’ve seen, as well as your information on the tutorial showing how to make the ring, call for a certain number of single crochet stitches to make the initial ring. I believe you said it is often six–to go by the pattern. But the star pattern doesn’t say how many. Or maybe I’ve missed something. Any assistance greatly appreciated.
Joan, for this pattern, you don’t work any single crochets into the magic ring. Once you have an open ring, you work the puff stitches directly into the ring and then pull tight at the end of the first round.
Okay. I get it now. I guess I was a bit dense there. I appreciate your taking the time to reply and explain this to me. …Joan
So tickled with this pattern! I much prefer the magic ring method! Thanks for sharing!
Thank you for the pattern! I had some difficulty with the last round. It seems it was too rounded. I think part of the problem was the wool was not stiff enough so I used another one and it was better. I still had trouble with the definition so I tried to work from your picture. It looks like you have either a slip stitch between the HDC, DC, CH, DC, HDC so I tried a SC which seemed to anchor it a bit and give it definition. I hope this helps others. Thanks again!!!!
\
nevermind. i should learn to read….lol
Glad you figured it out!
I ran into the same problem with that pin, and then I was bummed out. But yay! Thanks for posting this!
I am so glad I found this pattern. I was getting frustrated because I kept finding the picture with no instructions and am not very good yet at figuring out patterns by picture. I love your flower coaster pattern and now I have this one too. Thank you for your beautiful patterns.
In round 2, do you only chain two at the beginning or between each set of stitches? Thanks!
I have looked at/attempted a number of similar stars. This is the only one that seems to work out. Will be my go-to for stars. Thanks for sharing this.
Just the one. It represents the first double chain for that group of ‘3 DC, ch1,3DC’
I had trouble with it too, at first. Probably because I have never worked a magic ring quite like that. But it was well worth the little time it took to figure it out.
Hi! I love this little crochet pattern so much that I included it in my favorite holiday DIY projects! I hope you’ll check out the my post and thank you for sharing this sweet little tutorial. 😀
Thank you. I was looking for a simple project I could make in small batches to give away as swaps and I think this might be it! I’m the sheriff at camp this year so it would be such a pleasure to do these 🙂
That sounds so fun, and the campers will love it!
I really like this crocheted star! I don’t follow directions very well, do you have a tutorial where we can see pictures of you doing the project? I would so love to make some of these. Thank you.
Lovely pattern! What is the finished size? Thanks. 🙂
Erm, maybe 4 inches? It’ll depend on your hook, gauge and yarn weight.
Great Pattern, but when I copied and printed it the Yellowish-greenish titles (Ie. Supplies, etc) were practically invisible. I had to rewrite them in darker ink. Maybe a darker color would be good in the future.
Thanks
do you chain any before you start the puff stitches
Thank-you!! I just saw that pin with no pattern at the end of the rainbow. I’ve had a few tries at it on my own and was feeling frustrated. Now I’ve found you. Now I will have peace. Thanks, and Merry Christmas!
I love that this pattern is trending in 2015 too 😀
Thank you for sharing!
Merry Christmas from Denmark
Hugs
Frida
I can’t get the pattern to print it will print everything else on the page except for the pattern, don’t know what I am doing wrong.
I love these! Thank you so much for sharing. I can’t wait to make some this year! 🙂
Hi! I LOVE this pattern! They are so fun and easy to make! I use all of my scrap yarn because it takes such little yarn! Love! Love! Love! Thank you so much! Oh did I mention I LOVE this pattern? Yea it is fun!
I love this pattern! Thanks for sharing!
I discovered a new way to make this star. It looks more like a snowflakes number ten yarn and a D 3.00 mms hook and you have a tiny star! I think it looks more than a snowflake. I wanted to tell you that I am using this to make adorable earnings! I would post a picture but i don’t know how to post it.
In round 2, after the first *…*, do you do the other 4 in the space between each puff stitch, or in the top of each puff stitch. Thank you, Sally, Southampton, Ma
The link for the original star you posted goes to slumberspun’s Etsy shop. If you click her profile picture you’ll see the star pattern is the only item listed. You will probably want to credit her as the original designer of this star 🙂
In the top, I’m pretty sure. That’s how I did it and they look pretty darn good.
I usually crochet away from home. While my client is sleeping. Is there a printable form of this pattern?
I made these for Christmas last year and everyone absolutely loved them they have this really cool yarn that’s got the shimmery wrapped around it they have it in black white and red I use that to make these Stars and they look so cool I love this pattern thank you thank you thank you
Thank you so much ! You are a darling !