
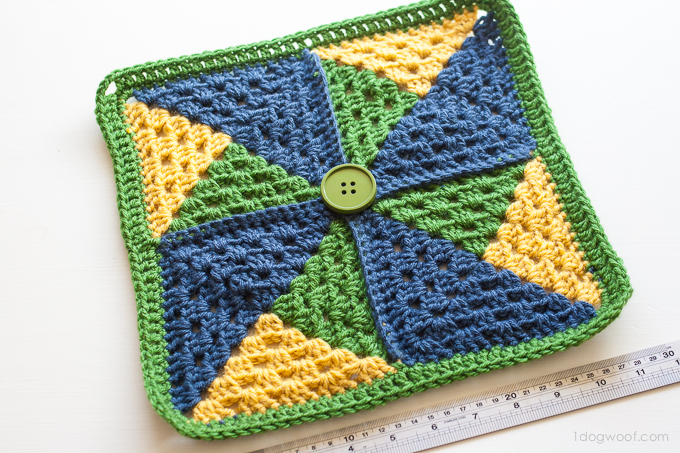
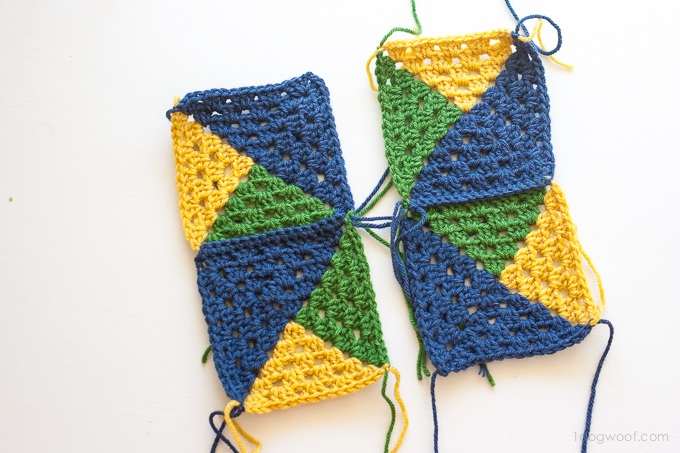
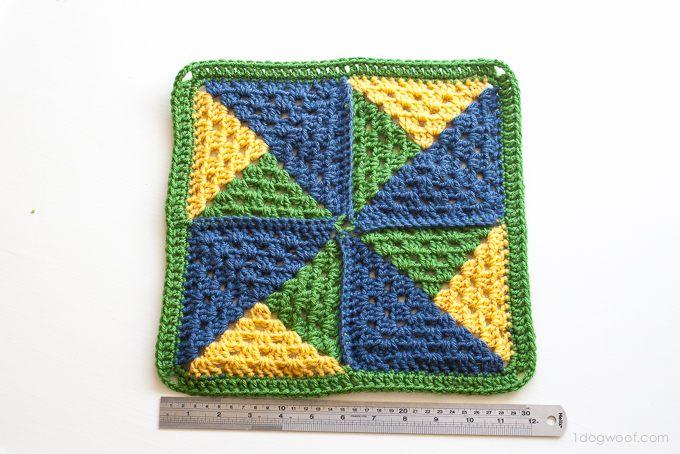
Just a few notes before we start. This pattern is the sum of 4 small squares, each of which consists of 1 large triangle and 2 small triangles. The 4 squares are approximately 5″ along the side, and are combined to make a large square that is approximately 10″ along the side. Add in a simple border (or 2) and you’ll reach your desired 12″ square.
- The colors change in the middle of the corners of the small squares.
- To change colors, drop working yarn end, pick up new color, YO and pull through the loop already on the hook (counts as a ch1).
- ch3 at the beginning of round counts as a dc throughout.
- Notice that each small square round ends with a ch2 just before the join, not ch1.
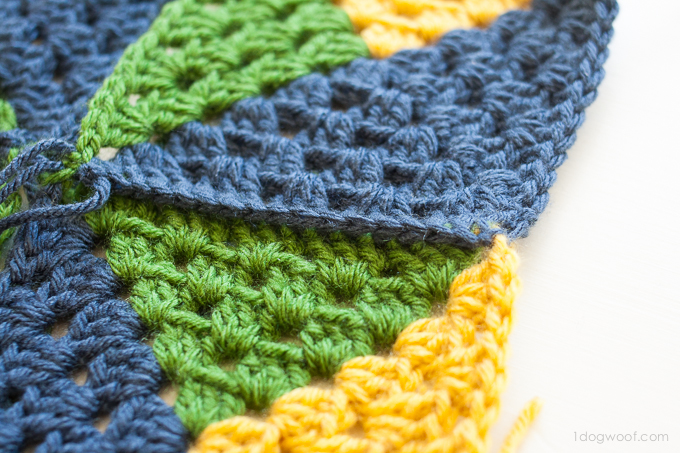
- At the end of each small square, leave a loooong tail to use when stitching the squares together.
- I cut the yarn on every color switch, and I know that sounds incredibly tedious, but in each corner, I made a small knot with the old yarn and the new yarn, and then was able to tuck it into the stitches while working the next round, so I didn’t have to weave anything back in. I did the same on the last round and tried to tuck in the ends while working the outside border, and then only had to weave in a few loose ends.

Supplies
I used Lion Brand Vanna’s Choice yarn, which is a nice soft worsted weight yarn, in 3 colors (A, B, C)
US I hook (5.5mm)
embroidery needle
scissors
Abbreviations
sc – single crochet
dc – double crochet
sl st – slip stitch
ch sp – chain space, or, the big gap you see between the dc clusters
Instructions
SMALL SQUARE (Make 4)
Using color A (the largest triangle) ch 4. sl st into 1st ch. -> creates loop.
Rnd 1:
Using color A: ch 3, work 2 dc into the loop. ch 1. Switch to color B.
Using color B: ch 1, work 3 dc into loop, ch 1. Switch to color C.
Using color C: ch 1, work 3 dc into loop, ch 1. Switch back to color A.
Using color A: ch 1, work 3 dc into loop, ch 2, sl st into top of beginning ch 3.
Rnd 2:
Using color A: ch 3, work 2 dc into same chain space. ch 1, work 3 dc into next chain space (should be space between color (A & B)), ch 1. Switch to color B.
Using color B: ch 1, work 3 dc into same chain space, ch 1, work 3 dc into next chain space (should be space between color (B & C)), ch 1. Switch to color C.
Using color C: ch 1, work 3 dc into same chain space, ch 1, work 3 dc into next chain space (should be space between color (C & A)), ch 1. Switch back to color A.
Using color A: ch 1, work 3 dc into same chain space, ch 1, work 3 dc into next chain space, ch 2, sl st to top of beginning ch 3.
Rnd 3:
A: ch 3, work 2 dc into same chain space, [ch 1, 3 dc into next ch sp] 2x, ch 1. Switch to B.
B: ch 1, work 3 dc into same chain space, [ch 1, 3 dc into next ch sp] 2x, ch 1. Switch to C.
C: ch 1, work 3 dc into same chain space, [ch 1, 3 dc into next ch sp] 2x, ch 1. Switch to A.
A: ch 1, work 3 dc into same chain space, [ch 1, 3 dc into next ch sp] 2x, ch 2, sl st to top of beginning ch 3.
Rnd 4:
A: ch 3, work 2 dc into same chain space, [ch 1, 3 dc into next ch sp] 3x, ch 1. Switch to B.
B: ch 1, work 3 dc into same chain space, [ch 1, 3 dc into next ch sp] 3x, ch 1 Switch to C.
C: ch 1, work 3 dc into same chain space, [ch 1, 3 dc into next ch sp] 3x, ch 1. Switch to A.
A: ch 1, work 3 dc into same chain space, [ch 1, 3 dc into next ch sp] 3x, ch 2, sl st to top of beginning ch 3.
Rnd 5:
A: ch 3, work 2 dc into same chain space, [ch 1, 3 dc into next ch sp] 4x, ch 1. Switch to B.
B: ch 1, work 3 dc into same chain space, [ch 1, 3 dc into next ch sp] 4x, ch 1. Switch to C.
C: ch 1, work 3 dc into same chain space, [ch 1, 3 dc into next ch sp] 4x, ch 1. Switch to A.
A: ch 1, work 3 dc into same chain space, [ch 1, 3 dc into next ch sp] 4x, ch 2, sl st to top of beginning ch 3.
Fasten off with long tail.
Attach the squares together so that the large triangle makes a pinwheel shape, in a counter clockwise direction. You can whip stitch them together or work them together using single crochet along the edge of both squares.
Border round 1: Using a standing sc to start the border, work single crochet along the entire outside of the large square, using 3 sc in the corner chain spaces. Slip stitch to end the round.
Border round 2: Ch2, then dc in each stitch around, using [dc, ch 2, dc] in the corner stitch and then continue working dc in each stitch around. Fasten off and weave in any leftover ends.
This pattern has also been translated into Dutch, with pictures!
“Dit patroon is door HET HAAKBEEST in het Nederlands vertaald. Je vindt een versie met foto’s voor rechtshandigen , eentje met foto’s speciaal voor linkshandigen en een printerversie zonder foto’s”


I absolutely love your pinwheel design for the Moogly 2015 Cal, I can hardly wait to get started. I like this one so much I might need to make a blanket just using this square too…
Actually, you don’t have to snip the yarn off after every color change. That seems like such an unnecessary effort! I tried it, including the method of knotting and tucking in the stitches as I went along, but I wasn’t happy with that. So now I just slip-stitch my way backwards with the new color, until I reach the previous corner, which is where I do the color change. Not sure if this explanation makes sense, but the result is very clean… no carrying of yarn and no weaving in ends, because I never break off my yarn.
Thank you for the pattern, though – it’s really cute looking!
That’s awesome ChiWei. I’ve been thinking about quilt squares made with crochet. It looks fabulous.
Thanks for the suggestion, Andrea! I’m about to start the square, and I hate tucking in ends (I usually put it off to the very last minute), so being able to do it without AS many ends sounds great!
ChiWei, the pattern’s really cute and I look forward to making it!
Hi Andrea, thanks for the suggestion! Actually, I’m a little confused. Does the slip stitch add to the bulk of the square, or do you stitch it on the backside of the square? And do you do it for the large triangle too? Thanks!
Hi ChiWei!
Yes, I am stitching it on the backside, also the big triangle. It does add a little bit of bulk, but I don’t find it bothersome at all. Less so than carrying yarn, or – god forbid – weaving in all these ends. 🙂 I am going to try and post a picture of mine on your Facebook, since I don’t think I can post one here.
Man..how I wish I would have seen your tip BEFORE I snipped and sewed in all those ends!! 🙂
ChiWei, this is amazing…I absolutely LOVE this afghan square!
LOVE, LOVE, LOVE the design. I think I’ll make it in cotton, add a back and have a fabulous pot holder!. Thanks for sharing.
Aww, thanks so much! The pot holder is a great idea!
I hear ya! I always try to tuck in the ends these days…maybe because I never quite finished a grannie square quilt because of the durn ends!
Ack, so sorry it’s taken me so long to get back to you Andrea! I saw your post on Facebook and I think I know what you mean. I think the bulk might be kind of nice to add warmth to the blanket (if you’re doing a blanket…). I’ll definitely have to give that a try, thanks!
I love this and all your ideas! I think it would really be adorable as a wall hanging in a child’s room.
What size button did you use to finish up the square?
I just picked a random one from my stash, it might be 1.5 inches.
Will you be creating a video for this square?
I could not find the amounts of yarn needed only the brand. How much yarn of each color?
For just one square, you don’t need much – I’d consider it a scrapbuster project!
This is really interesting, You’re a very skilled blogger.
I’ve joined your rss feed and stay up for looking for extra of your excellent
post. Also, I’ve shared your site in my social networks