
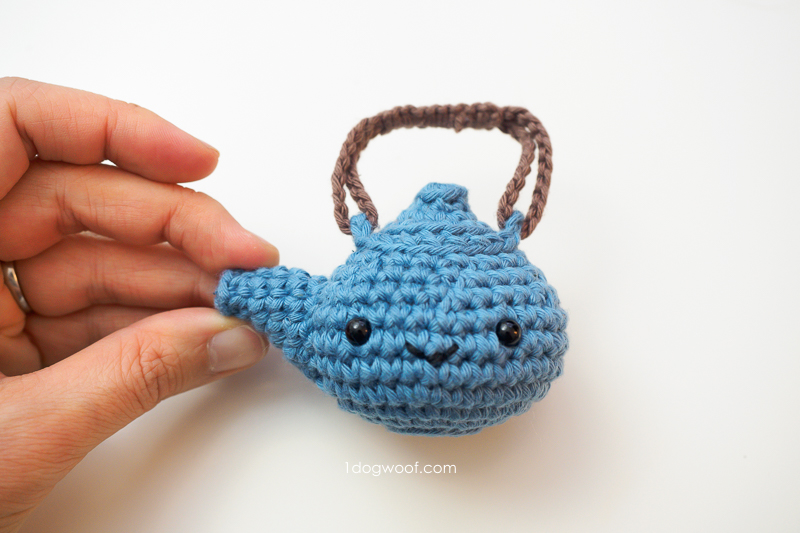
Some people may defer to the European, Beauty and Beast type of teapot, but this little amigurumi teapot is inspired by the distinctive look of the Japanese tetsubin tea kettles. Of course, at this size, a round teapot is any round teapot, but hopefully the unique handle of this amigurumi sets it a bit apart!

——————————————
Purchase the PDF from Ravelry or Add to your queue
——————————————
This teapot is constructed pretty simply, using crocheted rounds, worked with a seam along the back. (If you need help with amigurumi skills, head over to this Amigurumi Flan tutorial to get started!)
But you don’t close the top of the amigurumi right away. You leave it open so you can create the loops through which the handles will go. Then you work up a separate cap, just like a real kettle that is then sewn onto the body of the kettle using mattress stitch.
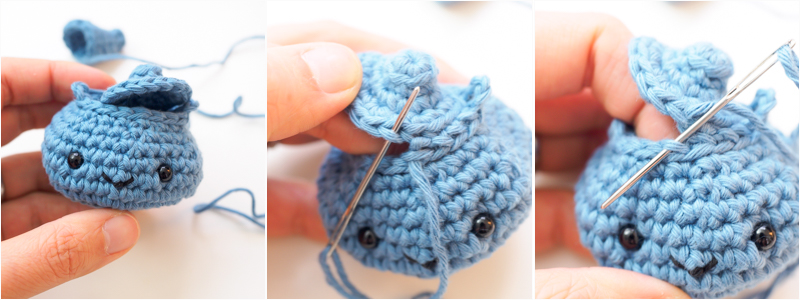
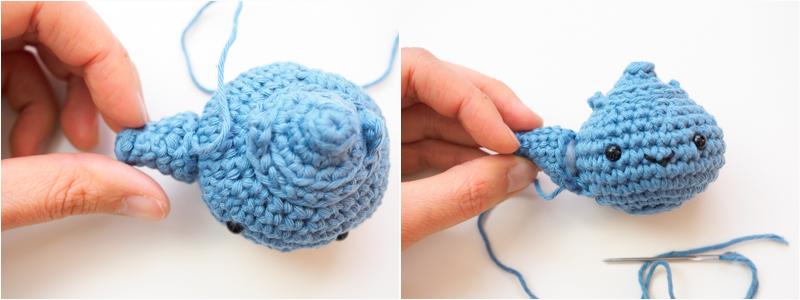
When the body is done, line up the spout on either side of the face, and sew it to the body. You can add just a tiny bit of stuffing in the spout to help it hold its shape.
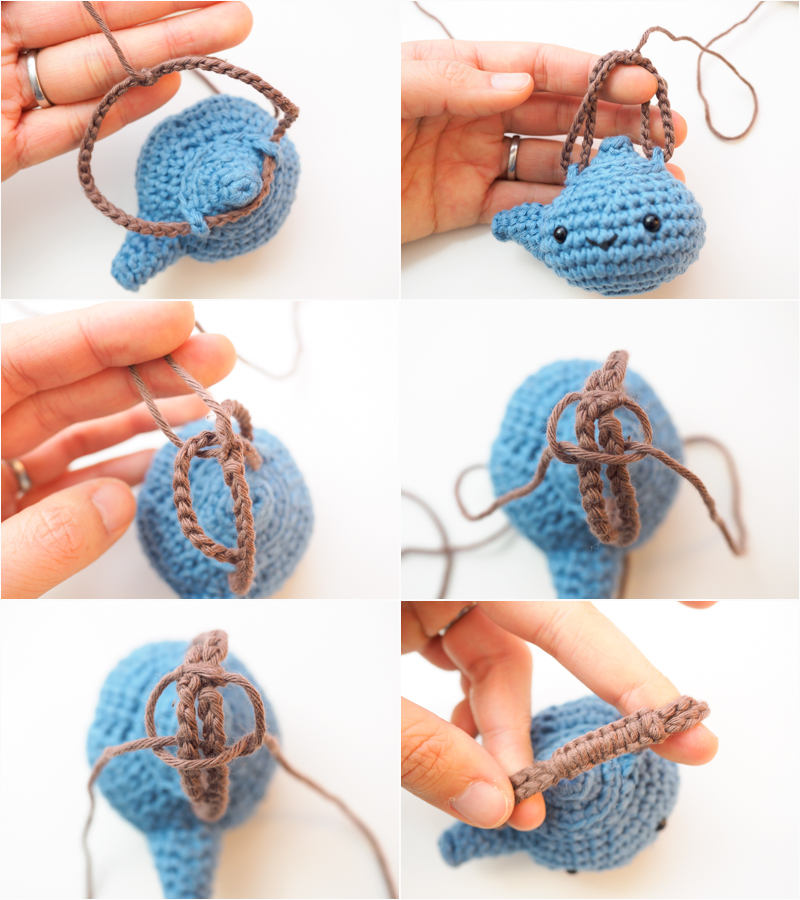
Unlike the little teapot song where the handle is on the other side of the spout, the handle floats above the tea kettle and is simply made from chain stitches and macrame square knots.
You can also purchase a printable and downloadable PDF from my pattern shops. The inexpensive PDF includes all the instructions below, as well as photos at the end for easy printing. Having a PDF is great for offline crocheting!
——————————————
——————————————
Supplies
- MC: Paintbox Cotton Aran in any color or other color for the clear glass
- C1: Paintbox Cotton Aran in Soft Fudge or other color for the base
- F/3.75mm crochet hook
- D/3.25mm crochet hook
- Cluster fiberfill
- 6mm safety eyes
- scissors
- embroidery thread or lightweight yarn in Black
- tapestry needle
Abbreviations
- st(s) – stitch(es)
- sl st – slip stitch
- ch – chain stitch
- sc – single crochet
- hdc – half double crochet
- inc – increase: work 2 sc in same st
- dec – decrease: work 2 sc together
- BLO – back loop only
Pattern Notes
- Rounds in teapot are worked with a seam and joined with a seamless join.
- Eyes are placed approximately 1.0-1.25 inches apart.
- Amigurumi can be closed using this technique.
Amigurumi Teapot Instructions
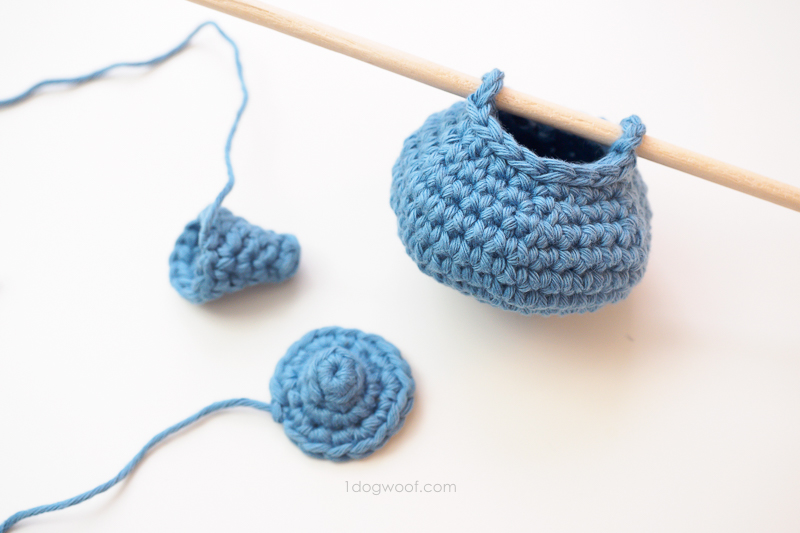
BODY
- Worked in seamed rounds.
- Worked with MC.
Round 1: Work 6 sc into a magic circle. Join to first sc with sl st. (6)
Round 2: Ch 1. Work 2 sc into each st around. Join to first sc with sl st. (12)
Round 3: Ch 1. Work 1 sc in BLO of each st around. Join to first sc with sl st. (12)
Round 4: Ch 1. Work 2 sc in each st around. Join to first sc with sl st. (24)
Round 5: Ch 1. Work [3 sc, inc] 6x around. Join to first sc with sl st. (30)
Round 6: Ch 1. Work [4 sc, inc] 6x around. Join to first sc with sl st. (36)
Round 7-9: Ch 1. Work 1 sc in each st around. Join to first sc with sl st. (36)
Round 10: Ch 1. Work [4 sc, dec] 6x around. Join to first sc with sl st. (30)
Round 11: Ch 1. Work [3 sc, dec] 6x around. Join to first sc with sl st. (24)
Round 12: Ch 1. Work [2 sc, dec] 6x around. Join to first sc with sl st. (18)
Round 13: Ch 1. Work 1 sl st in each of next 5 sts, ch 3, 1 sl st in each of next 9 sts, ch 3, 1 sl st in each of next 4 sts. Join to first sc with sl st.
Fasten off and weave in ends.
- Add eyes between Rounds 8 and 9.
- Sew mouth between Rounds 7 and 8, centered between the eyes.
SPOUT
- Worked in seamed rounds.
- Worked with MC.
Round 1: Work 6 sc into a magic circle. Join to first sc with sl st. (6)
Round 2: Ch 1. Work 1 sc in BLO of each st around. Join to first sc with sl st. (6)
Round 3: Ch 1. Work 2 sc, 2 inc, 2 sc. Join to first sc with sl st. (8)
Round 4: Ch 1. Work 3 sc, 2 inc, 3 sc. Join to first sc with sl st. (10)
Round 5: Ch 1. Work 4 sc, 2 hdc in each of next 2 sts, 4 sc. Join to first sc with sl st. (12)
- Fasten off with a long tail.
CAP
- Worked in seamed rounds.
- Worked with MC.
Round 1: Work 6 sc into a magic circle. Join to first sc with sl st. (6)
Round 2: Ch 1. Work 1 sc in BLO of each st around. Join to first sc with sl st. (6)
Round 3: Ch 1. Work 2 sc in each st around. Join to first sc with sl st. (12)
Round 4: Ch 1. Work [1 sc, inc] 6x around. Join to first sc with sl st. (18)
- Fasten off with a long tail.
ASSEMBLY
Align the seams of the CAP on the BODY and sew the CAP onto the BODY using a mattress stitch, skipping the ch 3 loops.
Stuff the amigurumi before sewing the opening closed. Fasten off and weave in ends.
Sew the SPOUT onto the body, aligned with the ch 3 loops and so that the bottom of the spout lines up just above the eyes. You can stuff the spout lightly.
Use C1 and ch 50, starting and ending with a long tail. Thread an end of the handle through both ch 3 loops and then tie ends together.
Double up on the handle.
Take the beginning and end tails and work macrame square knots around the handle for about an inch.
Fasten off and weave in the two ends.
Enjoy your new amigurumi teapot!
Head over to the Amigurumi Advent Calendar intro post to see the entire collection and share your work with the hashtag #AmigurumiAdventCAL.

Check out my pattern shops on Ravelry and Etsy where you can purchase printable PDFs of my latest crochet patterns. These PDFs are formatted without comments or ads, and have instructional photos at the bottom for optional printing.
I sometimes include affiliate links in my supply lists. Purchasing from these merchants earns me a small commission with no extra cost to you, and goes towards supporting One Dog Woof.
Please be respectful and do not sell or distribute this pattern in any way, especially as your own. Instead, share the original blog post link! You can sell finished products made from this pattern by giving credit to One Dog Woof as the pattern designer and linking to the blog post. If you have any questions regarding distribution or translation of this pattern, please see my Terms of Use. Thank you for your consideration!


This advent event has been so fun! You are so creative! I love this teapot!
Aw~~ This is so adorable~~ Thank you for sharing the tutorial!!
We are studying Japan next year so this will make a brilliant decoration. I am also learning Kogin Embroidery.
This is such a cute tea pot.
Which size hook is for which bit? I can’t see where you specify.
This is so so cute and easy to make and so good! I made one in about an hour. A very good pattern. Thank you so much.
Bonjour,
Très joli votre réalisation
Merci pour votre tuto et belle journée