
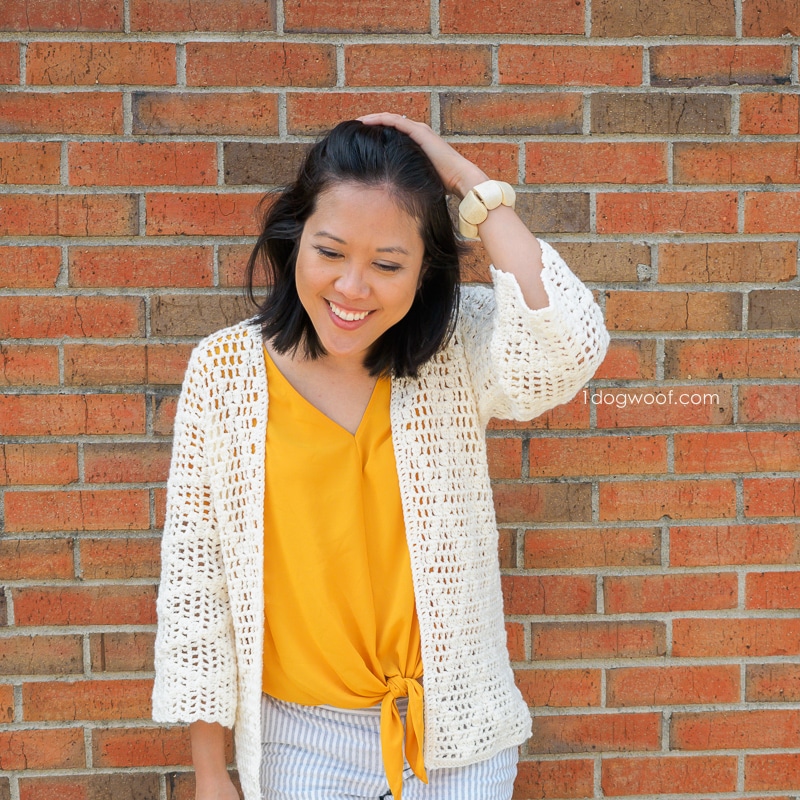
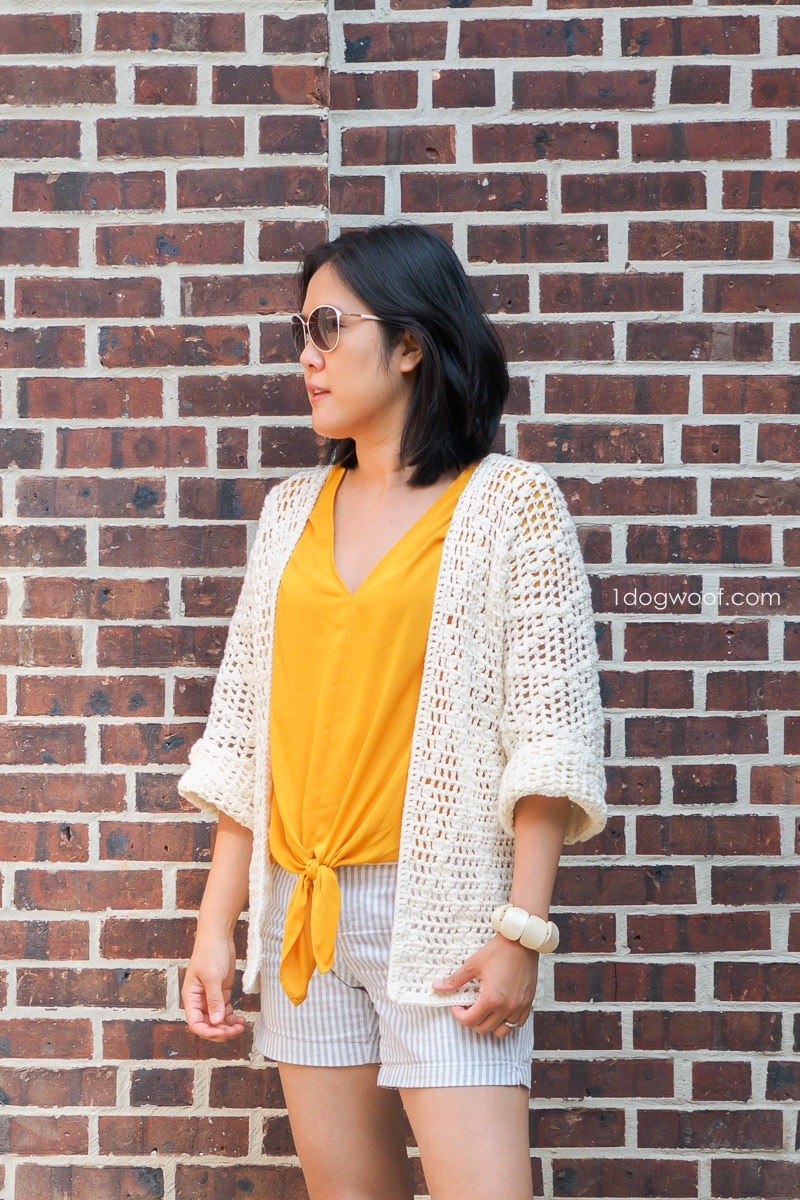
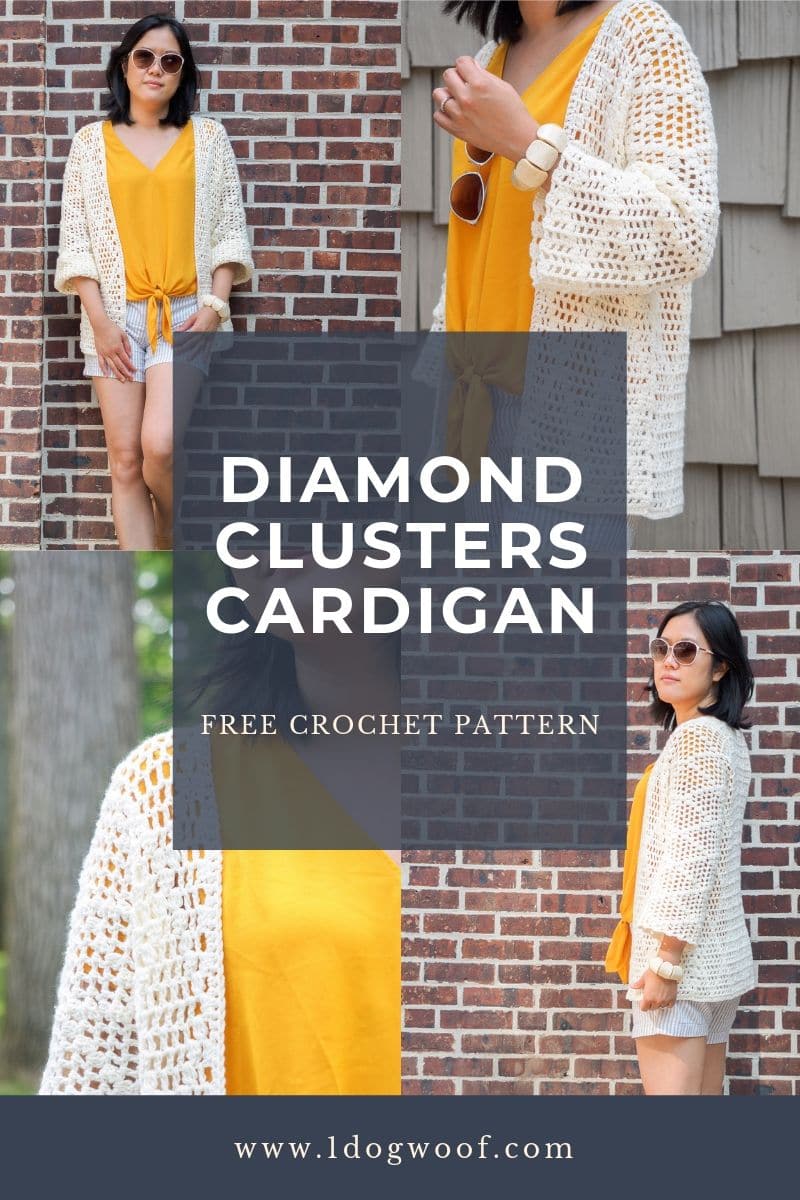
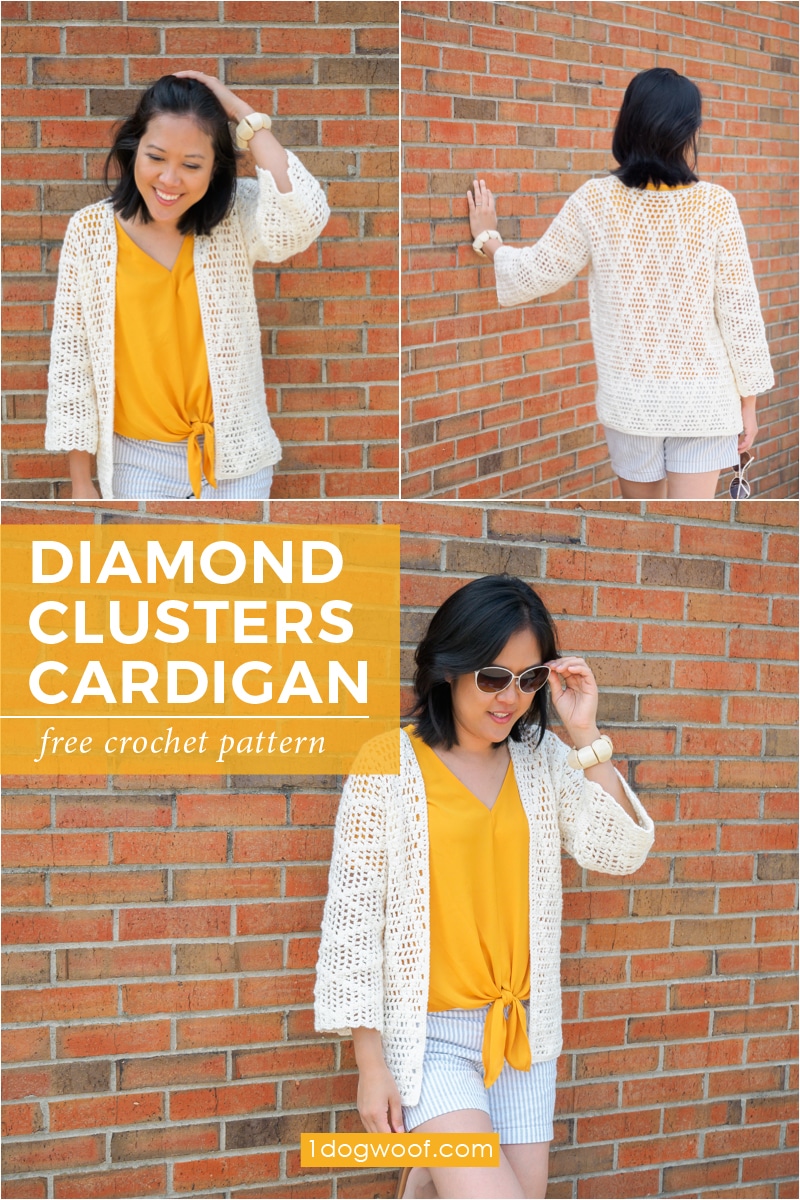
The modern diamond motif and easy construction of the Diamond Clusters Crochet Cardigan will make this casual, go-anywhere cover-up a 3-season staple in your closet. Throw it on for bbqs, summer evenings, or use it to ward off the A/C chill on your next movie night!
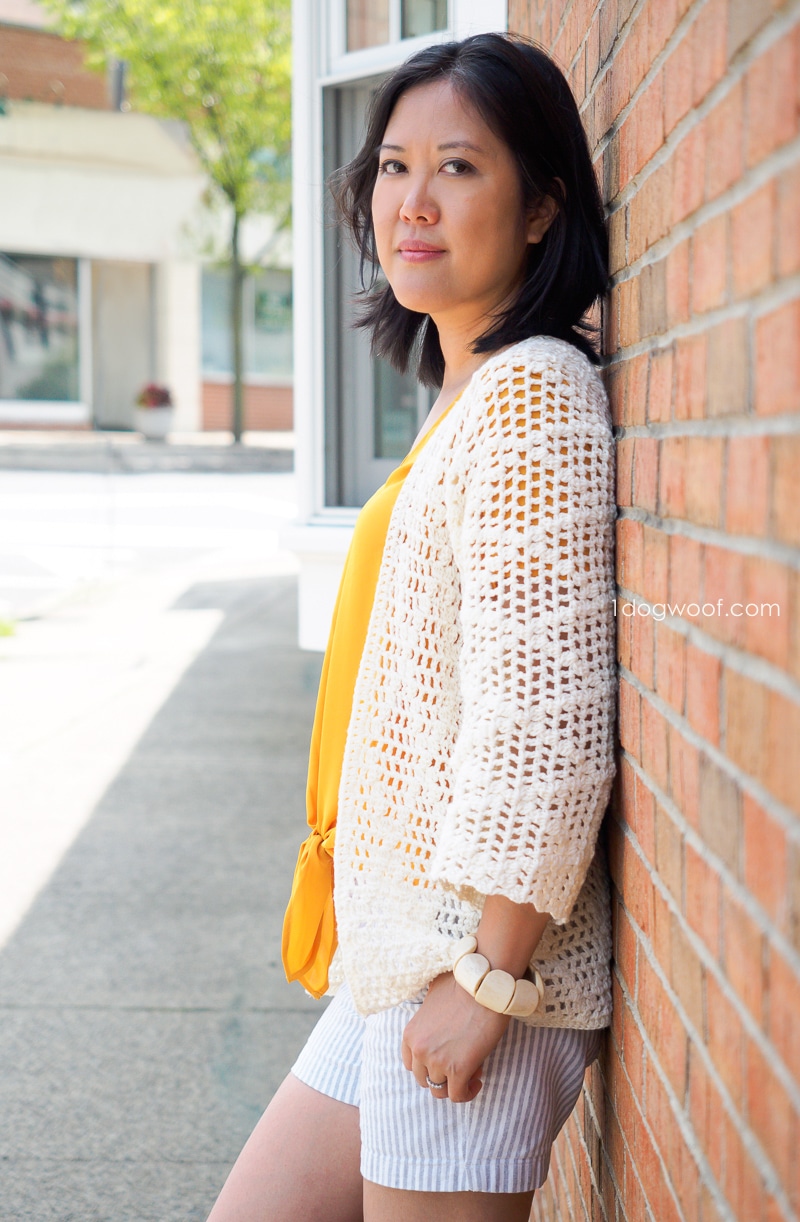
The Summer Diamonds Wide-Sleeve Cardigan was my very first crochet garment, and one of my most popular designs. I love the piece, but I sometimes find it a bit too big to just throw on and walk out the door, so I’ve wanted to revisit that design and see if I could make something that plays off the diamond design, fits my mom-on-the-go lifestyle, and have that simplicity in construction.
The Yarn
For this project, I used Lion Brand Yarn’s Comfy Cotton Blend. It’s the same yarn as Flikka, but unlike Flikka, Comfy Cotton Blend comes in a few great solid colors, like this Whipped Cream. It’s white, which makes it perfect for light summer wear, but not too blindingly white, so you don’t look or feel completely sterile, lol.
Comfy Cotton Blend, as its name suggests, is a 50%/50% cotton and polyester blend. It has the cool touch of cotton, with the soft touch of polyester. And with the synthetic yarn mixed in, you won’t get a lot of the mis-shaping that can come with a 100% cotton yarn. Each ball of Comfy Cotton Blend is 200g, with a whopping 392 yards in it, so you don’t need many balls to make a garment.
The Construction
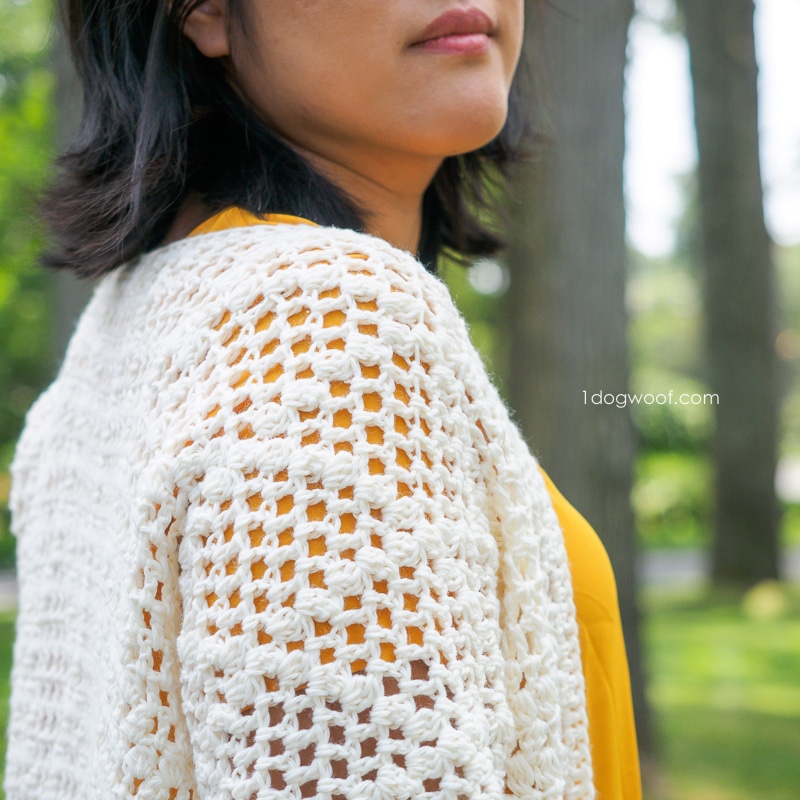
This diamond clusters crochet cardigan is a play on my previous diamond cardigan. But instead of using holes in a sea of double crochet stitches to show the diamond, this garment uses puff stitches in a open double crochet mesh. So I’ve sort of flipped the concept, and I love how it worked out!
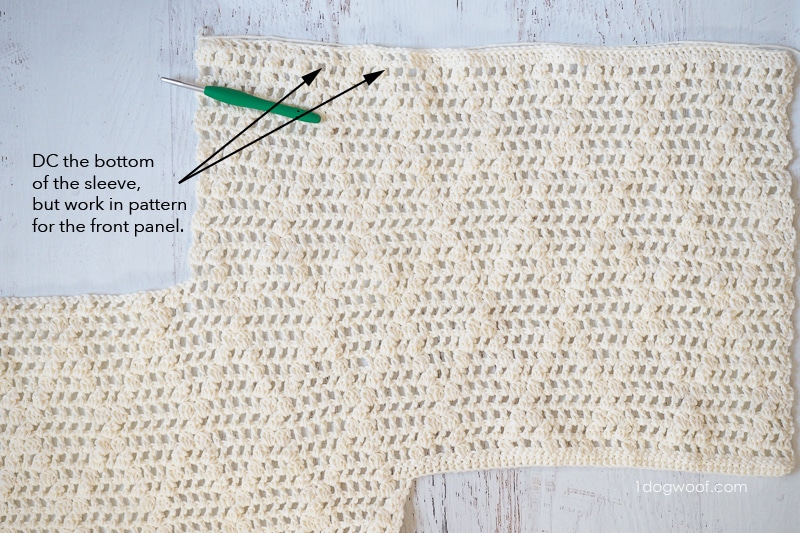
As you can see below, the cardigan is made flat in 2 pieces, and completed with 2 simple seams. You can make 75% of the entire piece with one continuous strand of yarn! The cardigan is worked from the bottom of the back upwards, directly into the sleeves, and into the right front panel. Attach a separate strand of yarn to work the front left panel and sleeve. Then, fold the cardigan in half so the front and back hems meet, and seam together the bottom of the sleeves all the way down the sides.
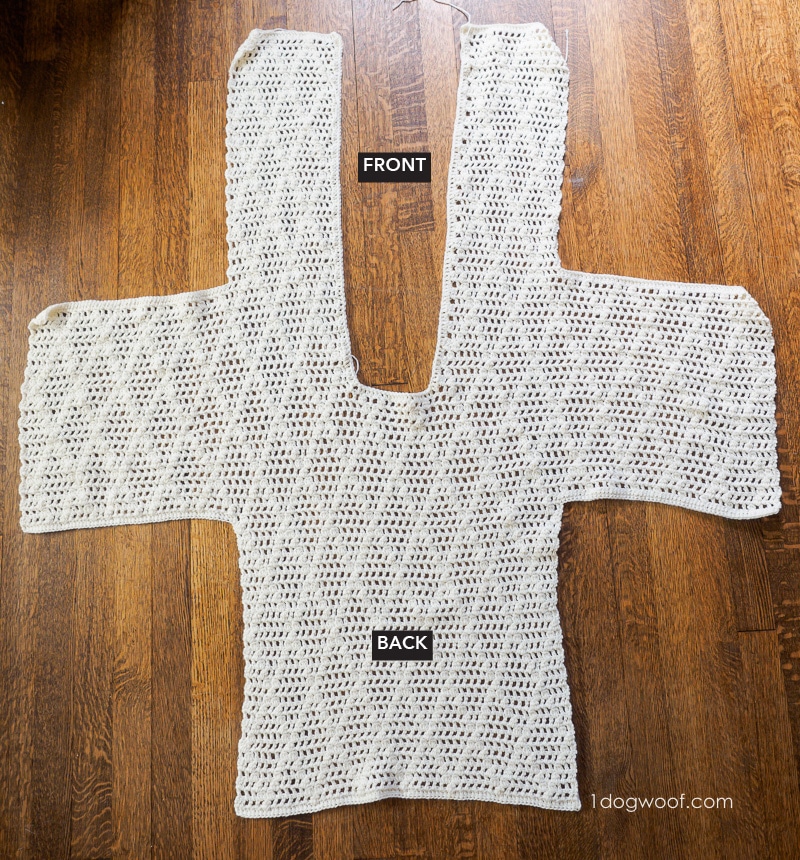
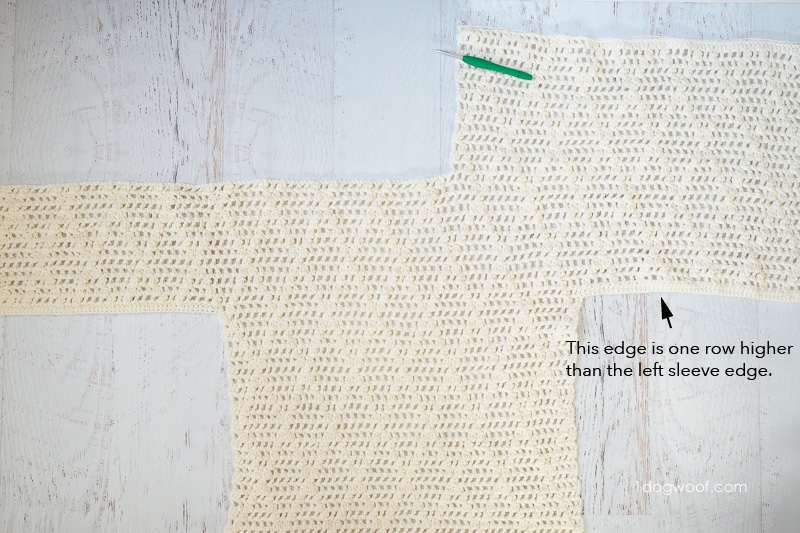
One thing to note about this type of construction is that the garment isn’t exactly symmetrical. Because you’re working in one piece, you’ll extend out from the back body to make the first sleeve. Then to make the other sleeve, you’ll turn the piece, work the second row of the sleeve, across the body, and then out to make the other sleeve. This means that one sleeve will be one row higher than the other. It also means one side of the back body will have an extra row. You’ll make up for this “lopsided-ness” when you work the last rows of the sleeve and front body, so that in the end, both sleeves will still have the same number of rows in it, and the body’s extra rows will be mirrored from front to back. Once you seam up your work, the asymmetry won’t even be noticeable.
Get the Pattern PDF
I found it difficult to clearly explain the construction of this piece and not make the lopsidedness too intimidating, so I drew up a few extra charts and diagrams. These extras, along with a full stitch chart and instructions on how to customize the sizing for the Diamond Clusters Cardigan, can be found in the printable and downloadable PDF available for purchase through my pattern shops.
In this blog post, you will find the supplies, abbreviations, and written instructions for making the Diamond Clusters Cardigan in 5 different sizes. But if you’d like more help, I highly recommend grabbing a copy of the PDF. It’s 9 pages of beautifully formatted text, charts, and diagrams to help you make the exact cardigan you’re looking for.
You can also subscribe to my email list to get discount codes for my new pattern launches!
——————————————
Buy the Diamond Clusters Cardigan PDF on ETSY
Buy the Diamond Clusters Cardigan PDF on RAVELRY
Add the Diamond Clusters Cardigan pattern to your Ravelry queue
——————————————
Click here to save this pattern on Pinterest!
Diamond Clusters Crochet Cardigan Free Pattern
Supplies
- 3 (3, 4, 4, 5) balls of Lion Brand Comfy Cotton in Whipped Cream (200g/7.0oz, 392yds, 358m)
- I-9/5.5mm crochet hook
- Tapestry needle
- Scissors
Abbreviations and Stitch Guide (US terminology)
- st(s) – stitch(es)
- ch – chain stitch
- yo – yarn over
- fdc – foundation double crochet: Ch 3. yo, insert hook into the first ch, pull up a loop. Yo, pull through 1 loop on hook (ch st made). Yo, pull through 2 loops, yo, pull through 2 loops. Continue working fdc by working into each ch st.
- dc – double crochet
- puff st – *yo, insert hook into st, pull up a loop, yo, pull through 2 loops.* Repeat from * 2 more times. Yo, pull through all loops on hook.
Pattern Notes
- Skill level: Easy
- Gauge: 17 sts and 7 rows in 4 inches of diamond cluster motif
- Sizes: XS (S/M, L, XL/2XL, 3XL)
- Model bust size is 34.5 in and wearing size S
- Fit is meant to be loose and casual.
- Finished body widths: 17.75 (20.5, 23.25, 26, 29) inches
- Finished lengths: 22.75 (24, 25.25, 26.25, 27.5) inches
- The ch 3 at the beginning of a row does not count as a st. The first dc is worked into the same st.
- ** To work fdc stitches at the end of a row for the sleeve extensions: yo, insert hook into the same st that you just finished, pull up a loop. Yo, pull through 1 loop on hook (ch st made). Yo, pull through 2 loops, yo, pull through 2 loops. Continue working fdc by working into each ch st.
Instructions for the Diamond Clusters Crochet Cardigan
Body
Row 1: Work 75 (87, 99, 111, 123) foundation double crochet sts. Turn.
Row 2: Ch 3 (does not count as a st, here and throughout). Work 1 dc in same st. Work *[1 dc, ch 1] 3x, [1 puff st, ch 1], [1 dc, ch 1] 2x* across the row. Work 1 dc in each of next 2 sts. Turn. (Pattern from * will be repeated 6 (7, 8, 9, 10) times across each row.)
Row 3: Ch 3. Work 1 dc in same st. Work *[ch 1, 1 dc in ch sp] 2x, [ch 1, 1 puff st in ch sp] 2x, [ch 1, 1 dc in ch sp] 2x* across the row. Ch 1, work 1 dc in last st. Turn.
Row 4: Ch 3. Work 1 dc in same st. Work *[1 dc in ch sp, ch 1] 2x, [1 puff st in ch sp, ch 1], [1 dc in ch sp], [ch 1, 1 puff st in ch sp], [ch 1, 1 dc in ch sp], ch 1* across the row. Work 1 dc in each of next 2 sts. Turn.
Row 5: Ch 3. Work 1 dc in same st. Work *[ch 1, 1 dc in ch sp], [ch 1, 1 puff st in ch sp], [ch 1, 1 dc in ch sp] 2x, [ch 1, 1 puff st in ch sp], [ch 1, 1 dc in ch sp],* across the row. Ch 1, work 1 dc in last st. Turn.
Row 6: Ch 3. Work 1 dc in same st. Work *[1 dc in ch sp, ch 1], [1 puff st in ch sp, ch 1], [1 dc in ch sp, ch 1] 3x, [1 puff st in ch sp, ch 1]* across the row. Work 1 dc in each of next 2 sts. Turn.
Row 7: Ch 3. Work 1 dc in same st. Work *[ch 1, 1 puff st in ch sp], [ch 1, 1 dc in ch sp] 4x, [ch 1, 1 puff st in ch sp]* across the row. Ch 1, work 1 dc in last st. Turn.
Row 8: Ch 3. Work 1 dc in same st. Work *[1 puff st in ch sp, ch 1], [1 dc in ch sp, ch 1] 5x* across the row. Work 1 puff st in next st, 1 dc in next st. Turn.
Row 9 (repeat Row 7): Ch 3. Work 1 dc in same st. Work *[ch 1, 1 puff st in ch sp], [ch 1, 1 dc in ch sp] 4x, [ch 1, 1 puff st in ch sp]* across the row. Ch 1, work 1 dc in last st. Turn.
Row 10 (repeat Row 6): Ch 3. Work 1 dc in same st. Work *[1 dc in ch sp, ch 1], [1 puff st in ch sp, ch 1], [1 dc in ch sp, ch 1] 3x, [1 puff st in ch sp, ch 1]* across the row. Work 1 dc in each of next 2 sts. Turn.
Row 11 (repeat Row 5): Ch 3. Work 1 dc in same st. Work *[ch 1, 1 dc in ch sp], [ch 1, 1 puff st in ch sp], [ch 1, 1 dc in ch sp] 2x, [ch 1, 1 puff st in ch sp], [ch 1, 1 dc in ch sp],* across the row. Ch 1, work 1 dc in last st. Turn.
Row 12 (repeat Row 4): Ch 3. Work 1 dc in same st. Work *[1 dc in ch sp, ch 1] 2x, [1 puff st in ch sp, ch 1], [1 dc in ch sp], [ch 1, 1 puff st in ch sp], [ch 1, 1 dc in ch sp], ch 1* across the row. Work 1 dc in each of next 2 sts. Turn.
Row 13 (repeat Row 3): Ch 3. Work 1 dc in same st. Work *[ch 1, 1 dc in ch sp] 2x, [ch 1, 1 puff st in ch sp] 2x, [ch 1, 1 dc in ch sp] 2x* across the row. Ch 1, work 1 dc in last st. Turn.
Row 14: Ch 3. Work 1 dc in same st. Work *[1 dc in ch sp, ch 1] 3x, [1 puff st in ch sp, ch 1], [1 dc in ch sp, ch 1] 2x* across the row. Work 1 dc in each of next 2 sts. Turn.
Note: Rows 3-14 completes 1 repeatable diamond motif.
Continue working in the diamond motif pattern until your panel is approximately 16 inches long (32 total rows)
Back Sleeves
Row 1: On the next row, work in pattern to end of row, but do not turn. Continue the row by working 56 fdc **. Turn. Note: This is the first sleeve extension.
Row 2: Work in pattern across the sleeve (56 sts) and body (75 (87, 99, 111, 123)). Do not turn. Continue the row by working 56 foundation double crochet sts. Turn. Note: This is the second sleeve extension.
Row 3: Work in pattern*** across the entire row.
Rows 4-12 (14, 16, 18, 20): Continue working in the diamond motif pattern until your sleeves are approximately 6.75 (8, 9.25, 10.25, 11.5) inches deep (12 (14, 16, 18, 20) rows on one sleeve, 11 (13, 15, 17, 19) rows on the other).
Front Right Sleeve + Right Panel
Row 1: Work in pattern for 83 (89, 93, 99, 103) sts. Turn, leaving remaining 104 (110, 118, 124, 132) sts unworked.
Rows 2-12 (14, 16, 18, 20): Continue working in the diamond motif pattern across the row. Turn at the end of each row.
Row 13 (15, 17, 19, 21): Work 56 dc, and then in the diamond motif pattern for 27 (33, 37, 43, 47) sts. Turn.
Row 14 (16, 18, 20, 22): Work in the diamond motif pattern across for 27 (33, 37, 43, 47) sts. Turn.
Rows 15 (17, 19, 21, 23) – 44 (46, 48, 50, 52): Continue working in the diamond motif pattern. Turn.
Row 45 (47, 49, 51, 53): Work 1 dc in each st across. Cut yarn, fasten off and weave in ends.
Front Left Sleeve + Left Panel
Row 1: Following the end of Row 1 of the Front Right Sleeve, skip 21 (21, 25, 25, 29) sts. Join yarn, ch 3 (does not count as stitch). Work in the diamond motif pattern across the row.
Rows 2-11 (13, 15, 17, 19): Continue working in the diamond motif pattern across the row. Turn at the end of each row.
Row 12 (14, 16, 18, 20): Work 56 dc, and then in the diamond motif pattern for 27 (33, 37, 43, 47) sts. Turn.
Row 13 (15, 17, 19, 21): Work in the diamond motif pattern across for 27 (33, 37, 43, 47) sts. Turn.
Rows 14 (16, 18, 20, 22)-44 (46, 48, 50, 52): Continue working in the diamond motif pattern. Turn.
Row 45 (47, 49, 51, 53): Work 1 dc in each st across. Cut yarn, fasten off and weave in ends.
Seaming
Fold the garment over at the back of neck. Line of the bottom of the sleeves, as well as the bottom of the front hems with the bottom of the back hem.
With a separate length of yarn, and starting at the sleeve cuffs, use the mattress stitch to seam under the arms and down the side of the garment.
Repeat for the other side.
Finishing
With the garment right side out, work a dc border evenly around the front of the cardigan, starting from the bottom of the front right, around the neckline, and down the front left.
Fasten off and weave in all ends.
All done!
I’d love to see all the different cardigans you make with this pattern! Please share them with me on Instagram by using the hashtag #DiamondClustersCardigan and tagging me @1dogwoof. You might just be featured on my feed!


Thank-You so much for this very cute pattern!
What a cute cardigan! Thank you for sharing the pattern! I just can’t wait to try it!
nice one good post
common Ip address
popular IP address
What a cute cardigan!
Might have to give this one a go!
Awesome blog. I enjoyed reading your articles.
Very helpful information. I am very satisfied with this article, I can share with you also useful information about it
This is just awesome. After reading this post, I am feeling like getting a cardigan ready for myself. Thank you for all those instructions.
Hey,
Nice Pattern. Will love to try it, but have one problem is the stitch given in the bracket counted as one then 2x for example Work *[1 dc, ch 1] 3x, [1 puff st, ch 1], [1 dc, ch 1] 2x* across the row.
It’s work the first bracket 3x, the second bracket once, the third bracket twice, and the whole thing repeated across the row.
Hi, I love thuis design and am planning to start making it. Only thing is that I’d like to make it shorter (somewhat like your Firefly cardigan, if only I knew how to knit!). Do you have any tips? regards, Esther
I can’t follow the instructions in this pattern at all, do you have a video showing how to make this? I took it to a crochet expert and she couldn’t follow it either. Please help, I am excited to make this.Stacy
Hi, I have started this cardigan and I have reached the back sleeves and I need a little help from you.
All i want to know is, you have mentioned that I should have 20 rows on one sleeve and 19 rows on other, so are you counting the Fdc row as the first row on the left side or no? Please help!
Hi Stacy! I’m sorry I don’t have a video for this project. If you can be more specific about where you’re having problems, I can try to help.
Hi Esther, you’ll need to make less rows when making the front and back panels.
When i saw you, I just said “such a beautiful woman”
Very Beautiful woman
Chi Wei .. I ask you thiis because I know you to be an intelligent person and not just a pattern-making robot.
Can you please suggest how I can adjust let us say this pattern (although I mean ANY cardigan) so that the two fronts become remain straight up&down on their seam sides but wedge-shaped in the middle. When I add that this is to accommodate a big (_|_), you’ll understand what I mean.
Currently there is no pattern available for the pear-shaped woman: even that big Norwegian bird is apple-shaped – quite different.
In the lying-flat photo above, the two sides of the ‘neck’ would probably need to meet at the bottom.
(This cardi isn’t a good example, in fact, because of the pattern; so pretend there’s no stitch pattern if you can think of a way for me to do the necessary increasing/decreasing ..
Because every pattern is different in its construction this is a difficult question to give a quick, cohesive answer to. My friend Chantal did a 5-part series on modifying patterns. While it mainly refers to knit garments, crochet garments would not be that different: http://www.knitatude.ca/blog/2019/8/8/how-to-modify-patterns-part-1-finding-your-body-shape
Hi, I making this pattern in weight 1 fingering yarn for XL size.. can you please help in deciding as to what should be the number of foundation chain?
You will have to do a gauge swatch and see how many stitches you need to get the 4″ x 4″ gauge swatch and then adjust from there.
Hi! Thanks for this pattern I’m loving it. I’m new to crochet so sorry if this question is basic. I’ve done the first four rows of the back and I’m confused if the last DC goes into the CH from the previous row or the last DC from the previous row. The diagram (which is super helpful thank you for that) makes me think it’s the last DC but when I read the instructions I think CH? Again I’m a newbie so sorry if this is a really basic question!
Hello! I am very excited to make this cardigan but I am having some trouble getting started.
Could you please explain row 2 I’ve tried it several ways and I am not getting it right. It would be helpful if you could do a video tutorial for the first couple rows.
Thank you!
I am not currently making video tutorials for previous patterns, but maybe I can help. For Row 2, you start with the ch 3. You dc into the first st. You *dc into the next ch, ch 1, sk 1 ch*. You will do *that* 2 MORE times. You will then puff st into the next ch, ch 1, and sk 1 ch. Then you will *dc in next ch, ch 1, sk 1 ch.* You will do *this* one MORE time. You will now repeat this entire sequence across the row.
Aw thanks, I’m so glad! The last DC goes into the the last DC from the previous row, the ch3 made before the first DC doesn’t count as a st.
Thank you for explaining the beginning of the pattern to me. I have finished the first 32 rows for the back. I was able to follow row 1 back sleeve and now I am stuck. Your diagram has been very helpful but is missing row 1&2 for the sleeve extensions. Could you please help me with row 2 if I get it started I should be able to figure out what comes next. Thank you so much for your help!!
Stacey
Hi Stacie, you just continue the diamond stitch pattern along the sleeve. Hope that helps!