
I had this project done last year, would you believe it? But I never got around to posting it…until now. It’s been so long that I can barely understand my notes, so bear with me on this one, and feel free to correct me if you make it, so others can benefit. Let’s just call this a mutual collaboration, m-kay?
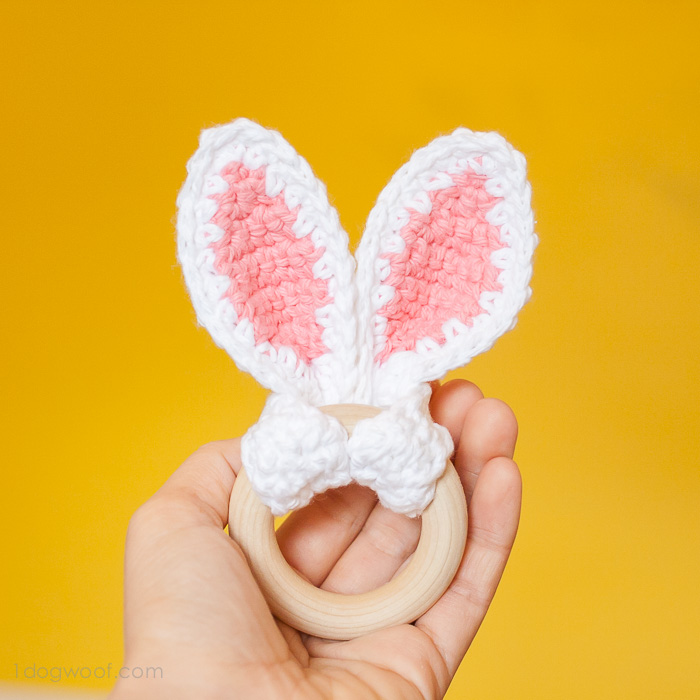
Anyways, Easter is holy-smokes-next-week-where-did-the-time-go?! Oh wait, I know. 9 hour work days, an hour commute, crazy kids, and binge-watching Bones. Yup, that’ll do it. But there’s a week, and this bunny teether should be fairly easy to whip up, and totally appropriate for any other time of year, I hope.
Oh, and I just thought of something. I want to share a bit more about the behind-the-scenes so you can see a little bit of my reality, I dunno, just for fun. So, here’s my notes. Go.
ch 2, sc1, ch 1 turn
2 sc in st, ch 1 turn
2sc in 1st st, 1 scm ch1 turn (3)
2sc in 1st st, 2 sc, ch 1 turn (4)
(5)
(6)
3x (6)
decrease to 4 st.
then 18x (4) probably be 23 or 24x(4) before starting back up to 6st.
Yah. Crazy right?
Now, let’s make this mean something…
And as with my other patterns, you can sell finished products with this pattern, but please do not distribute/sell the pattern itself as your own. My notes may be bad, but they’re still my notes.
Supplies
white and pink Lily Sugar ‘N Cream cotton yarn (Better to chew on than acrylic, no?) – this is scrap-buster project
G hook (4.0mm)
2.5 in wooden teething ring from Alexa Organics
scissors
Abbreviations
sc: single crochet
sc2tog: decreasing stitch from 2 single crochets to 1 stitch
sl st: slip stitch
Instructions
Outer ear (Make 1)
Row 1: Ch2, work 1 sc in 2nd stitch from hook. Ch 1. Turn.
Row 2: Work 2 sc in first stitch. Ch 1. Turn.
Row 3: Work 2 sc in first stitch, 1 sc in next stitch. Ch 1. Turn. (3)
Row 4: Work 2 sc in first stitch, 1 sc in next 2 stitches. Ch 1. Turn. (4)
Row 5: Work 2 sc in first stitch, 1 sc in next 3 stitches. Ch 1. Turn. (5)
Row 6: Work 2 sc in first stitch, 1 sc in next 4 stitches. Ch 1. Turn. (6)
Row 7-9: Work 1 sc in each stitch across. Ch 1. Turn. (6)
Row 10: Work 1 sc2tog (decrease) across first 2 stitches. Work 1 sc in next 4 stitches. Ch 1. Turn. (5)
Row 11: Work 1 sc2tog (decrease) across first 2 stitches. Work 1 sc in next 3 stitches. Ch 1. Turn. (4)
Row 12-35: Work 1 sc in each stitch across. Ch 1. Turn. (4)
Row 36: Work 2 sc in first stitch, 1 sc in next 3 stitches. Ch 1. Turn. (5)
Row 37: Work 2 sc in first stitch, 1 sc in next 4 stitches. Ch 1. Turn. (6)
Row 38-40: Work 1 sc in each stitch across. Ch 1. Turn. (6)
Row 41: Work 1 sc2tog (decrease) across first 2 stitches. Work 1 sc in next 4 stitches. Ch 1. Turn. (5)
Row 42: Work 1 sc2tog (decrease) across first 2 stitches. Work 1 sc in next 3 stitches. Ch 1. Turn. (4)
Row 43: Work 1 sc2tog (decrease) across first 2 stitches. Work 1 sc in next 2 stitches. Ch 1. Turn. (3)
Row 44: Work 1 sc2tog (decrease) across first 2 stitches. Work 1 sc in next stitch. Ch 1. Turn. (2)
Row 45: Work 1 sc2tog (decrease) across both stitches.
Work sc evenly all the way around the piece.
Inner ear (Make 2)
With pink yarn:
Row 1: Ch2, work 1 sc in 2nd stitch from hook. Ch 1. Turn.
Row 2: Work 2 sc in first stitch. Ch 1. Turn.
Row 3: Work 2 sc in first stitch, 1 sc in next stitch. Ch 1. Turn. (3)
Row 4: Work 2 sc in first stitch, 1 sc in next 2 stitches. Ch 1. Turn. (4)
Row 5: Work 2 sc in first stitch, 1 sc in next 3 stitches. Ch 1. Turn. (5)
Row 6: Work 2 sc in first stitch, 1 sc in next 4 stitches. Ch 1. Turn. (6)
Row 7-9: Work 1 sc in each stitch across. Ch 1. Turn. (6)
Row 10: Work 1 sc2tog (decrease) across first 2 stitches. Work 1 sc in next 4 stitches. Ch 1. Turn. (5)
Row 11: Work 1 sc2tog (decrease) across first 2 stitches. Work 1 sc in next 3 stitches, changing to white yarn at the end of the last sc. Ch 1. Turn. (4)
Row 12-17: Work 1 sc in each stitch across. Ch 1. Turn. (4)
Work sc evenly all the way around the piece.
Now you want to attach the inner ear pieces to the outer ear:

Match up the inner ear piece you’ve just finished to the outer ear piece, and start working slip stitches along the narrowest part of the outer ear piece. After about 11 slip stitches, match the other inner ear piece to the outer ear piece and continue working slip stitches along the edge, this time, working through the 4 loops of both pieces – stitching them together. Continue working slip stitches around the ear, along the narrow strip, and along the other inner ear, finally getting all the way around, and slip stitch into your first stitch to complete the piece.
Attach your crochet ears to the wooden ring using a lark’s head knot: Fold the ear piece. Insert the ears through the wooden ring. Take the crochet fold on the other end and loop that around the two ears. Tighten and adjust to form the bunny ears.
NOTE: Once you’re satisfied with how it looks, you’ll want to tie or sew the ears securely together on the loop because it will fall apart. Trust me.


As usual, have fun, good luck, and let me know if there are issues with the pattern!


Absolutely adorable!
Thank you for sharing this! I have a few friends who are expecting and this is such a lovely and easy gift. I just finished my first one and didn’t encounter a problem with your pattern. I did make a mistake by tieing off my yarn on the inner ear part. So I ended up sewing them on rather than slip stitching. Next time I will do the slip stitching though.
Also, my ring is a little smaller (2″) so more of the white middle part is showing. Next time I will also extend the pink portion by 2 rows so it looks more like your original. Just thought I’d pass that tip along in case someone else is using a smaller ring. Thanks again!
These are great. I know quite a few people with teething babies. I made 2 bunny ears, and then adjusted the pattern just a little to try and make fox ears! Just waiting on the rings to put them all together. Thanks so much!!
Thanks for sharing the pattern! I’ve just made it for my baby 🙂
I had one issue with the pattern though. It is too short to knot it well. The ears are not as well visible from behind the ring as at your photo 🙁
I haven’t made any yet but how would you like to be addressed when advertising products?