
I can’t believe it’s already been over a year since I finished my gigantic Zoodiacs afghan! At the time, I also published a post on everything I knew about corner to corner crochet, or c2c crochet. It included my notes, my thoughts and a series of videos, including a hefty 30 minute video of me working through a simple square, complete with color changes. I think videos can be incredibly helpful, but if you don’t always have the internet handy, it’s nice to have a printed pictorial to carry around, just in case you can’t quite remember how something works. So here are 9 corner to corner crochet pictorials for beginners. I hope you find it useful!
Since this is a series of instructions, I’m not specifying any materials. Any hook and yarn that you have will work fine.
And if you’re wondering how to actually have a printed copy of what I’m sharing here, you can purchase the ebook in my Etsy shop. The printable PDF includes all the photos and instructions, beautifully and carefully formatted so that the matching text and images are all on the same page, so there’s no flipping back and forth while trying to learn something.
Starting a Corner to Corner Crochet Project
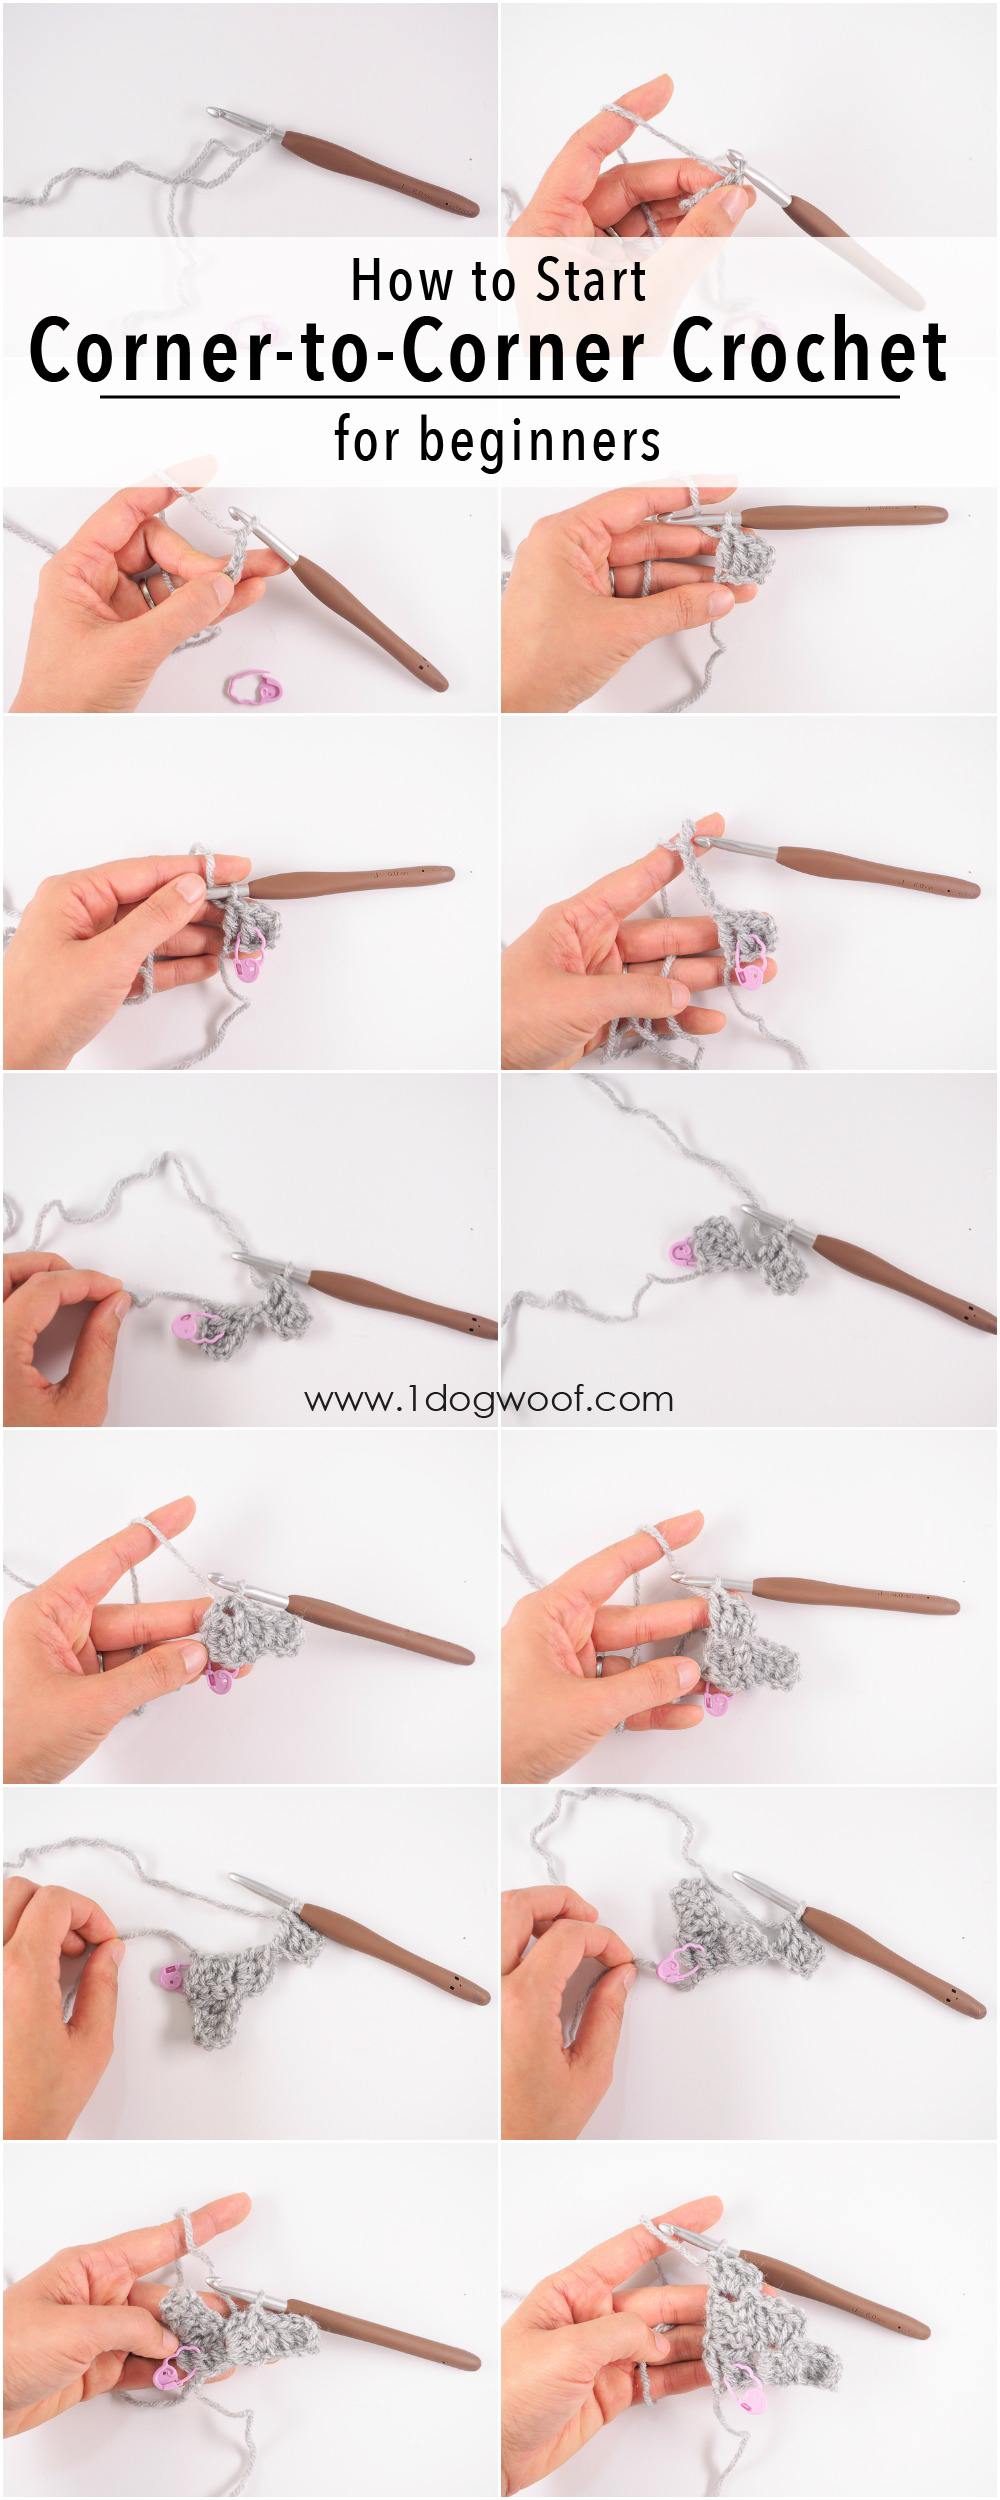
- Start with a slip knot on your hook.
- Ch 3, pinch 3rd ch.
- Ch 3 more.
- Work 1 dc into the ch you’re pinching, which is the 4th ch from hook. Then work 1 dc in each of the next 2 ch.
- Clip a stitch marker to the 1st dc to indicate the “front”.
- Ch 6.
- Work 1 dc in 4th ch from hook, and 1 dc in each of next 2 ch. Now you should have 2 squares completed.
- Turn the left square over so that the stitch marker faces down.
- Insert hook into ch sp of left square and join with sl st.
- Ch 2. Work 3 dc in ch sp. Two rows complete.
- To start the 3rd row, ch 6, work 1 dc in 4th ch from hook, 1 dc in each of next 2 ch.
- Turn left side of work (2 previous rows) over so that stitch marker faces up.
- Join to adjacent square with sl st through ch sp.
- Finish row by working [2 ch, 3 dc] in ch sp, joining to adjacent square, [2 ch, 3 dc]. This completes the 3rd row. Subsequent rows are worked the same way.
How to Increase Rows
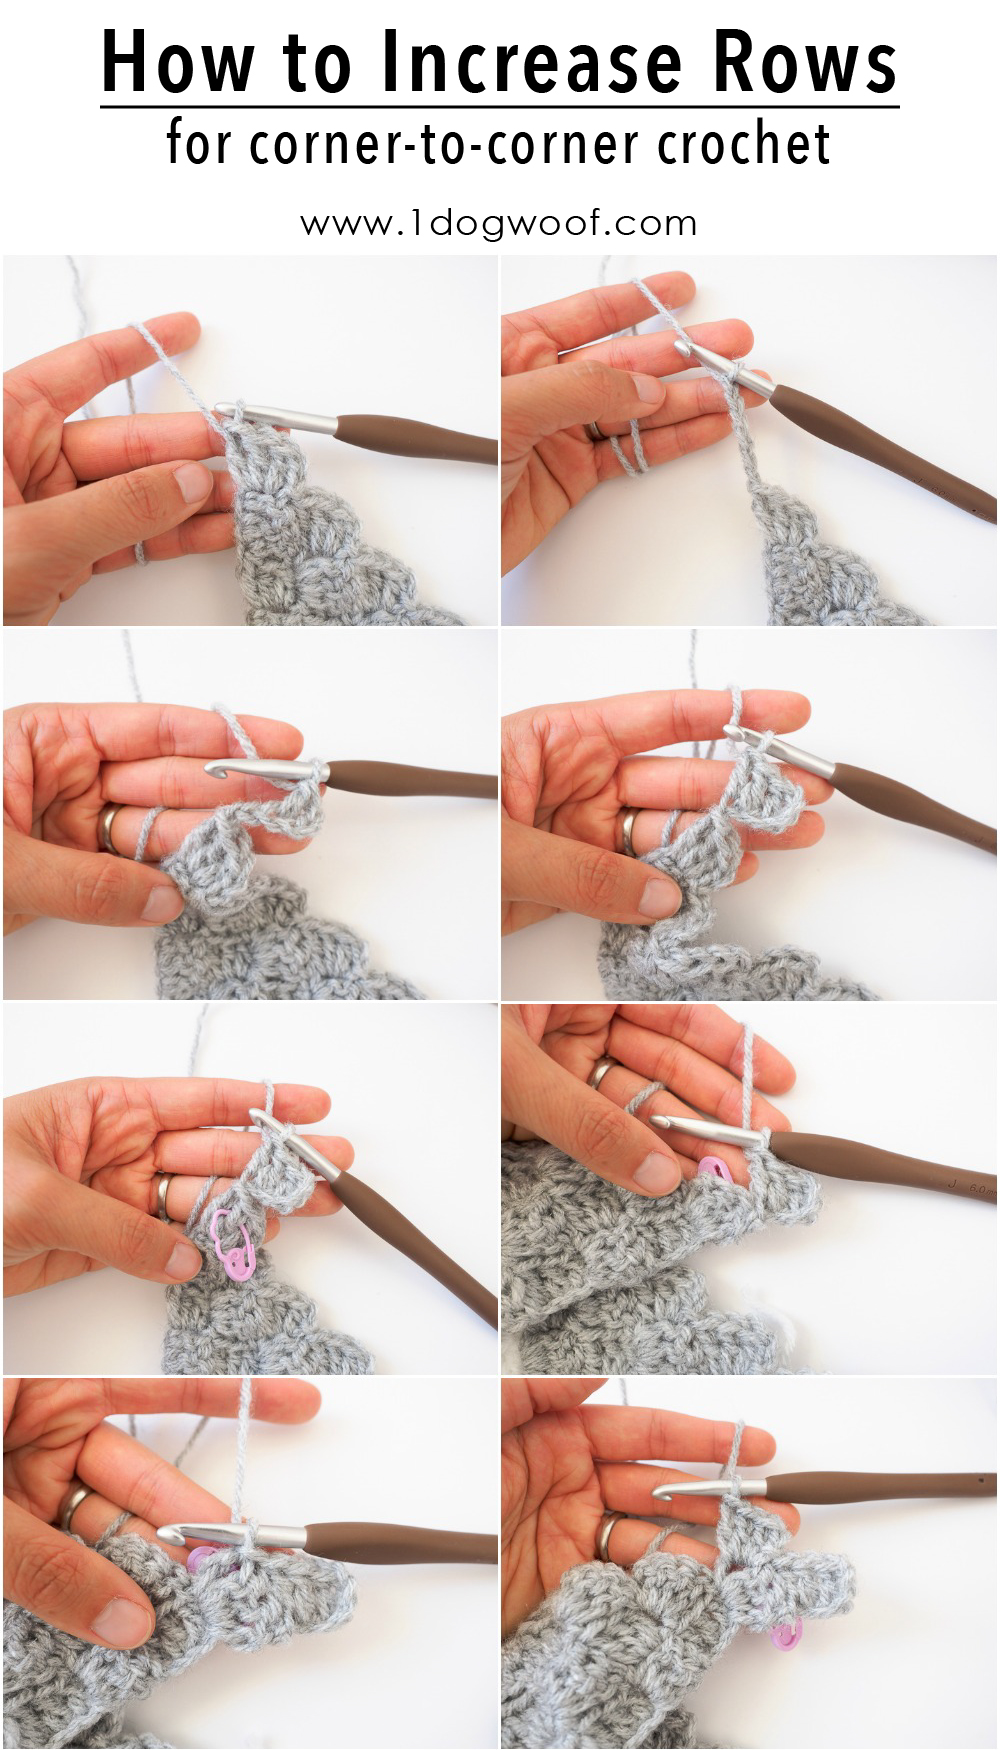
- You’ve reached the end of a row and need to increase rows until desired size. This is similar to the previous pictorial.
- Ch 6.
- Work 1 dc in 4th ch from hook.
- Work 1 dc in each of next 2 ch.
- Add stitch marker to indicate “front”.
- Turn work over so that the stitch marker faces down.
- Join with sl st to ch sp of adjacent square.
- Work [ch 2, 3 dc] in ch sp to complete the 2nd square in the row.
How to Add a New Color or Yarn Section
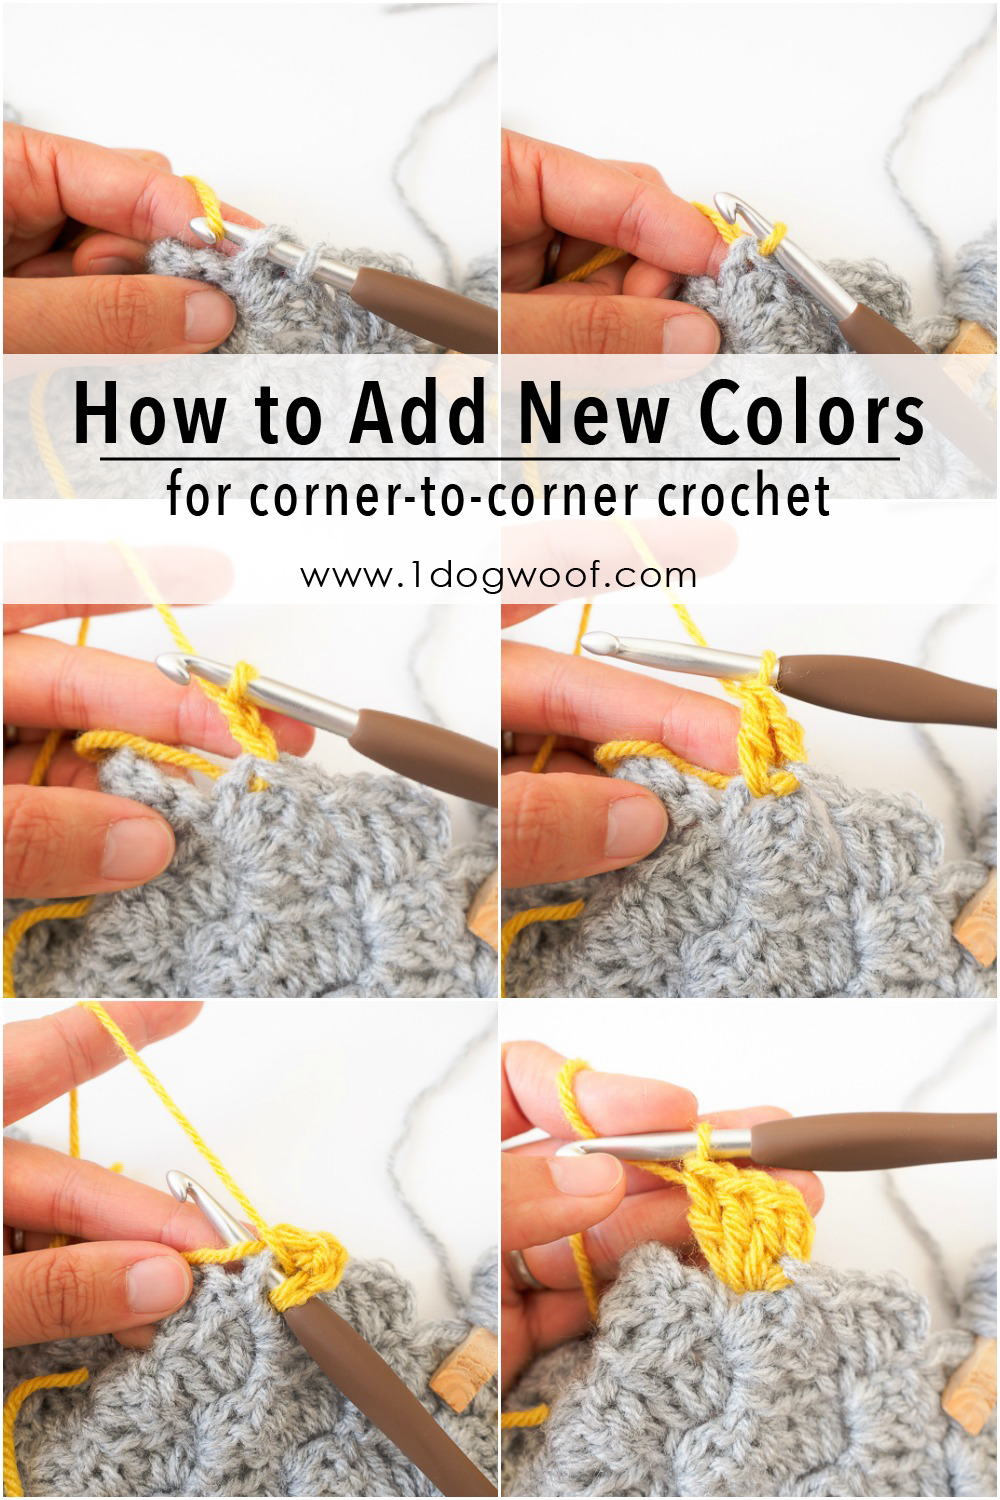
- Insert hook into ch sp of adjacent square.
- Pull up loop of new color yarn.
- Ch 2.
- Work 1 dc in ch sp. Hold tail of new yarn close to ch sp and work dc around the tail to help secure it in place.
- Tip: When inserting hook into ch sp, insert under the yarn tail before pulling up a loop.
- Work a total of 3 dc in ch sp to complete the square.
How to Create Bobbins for Small Sections of Color
I normally use my Modular Bobbin Holder to handle all the different bits of yarn, but for this particular project, there were a few too many bits to manage, so I chose to wind my yarn onto clothespins and attach the “bobbins” directly to the afghan I was working on. This trick, however, is really to help you calculate how much yarn you need to complete a particular section, so you don’t run out and have to keep re-attaching yarn.
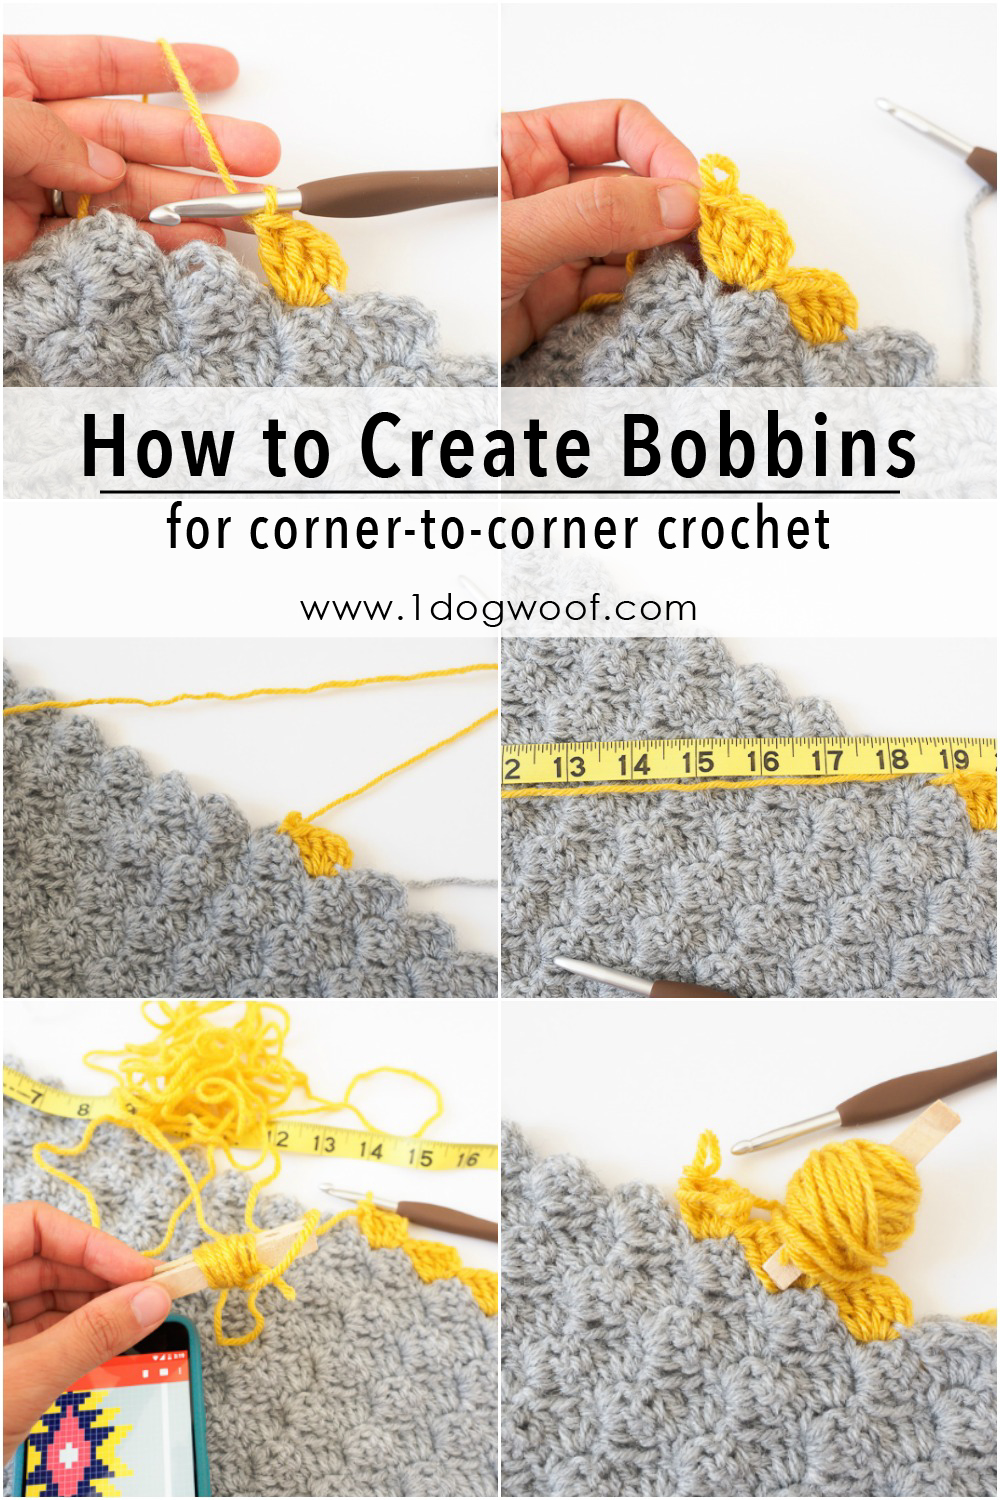
- Complete 1 square of new color to secure yarn in place.
- Work a second square. Pinch yarn where square completes.
- Still pinching the yarn, unravel the second square to the end of the first square.
- Measure length of yarn unraveled – this is how much yarn you need to work 1 square.
- Multiply this length by the number of squares needed to work a color section, add ~12” for slack and tail, cut.
- Wrap yarn around clothespin and clip to your work.
How to Pick Up Existing Color Changes
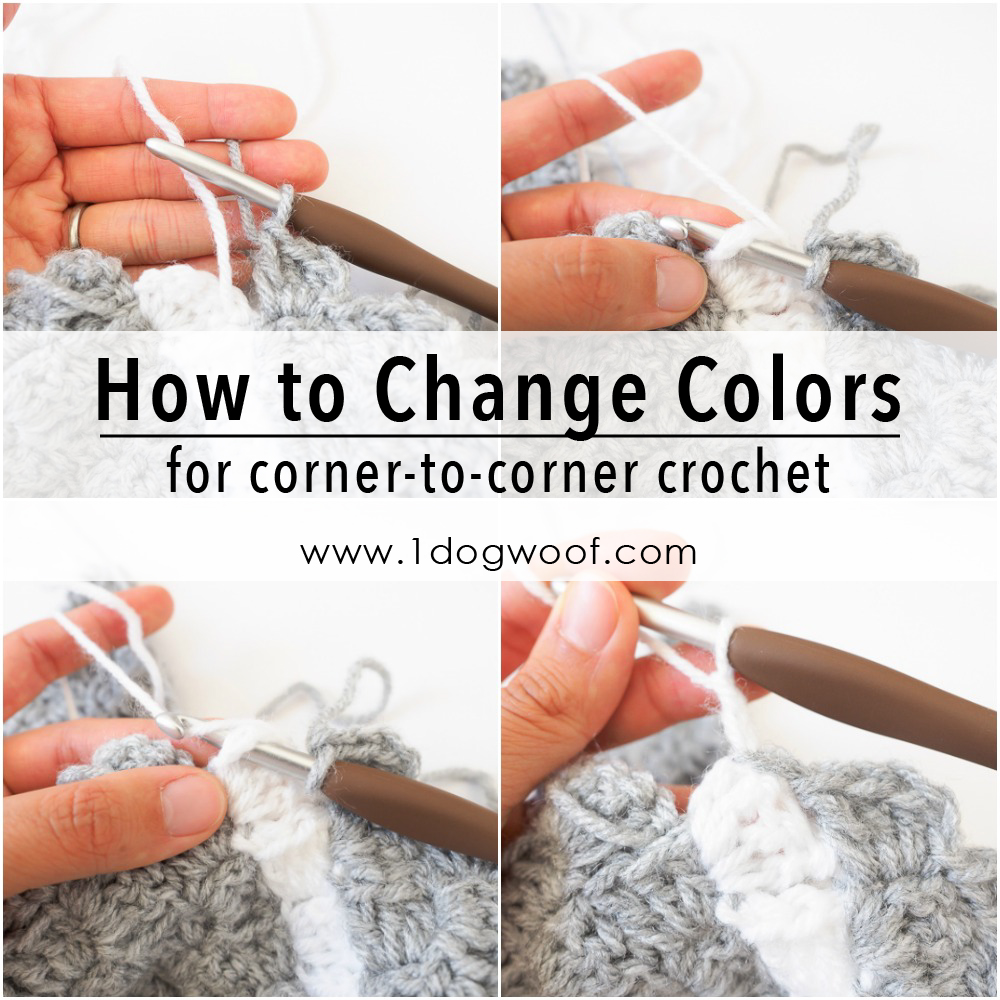
- Pick up the yarn you want to change to, pull slightly to tighten the previously worked square.
- Insert hook into adjacent ch sp.
- Yarn over and pull up a loop of new desired
color to complete a sl st. - Ch 2. Then work 3 dc in ch sp to complete square in new color.
How to Bring a Yarn Color Down to Where You Need It
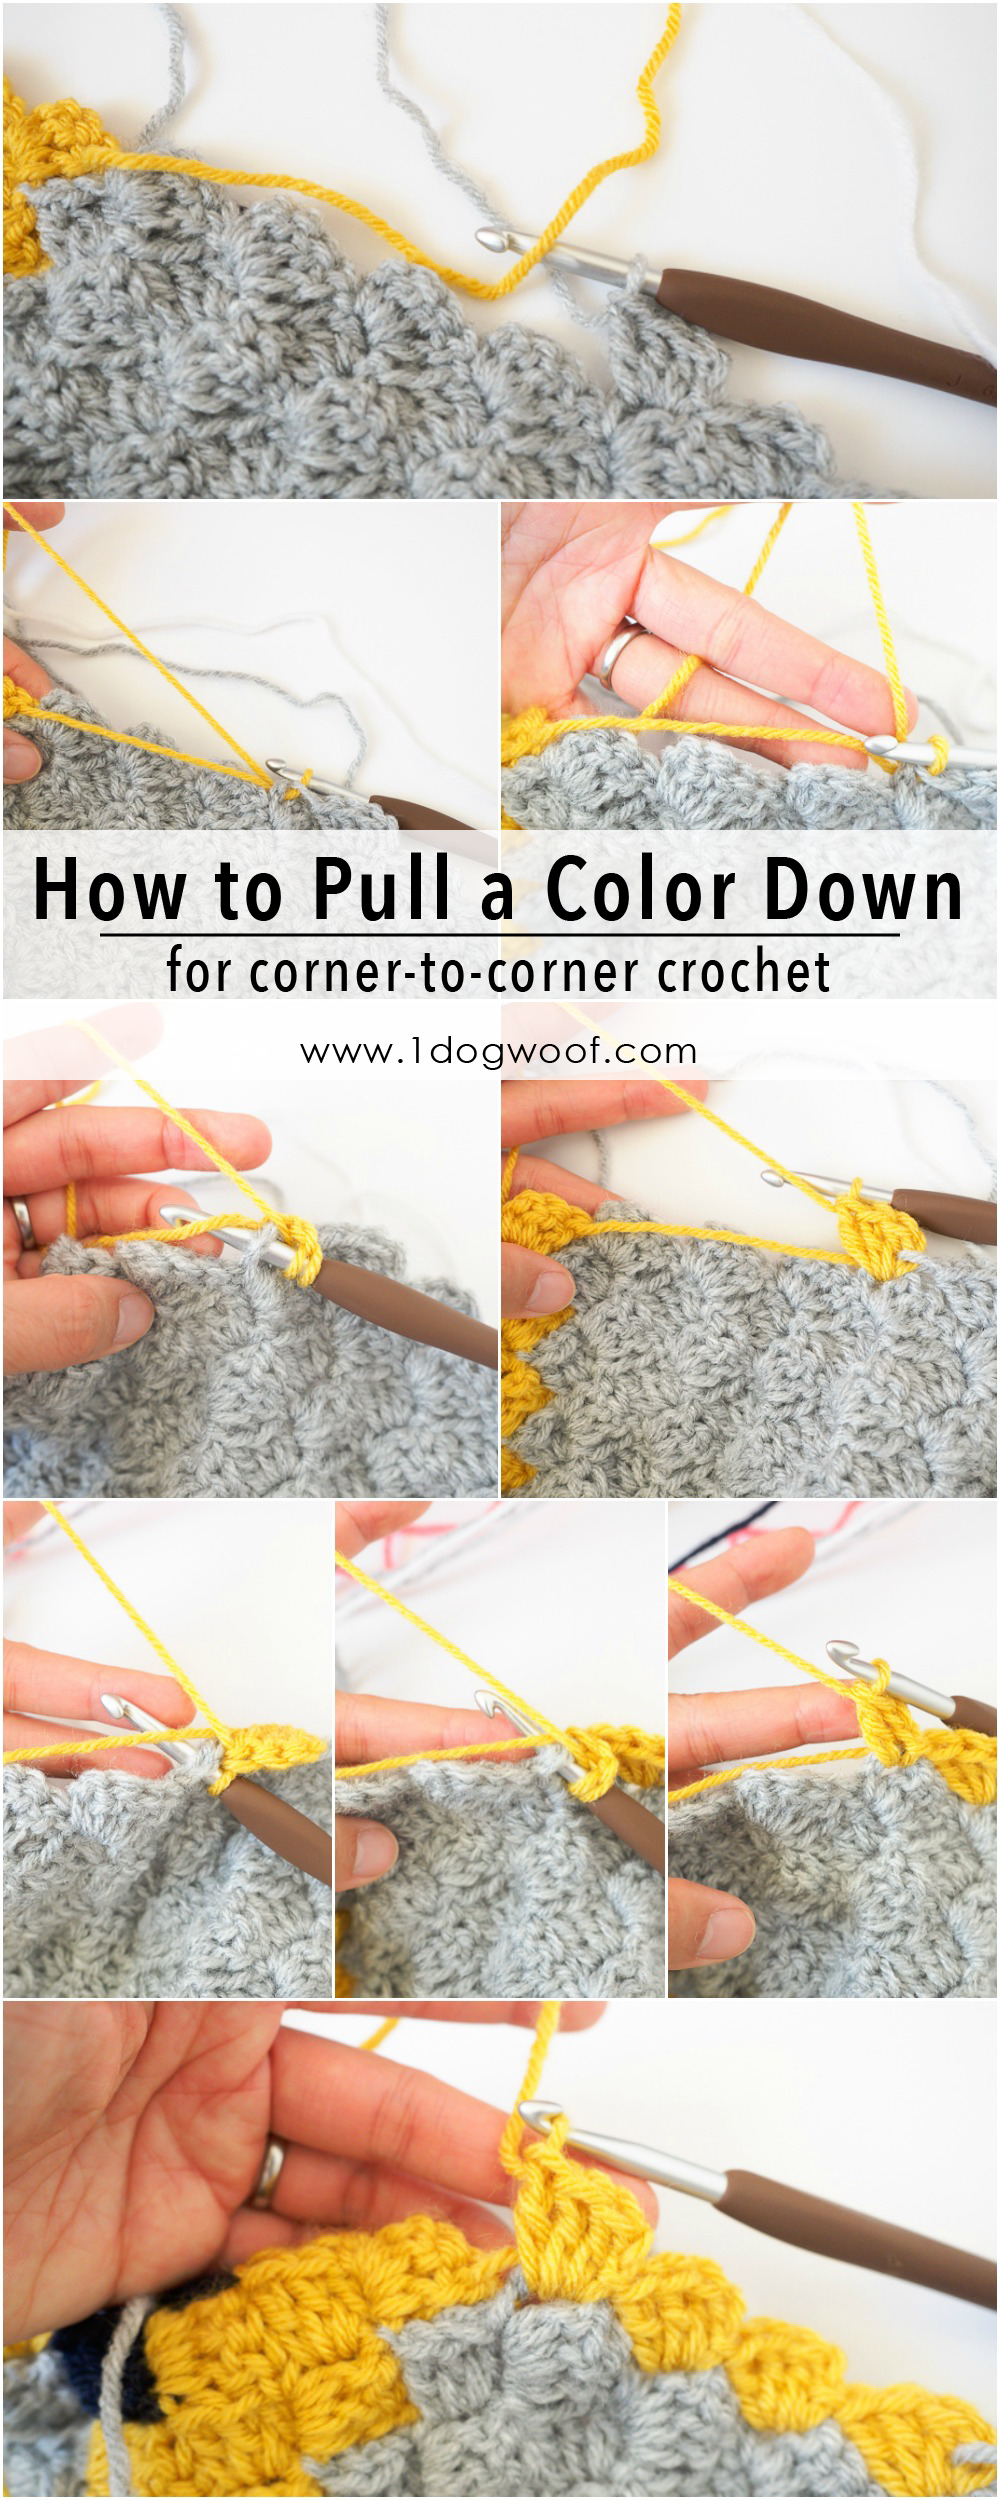
- Bring desired yarn down to where you need it.
- Insert hook into ch sp and pull up new loop.
- Allow enough slack in pulled down yarn to work around it on the next several stitches and maintain looseness in your work, but not too much slack that it can get tangled.
- Work around the pulled down yarn when completing the 3 dc in the ch sp.
- Pulled down yarn is hidden inside the 3 dc.
- Work around the pulled down yarn when joining to next square with sl st.
- Work around the pulled down yarn when working 3 dc in ch sp.
- Continue working around pulled down yarn until the point where you had originally pulled from. The yarn should be almost completely hidden underneath the c2c stitches.
How to Carry a Color Up to Where You Need It
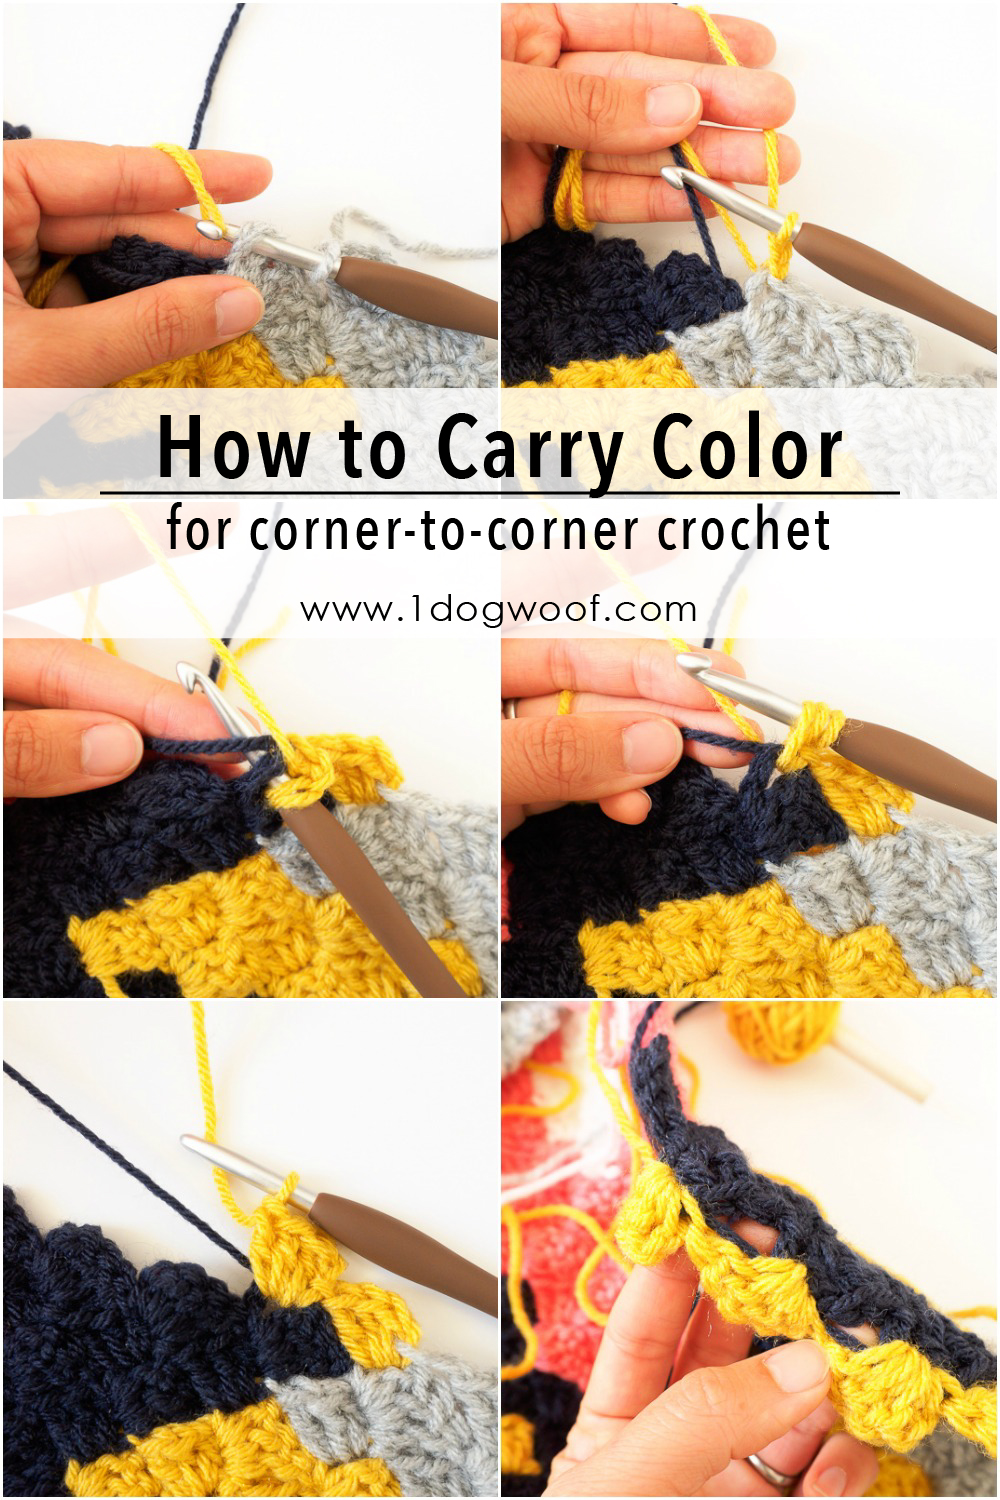
- Another way to minimize yarn ends is to carry a desired yarn up to where you need it, while hiding it underneath other stitches.
- I happen to also be joining a new color.
- Complete the mustard sq first, then start carrying the navy.
- Work the mustard loop around the navy to carry it with you.
- Navy is hidden underneath the mustard square.
- You can see the carried yarn if you look closely, but it’s not outwardly noticeable.
How to Decrease Rows

- Stop at a horizontal edge. Attach stitch marker to indicate “front”.
- Join with sl st to adjacent square.
- Ch 1.
- Turn work so that stitch marker faces away from you.
- To the left of the join, you’ll see the tops of the 3 dc.
- Work 1 sl st in each of the 3 st along the edge.
- Work sl st into ch sp immediately following the edge.
- Ch 3.
- Work 3 dc into ch sp to complete square. This is the first square in the new row.
- *For the final square in the project, use the same technique, and then join with sl st to adjacent ch sp, then fasten off.
How to Weave in Ends
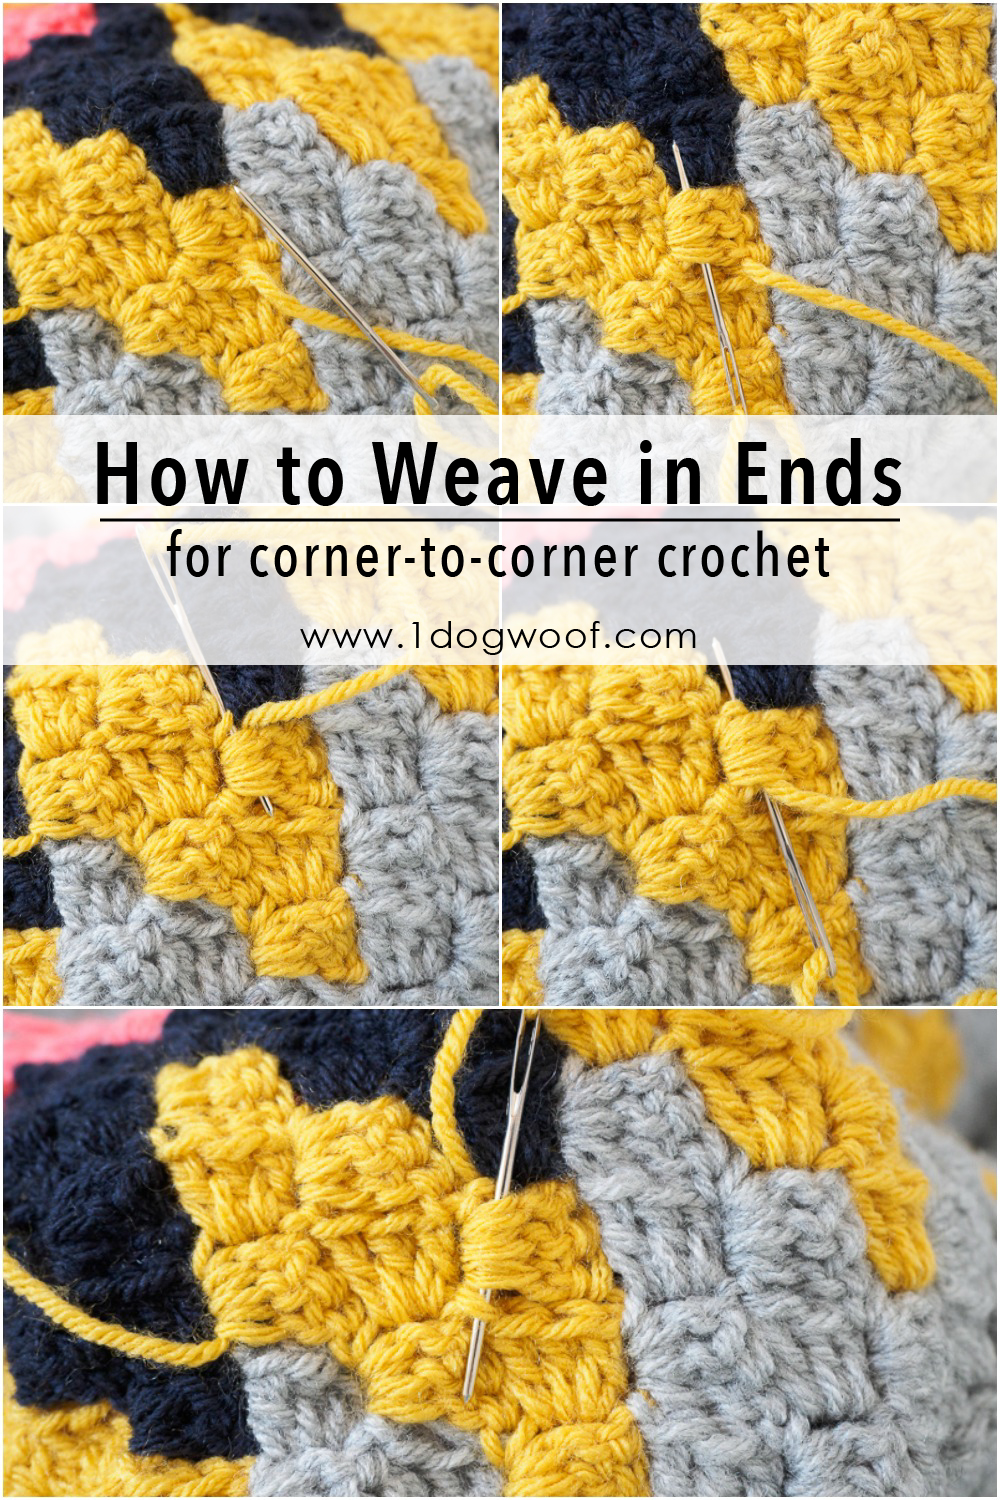
- Thread a yarn end onto an embroidery needle.
- Sew end through the cluster/bottom part of the 3 dc grouping.
- Sew end back and forth through same section a few more times to secure. Cut end.


So while you’re increasing you slip stitch and chain 2 into each of the chain space along with 3 double crochet, but when decreasing you slip stitch and chain 3 into each of the chain space along with 3 double crochet… just curious as to why I think wouldn’t be the same whether increasing or decreasing?
Yup. I think most tutorials say to do 3 chains on both decreases and increases. I choose to use 2 chains on my increases to keep the squares a bit tighter. I find that if I use 3 chains, the holes are larger than I’d like. But that’s probably just personal preference! It doesn’t really affect the “Square”-ness of each block, so I like using 2 chains more. Hope that helps!
Thank you for sharing the tutorial!! Bookmarked and gonna try later!
Thank you for such wonderful information. It really clarified and answered some questions I had.
Thank you so much for this great pattern! I started my blanket 2 days ago and I’m so excited!!! I will do it with the same grey background and white arrows, but the middle drawing in pink and blue. It’s such a great stitch! I’m already thinking about Christmas gifts for everyone!
Question. I’m familiar with c2c to make squares but how do you make a rectangle ie… rows that are the same length ? Trying to make an Afghan for a very tall gal! Thanks
Basically, you would do it the exact same way as a square C2C except you will stop increasing when you reach the width you want but you will continue the increase in height. In other words, you don’t have to continue increasing on both sides so instead of having a 25×25, you may have a 25×15. Does this help any? It would be easier to sketch it out than telling someone how to do it.
HELP!I’m new at this.I need to start adding rows to my work and already did my chain.It says to turn my work.How do I do that?
Thank you for taking the time to share all this wonderful information step by step and so detailed. I have done a c2c pattern baby blanket and have tempted a color change with picture but didn’t quite get the carrying over of the color change or how to hide them beautifully as you have switched your colors! Thank you for the encouragement once again that there is hope to try this once again ????????
oh no! I bought the lion brand track tape I believe it was called to make the shawl that was gray tan and white and now I can’t find it on your site… Help… I love the pattern… Thank you so much for all your generosity !!!!!
I am having problems with my c2c charts and my pattern working out right. I mark and count each row and how many c2c blocks per color but My pattern seems to be off block count when I’m doing the top and side decreases. Janet
Made a c2c 50 rows each side equal but dosent look square what have I done wrong
Thank you for this tutorial. I have looked at so many others but yours is the only one that makes sense to me. Now I can start the llama blanket for my granddaughter !
Thank you for your in depth tutorial! I have frogged my C2C so many times, I was about to give up! I do have a question though. How do you hold the new tile (6 chains) so that it will be facing the right (front) side. Sometimes, it’s automatically facing the right way, other times its obviously the back.
I’ve tried turning the chain over and crocheting in the back of the loops, but once you turn the new tile to attach to the next one, it’s backwards again.
Thanks in advance for any help!
Jan
The easiest way to figure that out is to watch a YouTube tutorial than it’s so easy
I’m a beginner at c2c and my finished pieces are skewed, not a proper square but pulled out at the start and finish corners. I presume this is about the tension I’m doing, is there something I can do to get it more square? Thanks for any tips.
Is this tutorial in US or UK terms
Hi Alisha, All 1 Dog Woof patterns use US terminology.