
I’ve had the photos for this project sitting around for a while so I thought I’d share it, since despite all the yumminess going on, you’re really here for the crafts, right? Or am I THAT charming?
J is at an age where he loves books, LOVES them. I can read the same book to him multiple times morning and night and he’ll point to it again and say “mo”. His favorite title keeps changing, so we have more than a dozen (maybe 2 dozen) floating around on the table next to our special chair, on the shelf underneath, or scattered on the floor. This doesn’t even include the ones he hasn’t pulled off the real bookshelf; this is just his “read everyday” bookshelf. I really needed a way to keep all these books in order; otherwise, I’d spend time picking up every night just so he can find his FAVORITE book in the morning.

This idea was not originally mine. I have to give credit to a post I saw on Ohdeedoh way back in the day, when I was pregnant and surfing the web, thinking about all the cool things I could do with all the spare time I was going to have after giving birth. Riiiight. Anyways, I pretty much used her tutorial, but I’ll add a couple of notes.
Here is my list of supplies:
1 – 48″ length of 1/4″ hot/cold PVC pipe. It’s the cream colored one, not the white one. A 1/4″ cream hot/cold PVC pipe is not the same as a 1/4″ white cold only PVC pipe, as I found out, 3 hardware stores later.
10 – 1/4″ PVC endcaps. Buy these the same time you buy the pipe, and make sure the end caps are completely flat on the bottom, and cream (hot/cold). I bought the white version the first time around, and they were rounded at the bottom, which won’t work at all.
10 – 1/4″ PVC 90 degree elbows, to match the rest of your PVC.
Silver spray paint for the pipes. Try to find either spray paint specifically made for plastic, or also buy a spray paint sealer.
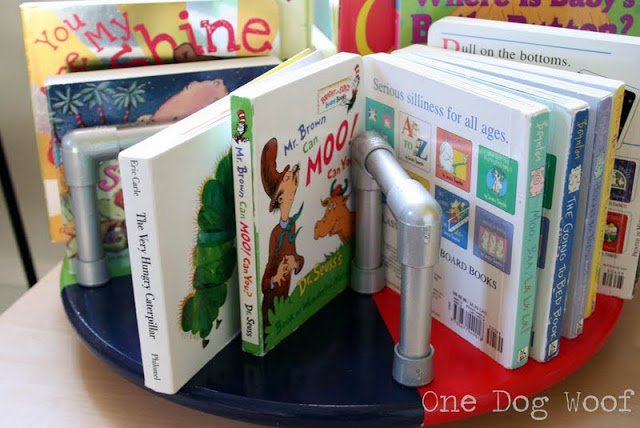
1 – lazy susan. I got mine from Ikea for under $10.
Acrylic paint in your choice of colors.
Polyurethane sealer for the base. I followed the original recommendations and got the blue Minwax water-based can.
10 small wood screws, a drill, and a screwdriver.
1. First thing I did was paint my lazy susan. I freehanded what I hoped would be 5 equal parts with a pencil, taped off one section at a time, and painted on several layers of acrylic paint. Once I was satisfied with the color, I sealed with the poly sealer.
2. Cut the pvc pipes into 3 inch lengths. Drew gave me the option of using a hacksaw or this little device he had. Not sure what it’s meant to do (nor do I know why/how he had it in that black hole we call a workroom), but it’s really really good at cutting PVC, way better than a hacksaw. I clamped the pipe in a vice, and basically scored it using this device until the piece broke off, creating my 3″ section with very smooth edges. The hacksaw made jagged edges.

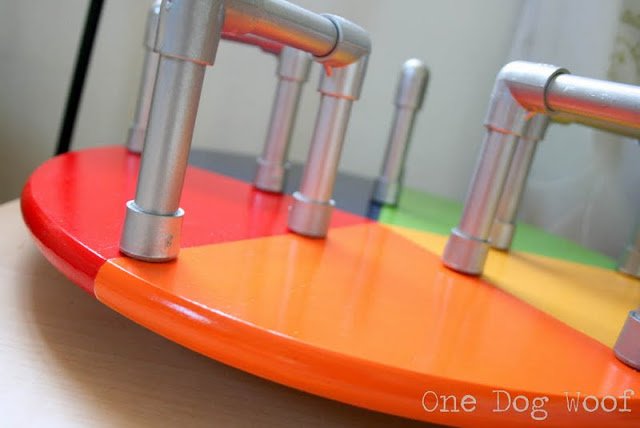
2. Assemble the 3″ pieces, end caps and elbows to make the “railings” of the merry-go-round. Then spray paint your 5 railings with the silver spray paint. I used normal spray paint, and it didn’t stick very well to the PVC (my fingers were silver) until I finished it with a spray plastic sealer. The sealer can be found next to the spray paints at the Home Despot (as Drew likes to call it).
3. Once the PVC sections are dry, use them to mark where you will attach them to the lazy susan base. I set it pretty close to the edge, and marked the dividing line between each color. Pre-drill a small hole on your marks.
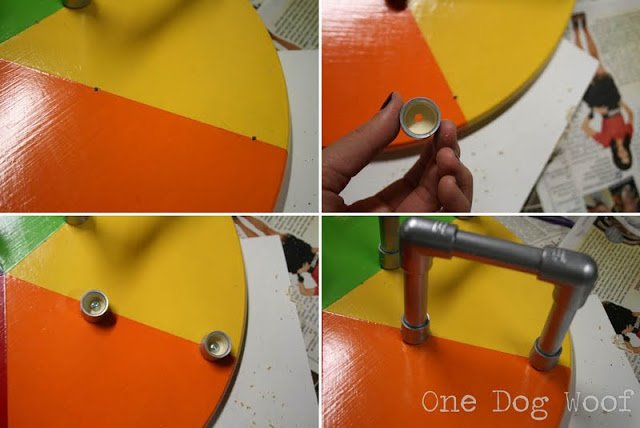
4. Take apart the railings and screw the bottom end caps into the base. I found that I needed to drill through the end cap as well before screwing down into the pre-drilled holes.
5. When the end caps are all secured, add the tops of the railings back on. You can glue them in, but I found the PVC to be a pretty tight fit (as long as you got all the right sizes!).
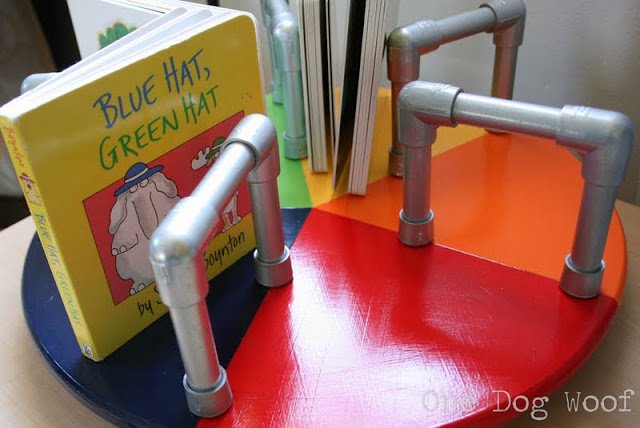
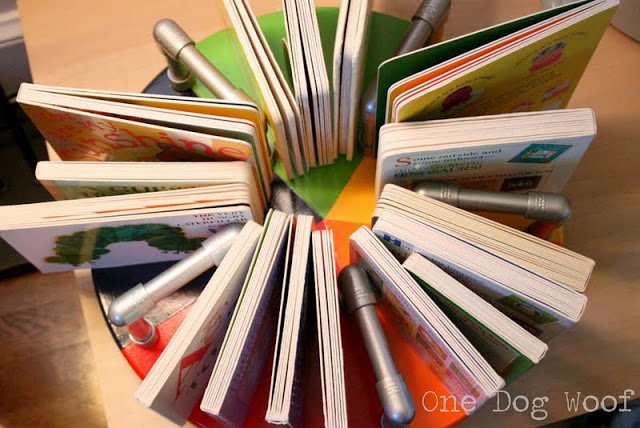
Now just add books! Of course, the board books fit best because they’ve got width to them. Our Dr. Seuss hardbacks stand up well also, but the paperbacks need to lean on something. J likes to stand and spin the book caddy and watch the books fall off. Maybe we’ll use this project as a lesson in centrifugal force someday…
![]()


Oh my goodness!! This is the coolest thing I’ve seen in awhile! LOVE it!! Great job, seriously amazing! I’m pretty sure we have every single one of those books too. 🙂
This is absolutely adorable and brings back great memories of our local park!! Do they even have those merry-go-rounds any more?? This is just really special!! 🙂
Clever idea – and nicely finished! I’m sure the kids LOVE it!
That is so great. My 3 year old has stacks and stacks of books on her night stand. I am letting daddy see this 😉 New follower from Lines Across. Love for you to follow back when you get a chance. Also, come and link up to Mom’s Monday Mingle..
http://naptimeshopper.blogspot.com
Julie at Naptime Review
So cute!! Think I may ask my dear hubby to make one for the Grands! I’m pinning this….Blessings!
You are so talented! It looks amazing!
This is adorable. What a fun way to make books accessible to children.
I really love this. Taking the time to paint that lazy susan though…that would’ve killed me 🙂
It wasn’t so bad. My little painting station sits next to the washer/dryer, so I do a little bit between 5 loads of laundry, or during commercials. Only took a couple of minutes to paint, and maybe half hour to dry. I wrapped the spongy paint brushed in saran wrap, so I didn’t have to wash the brushes every time. THAT would have killed me.
This is adorable!!!!
That is so darn cute & such a great idea!!
I’m a new GFC follower!
Come visit my blog & check out the giveaway I have going on 🙂
http://craftingandcreativity.blogspot.ca/2012/06/my-memories-suite-review-giveaway.html
Sarah
This is such a cute projects! I love the colors. Would you consider linking it up at my Pinworthy Projects Party? I hope to see you there!
How fun is this little bookshelf! Great job!
This is amazing! I love that it’s so bright and accessible. I’m sharing this on my facebook page. Thanks so much for sharing at Whimsy Wednesdays.
This is a super cute idea and while I don’t have any childrens books to use this for, I’m thinking it would be perfect for my vanity for makeup palettes!!
Happy to be your newest follower! Found you through the blog hop.
Hope you get a chance to check out my blog <3
xo, Jersey Girl
hairsprayandhighheels.blogspot.com
That is super cute- great idea! I would love for you to share this (and any other creations) at Pin It and Win It Wednesday @ http://www.cheapcraftymama.com!
love this idea very much! Definitely making a merry go round bookshelf for myself!
Oh it is so cute! The merry go round was my favorite playground item. I may try to make one for my nieces. Thanks for sharing!
So cute! By the way, Chris also refers to it as the Home Despot….must run in the family 🙂
So does Fred. Understandable though, when every project ends up requiring at least 15 trips, 15 receipts, 15 returns, 15 exchanges…
What a great idea! I wanted to let you know that you were featured @The Gunny Sack today! http://www.thegunnysack.com/2012/06/who-was-stuffed-in-gunny-sack-week-40.html
This is awesome.. you are one clever lady! Love that your blog bio! Hope you will share with my Pink Hippo Party @ http://pinkapotamus.blogspot.com/2012/06/pink-hippo-party-82.html
I am your newest follower~
xoxo
Amie @ Pinkapotamus
Pinning! This is just so cute! I actually have an extra lazy susan lying around that would work for this! I would love for you to share with my readers if you have the chance: http://www.momontimeout.com/2012/06/taking-timeout-thursday-no33.html
This is adorable, and perfect for holding a few favorite books in an easy-to-reach place! I love it! Thanks so much for linking this up to The Fun In Functional!
I love this. How creative and cute! Please come share at my linky party!
http://www.igottatrythat.com/p/blog-hop-linky-colde.html
Thanks
Marcie @ http://www.IGottaTryThat.com
I am in love with this idea! My kids would love this but I really want to make one for ME to put on my craft table to hold my craft mags, paper cutters, chipboard,square rulers and such. Thanks for the inspiration!
my daughter loves all books but her rooms very tatty.
I think can’t make this a little hard but thanks for the idea.
ok ChiWei. this is AMAZINGLY cute! love love love it!
xo,
Kimberly
If you would like to obtain much from this paragraph then you have
to apply such methods to your won blog.
Admiring the time and effort you put into your blog and in depth information you present.
It’s nice to come across a blog every once in a while
that isn’t the same out of date rehashed information. Excellent read!
I’ve bookmarked your site and I’m adding your RSS feeds to
my Google account.