
Have you entered the giveaway to win a really REALLY cute crocheted giraffe? If not, click here! The giveaway ends Sunday night at midnight!
When I was pregnant, I spent quite a lot of time roaming through the internets looking for nursery inspirations, not knowing there was a thing called Pinterest to suck you in like nobody’s business. I wanted J’s nursery to be gender neutral but still colorful and fun, and I wanted to use what I had around the house to decorate it. Sound familiar?
Well, the boy’s been enjoying his nursery for a while now, and I haven’t really updated it since I put it together. The cards I got at my baby shower are still tacked to the fabric covered corkboard I hung up….as well as the cards he got for his 1st birthday. At this rate, his graduation cards may be going up on that corkboard! So, I made a tiny and simple addition to his room this week – a paper basket 🙂
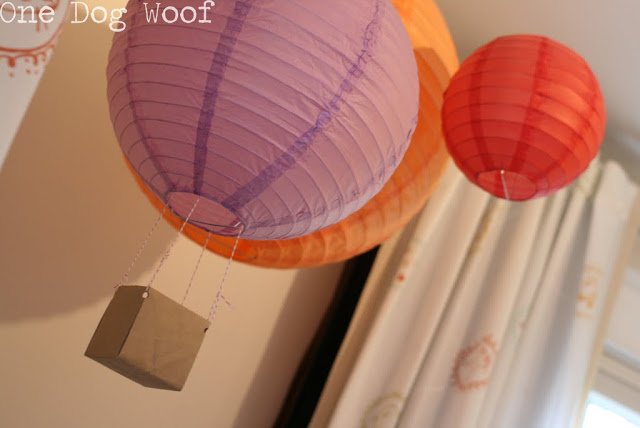
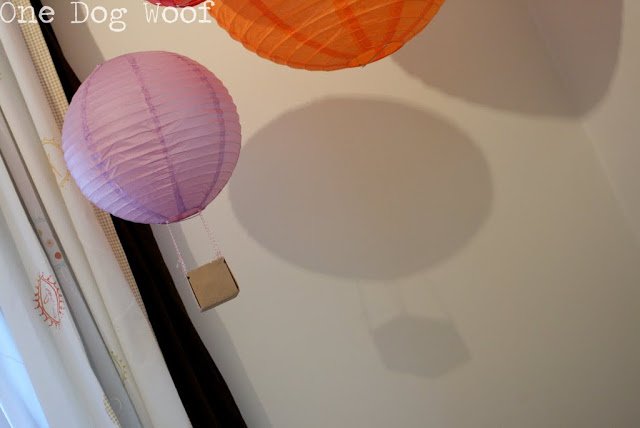
There are maybe 10 paper lanterns hung up on the ceiling, in all different colors. That was my concession to a mobile (actually, there’s a paper crane mobile too), and I liked how it added lots of visual interest to the room. Hanging a little brown basket off of one of them all of a sudden changes a paper lantern from a ball to a hot air balloon!
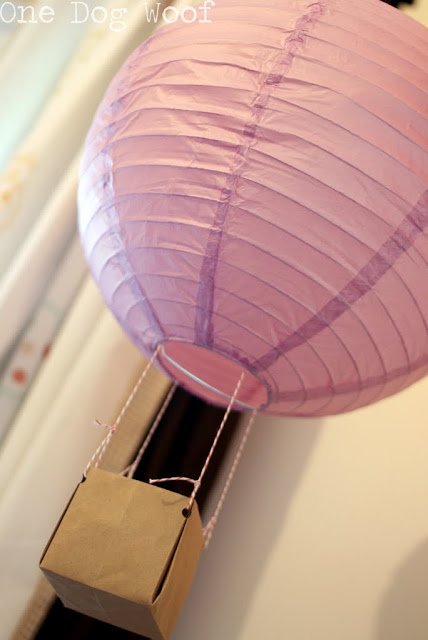
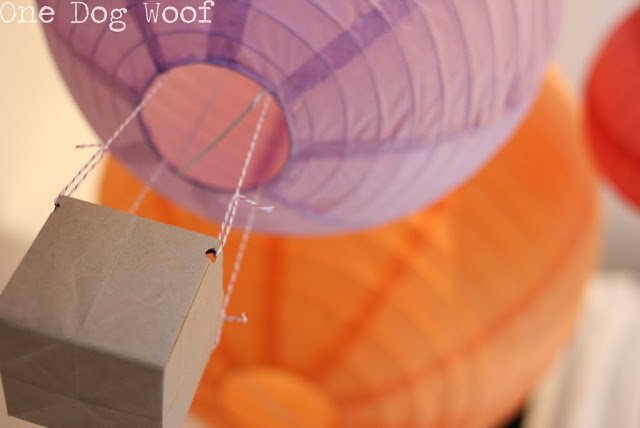
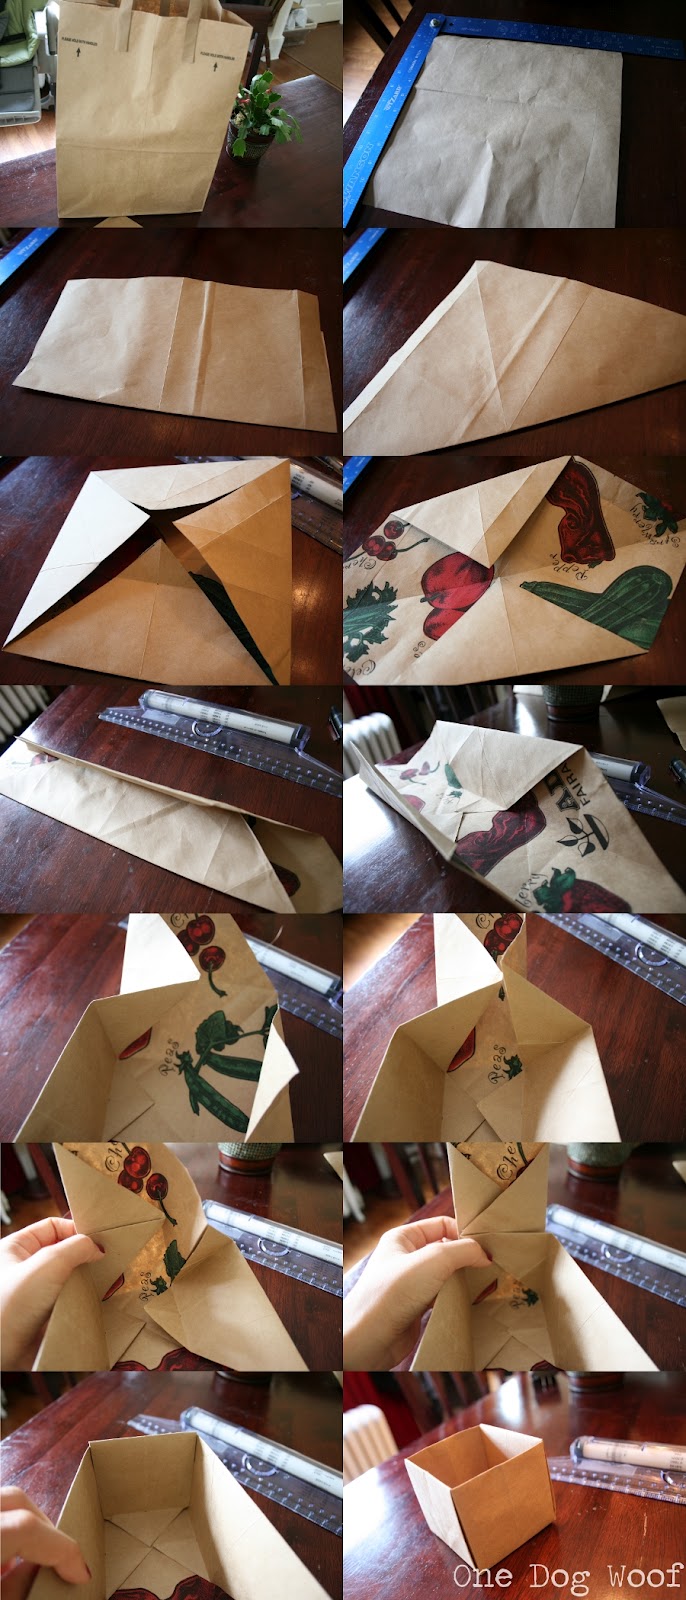
This project was FREE. The basket is an origami open cube that I made out of a paper bag. I couldn’t find cotton string in my house, so I used a bit of baker’s twine I bought for no other reason than it seemed to be the popular thing to do. I figured it might come in handy some time, and it did! I punched holes in the corner of the basket and strung the twine through, knotting them with an adjustable knot. The other end is taped inside the paper lantern. Why an adjustable knot? Because I couldn’t figure out how else to make sure the basket was hung straight.
Here are quick instructions for folding an origami open cube. Basically, it’s the same procedure as folding an origami box, except instead of folding the corners into the center, and then folding into the center again, creating fourths, you fold the structure into THIRDS, giving more height to the sides.
Instructions:
1. Have a square piece of paper handy.
2. Fold edge to edge both ways, and fold corner to corner both ways. This gives you the center, as well as necessary crease lines.
3. Fold all 4 corners into the center – more crease lines.
4. Unfold 2 opposite corners.
5. Fold into THIRDS – use a ruler to measure out a third. The middle third is the bottom of the box. The other 2 are to become the sides 1 and 2.
6. I have no idea how to explain this next folding step, so you’ll just have to look at the picture. Use the creases you’ve made to help you (mountain?) fold the sides in, almost like you’re wrapping a present. Do that on both sides.
7. You should now have a flap that will very obviously want to be folded over and into the box, creating a 3rd side.
8. Repeat steps 6 and 7 to create the 4th side of the box.
And since the basket looked a bit empty, I threw in one of J’s bath toys, a friendly shark. That’s not strange, is it? Having a pet shark in a hot air balloon? He can squirt water too 🙂
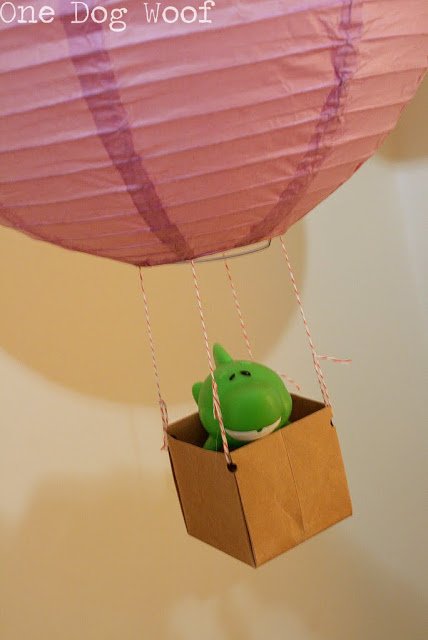
Enjoy the ride!


Visiting from TT&J. What an adorable project. I attempted some hot air balloons not long ago with a different medium and the project failed. They were going to go in my sons bedroom but this looks like something I can do with success and they would still pull off the theme. Thanks for sharing!
Thank you for visiting! A hot air balloon theme would be so cute!
I love these!! I have some paper lanterns and my boys would love those. They’re always trying to make hot air balloons with helium-filled balloons and are so disappointed because they don’t stay up… this is a perfect solution! I found you on TT&J too. I’m now following your adorable blog! I’d love for you to stop by my blog and follow me back if you’d like 🙂
Have a great weekend!
xo,
Laurie
hehe cute!!
xo,
kimberly
Super cute idea! I love to share this tutorial on my blog, Pure Joy Events (http://www.purejoyeventsblog.com/). Please let me know. Thanks! Christine
Genius! I love this idea!! It’s so cute! Thanks for sharing!
So cute! I have a bunch of lanterns leftover from a party last year and my daughter would love these. Thanks for the idea, and thanks for sharing at Simply Klassic!
I absolutely love these!! So cute!! I will have to try when I have a baby 🙂
Came over from the It’s Overflowing Party. 🙂
Come check my blog out too!
Ashleigh
http://livegorgeously.blogspot.com/
I found your blog on the Sunday Blog Hop.. But you won me over by your “about me” section because that is SO TRUE about reminding ourselves that we do have other things going on in our lives & if it wasn’t for that then you get caught up so easily. But anyway, holy genius idea & your food.. Will you come cook for me? Totally following you now!
These are adorable. So creative! I’m sure our baby just loves them!
ChiWei,
This is so cute! I love that it makes your nursery one of a kind!
I’m visiting from the I Heart Naptime linky party. I would love it if you stop by my blog!
Thanks for sharing,
Laura
What a fabulous idea!!! first time visiting your blog 🙂
Tee hee. What a great ride it is! Love the water squirting shark addition. He can help in case the hot air sets the balloon on fire …
🙂
Linda
Super cute!! Love the little passenger in the last shot. 🙂
Hi! New follower from Blissful and Domestic. Would love a follow back if you like my site too 🙂
Adorable! I love how you used things you already had.
I haven’t seen this before how cute!!! I’m a new follower as well from Blissful and Domestic. Feel free to follow me back 🙂
I love these, what a cute idea!
Debbie
Very cute! 🙂
Too cute! This could be used in other fun ways! Who would have thought of a hot air balloon? Such a great idea! Thank you for sharing it at Meet Me Monday! Love, Me http://www.youaretalkingtoomuch.com
How neat is this! I’m a new follower and would love if you could follow me back. Tx for sharing your project.
Cute! Found you on gingersnap crafts party!
Amber
recipeswelove.net
These are so darling! Love the idea!
Such an adorable idea. These would be great in a kiddo room or nursery!
Love this idea! So cute! My kids would think this was the coolest!
What a cute idea! FYI, when I clicked your link from the newbie party I had to click another option from blogger to be redirected. Not sure what link you put in for the party but next time you may want to be sure it is to YOUR direct blog:)
How adorable! I love it! Thanks so much for sharing with us this week!
Take care,
Trish
Love, love LOVE these!!! I will be featuring them on my site tomorrow!
I enjoyed reading these interesting craft ideas about hot air balloon lantern. I love to read blogs related to hot air ballooning. Thanks and Cheers for this blog. 🙂
Hot Air Balloon Rides
I enjoyed reading these interesting craft ideas about hot air balloon lantern. I love to read blogs related to hot air ballooning. Thanks and Cheers for this blog. 🙂
Hot Air Balloon Rides
Hi. Just a quick note to let you know that I truly appreciated this post. I have been looking for this kind of information. Keep up the good work!
Eco Bags
such a cute idea! my son’s first birthday theme is hot air balloons so I am using this idea to decorate the trees at the park. The boxes took a little patience. Mine kept turning into rectangles— but, persistence paid off! I finally have 1 box done! Thanks for the great idea!